
Guest hair has to be something you can do yourself, in a hotel bathroom, before a car picks you up. So every style here comes with the steps I’d actually walk a guest through, plus the fixes for fine, thick, curly or layered hair. Low buns, half-up hair, ponytails, curls, braids and short-hair finishes are all covered. If you want even more step-by-step options after this, there’s a second set of 20 wedding guest hairstyles tutorial picks worth a look. Start with whatever suits your dress neckline and the forecast, not the most complicated one.
Bobby Pins, U-Pins and Elastics, Sorted by Job
Most of the tutorials below say pin it, and most of the problems guests have come from using the wrong pin for the job. Here’s what each one does.
- Bobby pins grip. Use them to anchor hair against the scalp, wavy side down, and cross two in an X for real hold.
- U-pins (hair pins) shape. They hold a bun or twist in place without flattening it, but they don’t anchor much on their own.
- Clear elastics are for small sections, braids and bubble ponytails; they disappear in photos.
- Strong fabric or spiral elastics are for full ponytails and the base of a bun.
Buy pins in your own hair color rather than black. Spray a little hairspray onto pins before you use them; the slight tack keeps them from sliding out of clean hair.
Pinning that lasts
Push the pin against the direction the hair is falling, then turn it to catch some hair from the base. A pin that only catches the surface of a bun will work loose within an hour.
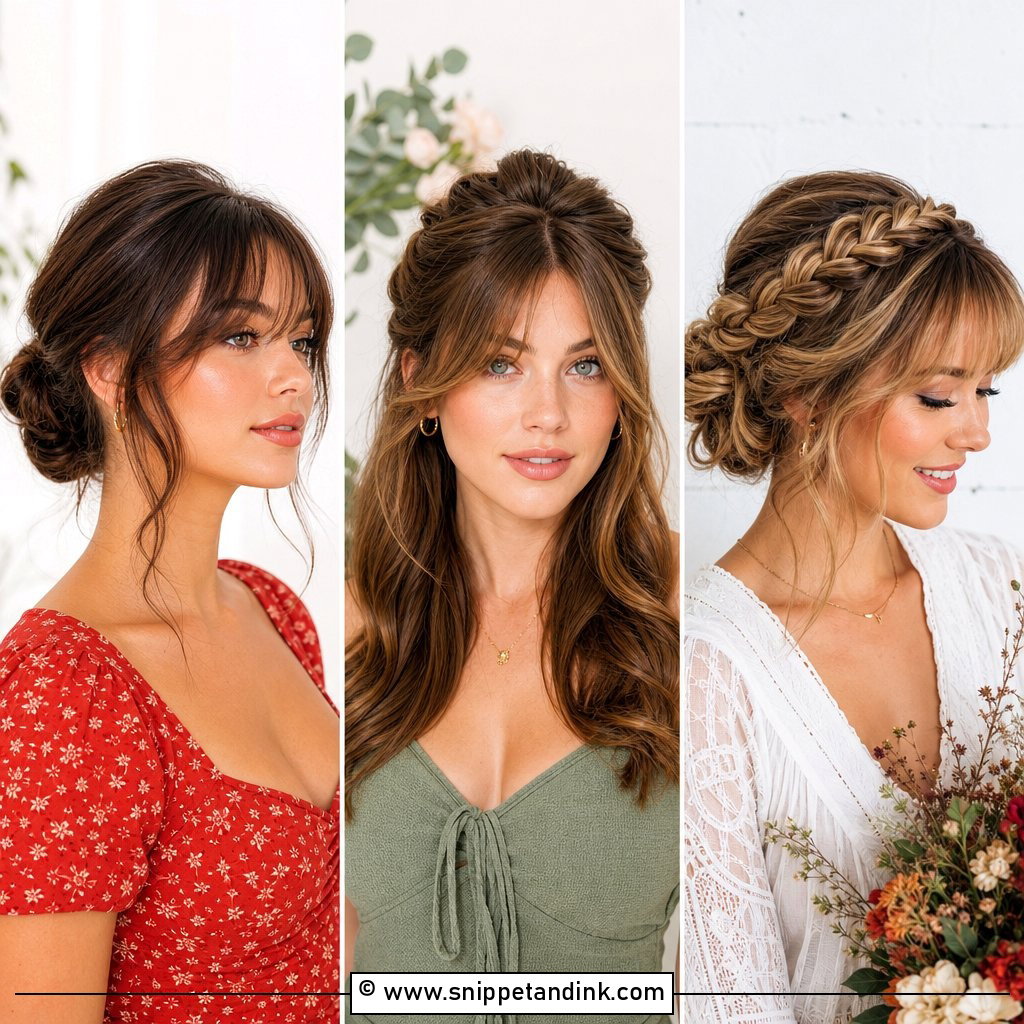
1. Low Bun Wedding Guest Hairstyle Tutorial
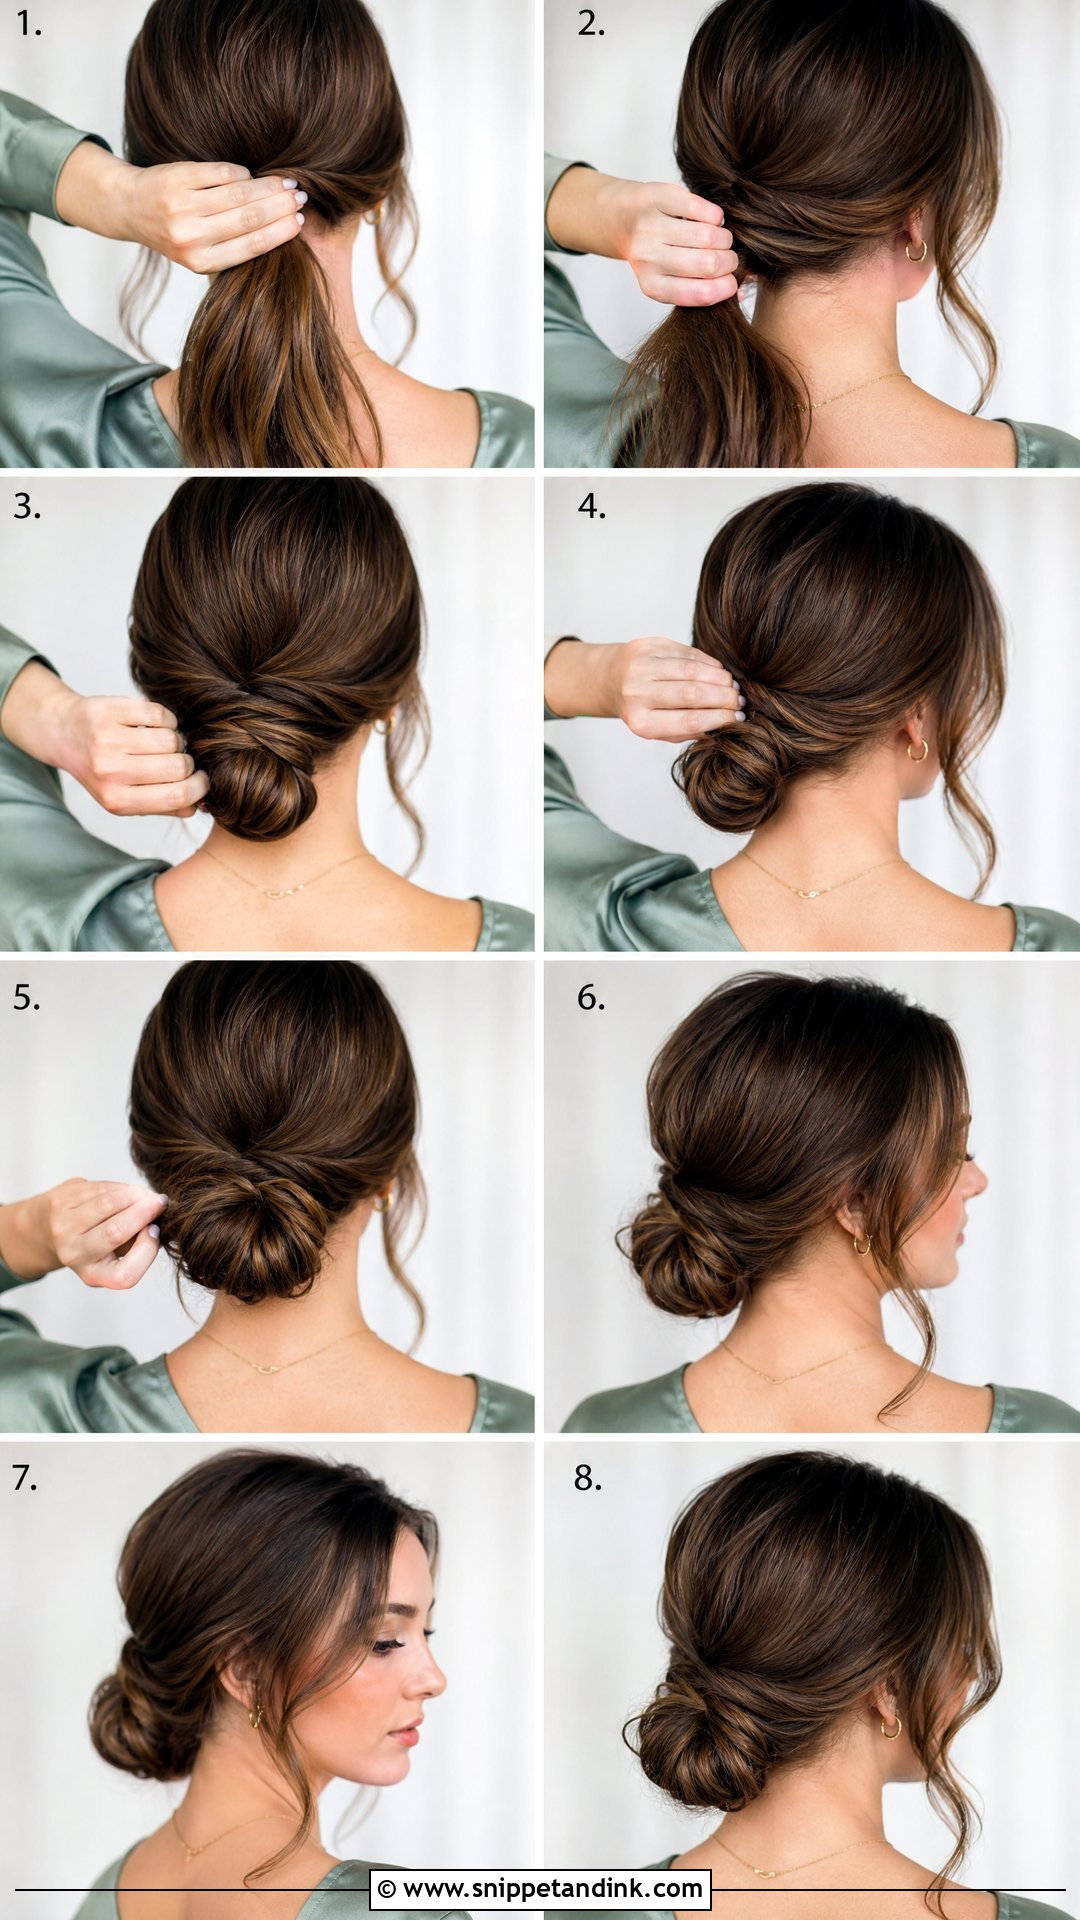
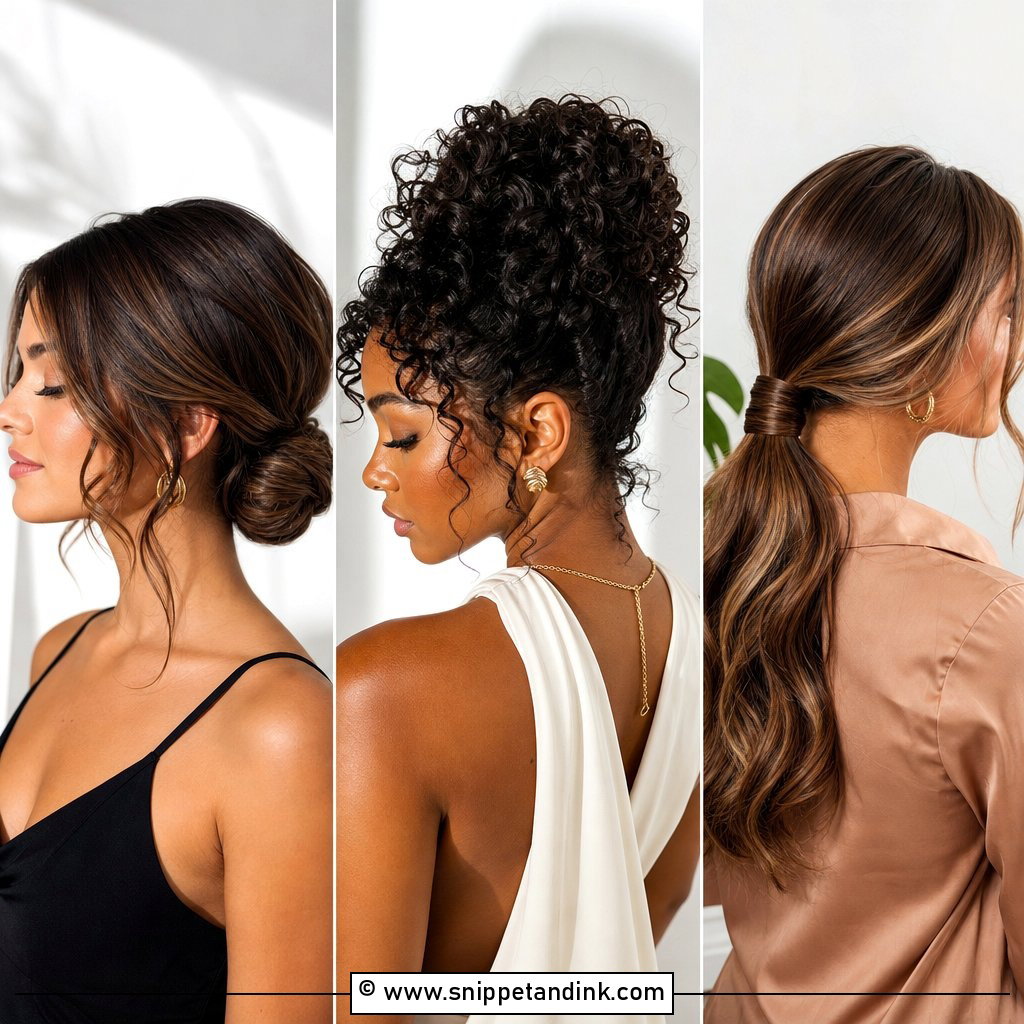
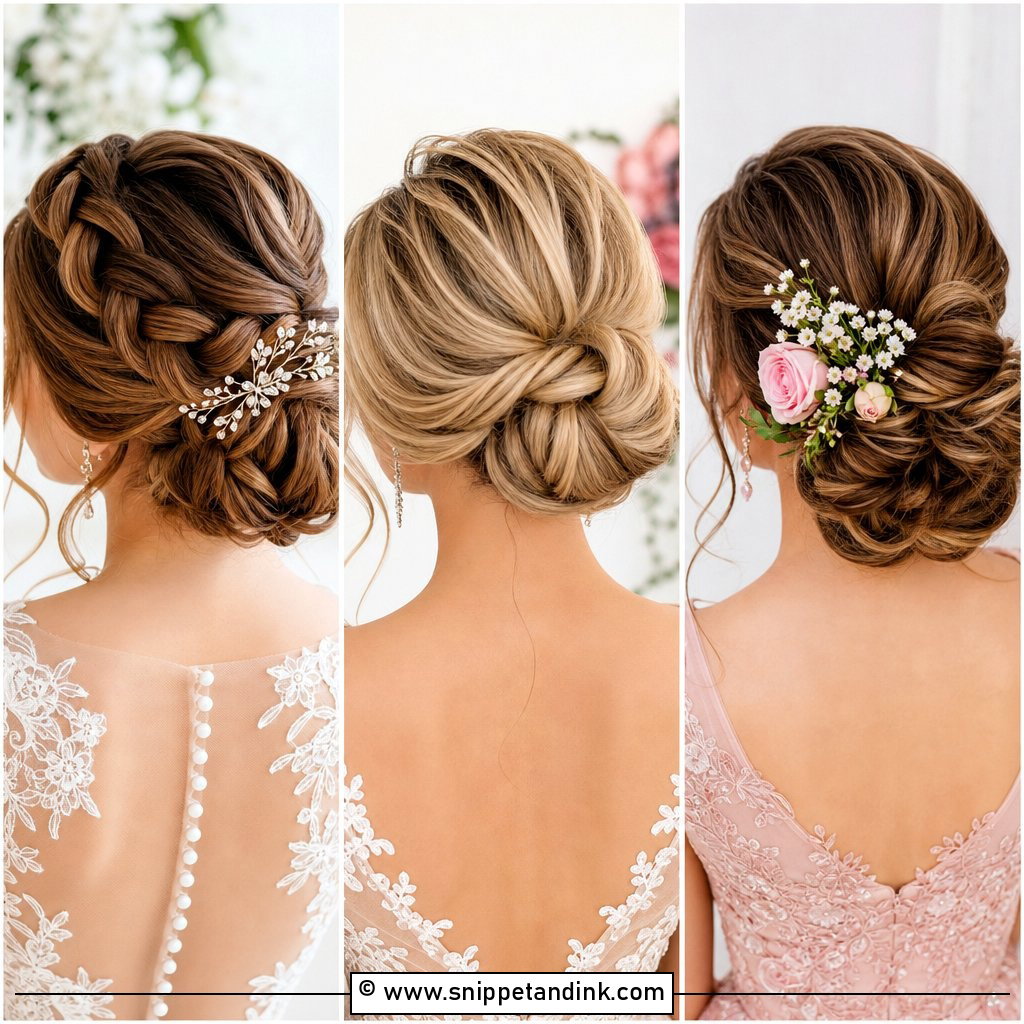
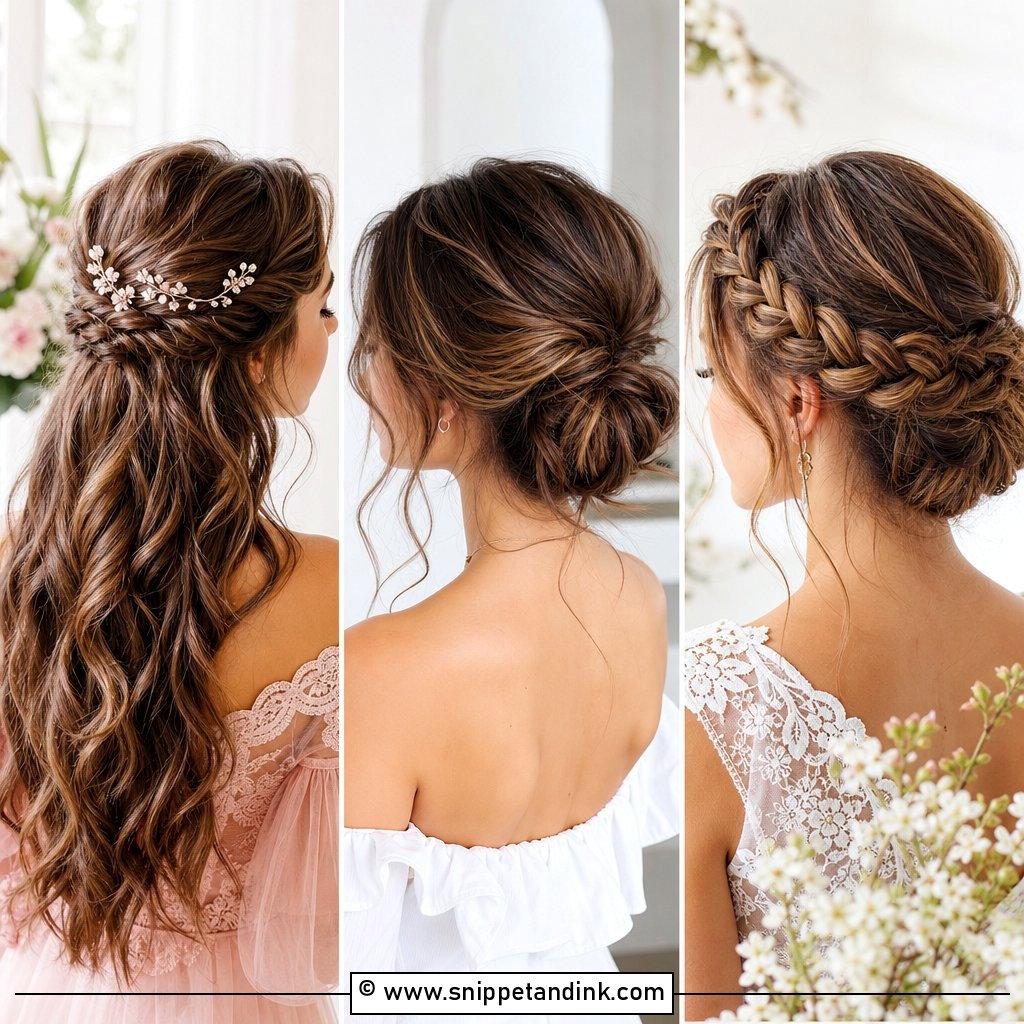
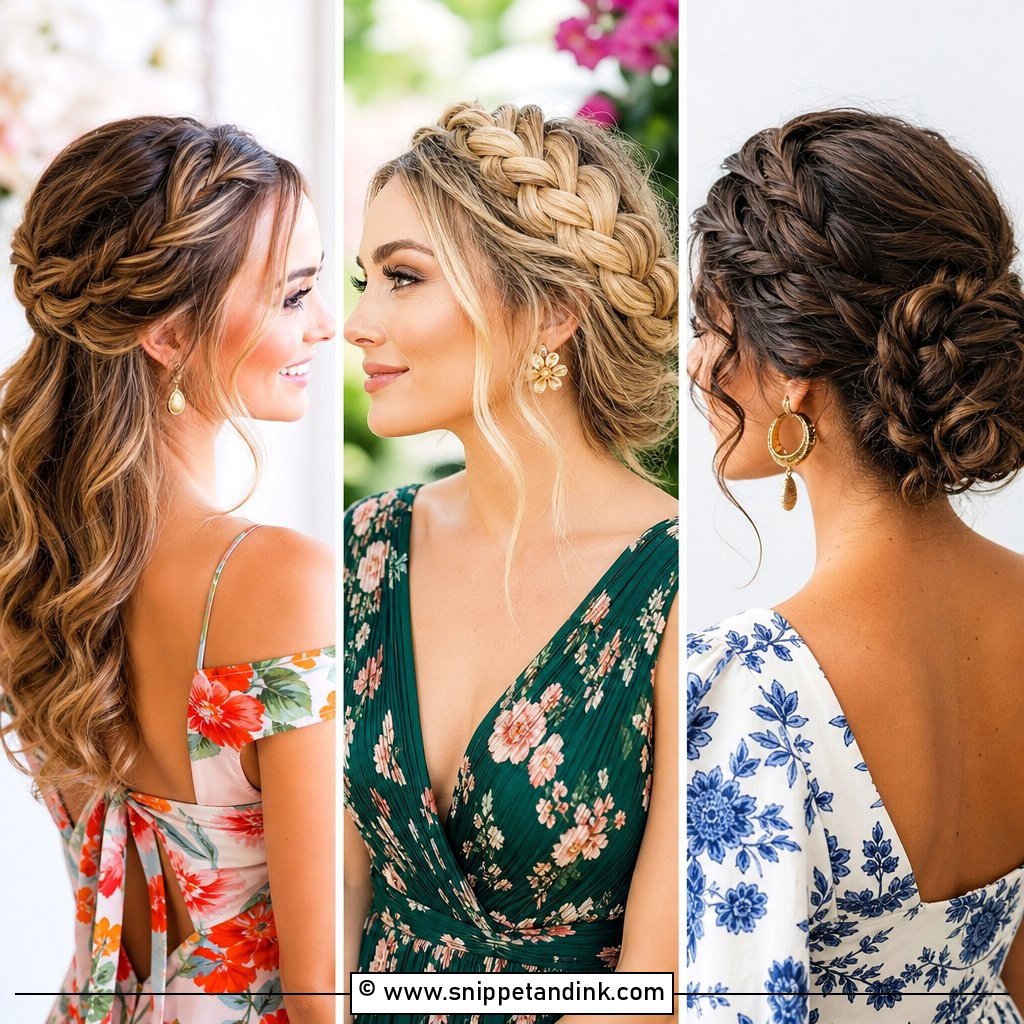
If I had to give one style to a nervous first-timer, it would be this low bun. Dry hair, texture spray or a light mousse for grip, then a low ponytail at the nape. Twist the ponytail around its base and pin it in small sections, pushing each pin into the base rather than just into the coil. Fine hair benefits from a gentle tease before twisting; thick hair is easier split in two and wrapped one half at a time. Flexible hairspray keeps it soft.
2. Half Up Wedding Guest Hairstyle Tutorial
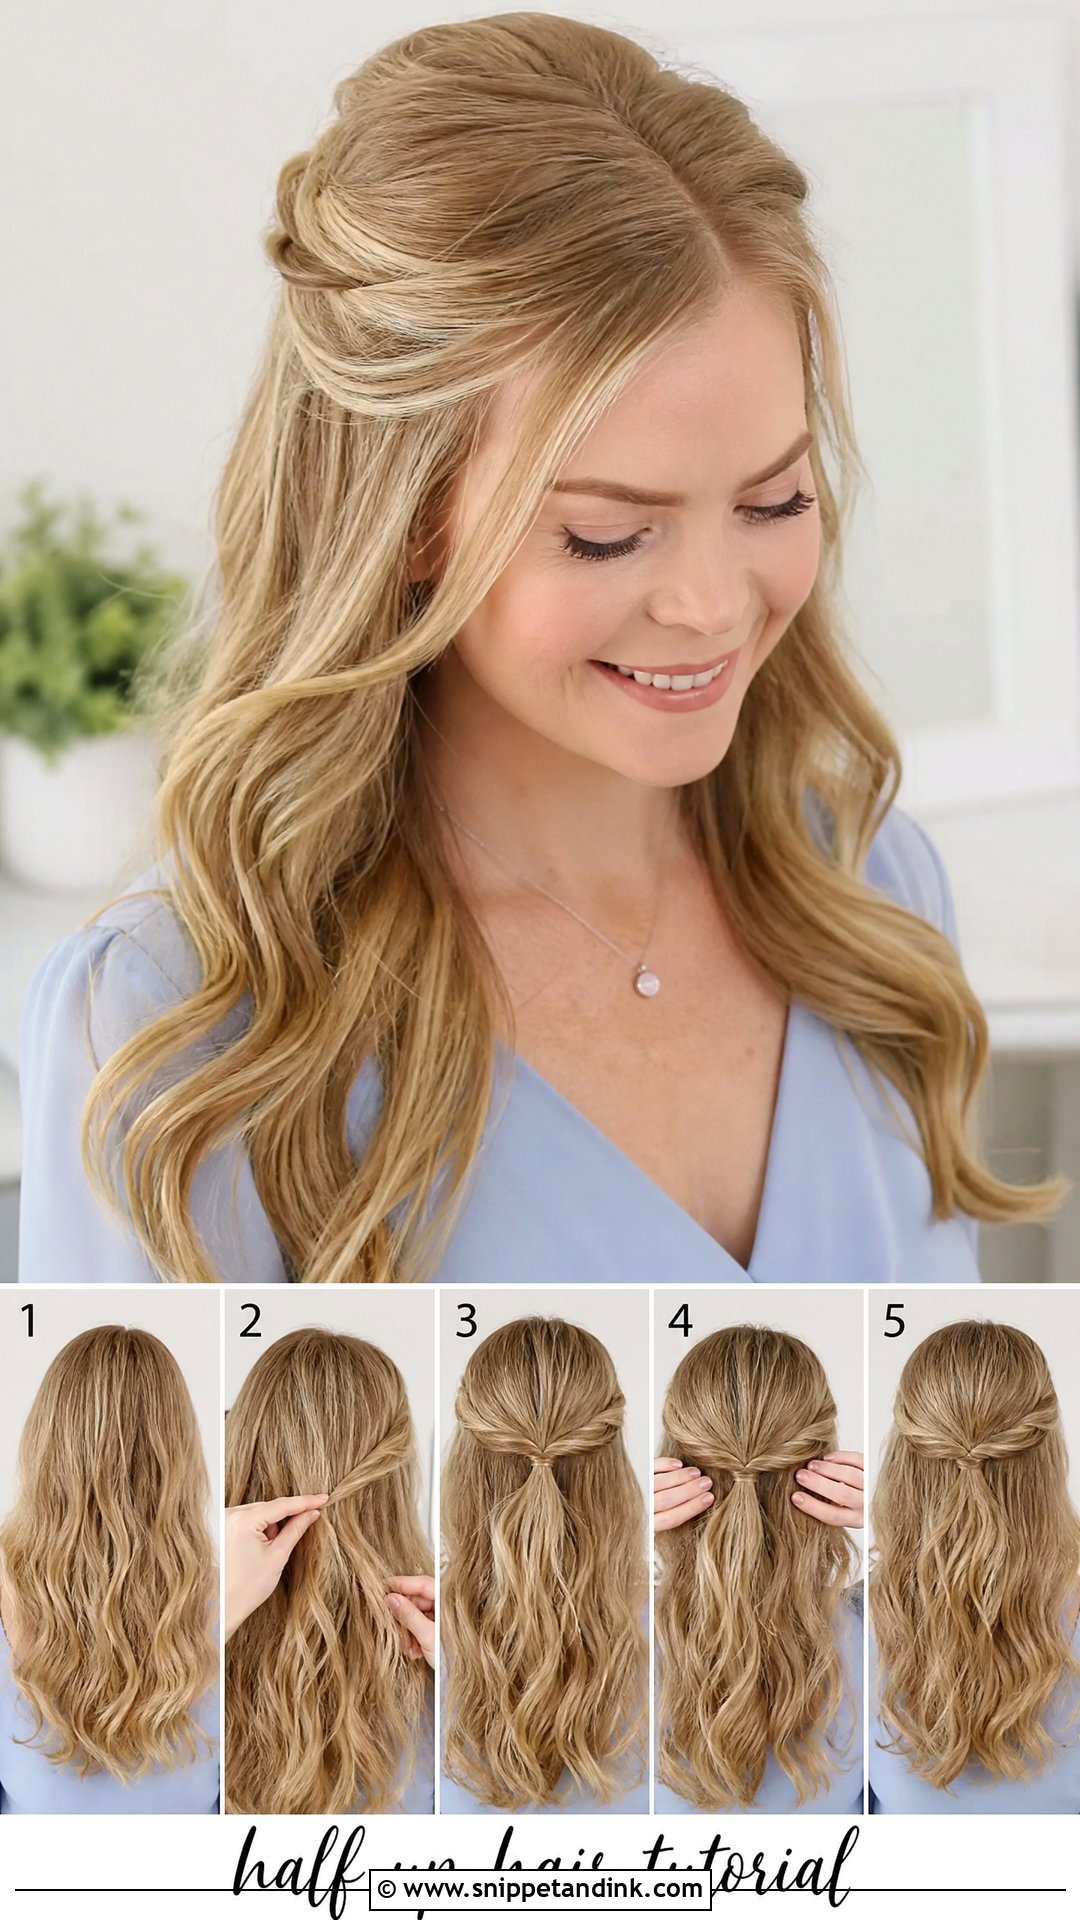
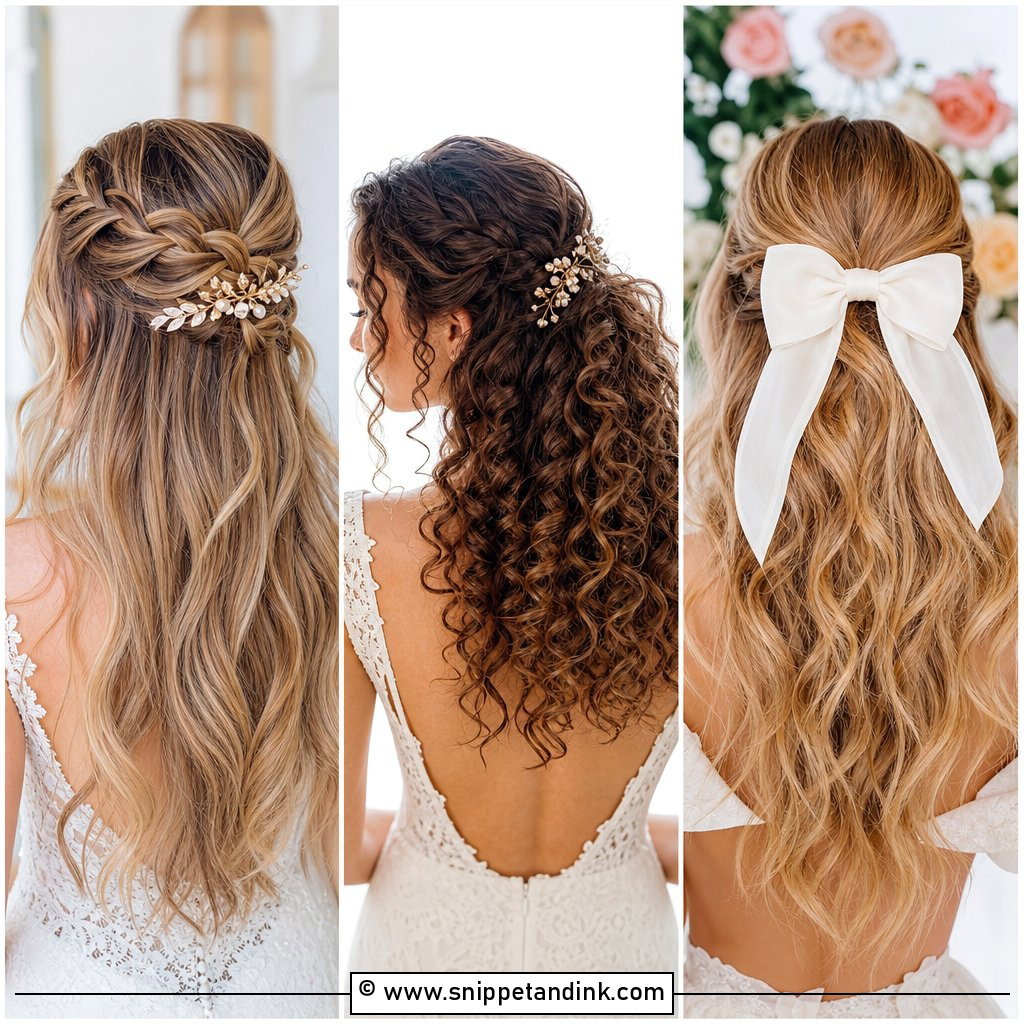
Half-up hair keeps the front off your face and the length free, which is why it works for long receptions. Curl with a medium barrel, break the curls up with your fingers, then take a section from each temple back to the crown. Secure with pins or a clear elastic and wrap a thin strand around it. The most common mistake I see is pulling the top section too tight; leave the front soft and lift the crown slightly with your fingertips before pinning.
3. Soft Curls Wedding Guest Hairstyle Tutorial
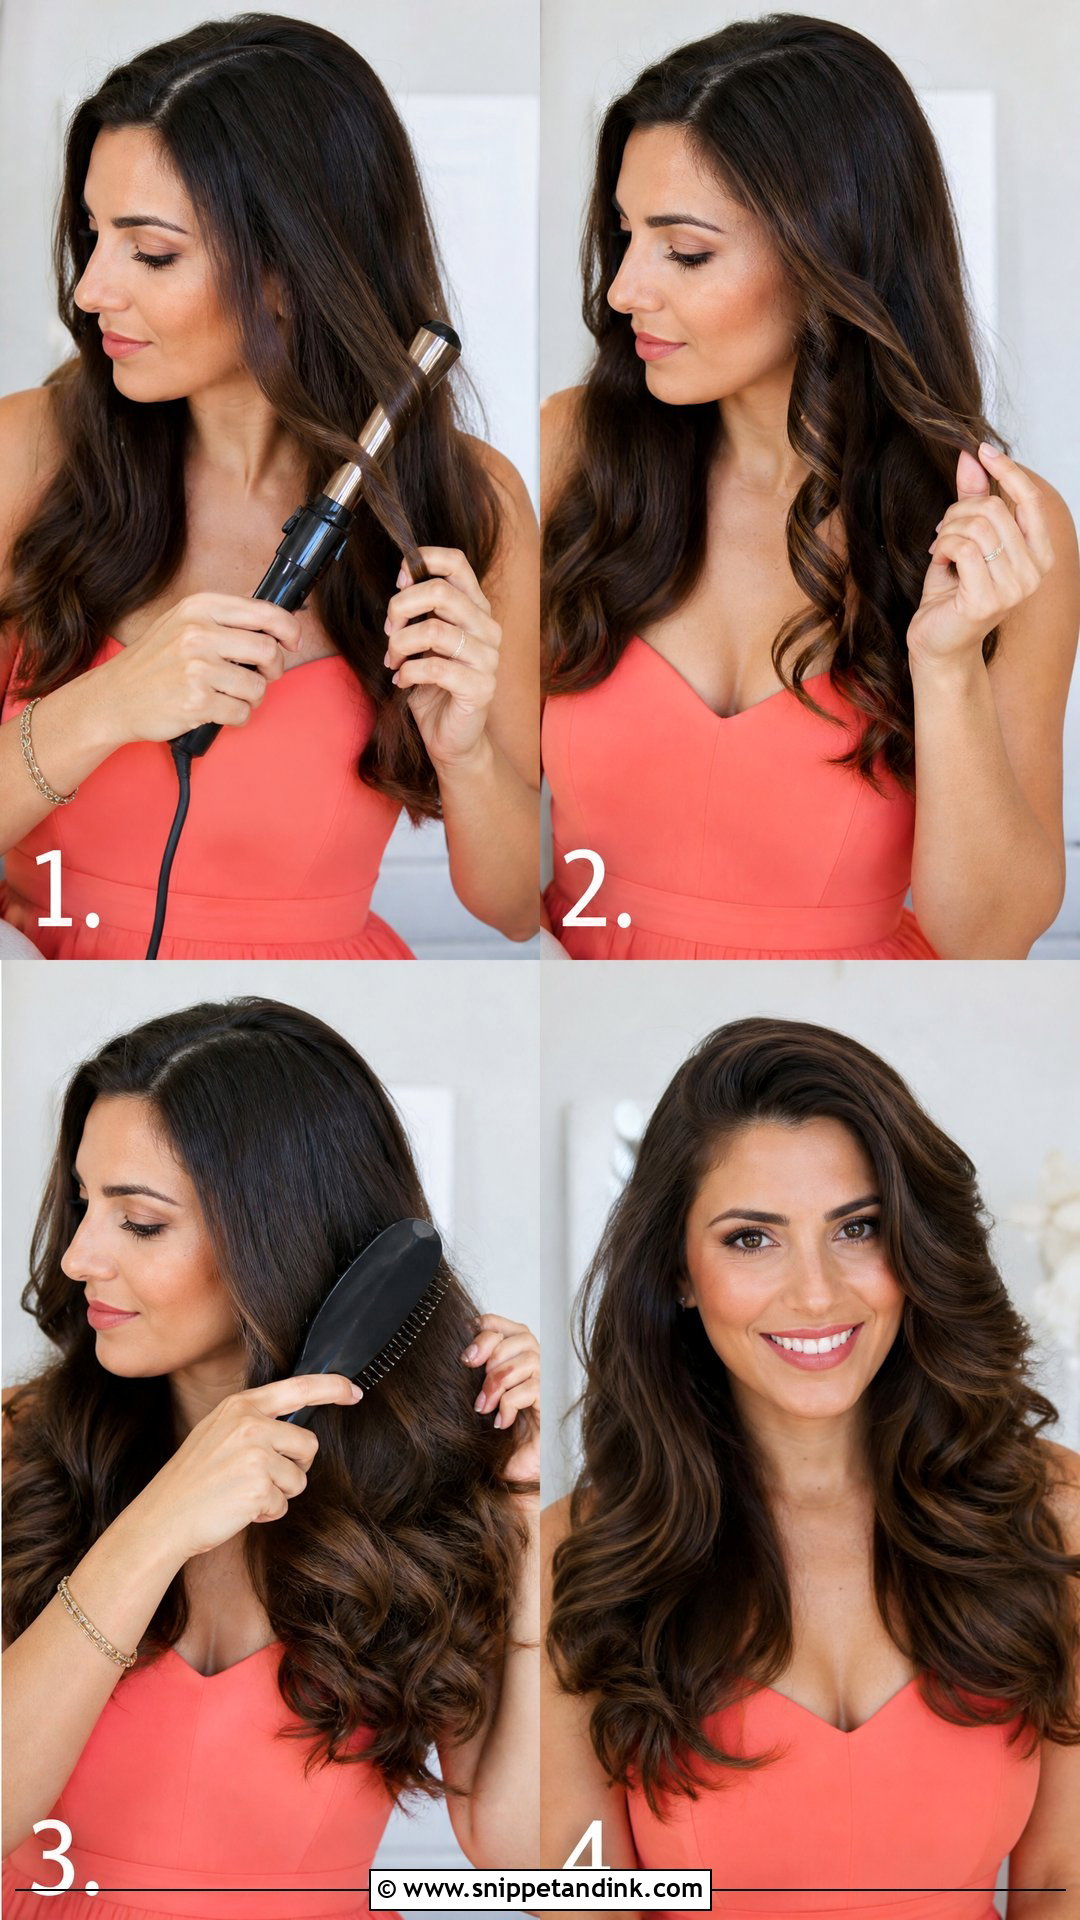
Soft curls last in proportion to how well they’re set. Heat protectant, fully dry hair, then medium sections curled away from the face, with a few at the back alternated so they don’t clump into one sausage-shaped curl. Don’t touch them until they’re cool; warm curls drop. Then loosen with a wide-tooth comb or fingers and add a little shine spray to the ends. They sit well with slip dresses and classic guest outfits.
4. Sleek Ponytail Wedding Guest Hairstyle Tutorial
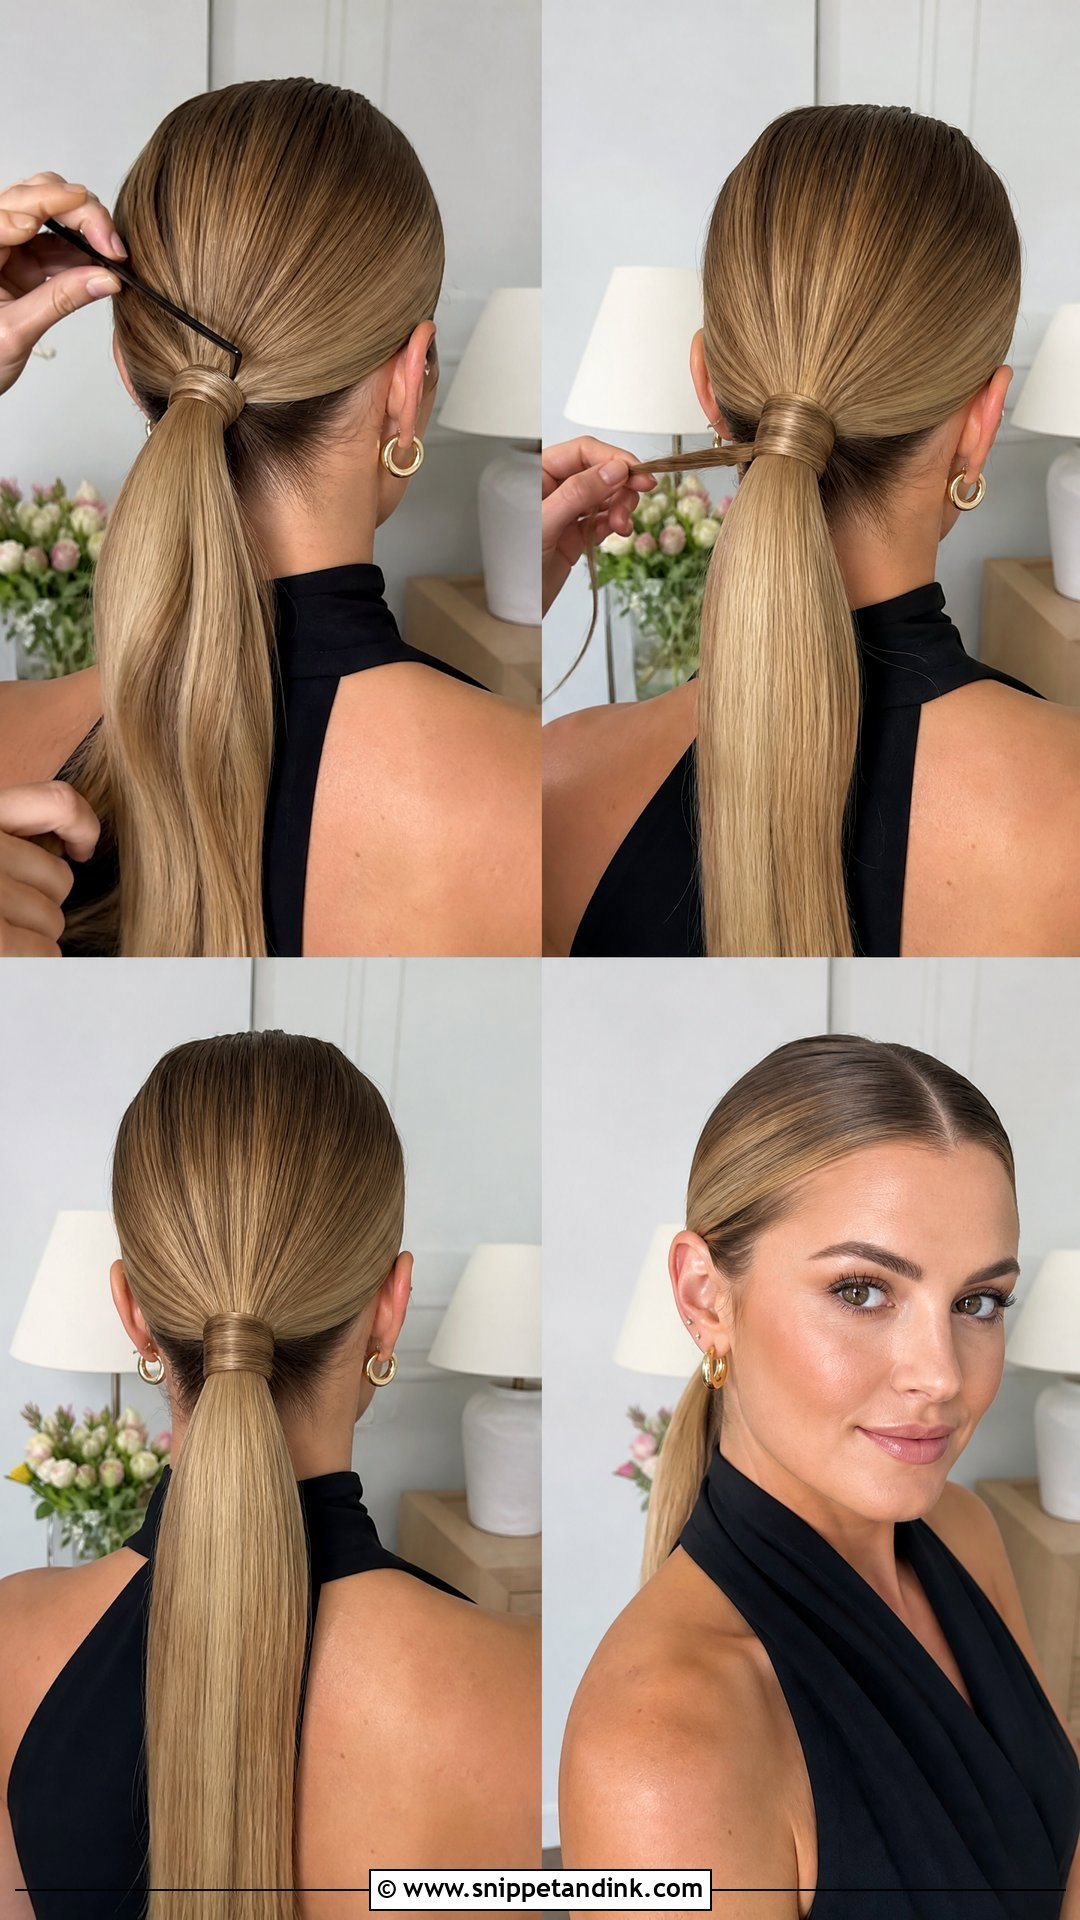
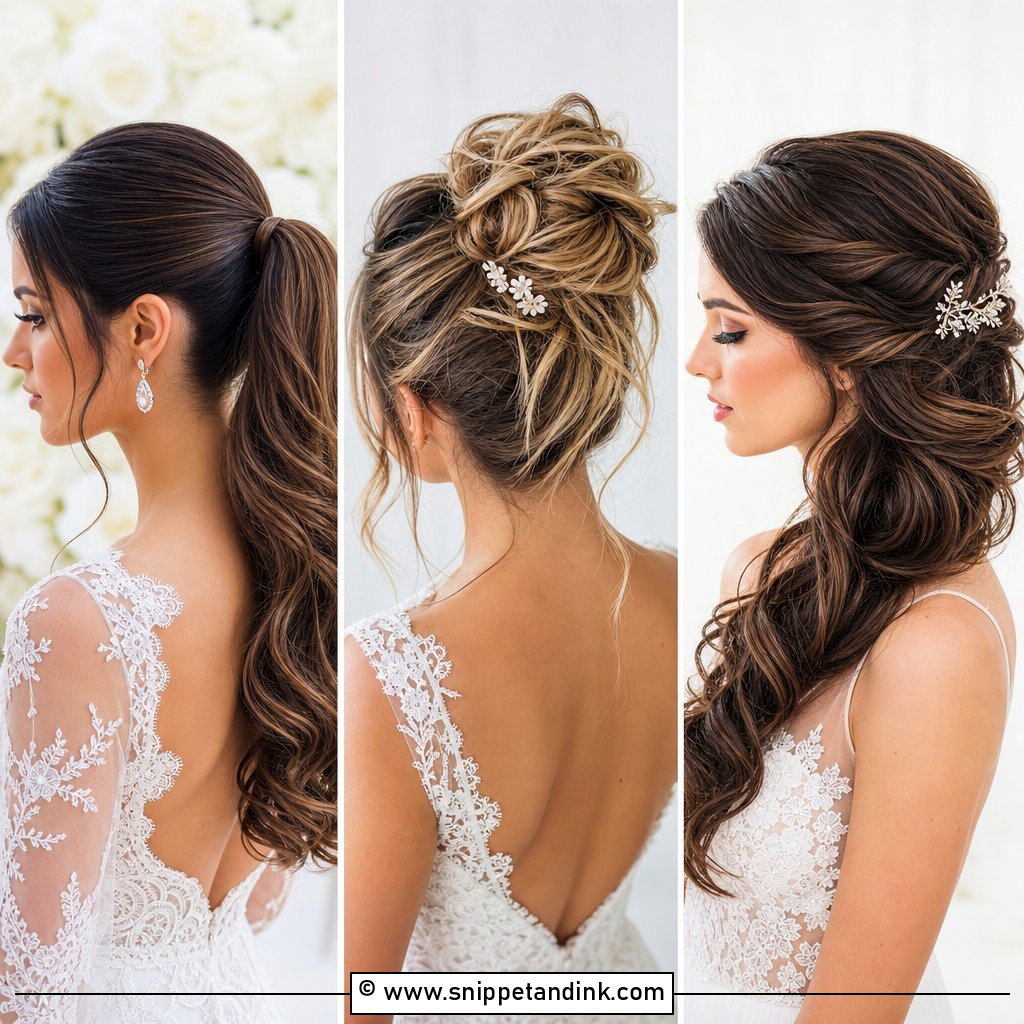
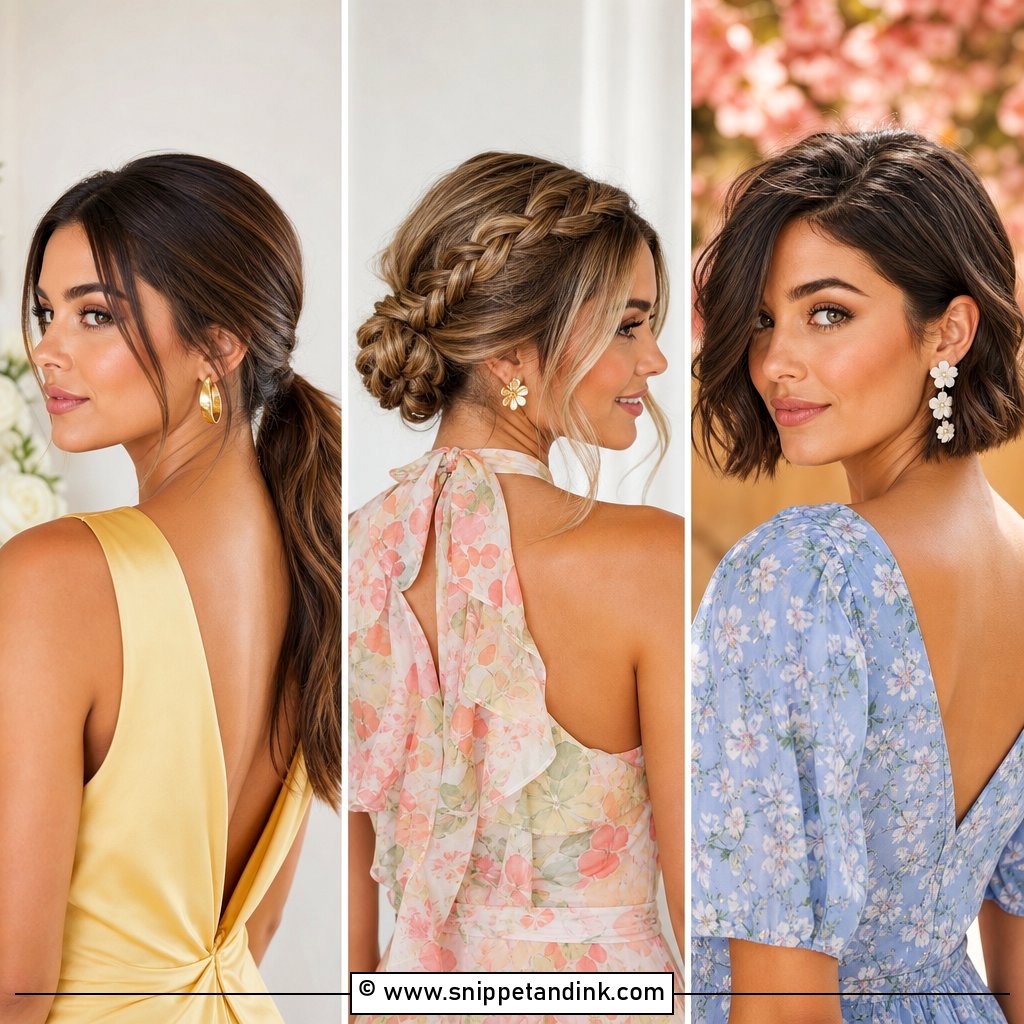
A sleek ponytail is all about smoothness at the hairline. I brush through a small amount of styling cream, choose the part, and gather the hair at mid-height or lower. A strong elastic, then a strand wrapped around it and pinned underneath. Flat-iron the length for gloss. For flyaways, spray hairspray onto a clean toothbrush and brush along the hairline; it works much better than spraying the head directly.
5. Braided Crown Wedding Guest Hairstyle Tutorial
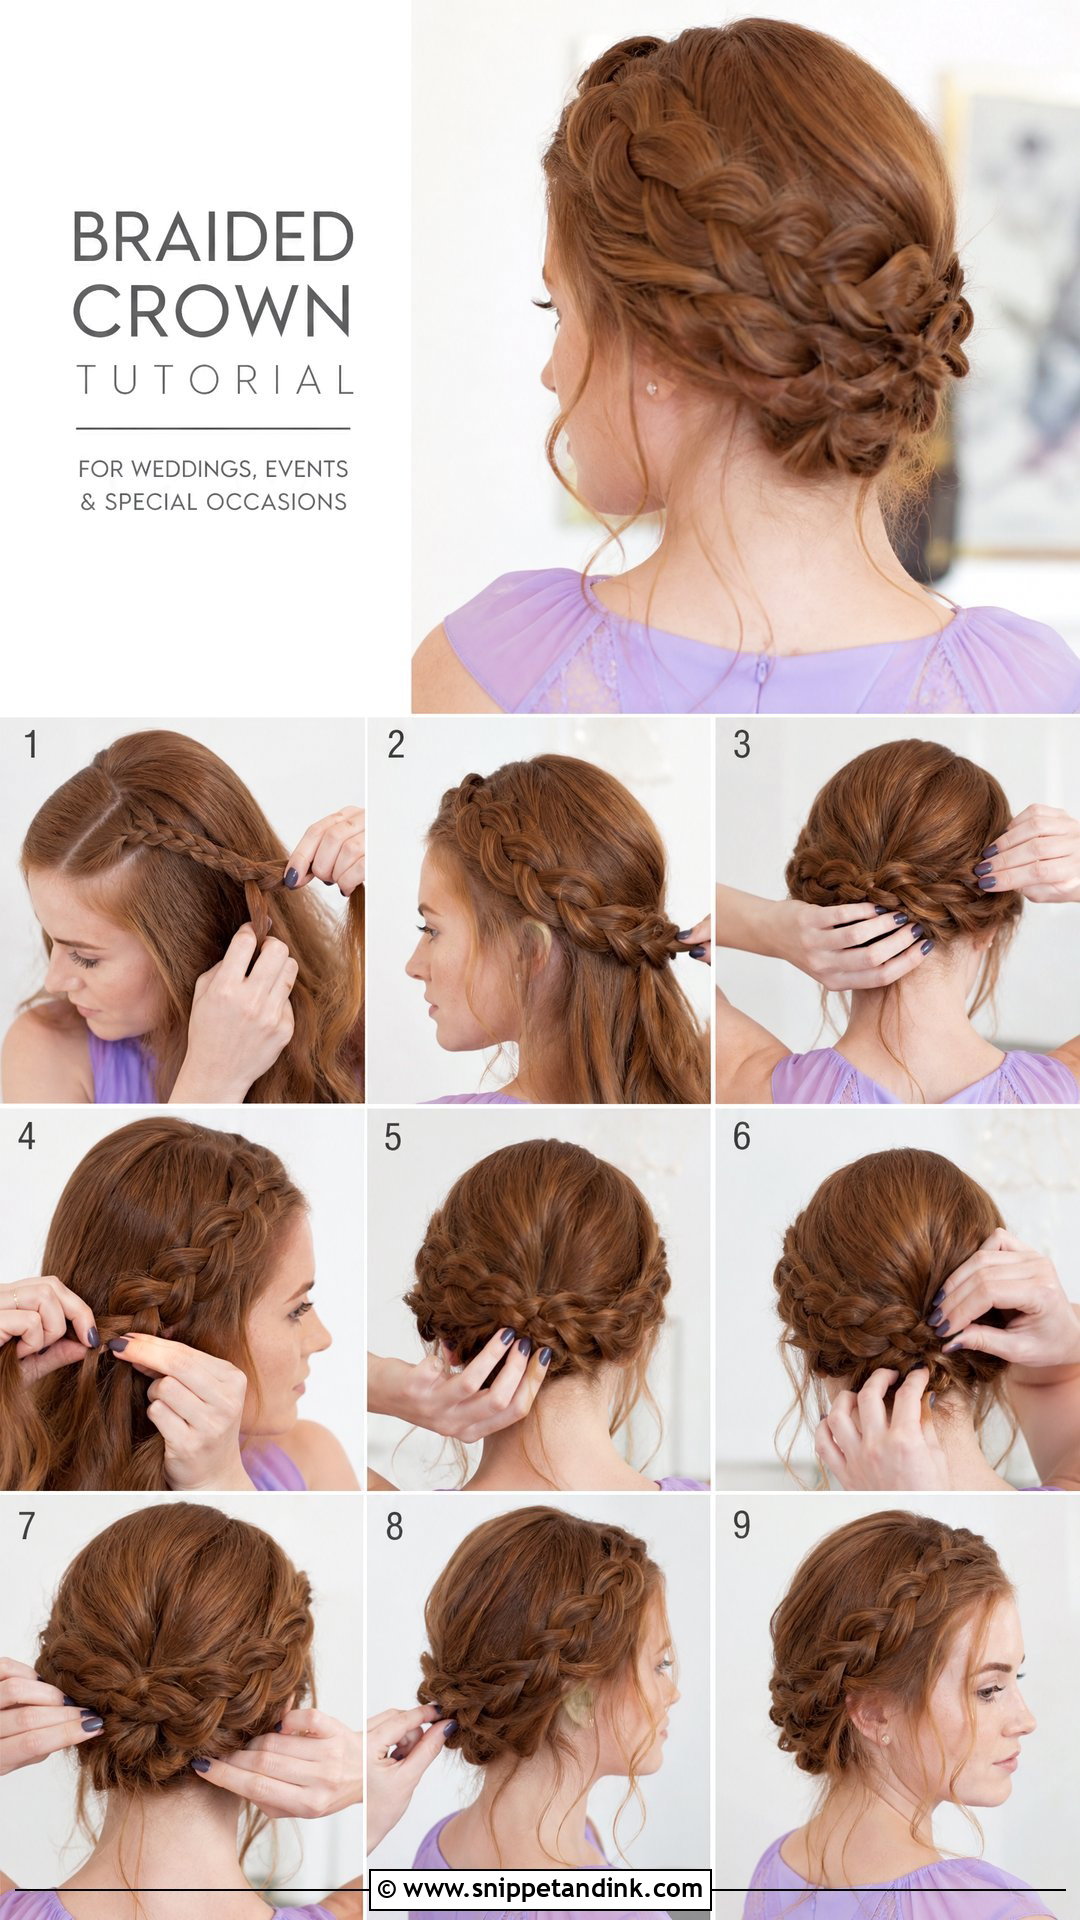
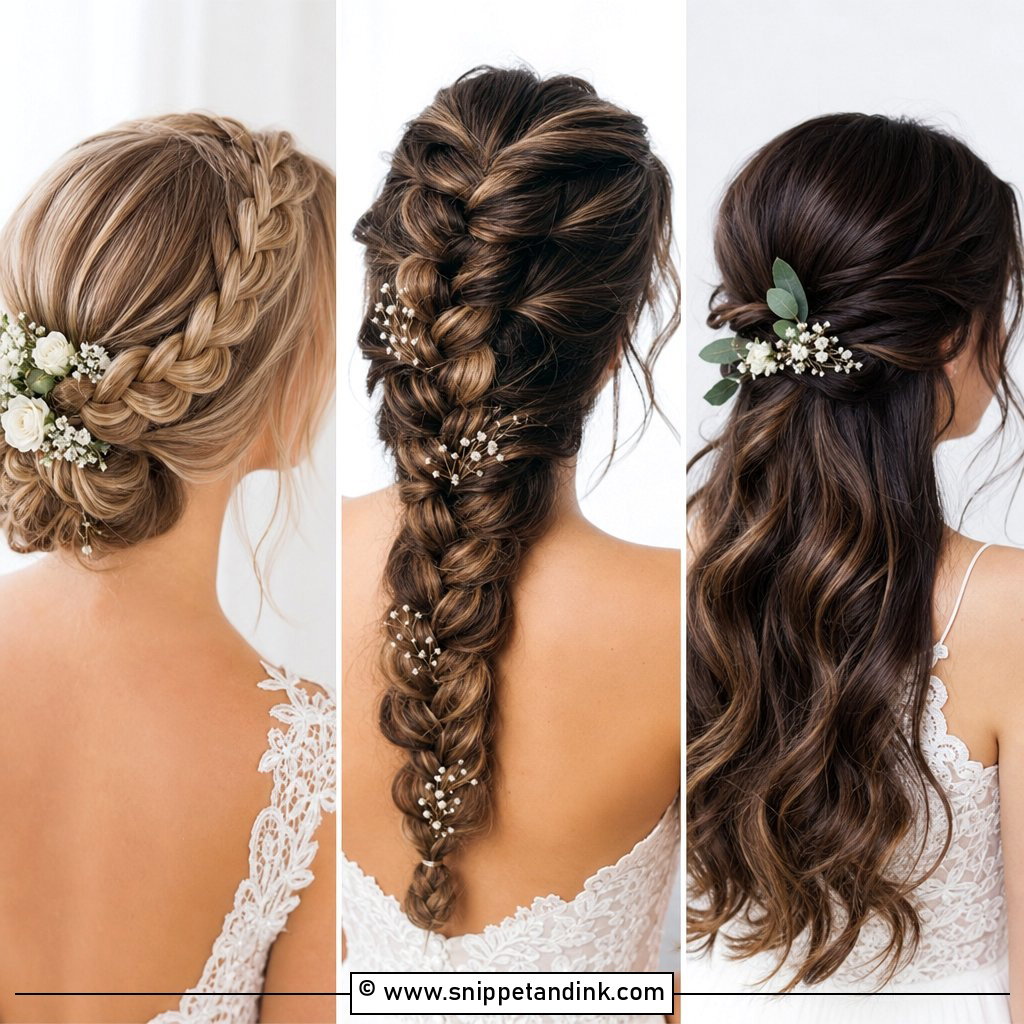
A braided crown made from two side braids is easier than braiding around the whole head in one go. Part your hair, braid loosely on one side, then the other. Bring each braid across the back of the head and pin it above the opposite ear. Pancake the loops by pulling them outward, which makes the braids look thick. It needs medium to long hair, ideally with some wave. Use pins that match your hair color and slide them in along the braid, not across it.
6. Side Swept Curls Wedding Guest Hairstyle Tutorial
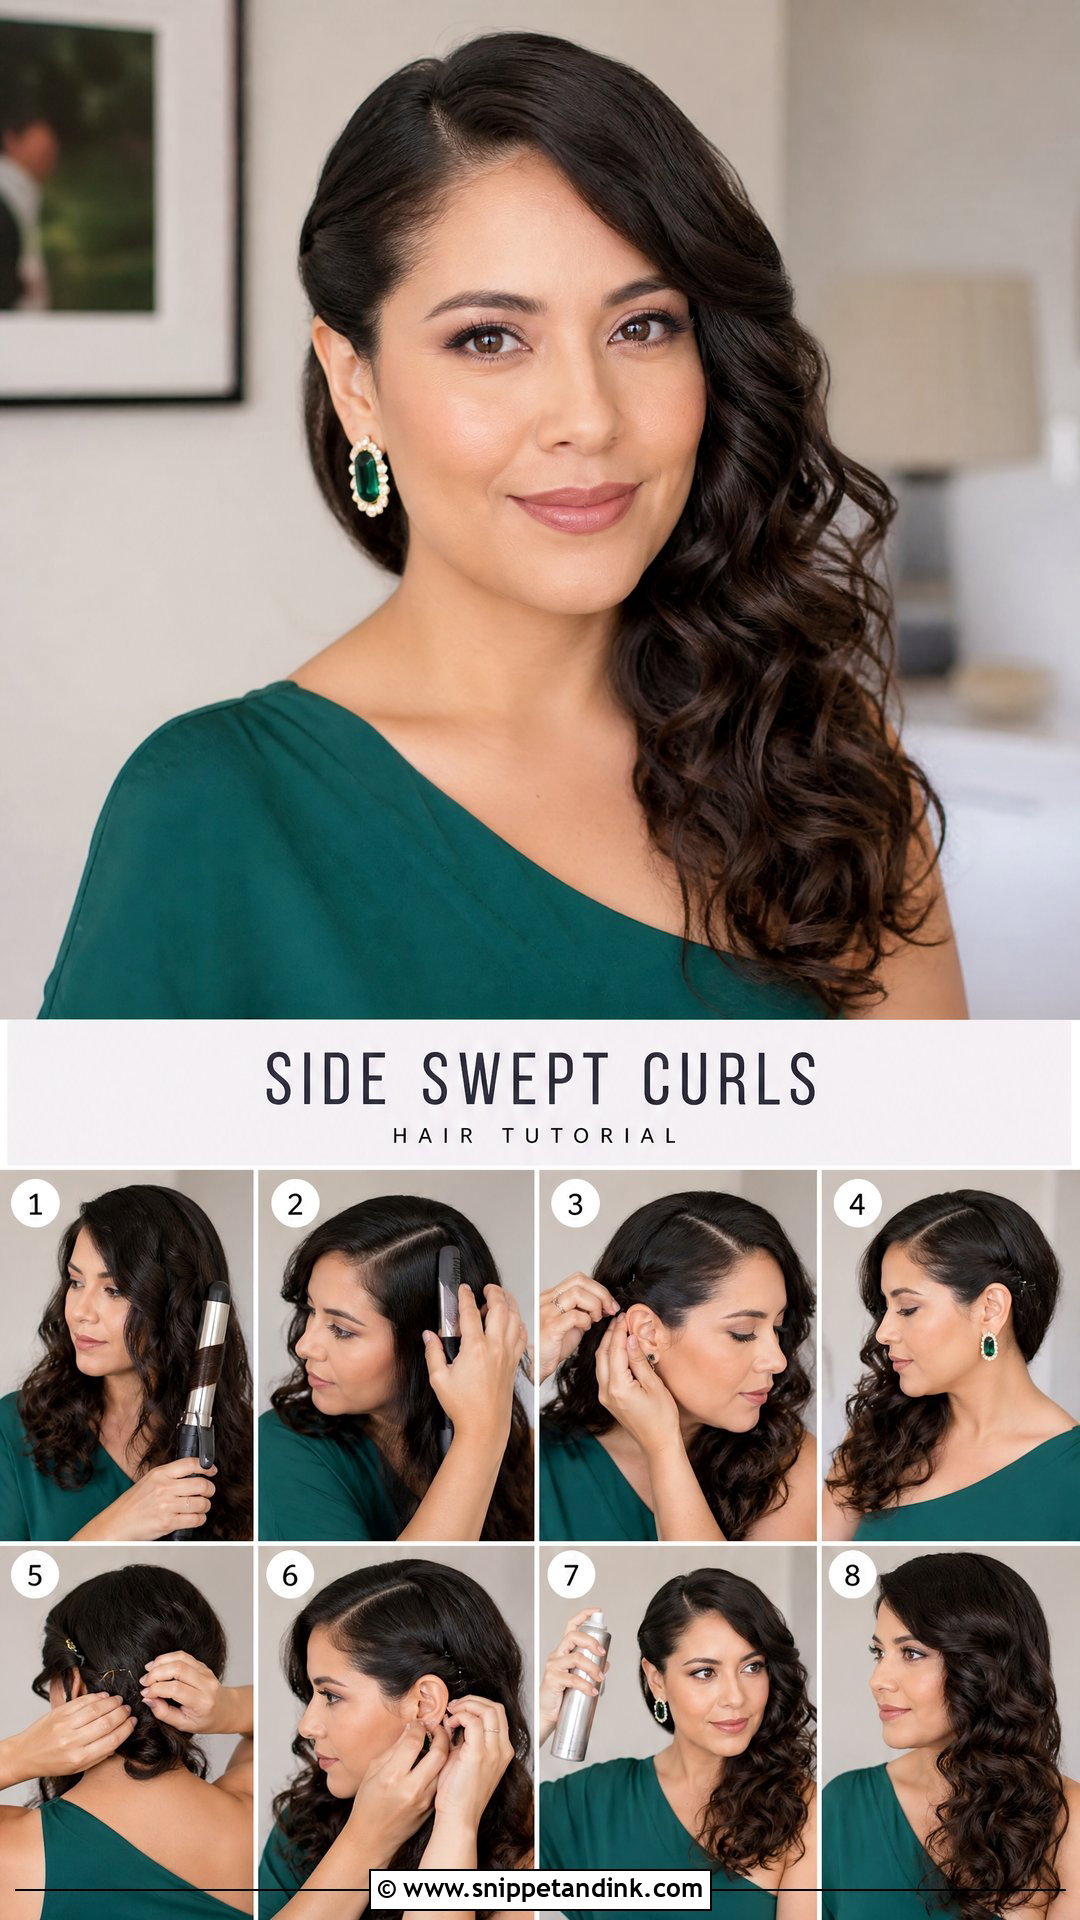
Side-swept curls need an anchor on the light side, or the sweep slides back to center. Curl and let the curls cool, then part deeply and sweep the heavier side over one shoulder. Pin the lighter side behind the ear with two bobby pins crossed in an X. On slippery hair, spray texture spray first. Brush the curls gently so they join into waves. It suits a one-shoulder dress or a square neckline.
7. Textured Bun Wedding Guest Hairstyle Tutorial
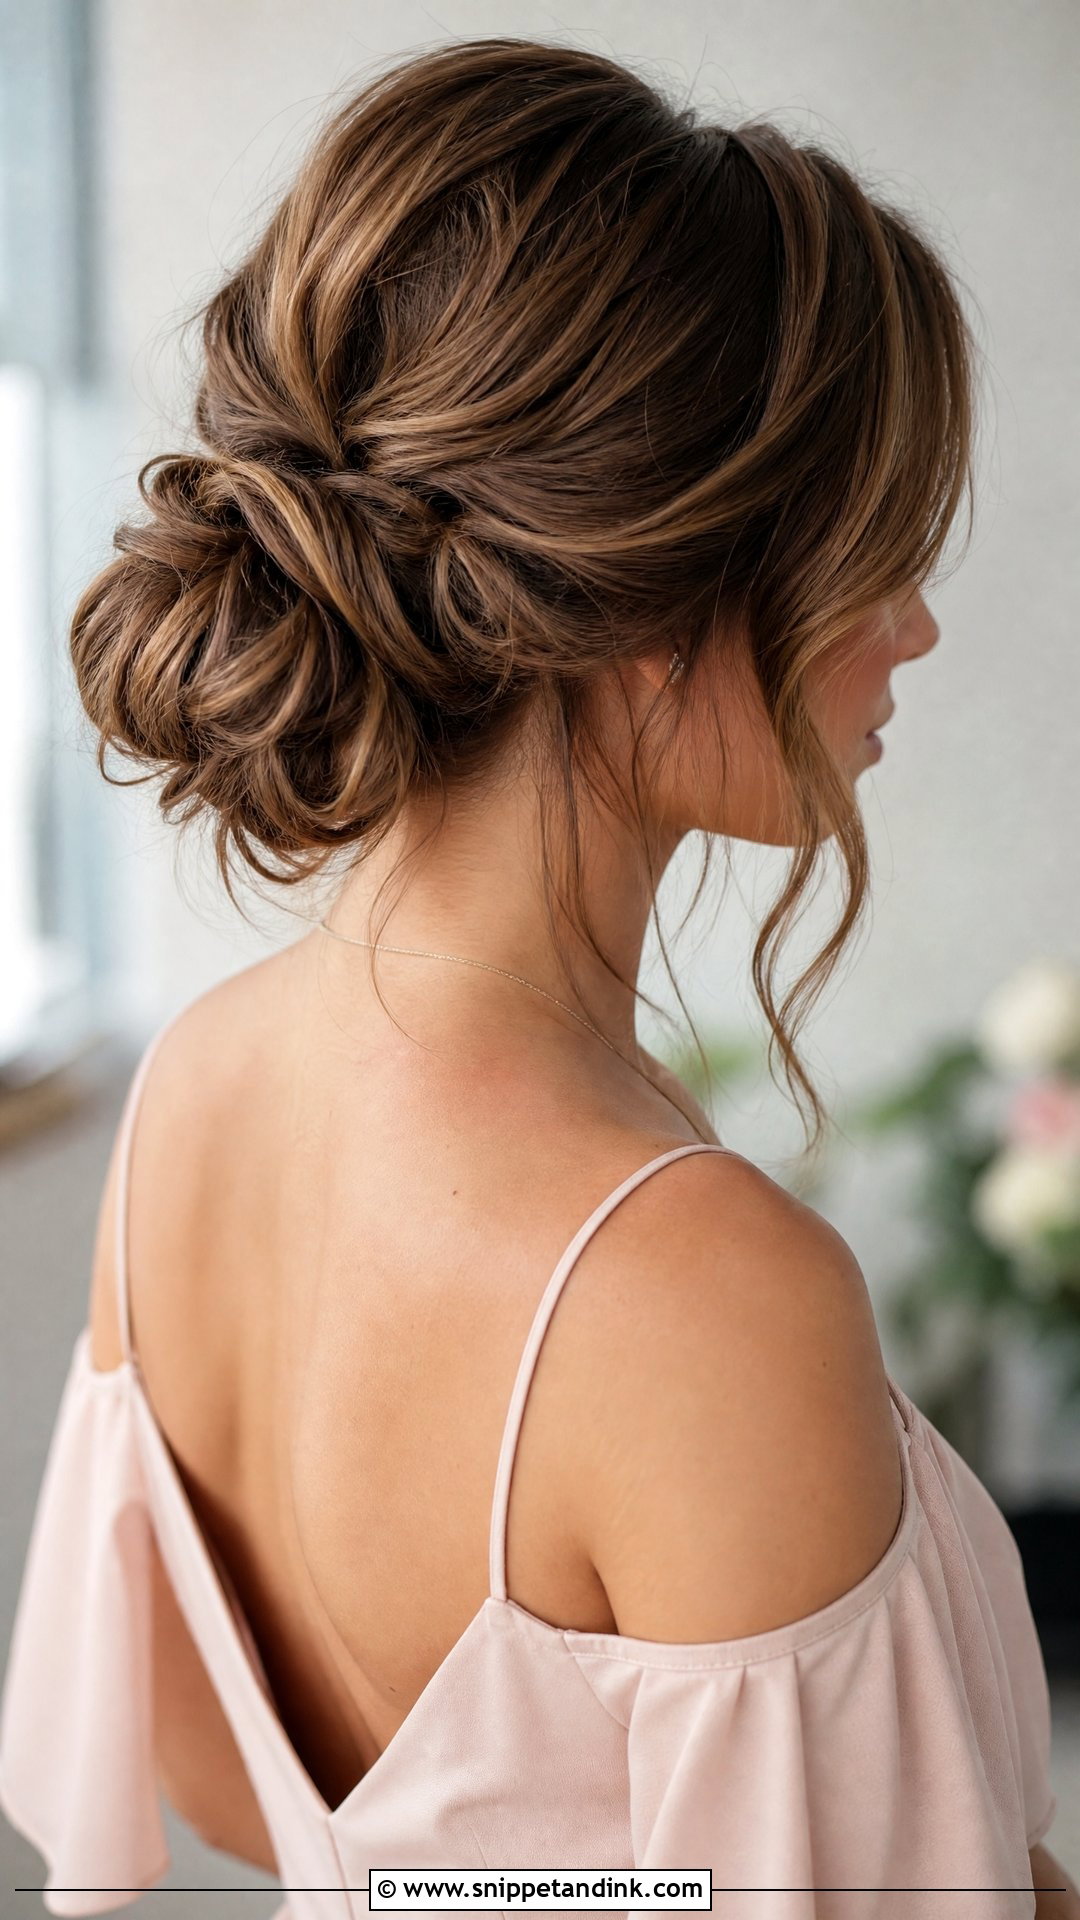
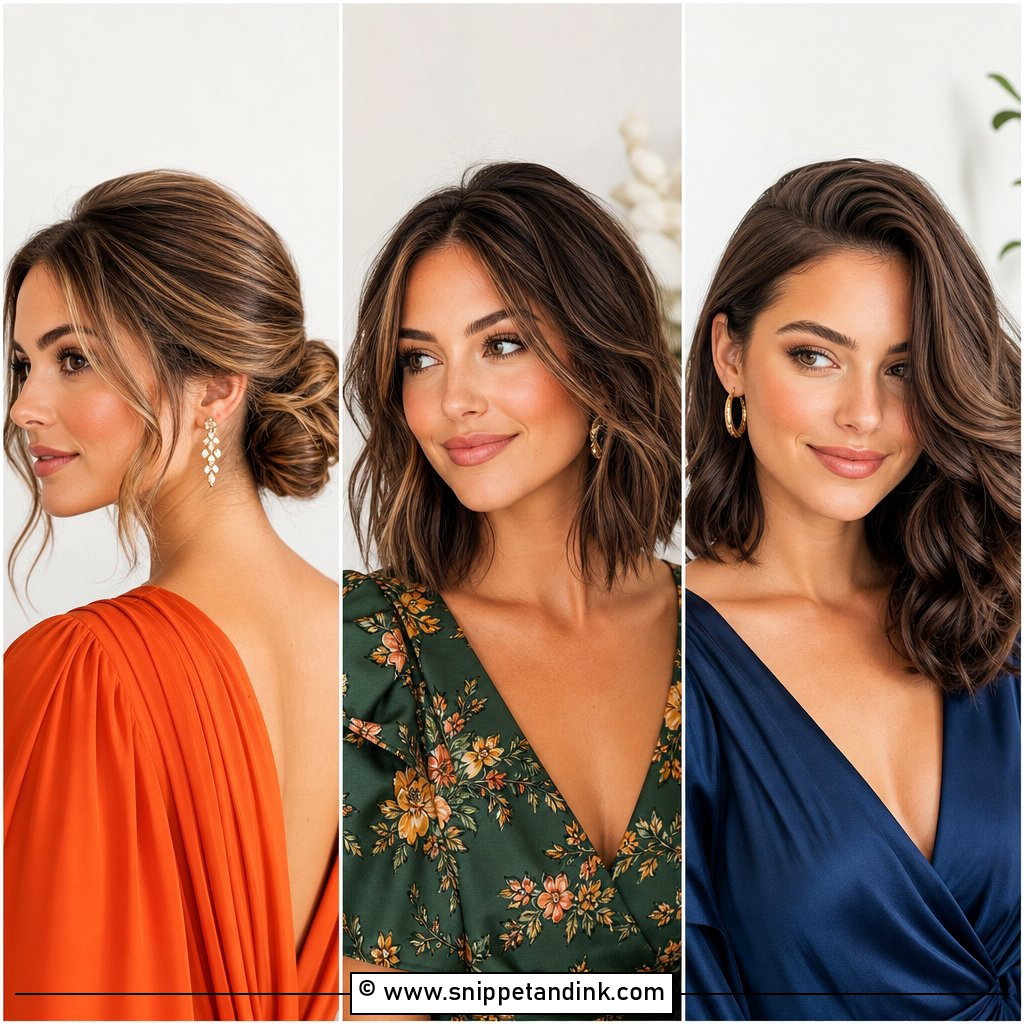
Layered hair is hard to put into a neat bun, which is exactly why I like a textured one for it. Loose curls first, then a low or mid ponytail, lightly teased. Twist it into a loose bun and pin it; short layers that poke out add to the texture. Pull a few strands out at the front, then pinch the crown gently upward for lift. Finish with a flexible hairspray. It holds all day because nothing is under strain.
8. French Twist Wedding Guest Hairstyle Tutorial
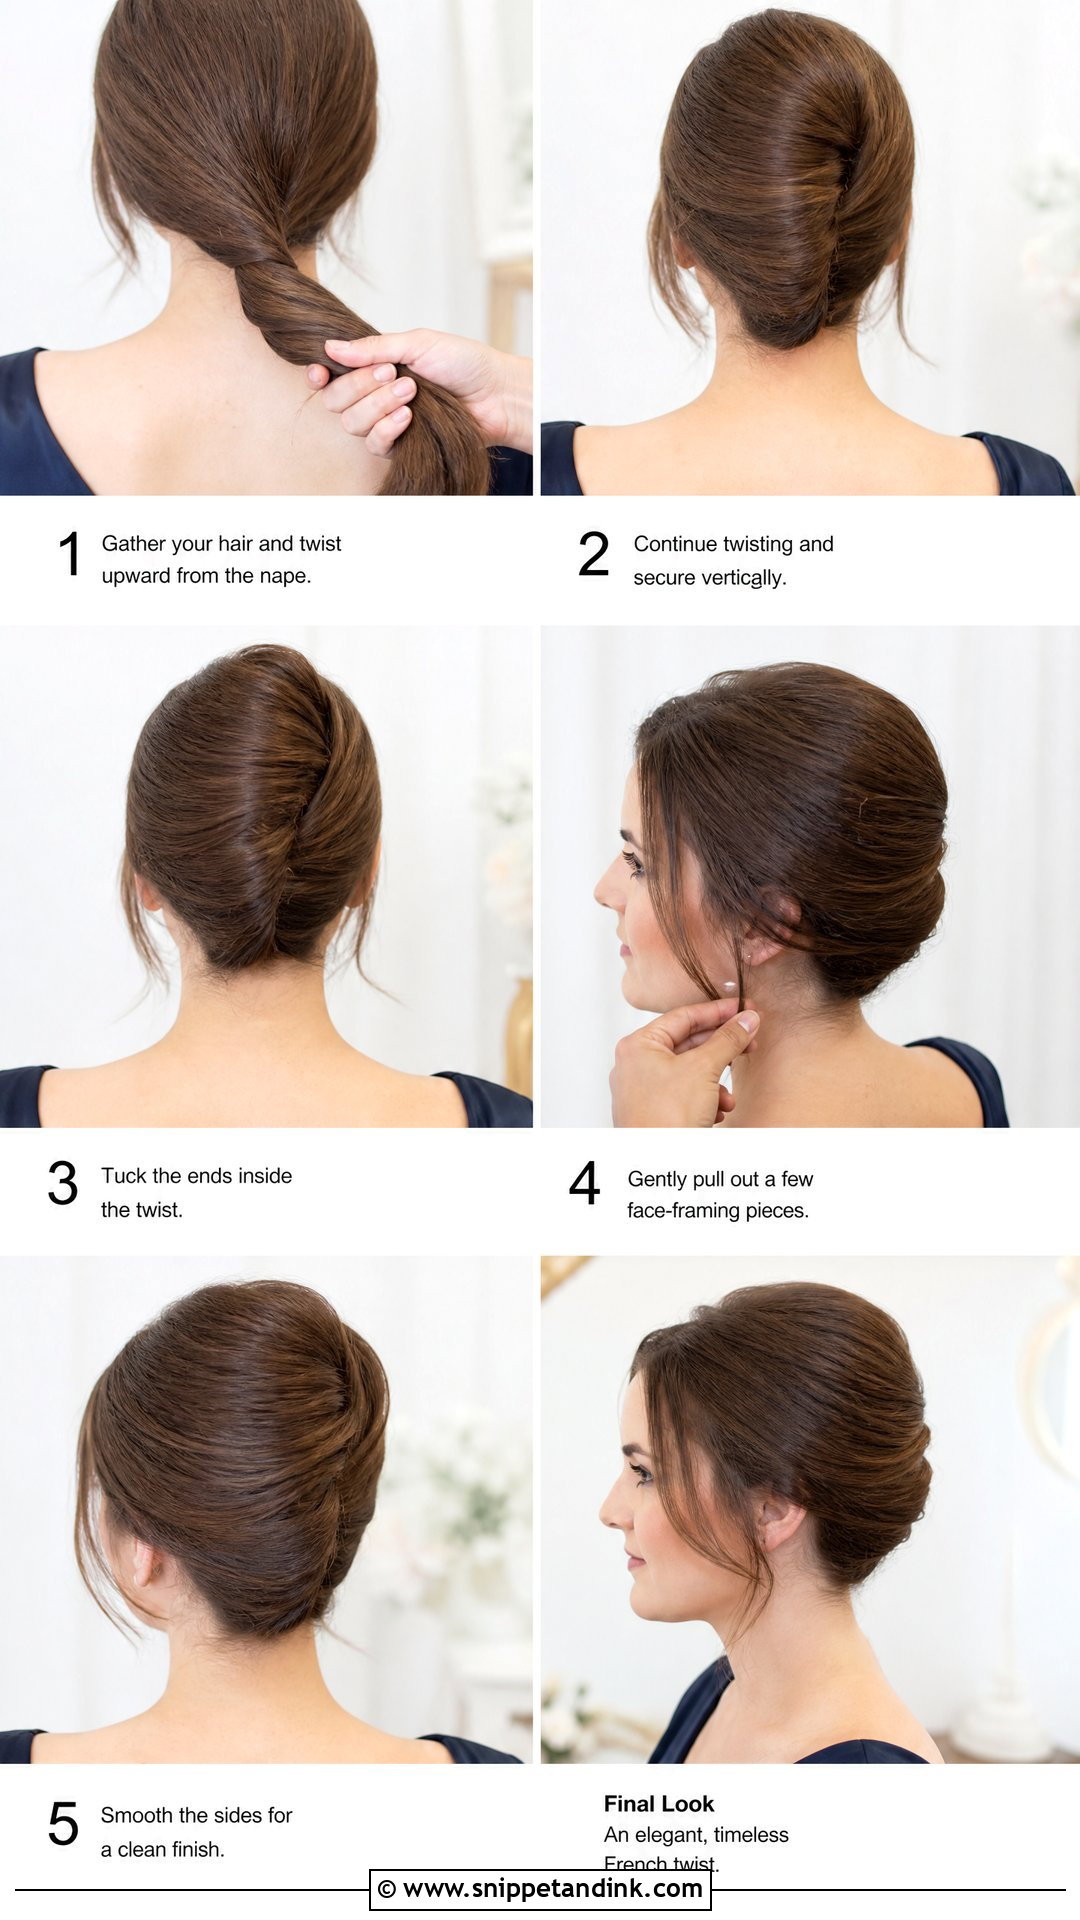
The French twist depends on the vertical row of pins up the back. Texture spray first, so the pins have grip. Sweep all the hair to one side and set a line of crossed bobby pins up the center of the back of the head. Then roll the loose hair inward over the pins and tuck the ends inside. Secure with more pins at the top, middle and bottom of the seam. A few loose pieces around the face soften it for a formal wedding.
9. Loose Waves Wedding Guest Hairstyle Tutorial
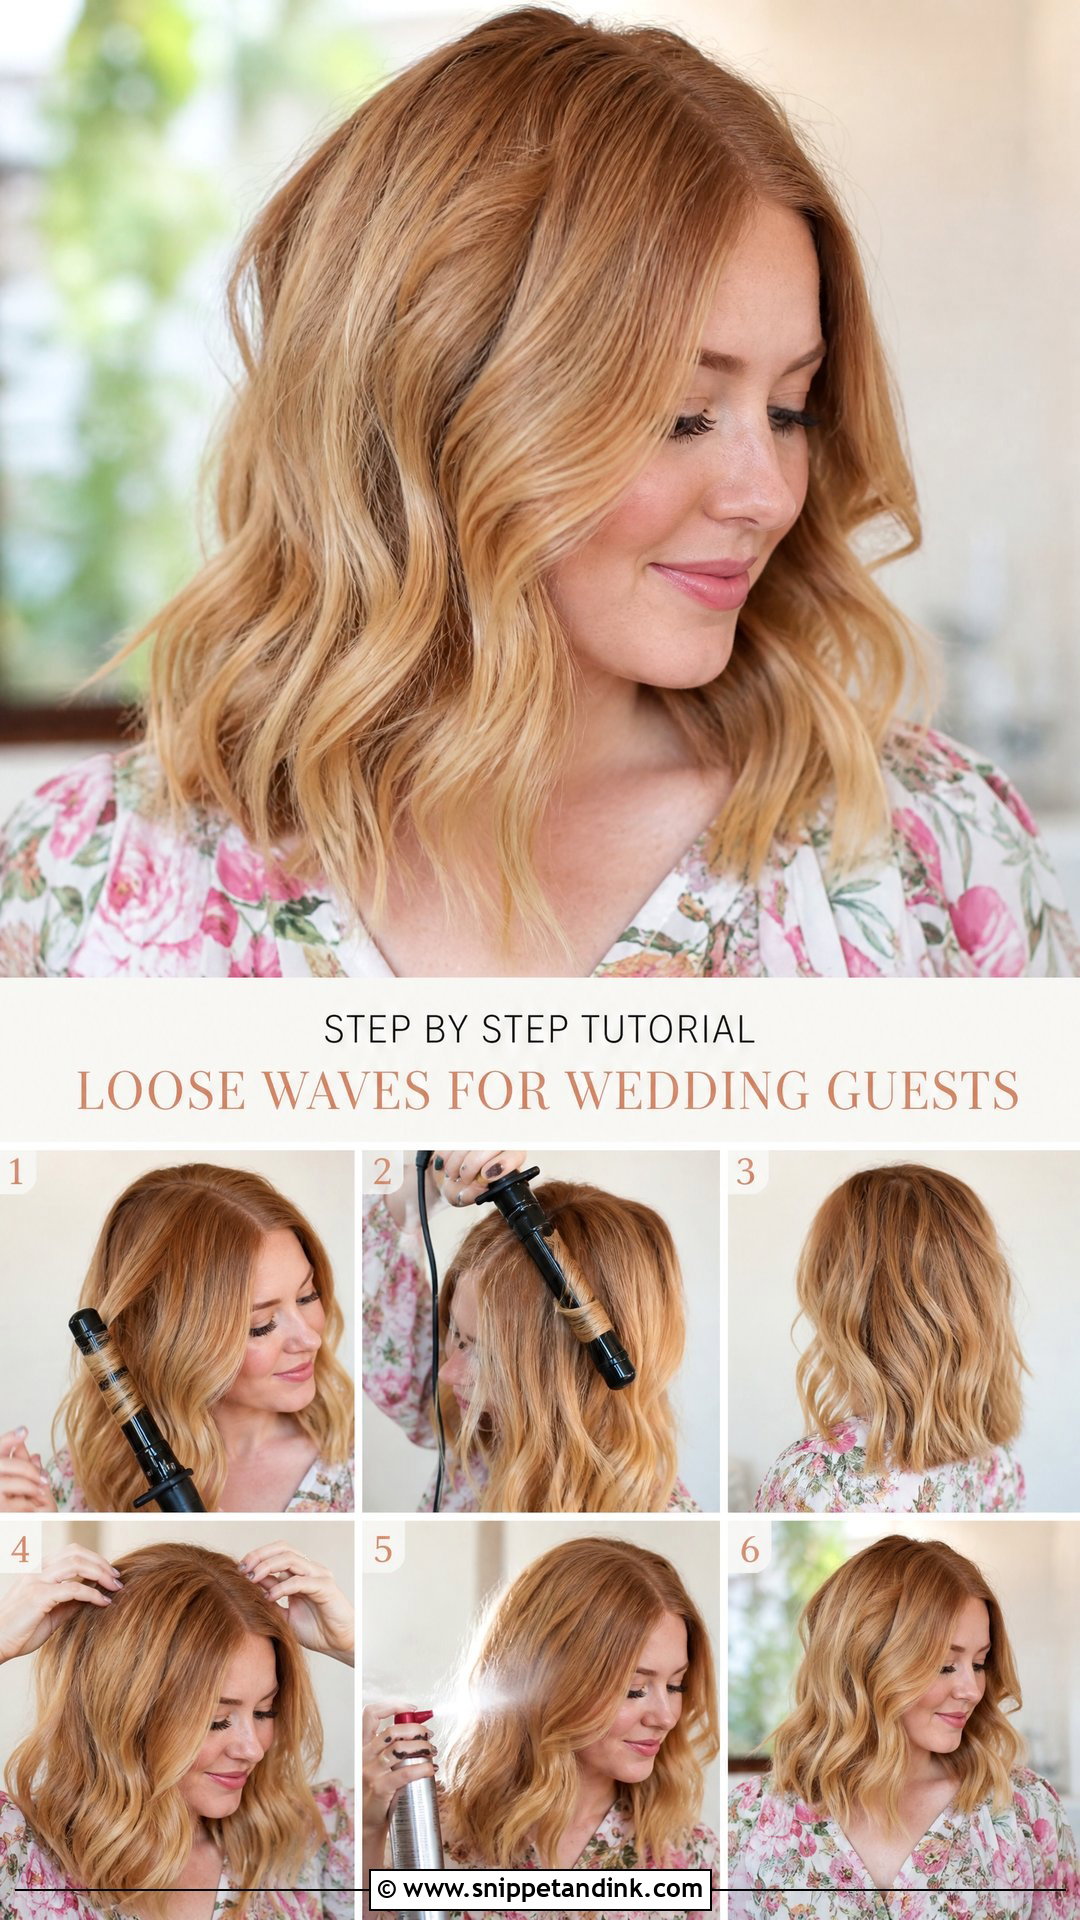
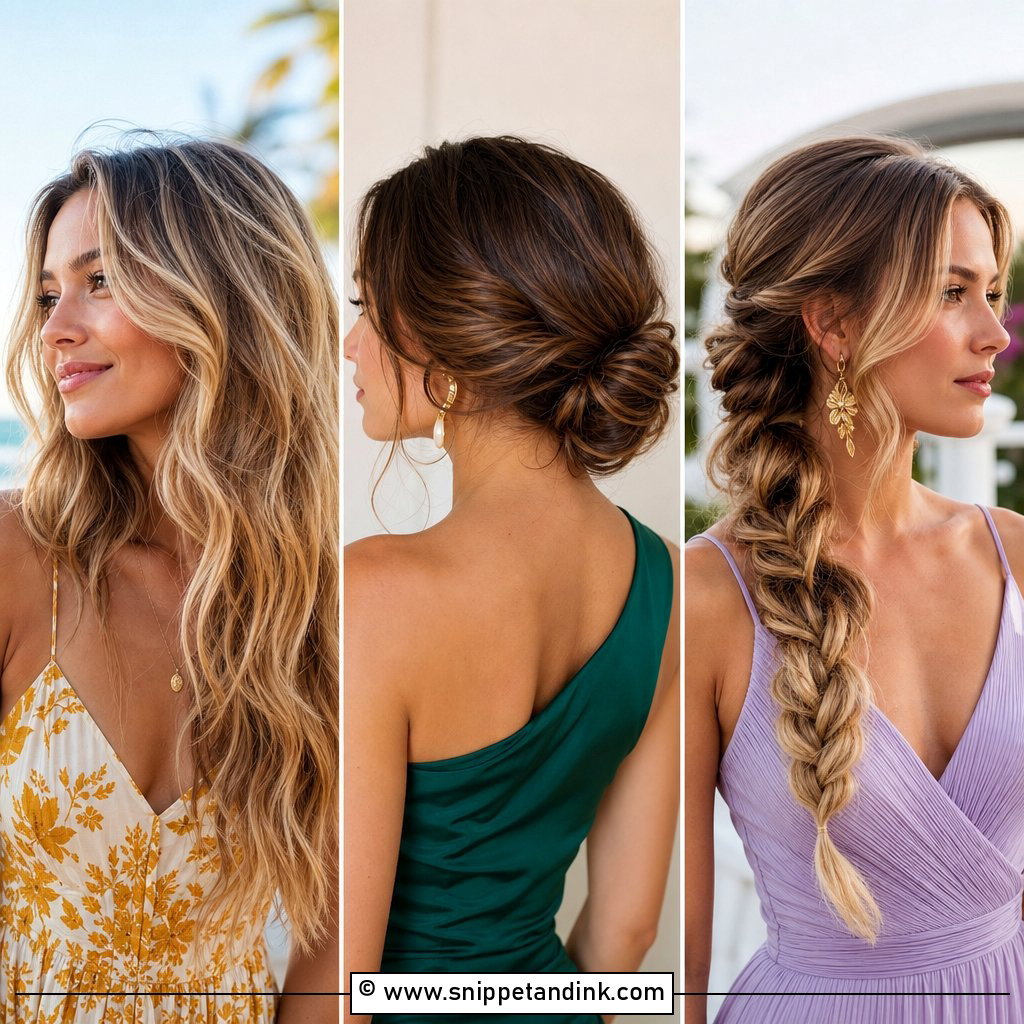
Loose waves are the down style that lasts longest, provided you clip each curl while it cools. Prep with heat protectant and a light mousse. Curl away from the face, leaving the last inch or so straight for a modern shape. Once cool, brush out with a paddle brush, add texture spray at the roots and a little serum at the ends. Short, medium and long hair all work.
10. Chignon Wedding Guest Hairstyle Tutorial
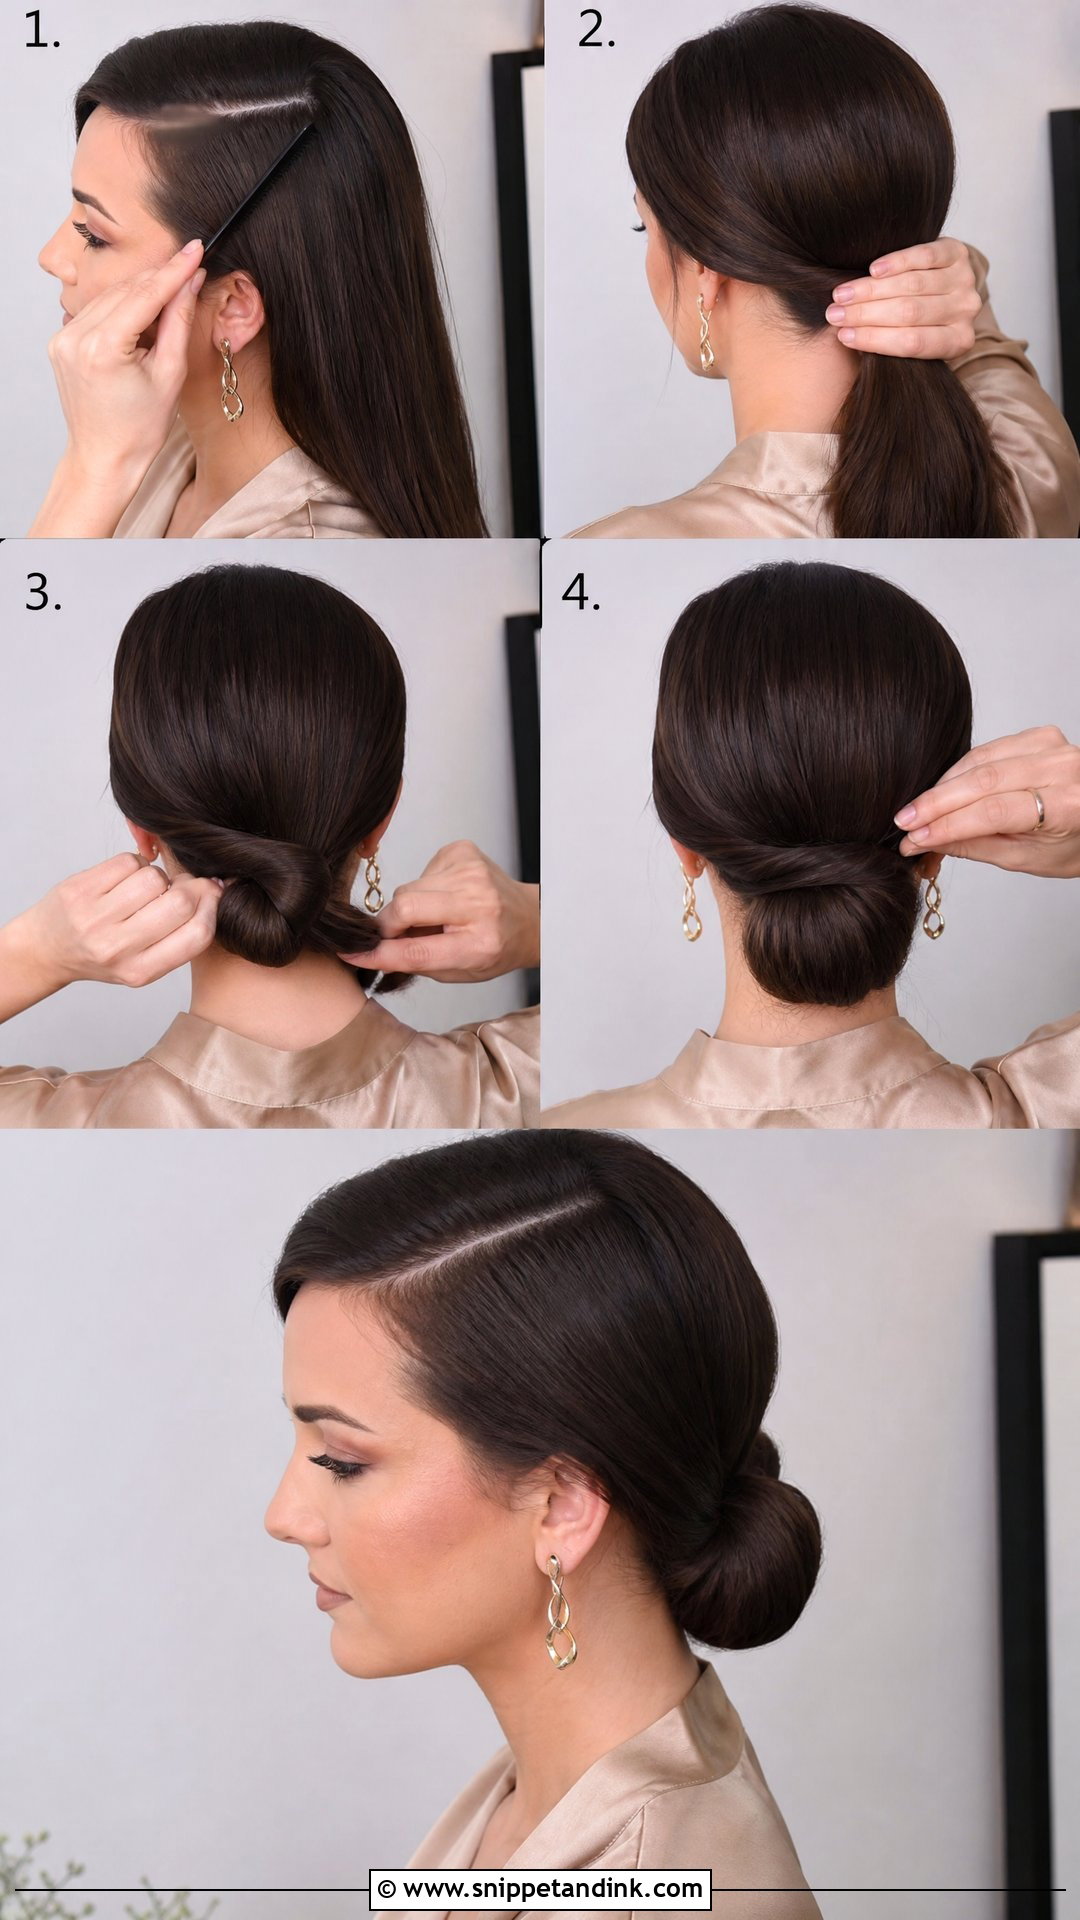
A chignon is a low coil pinned flat at the nape. Start with a clean part, brush the hair into a low ponytail, twist it into a coil and pin it flat, tucking the ends under. Fine hair needs a small bun pad or a tease first so the coil isn’t thin. A light styling cream smooths the surface. It needs nothing else, though a pearl clip or simple pins look right with a formal dress code.
11. Claw Clip Wedding Guest Hairstyle Tutorial
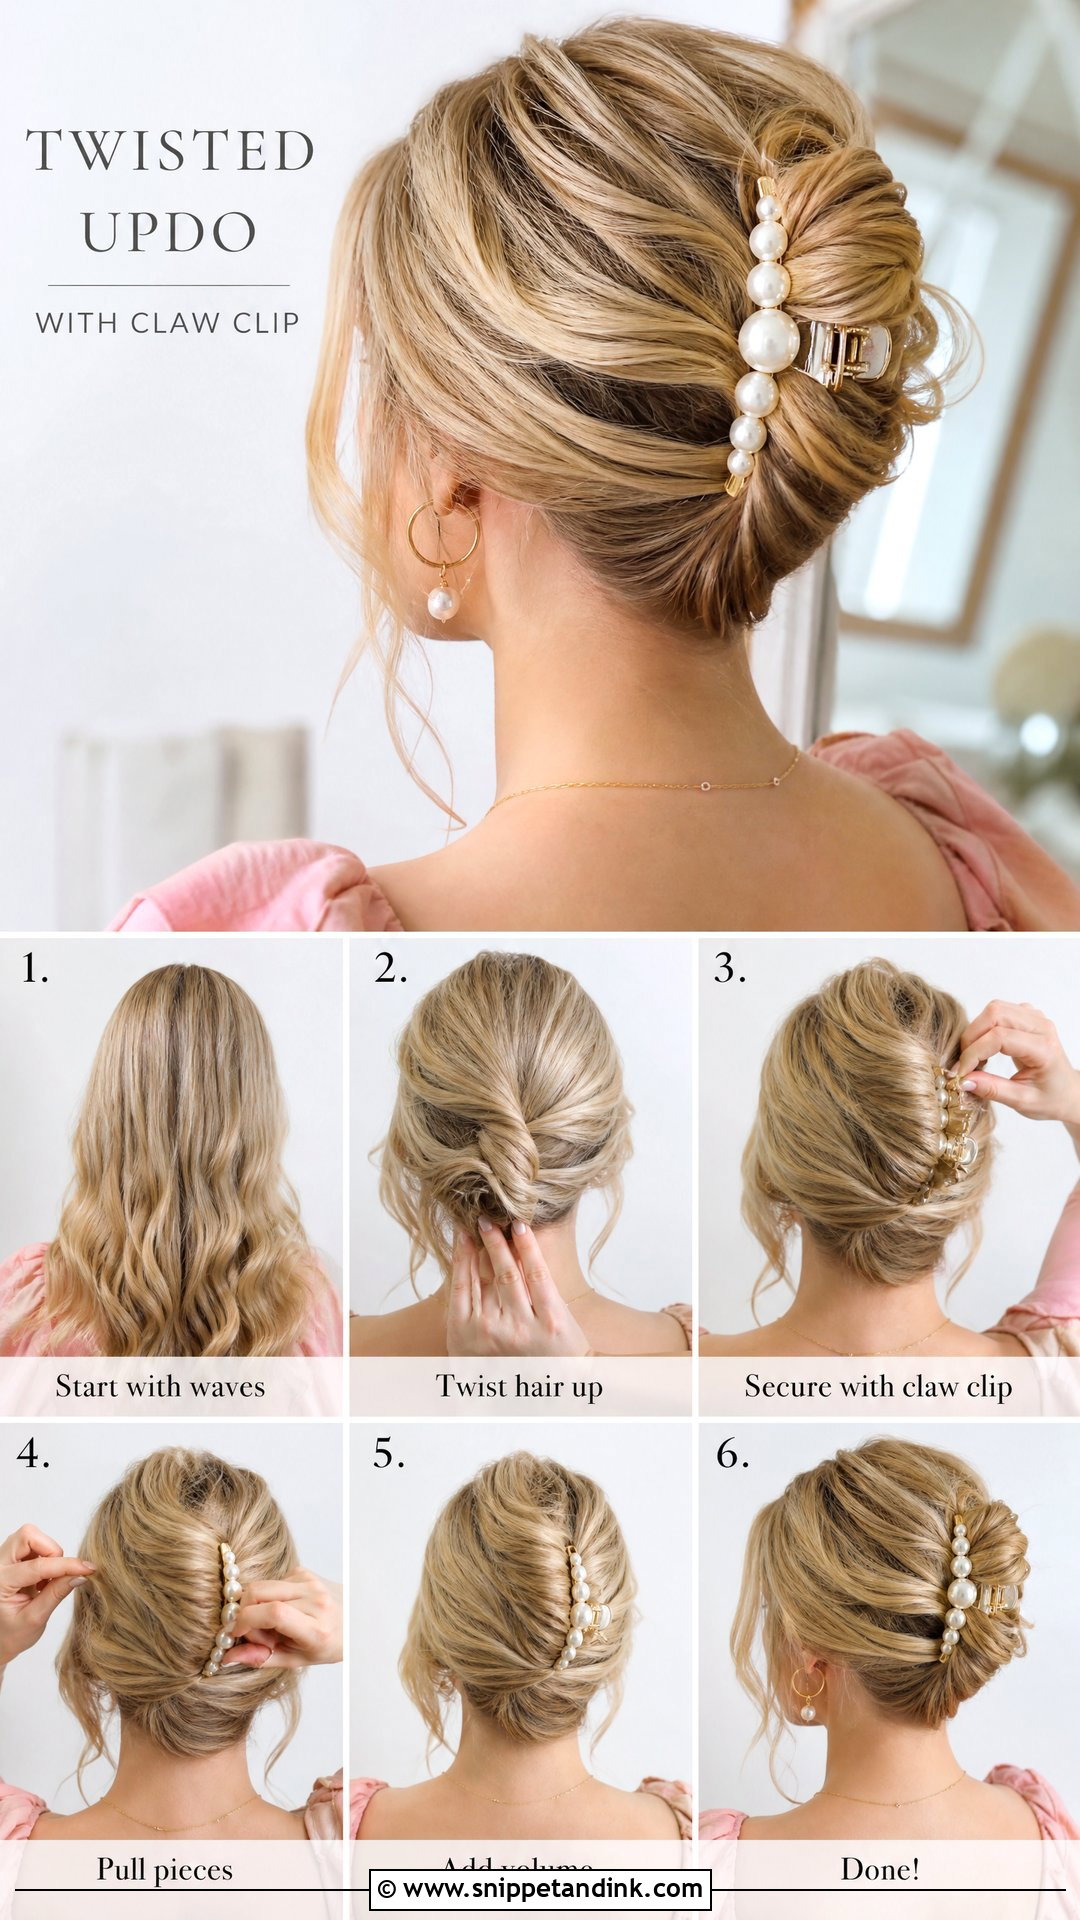
A claw clip only looks dressy if the twist under it is neat. I start with soft waves or a smooth blowout, gather the hair like a low ponytail, twist upward and fold the ends down if the hair is long. Then I clip it with a strong, pretty claw clip large enough to hold the full twist. Pearl, satin, tortoiseshell and gold-tone clips read as wedding wear; plain plastic doesn’t. Mist the front with hairspray.
12. High Bun Wedding Guest Hairstyle Tutorial
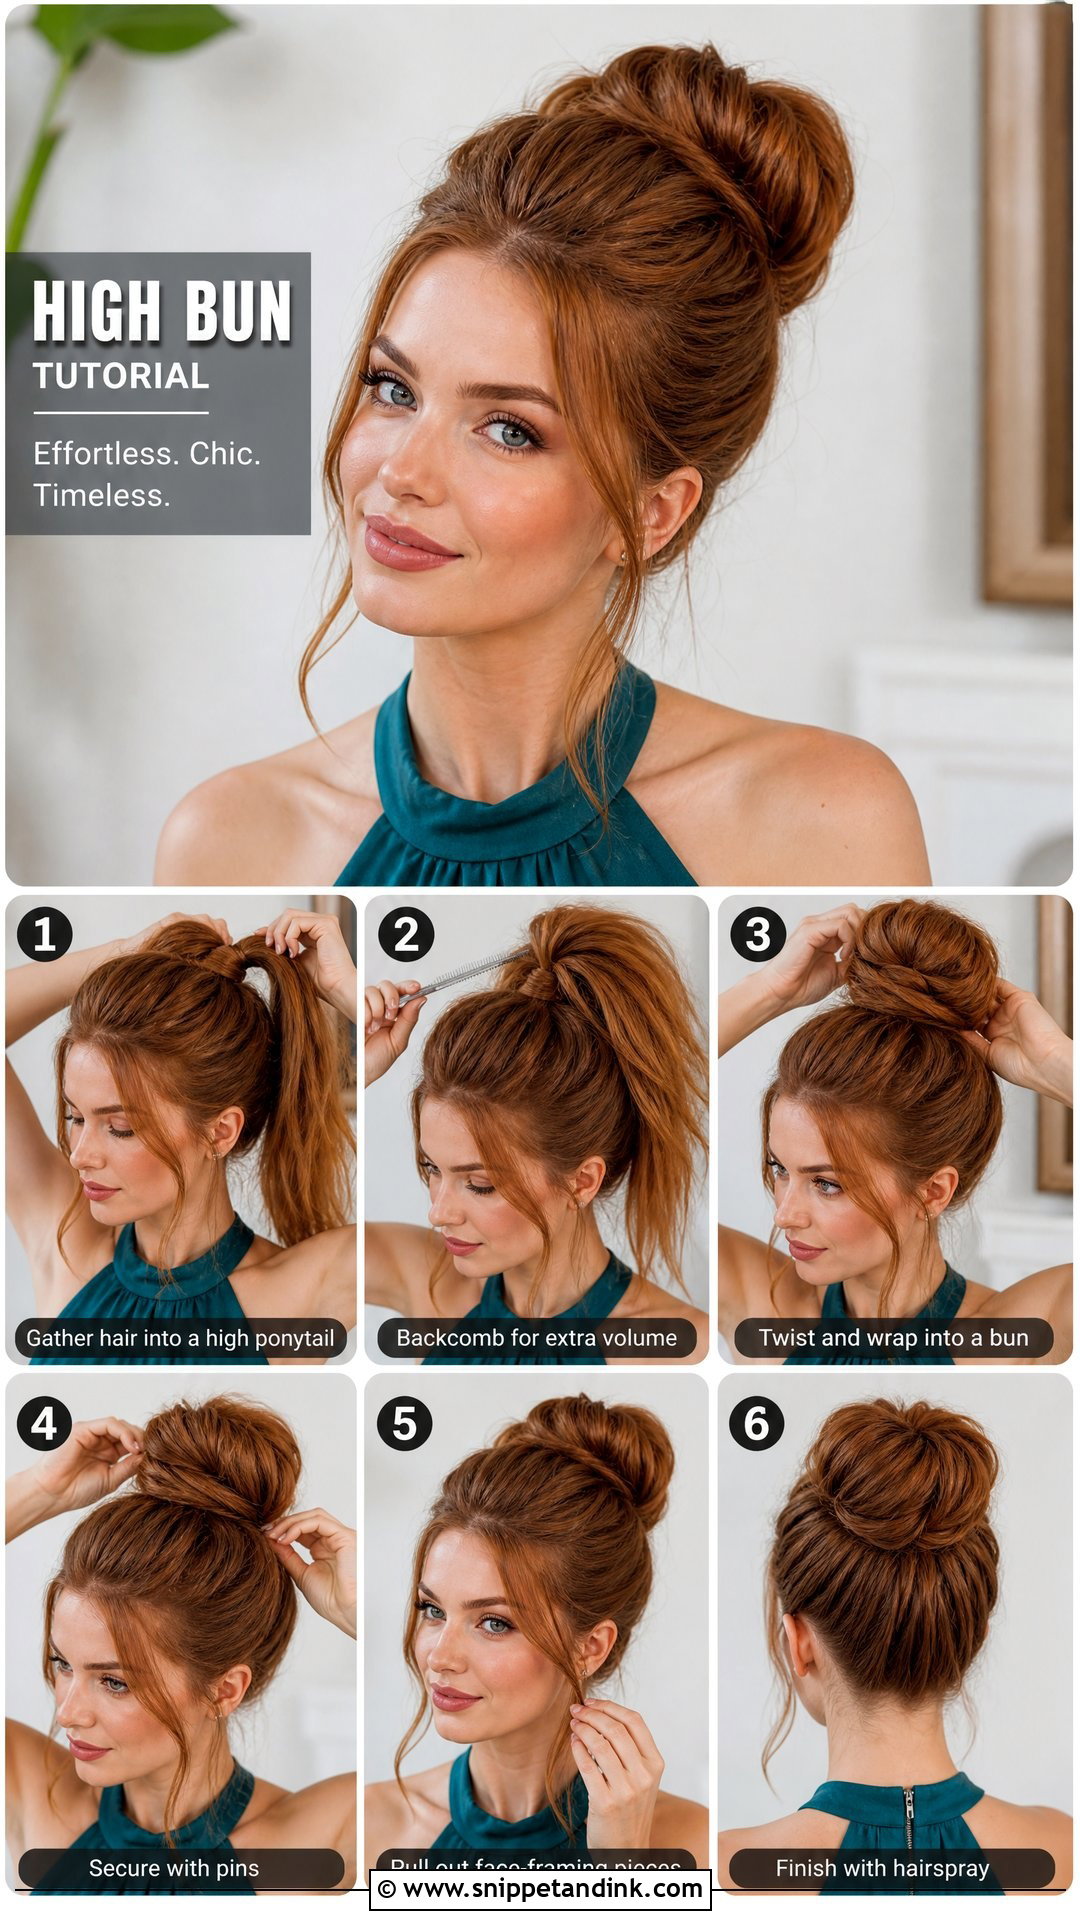
A high bun keeps the neck bare, which is why I recommend it for summer weddings. Flip your head forward and gather the hair into a high ponytail, then twist it around the base and pin it. A bun donut adds size if your hair is fine. Smooth the hairline with gel or cream. It suits halter, high-neck and open-back dresses. Heavy, thick hair can make a high bun pull, so set it slightly lower if you feel strain.
13. Short Bob Wedding Guest Hairstyle Tutorial
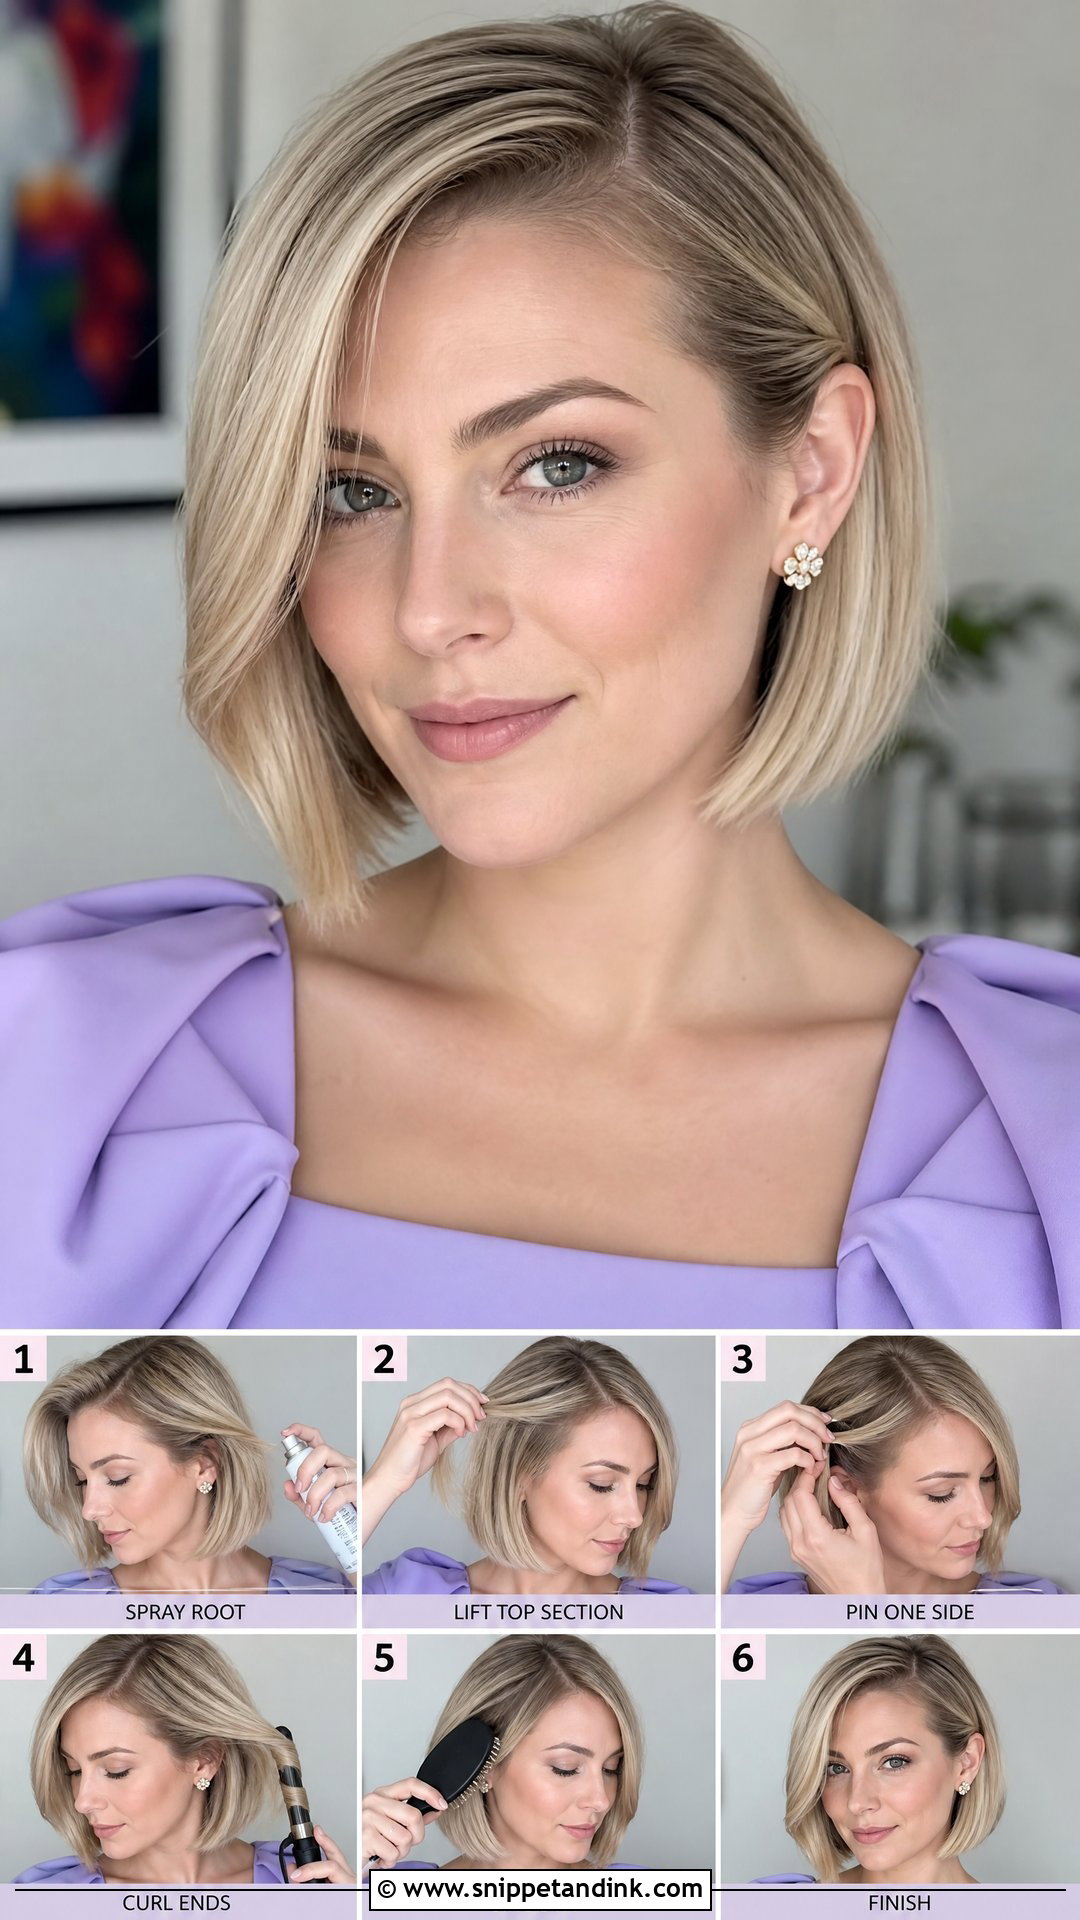
A short bob mostly needs shine and lift. I blow-dry with a round brush for volume at the root, then use a flat iron to bend the ends slightly under or out. A deep side part adds drama; a center part is more modern. Tuck one side behind the ear with a small pin if you want. A shine spray finishes it. Keep it smooth but not stiff, so the cut still moves.
14. Hollywood Waves Wedding Guest Hairstyle Tutorial
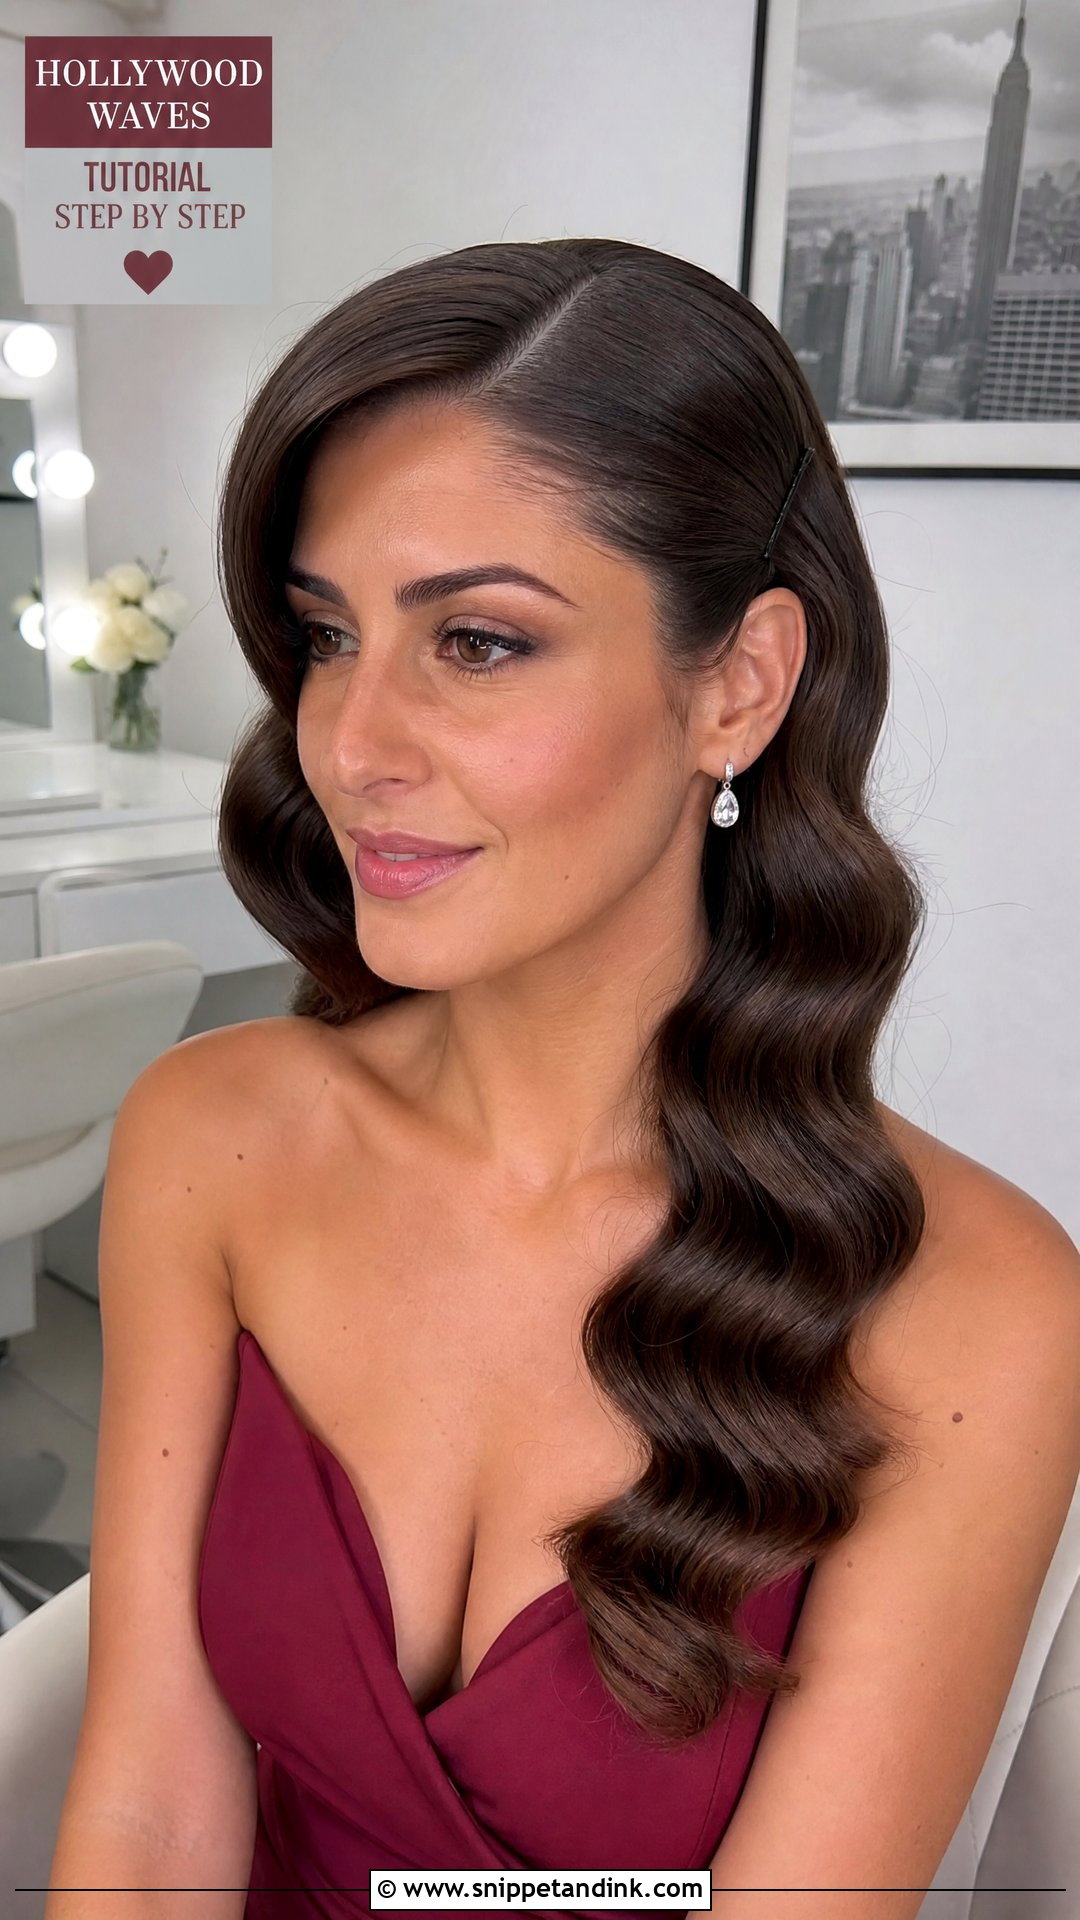
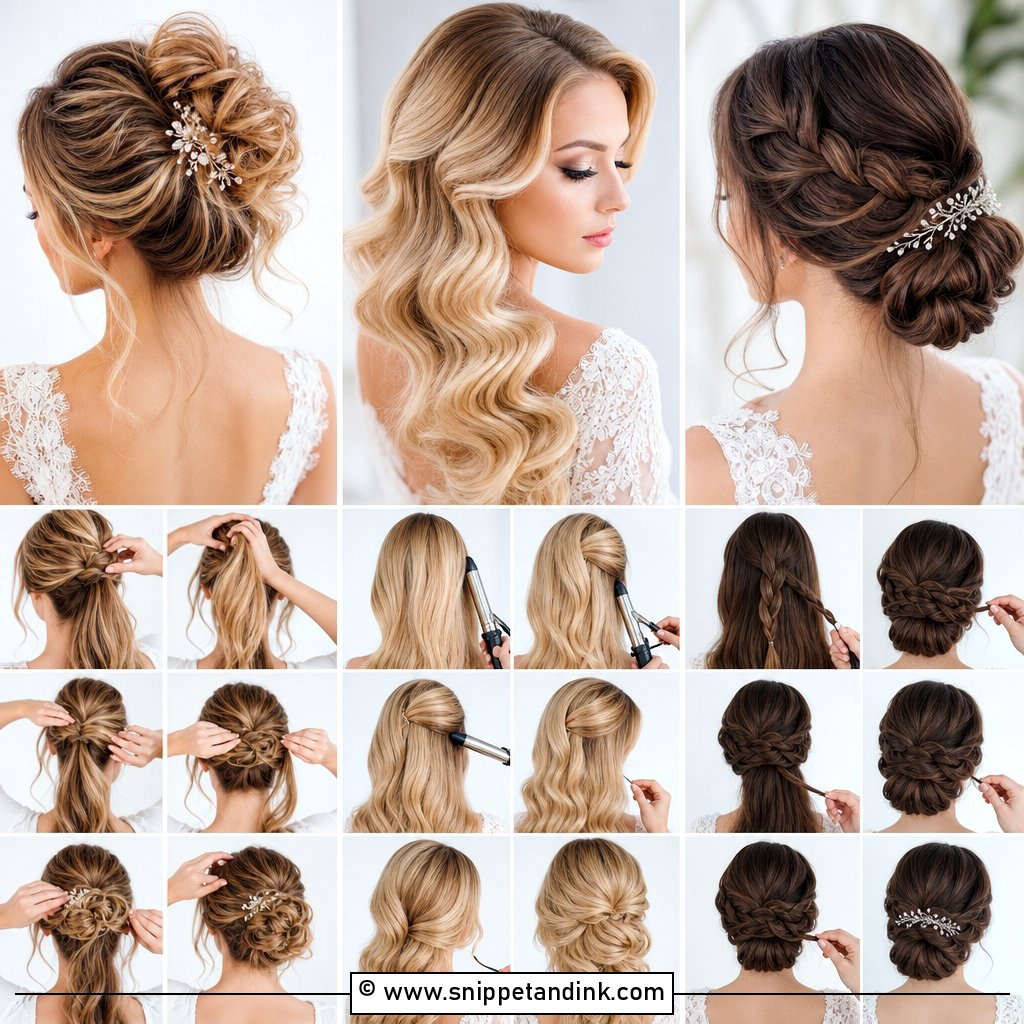
Hollywood waves take patience. Side part, then curl every section in the same direction with a medium iron, pinning each curl while it cools. When it’s all cool, remove the clips and brush through with a soft brush until the waves connect into one ripple. A little serum on the ends and hairspray on top. Pinning behind one ear gives that classic red-carpet shape. Plan for about an hour.
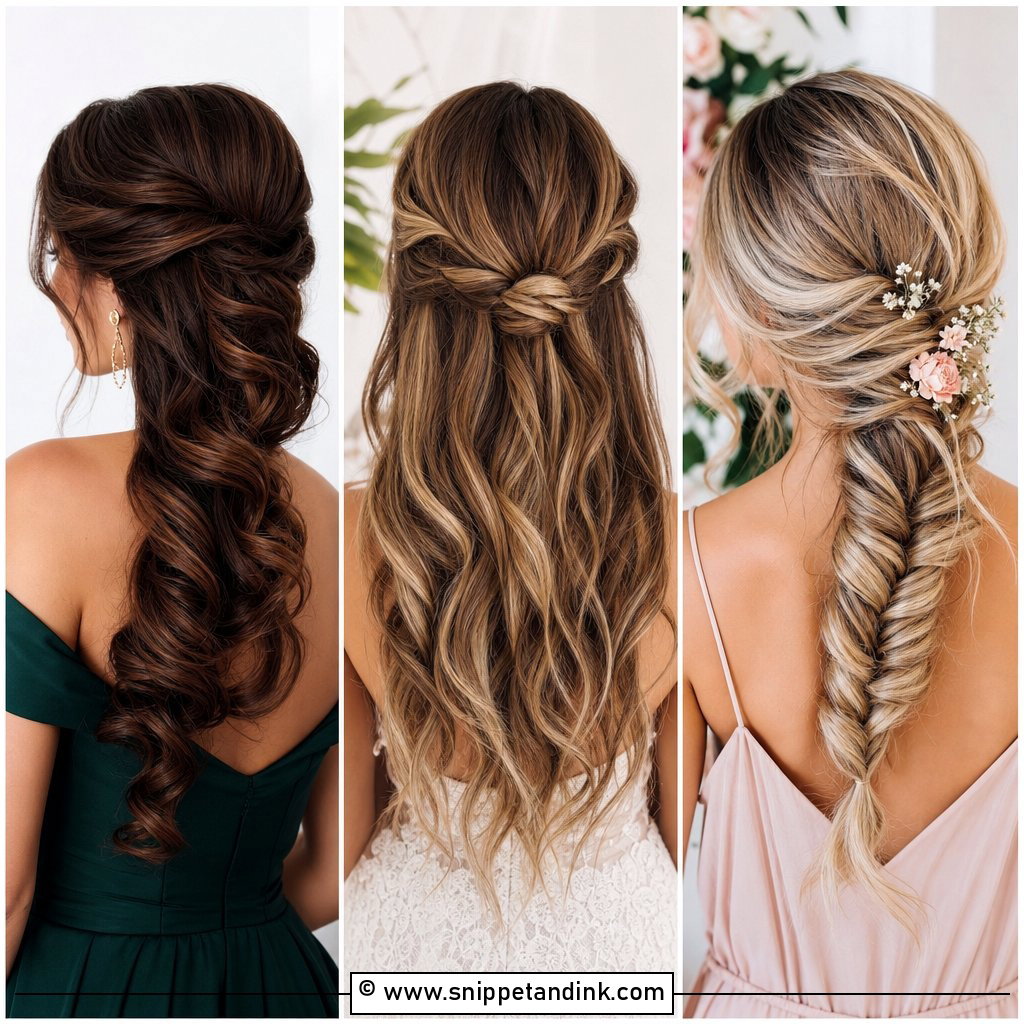
15. Bubble Ponytail Wedding Guest Hairstyle Tutorial
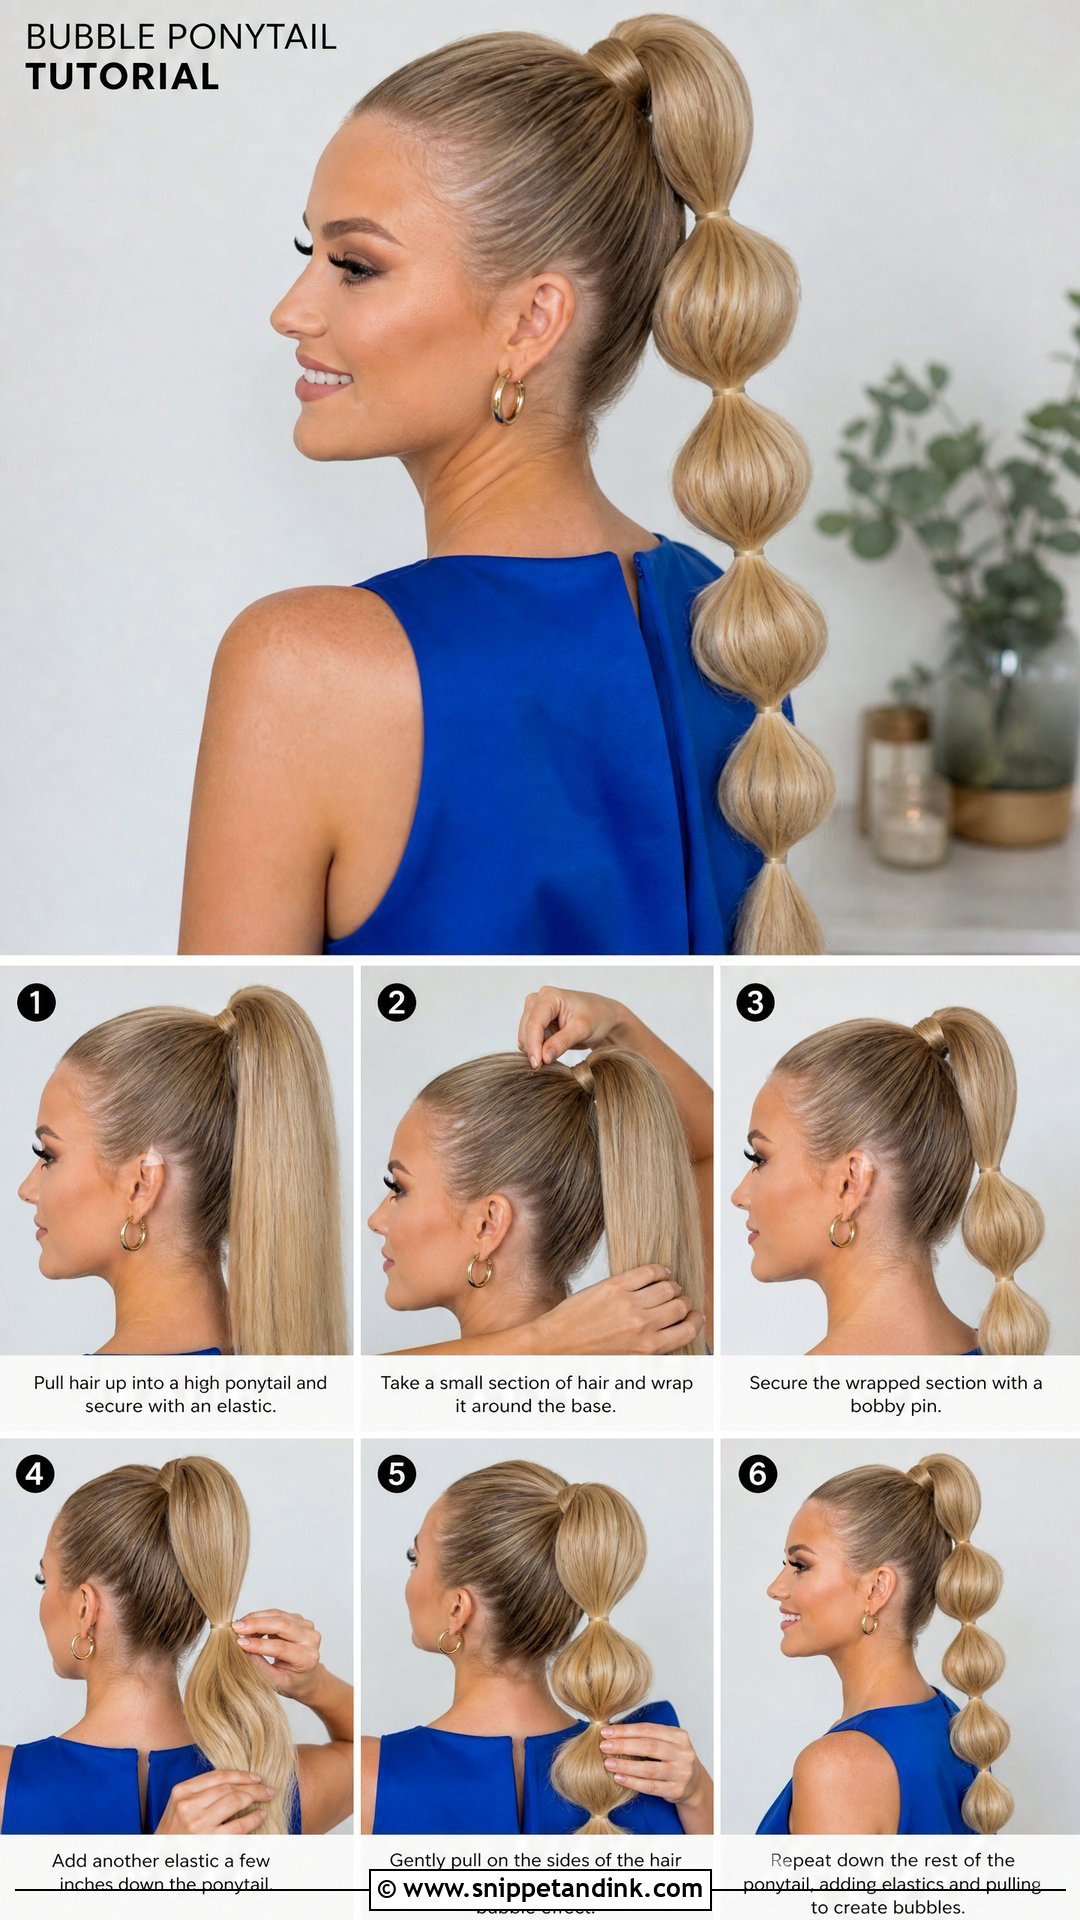
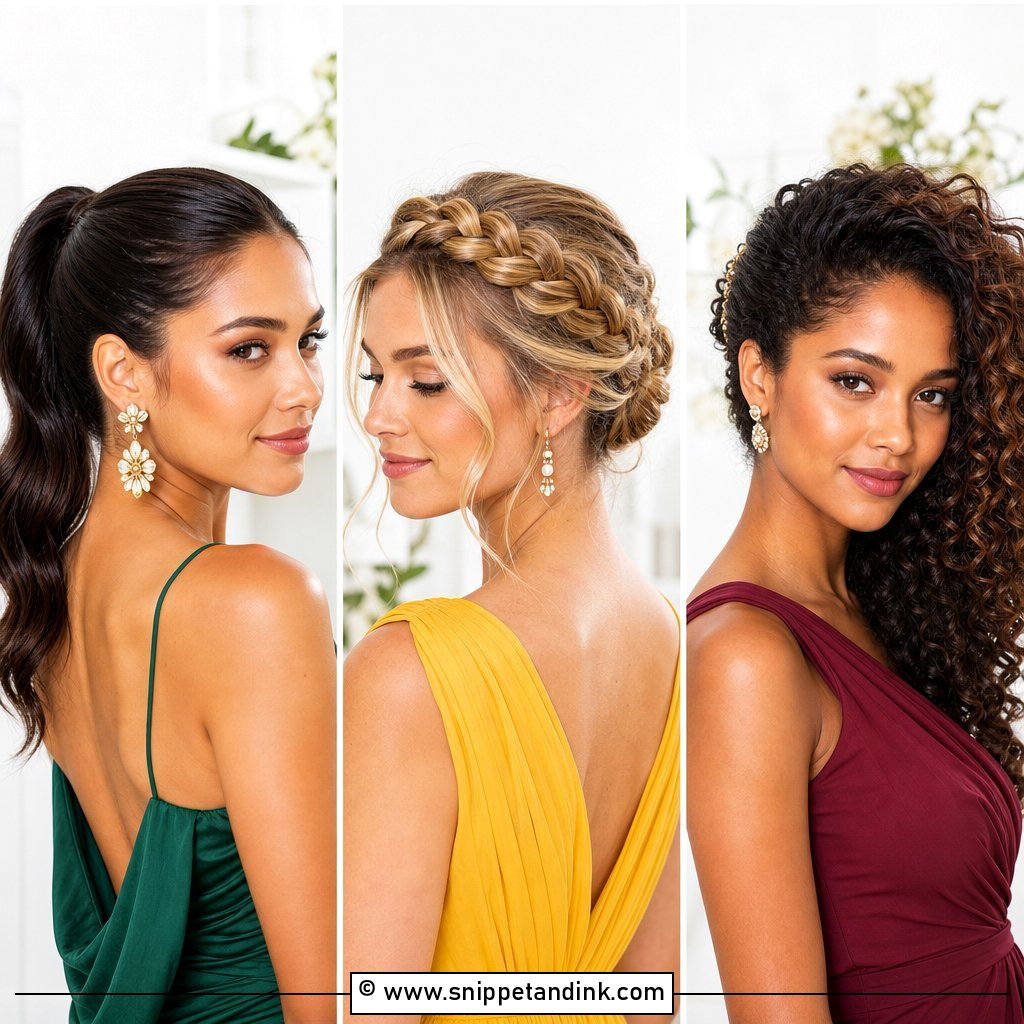
A bubble ponytail starts as a smooth ponytail at whatever height you like. Add small clear elastics every few inches down the length, then gently pull each section outward to round it. A tiny bit of styling cream keeps the surface neat. Curl the ends first for softness. It holds well in humid weather because the elastics do the work, and it suits long hair best.
16. Curly Updo Wedding Guest Hairstyle Tutorial
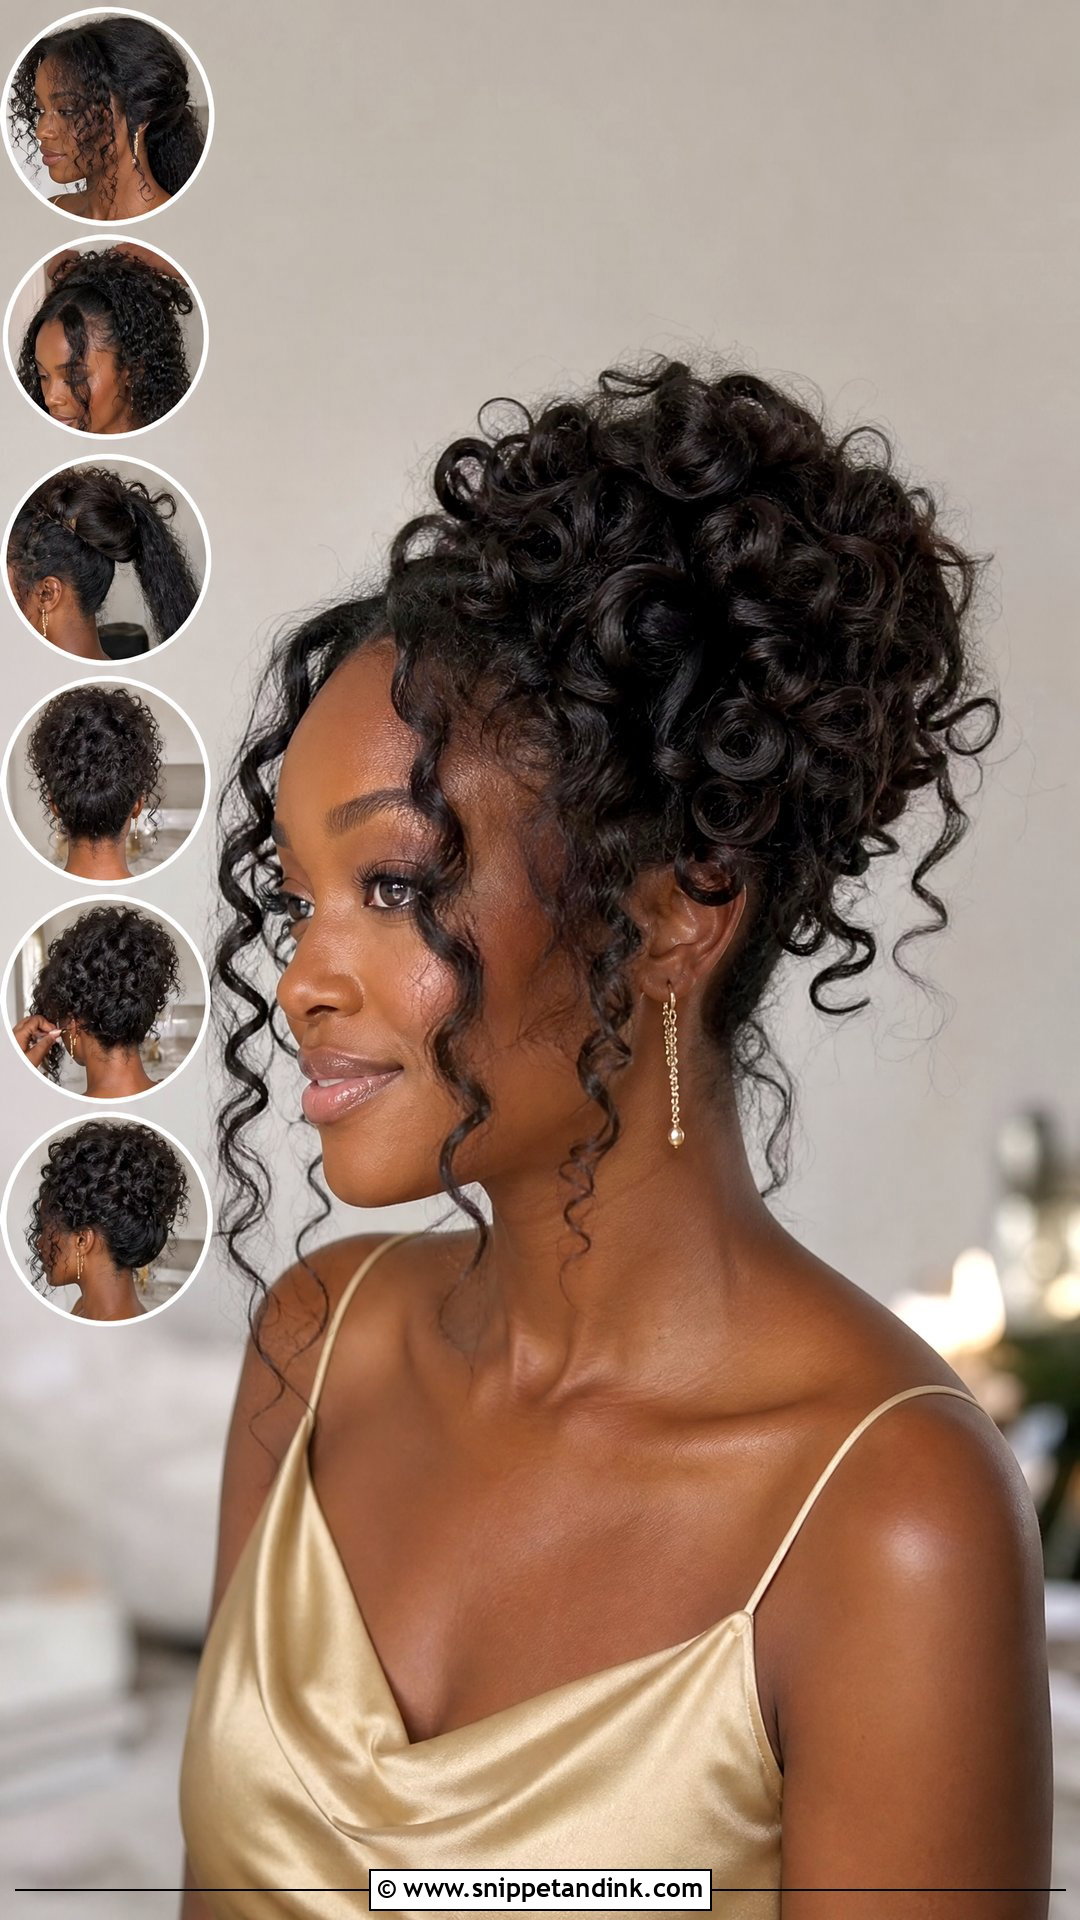
A curly updo should keep the curls defined, so don’t brush them. Start with curls set in a curl cream or gel and fully dried. Gather them loosely toward the back or crown and pin in sections, one at a time, rather than forcing everything into one tight bun. Let a few curls frame the face. Pins that match your hair color disappear into curls. A humidity-resistant spray finishes it.
17. Fishtail Braid Wedding Guest Hairstyle Tutorial
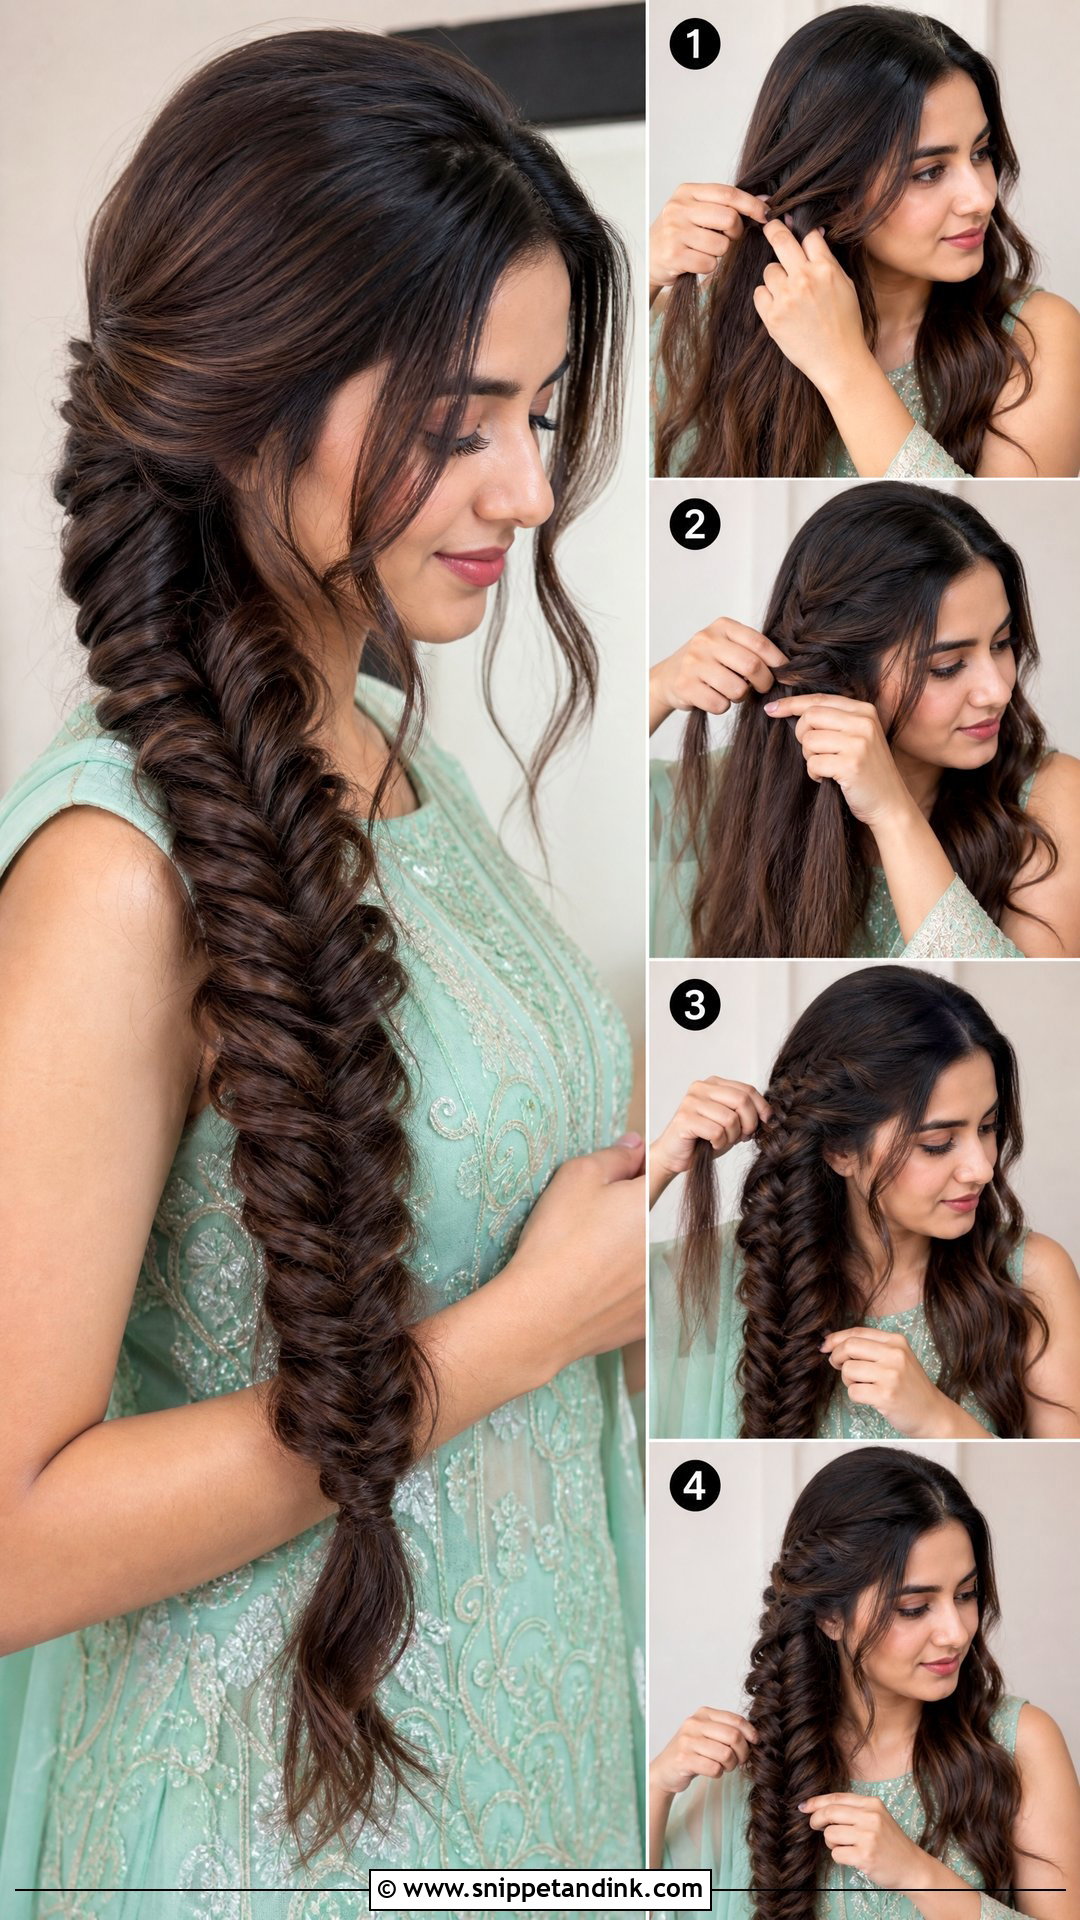
A fishtail braid suits beach, garden and semi-formal weddings. Texture spray first for grip. Pull the hair to one side or keep it centered, then divide into two sections. Take a small piece from the outside of one section and cross it over to the inside of the other. Repeat until the ends, then secure with a clear elastic. Pull the braid gently apart to widen it. Leave a few face-framing pieces loose.
18. Low Ponytail Wedding Guest Hairstyle Tutorial
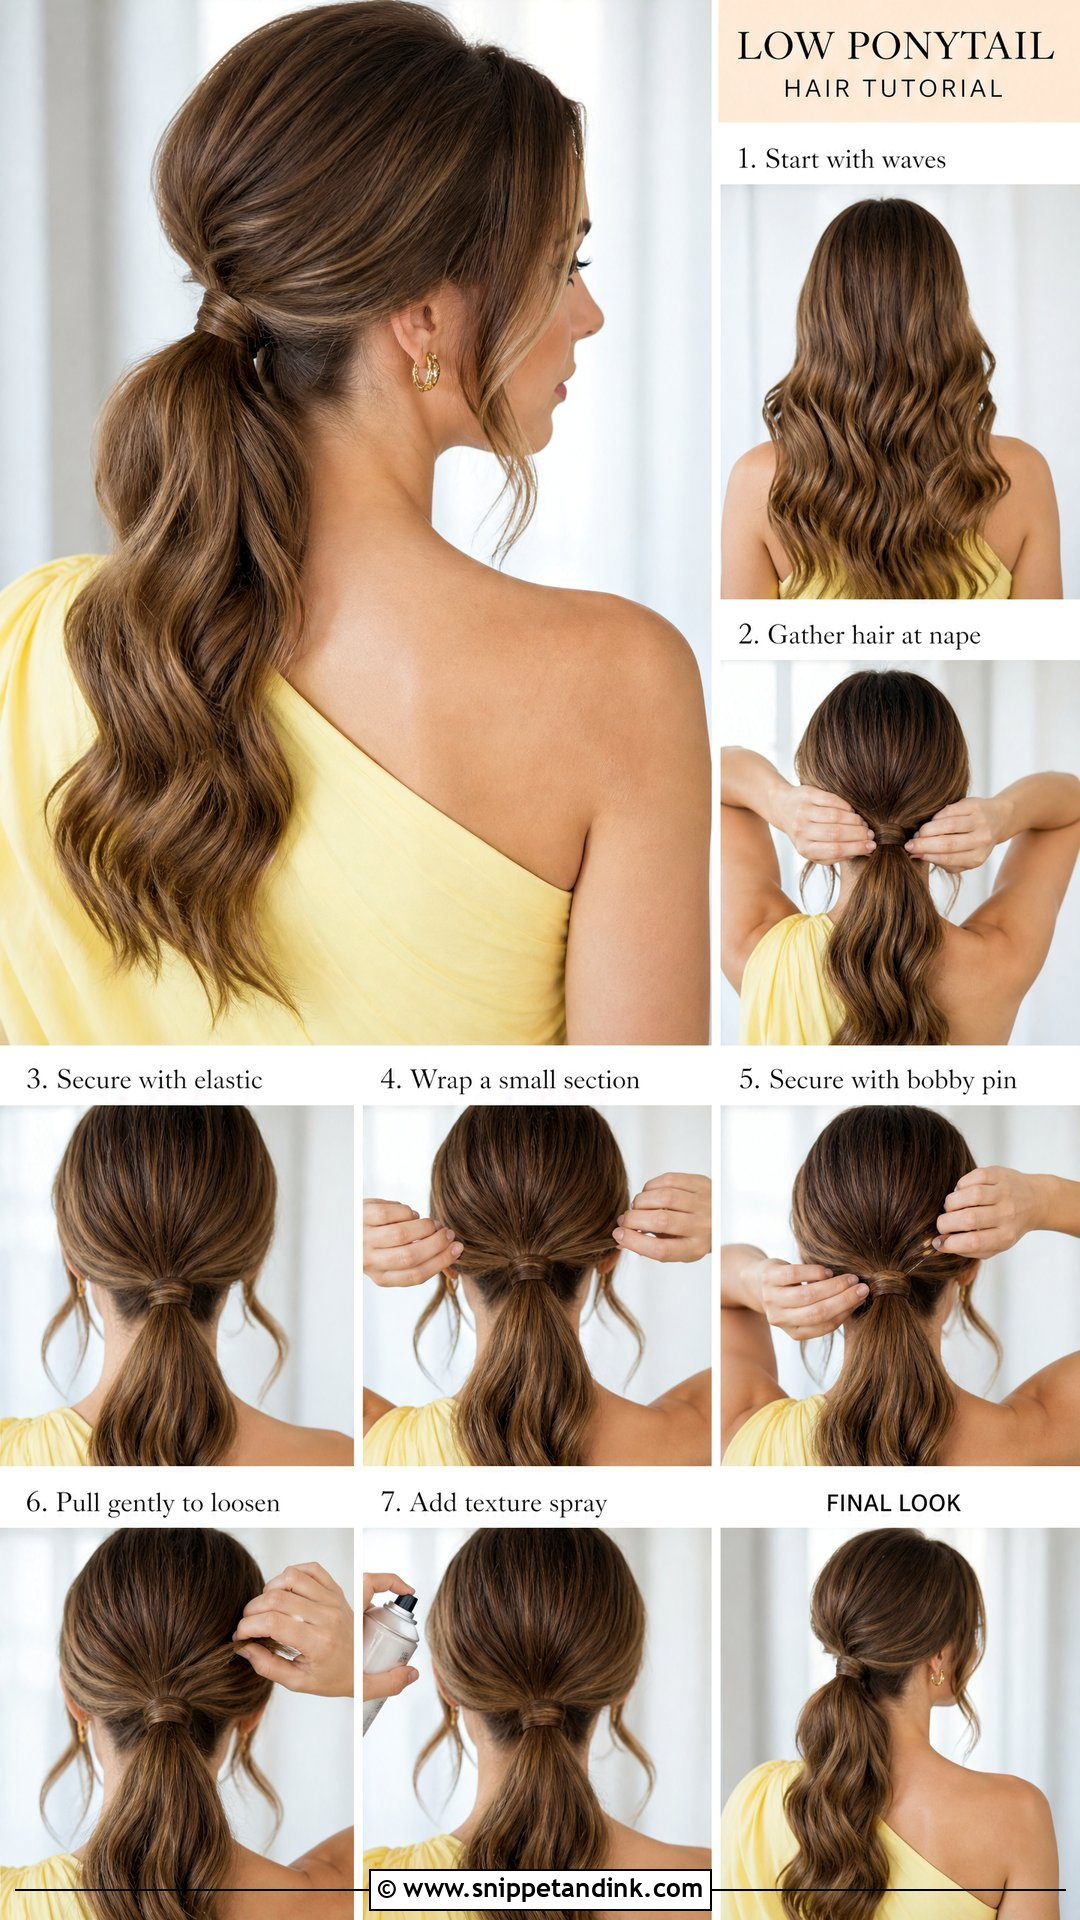
A low ponytail is the simplest style here, and the finish makes it. Start with a smooth blowout or soft waves, make a clean part, and gather the hair at the nape. Secure with an elastic and wrap a strand around the base. I lift the crown slightly with the end of a comb for shape. Curl the ends or keep them straight. It’s comfortable and secure all day.
19. Twisted Half Up Wedding Guest Hairstyle Tutorial
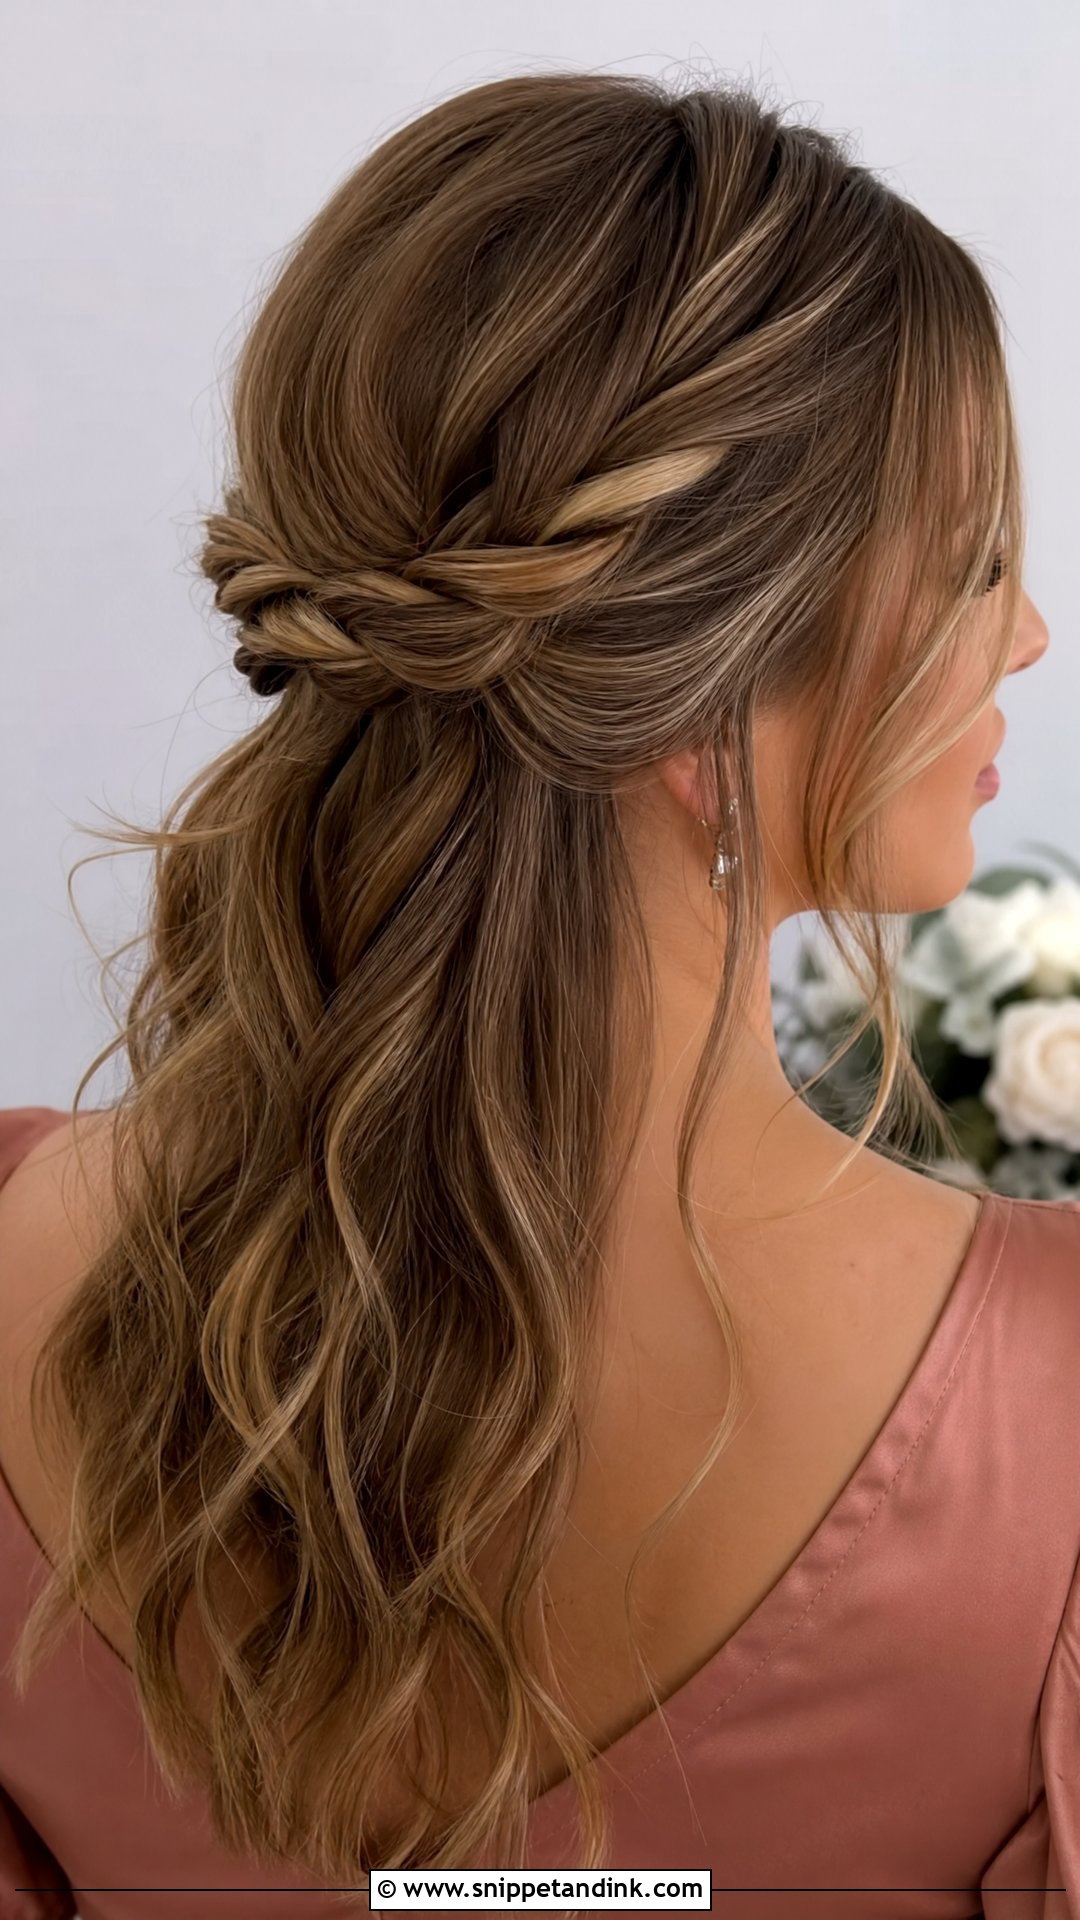
The twisted half-up is quick and beginner-friendly. Curl or wave the hair first. Take a front section from one side, twist it away from the face, and pin it at the back. Repeat on the other side, crossing the second twist over the first. Secure with pins or a small elastic and loosen the twists slightly. A little hairspray on the pins stops them slipping. It suits medium and long hair, especially layered cuts.
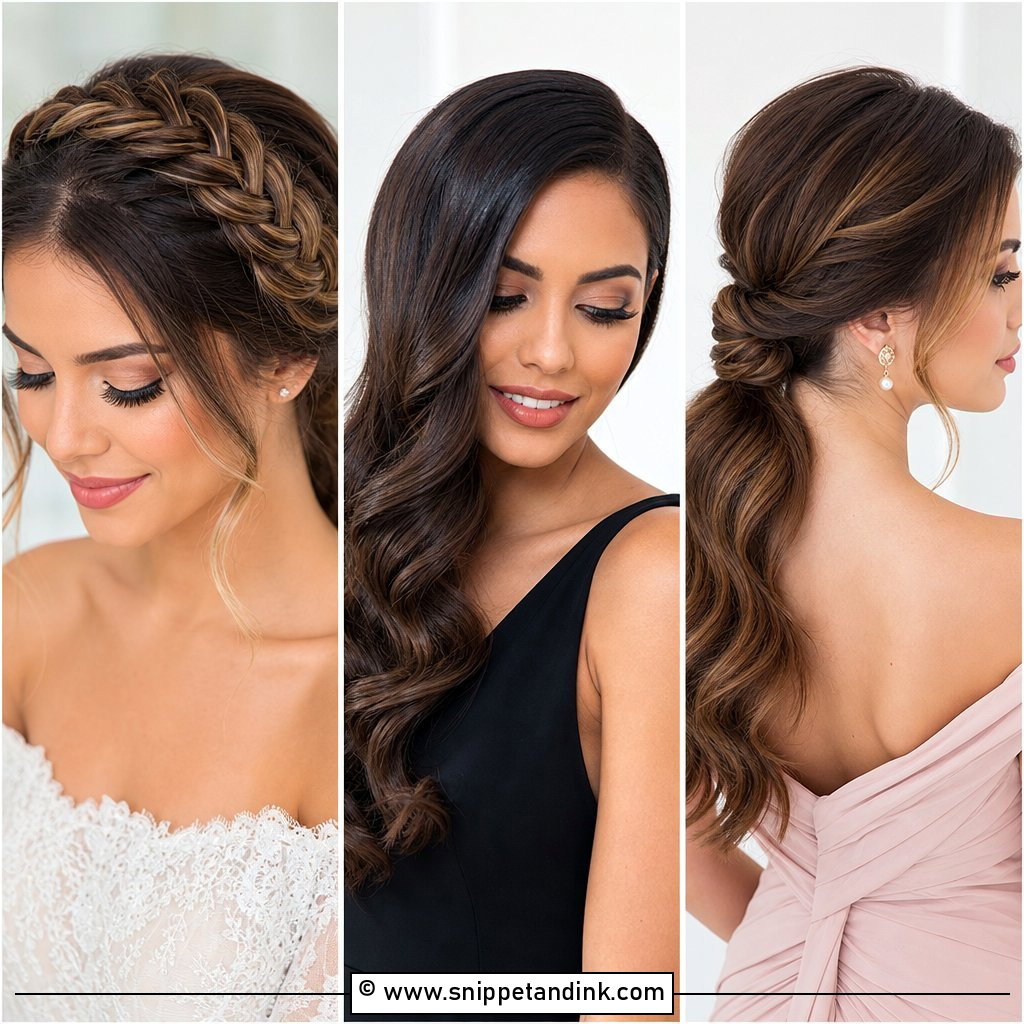
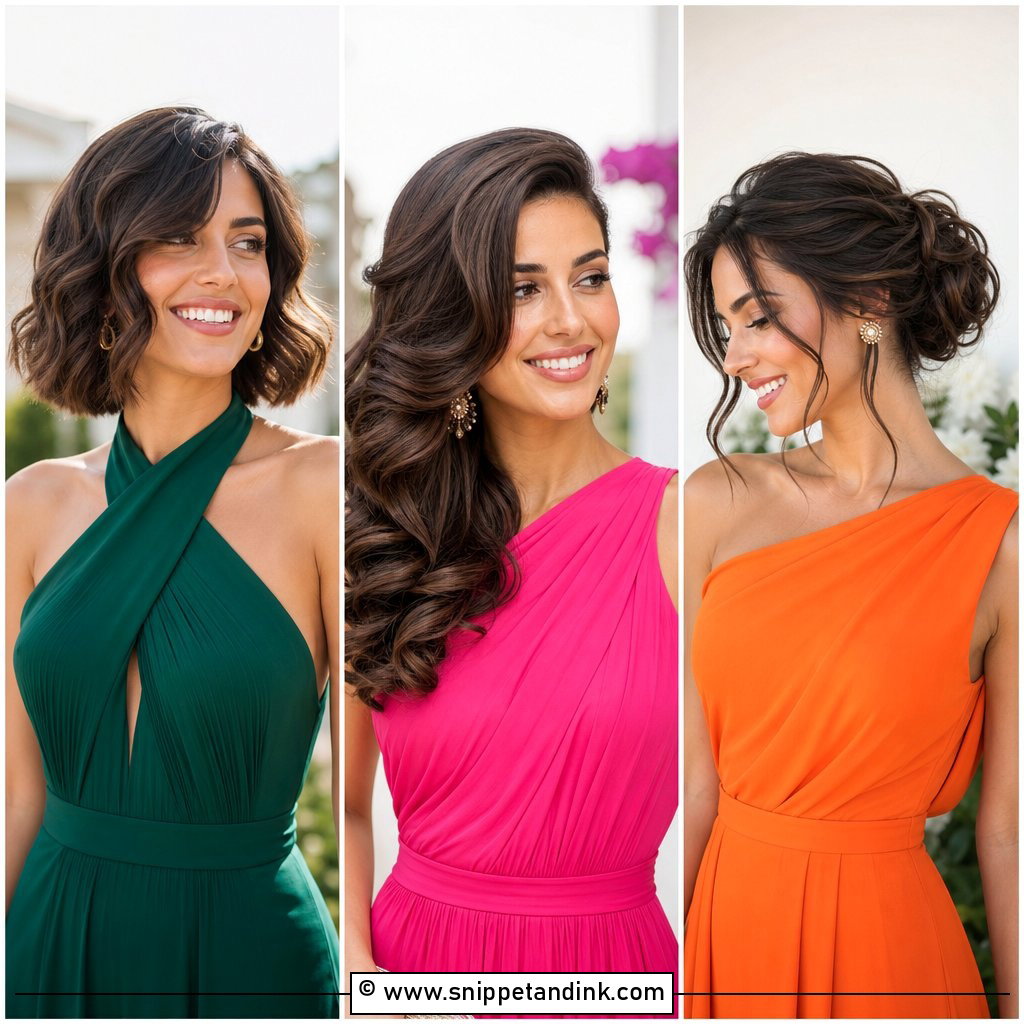
20. Side Bun Wedding Guest Hairstyle Tutorial
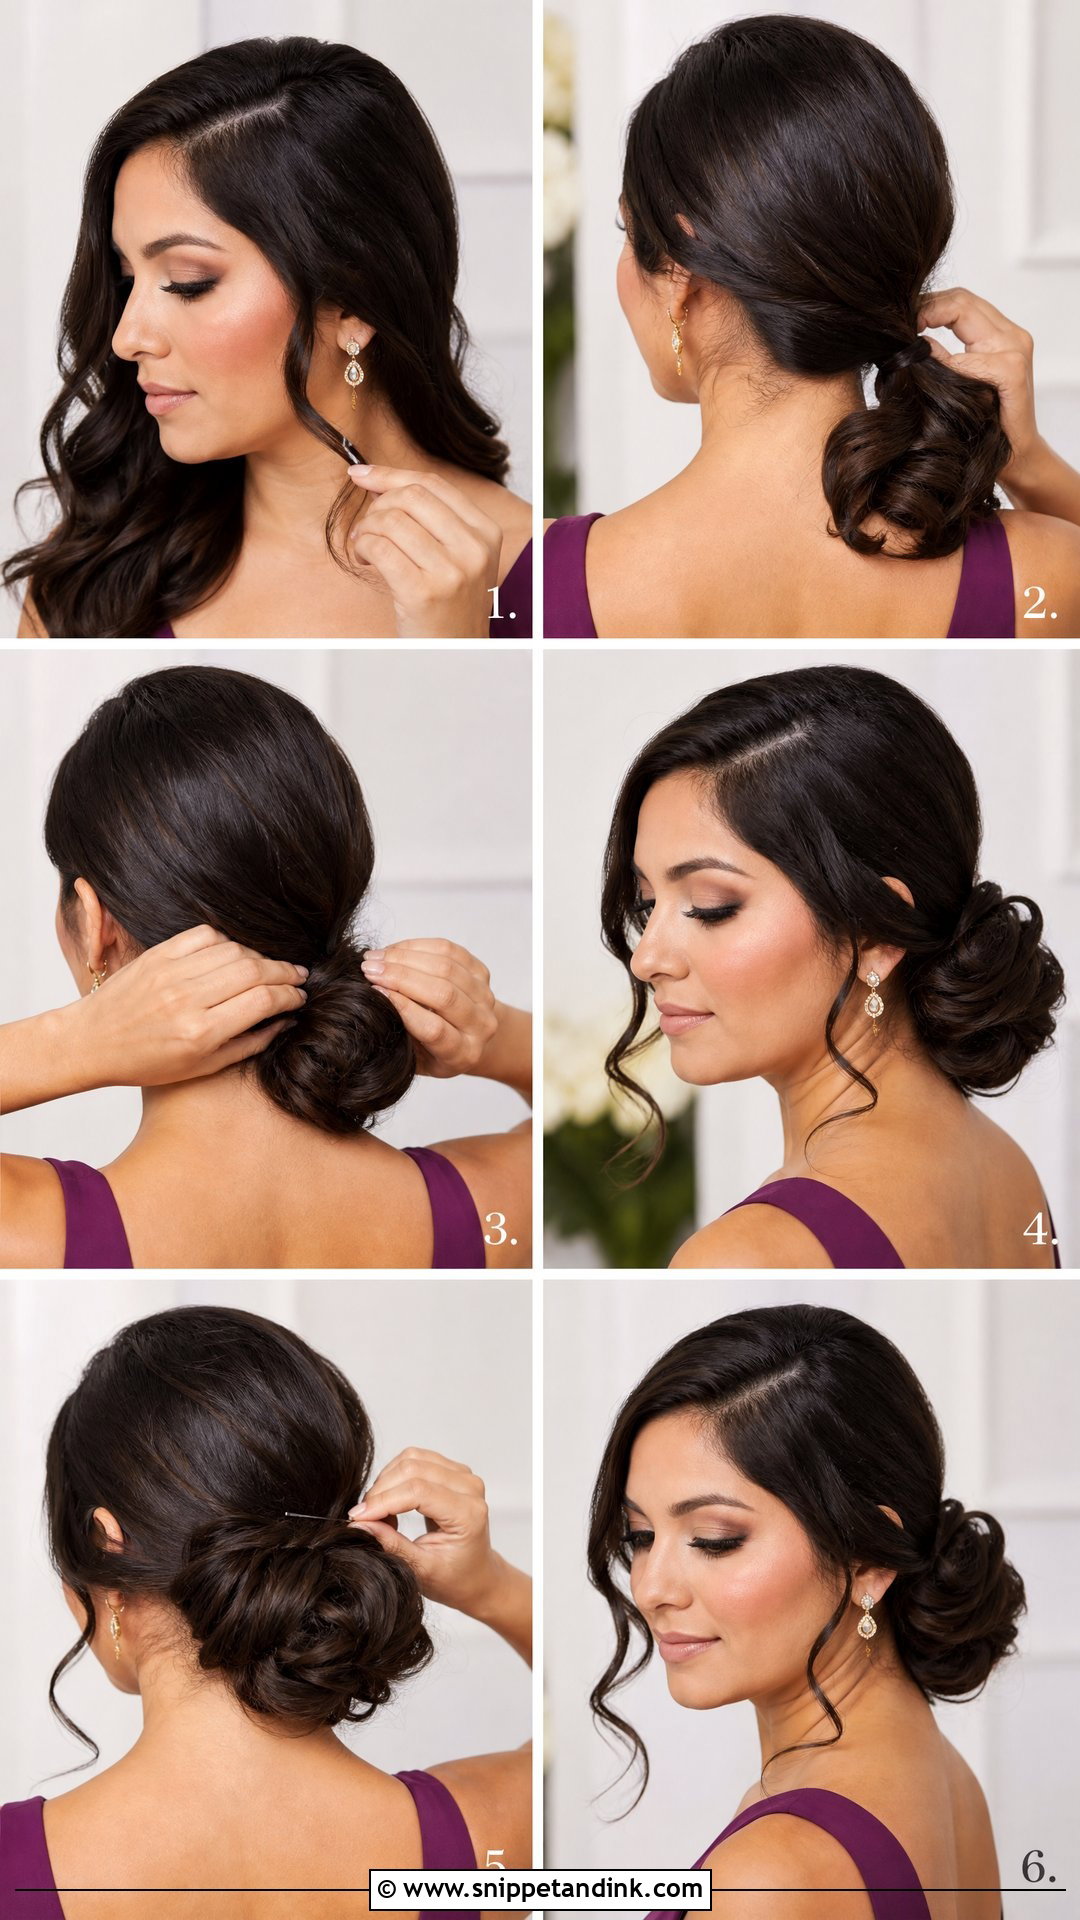
A side bun shows detail from the front, which makes it photograph well face-on. Make a side part, gather the hair low behind one ear, create a ponytail and twist it into a bun. Pin it securely. Keep it loose for softness or smooth for formality. Curl the front pieces before pinning. Layered hair needs extra pins to catch the shorter pieces. Finish with a flexible spray.
When a Style Starts Slipping at the Reception
Even a well-pinned style can give a little after hours of hugs and dancing. Most fixes take a minute in the restroom with a couple of spare pins.
A bun that sags
Don’t take it down. Push it back up into place and add two bobby pins in an X through the base of the bun into the scalp hair underneath.
Curls that have dropped
Twist each fallen section around a finger, hold it for a few seconds, and let go. A small amount of hairspray on your palms, smoothed over the curls, restores some hold without making them crunchy. In humid weather, sweeping the hair into a low ponytail or a loose side bun may be the better choice.
A braid or twist working loose
Find where it’s slipping and add a pin there, sliding it along the braid so it’s hidden. A loosened braid often looks better than a tight one; pull the edges out a little more and it becomes intentional.
Practice Once, Then Photograph It From Behind
The right style is the one that fits your hair, your outfit and how long you’ll be on your feet. A sleek ponytail suits a modern city wedding; soft curls or a textured bun sit better at a garden ceremony. Try your chosen style once before the wedding, especially if you’re using new products or tools. Take a photo of it from the front, side and back, since the back is what guests see during the ceremony.
You'll Like These Ideas:


Leave a Reply