
An Indian wedding is rarely one event. It’s three, four or five, each with its own outfit, jewellery and pace, and nobody wants to sit in a salon chair for two hours before every one of them. The styles below are the ones I reach for when time is short: a smooth bun that holds dupatta pins, a braid that can take flowers, curls that survive a sangeet. They suit the bride, sisters and bridesmaids, and any wedding guest in a lehenga, saree, anarkali or something fusion. I always settle the base first and add the decoration last.
Haldi Hair Isn’t Reception Hair
Each function asks something different of your hair, so I plan the looks as a set rather than letting someone fall in love with one style and repeat it.
Haldi
Turmeric paste gets everywhere and can tint light or highlighted hair yellow. Go for a simple braid or low bun, and work a little coconut or hair oil through the lengths beforehand so the paste rinses out more easily.
Mehendi
Once the henna goes on, your hands are out of action for hours. Choose something you won’t need to touch at all: a side braid, a soft messy bun or a twisted crown with flowers. I’d never leave hair loose here, because it ends up stuck in wet paste.
Sangeet and cocktail
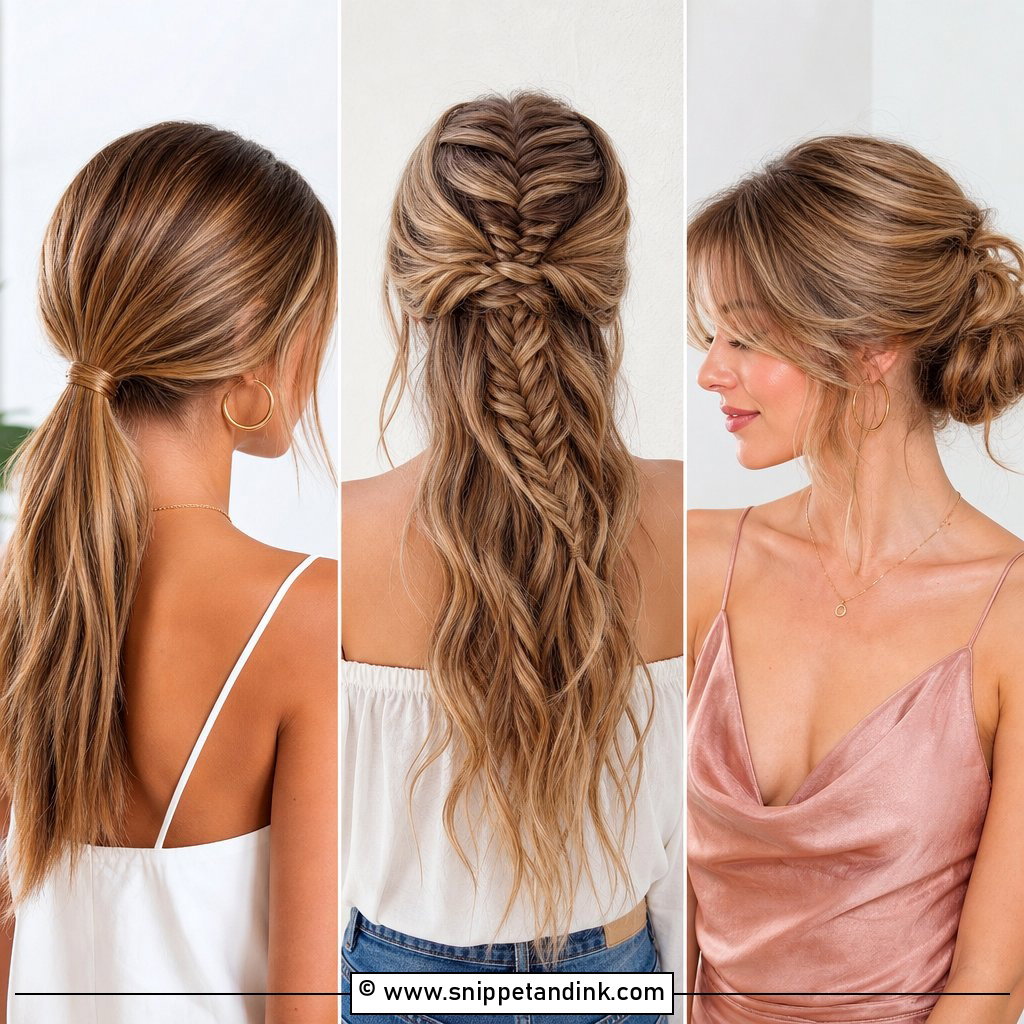
This is the dancing night. Ponytails, bubble braids and curls pinned back on one side all move well and fall back into shape after a spin.
Pheras and reception
The ceremony means sitting for a long time with a pinned dupatta and heavy jewellery, so a structured bun is the safe choice. The reception is where open curls or a sleek ponytail finally get their moment, once the head covering is off.
1. Indian Wedding Low Bun
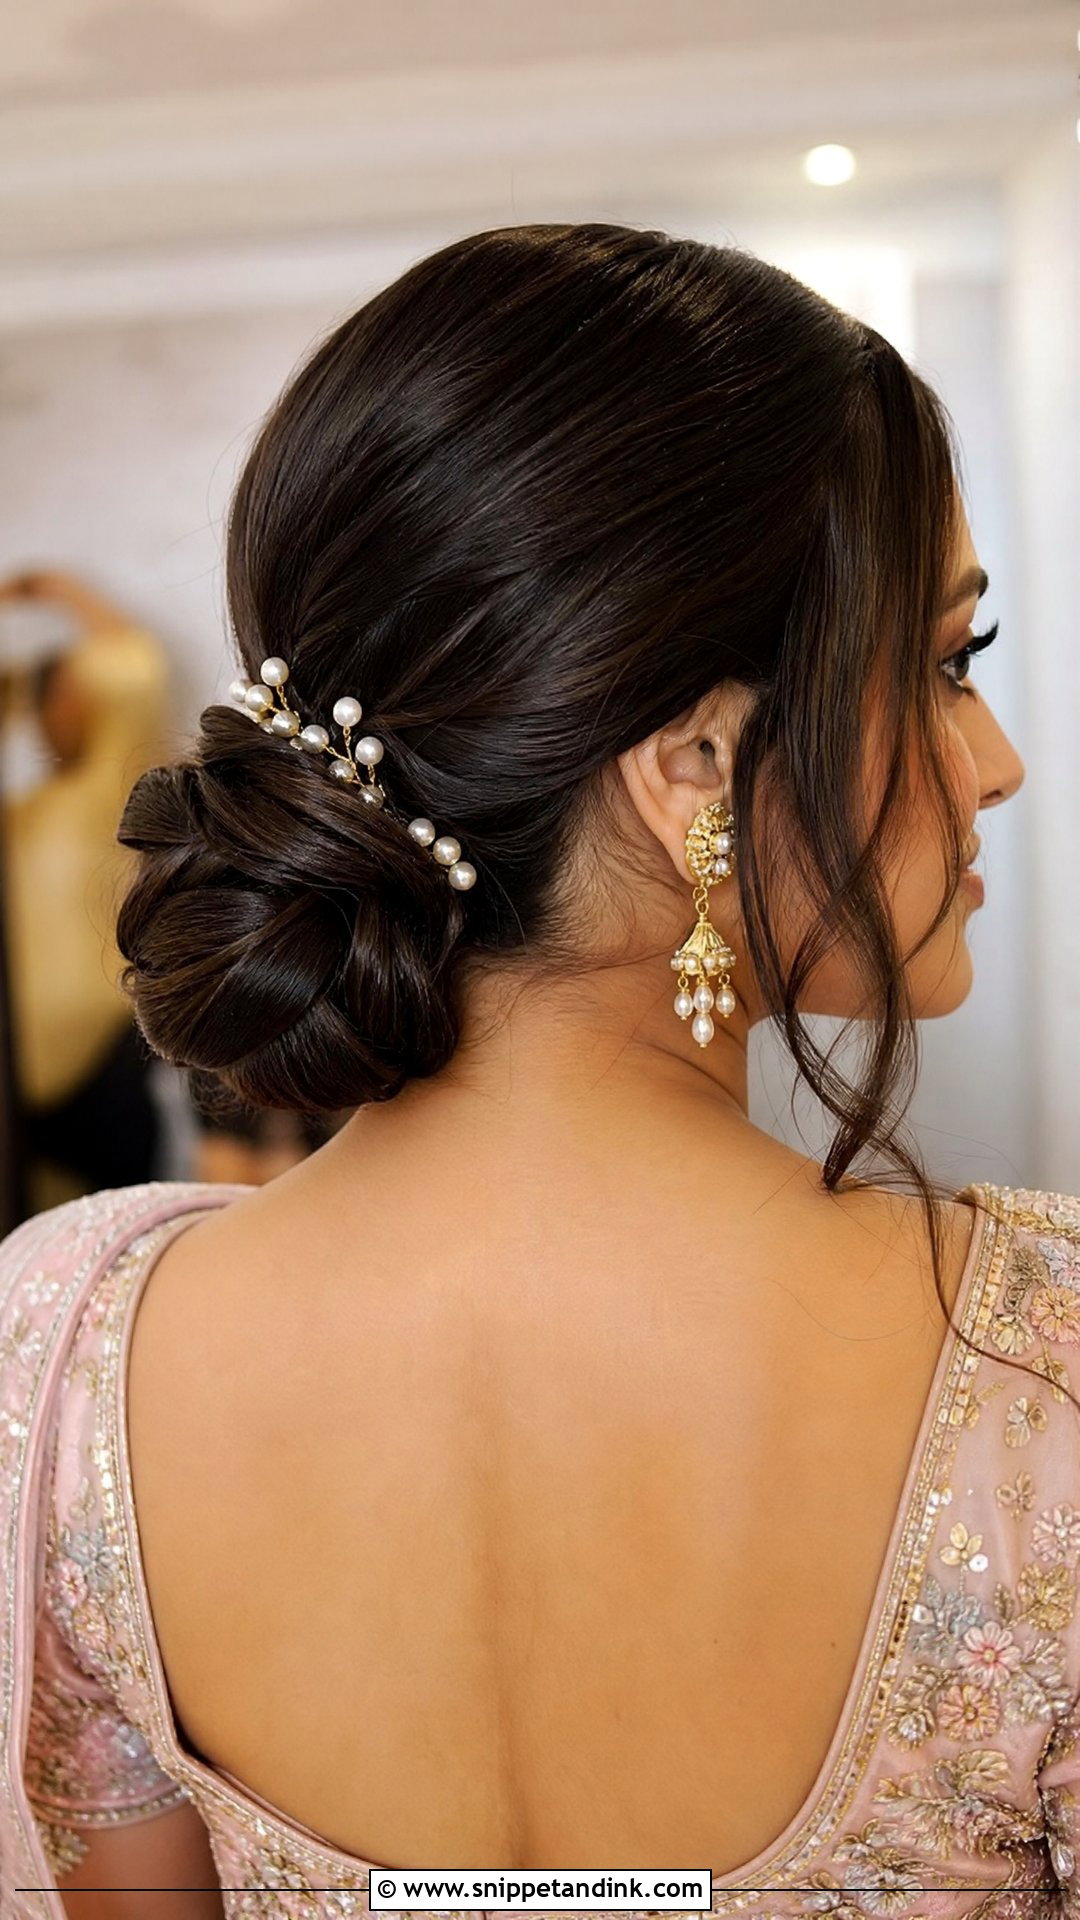
If I could only teach one style for a long ceremony, it would be this one. Sitting at the nape, the bun stays out of the way of a high blouse back and works well with dupattas, because the pins for the drape go straight into a solid mass of hair. I smooth the crown, tie a low ponytail with a strong elastic, twist the length round it and pin in a circle, angling each pin back toward the elastic. Keep it sleek for a silk saree, or pull a few strands loose at the temples if the jewellery is heavy and the face needs softening.
2. Indian Wedding Gajra Bun
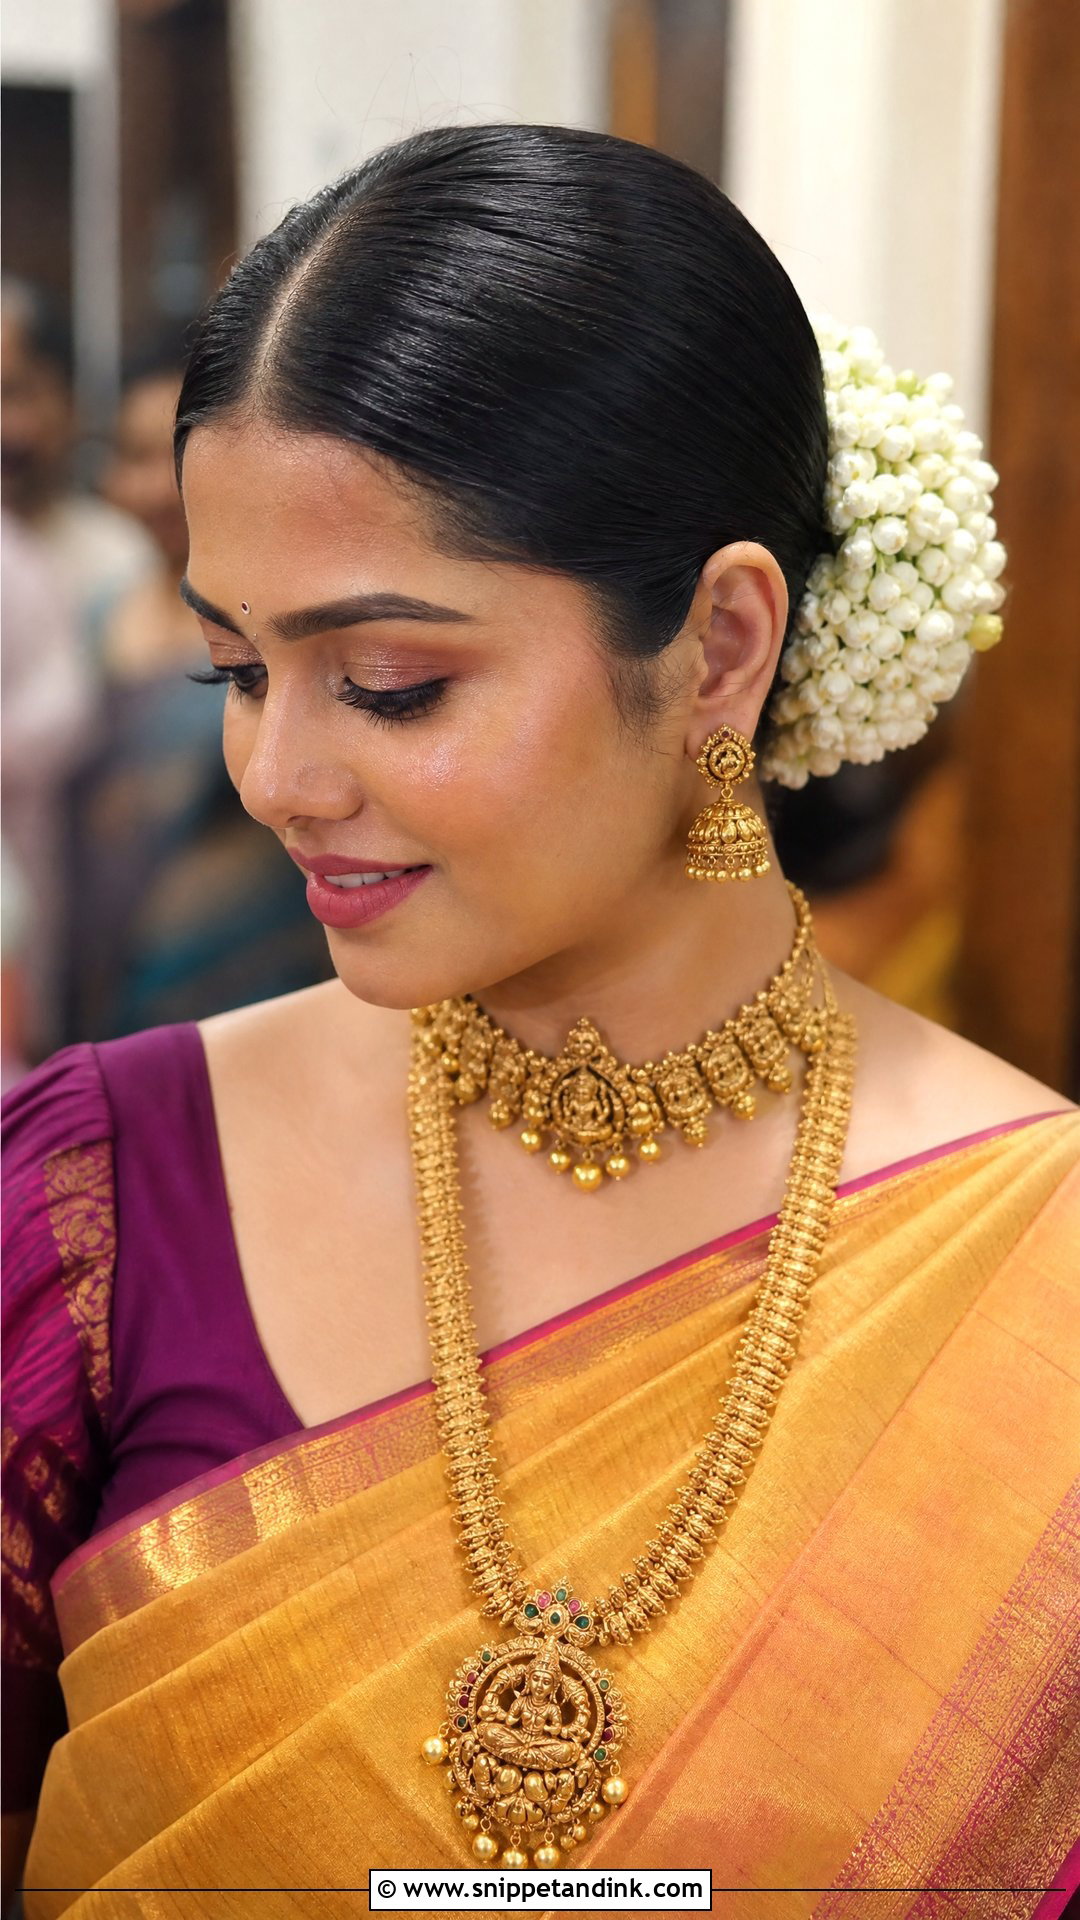
Nothing says wedding morning quite like the scent of jasmine. The gajra bun is simple: a smooth low or mid bun, then a single strand of gajra wound around it. On fine hair I use a bun padding or tease the ponytail before twisting, because a small bun gets swallowed by the flowers. It’s my go-to for hot weather, since everything is lifted off the neck. Keep the front polished with a center part, or curl a couple of short pieces near the cheeks.
3. Indian Wedding Messy Bun
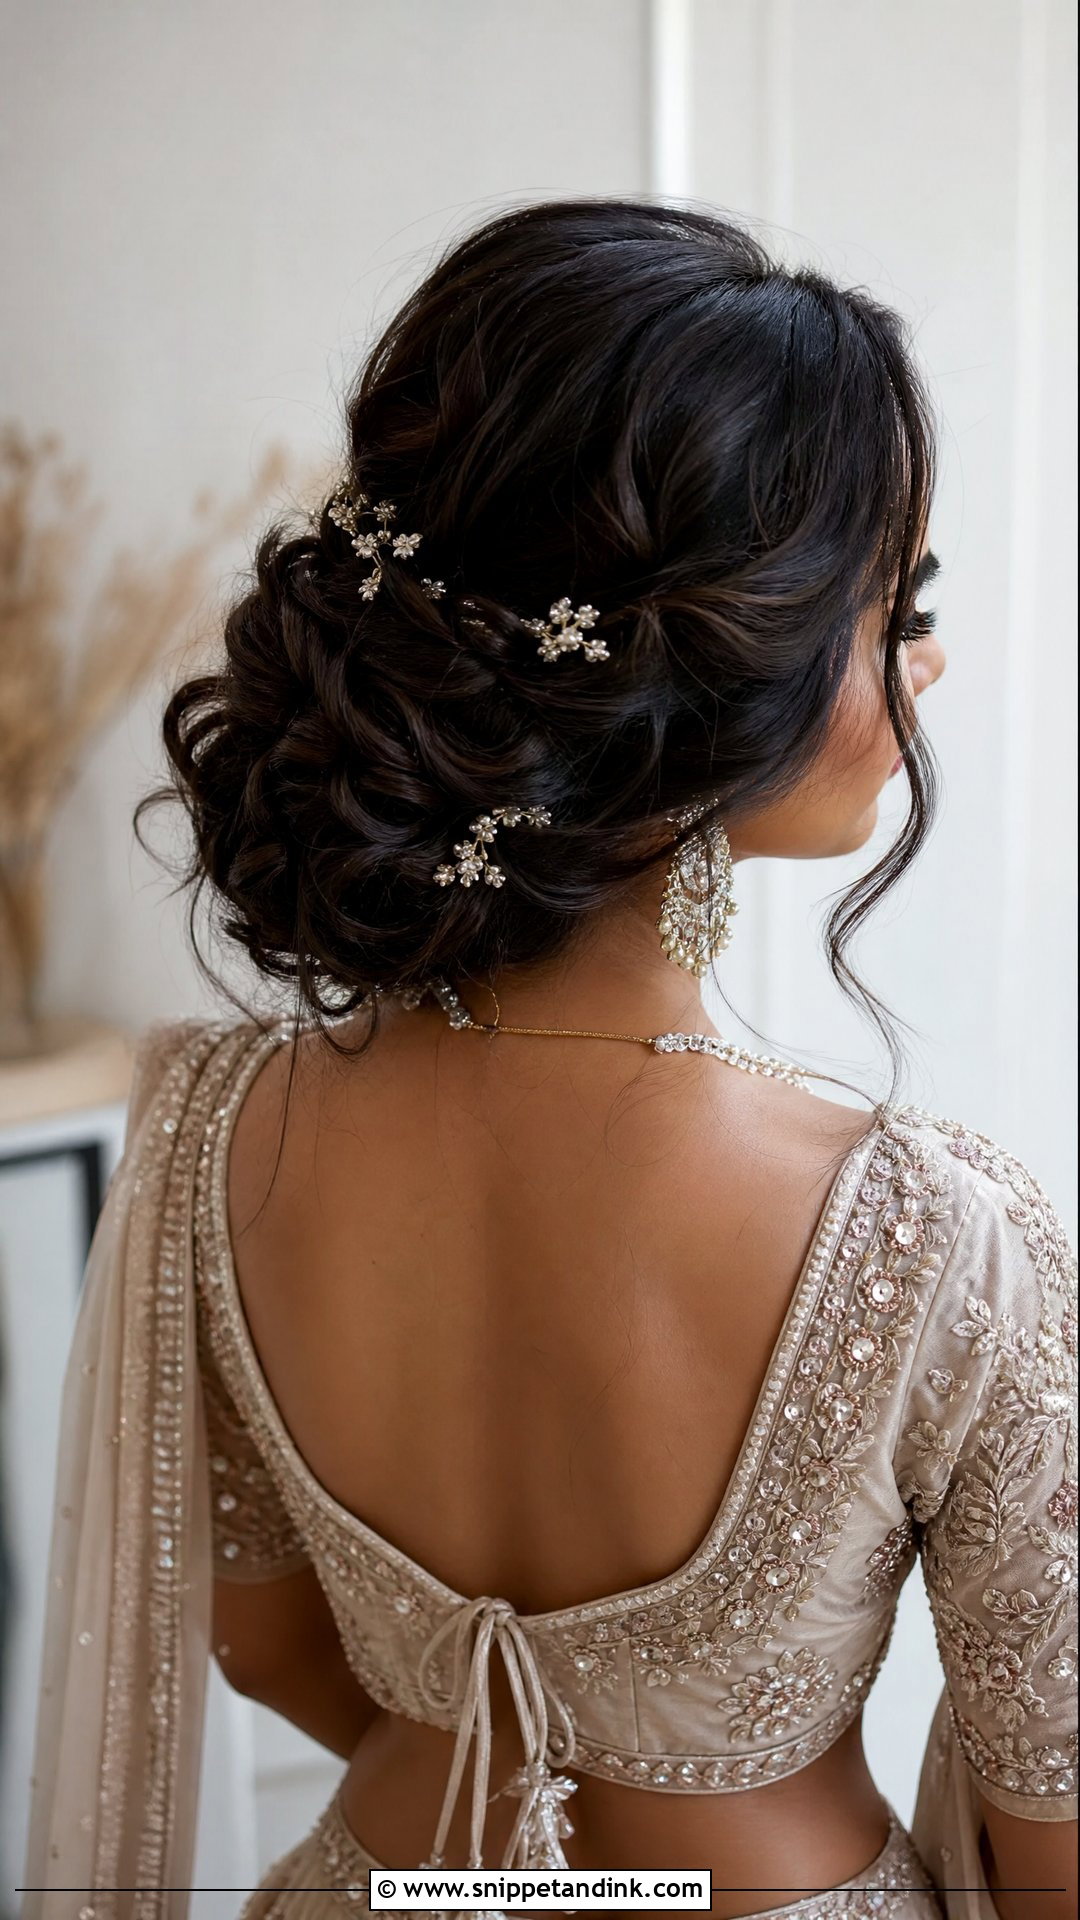
A messy bun takes more care than it looks. The trick is to curl the hair first, then pin small sections one at a time into a loose low knot instead of twisting everything together. That gives the airy, uneven shape; twisted tightly, it just looks like a regular bun that’s coming undone. I use it for mehendi, haldi and engagement looks where movement matters. Leave a few strands near the face if the neckline is deep, and finish with small flowers or gold pins so it reads festive rather than casual.
4. Indian Wedding Side Bun
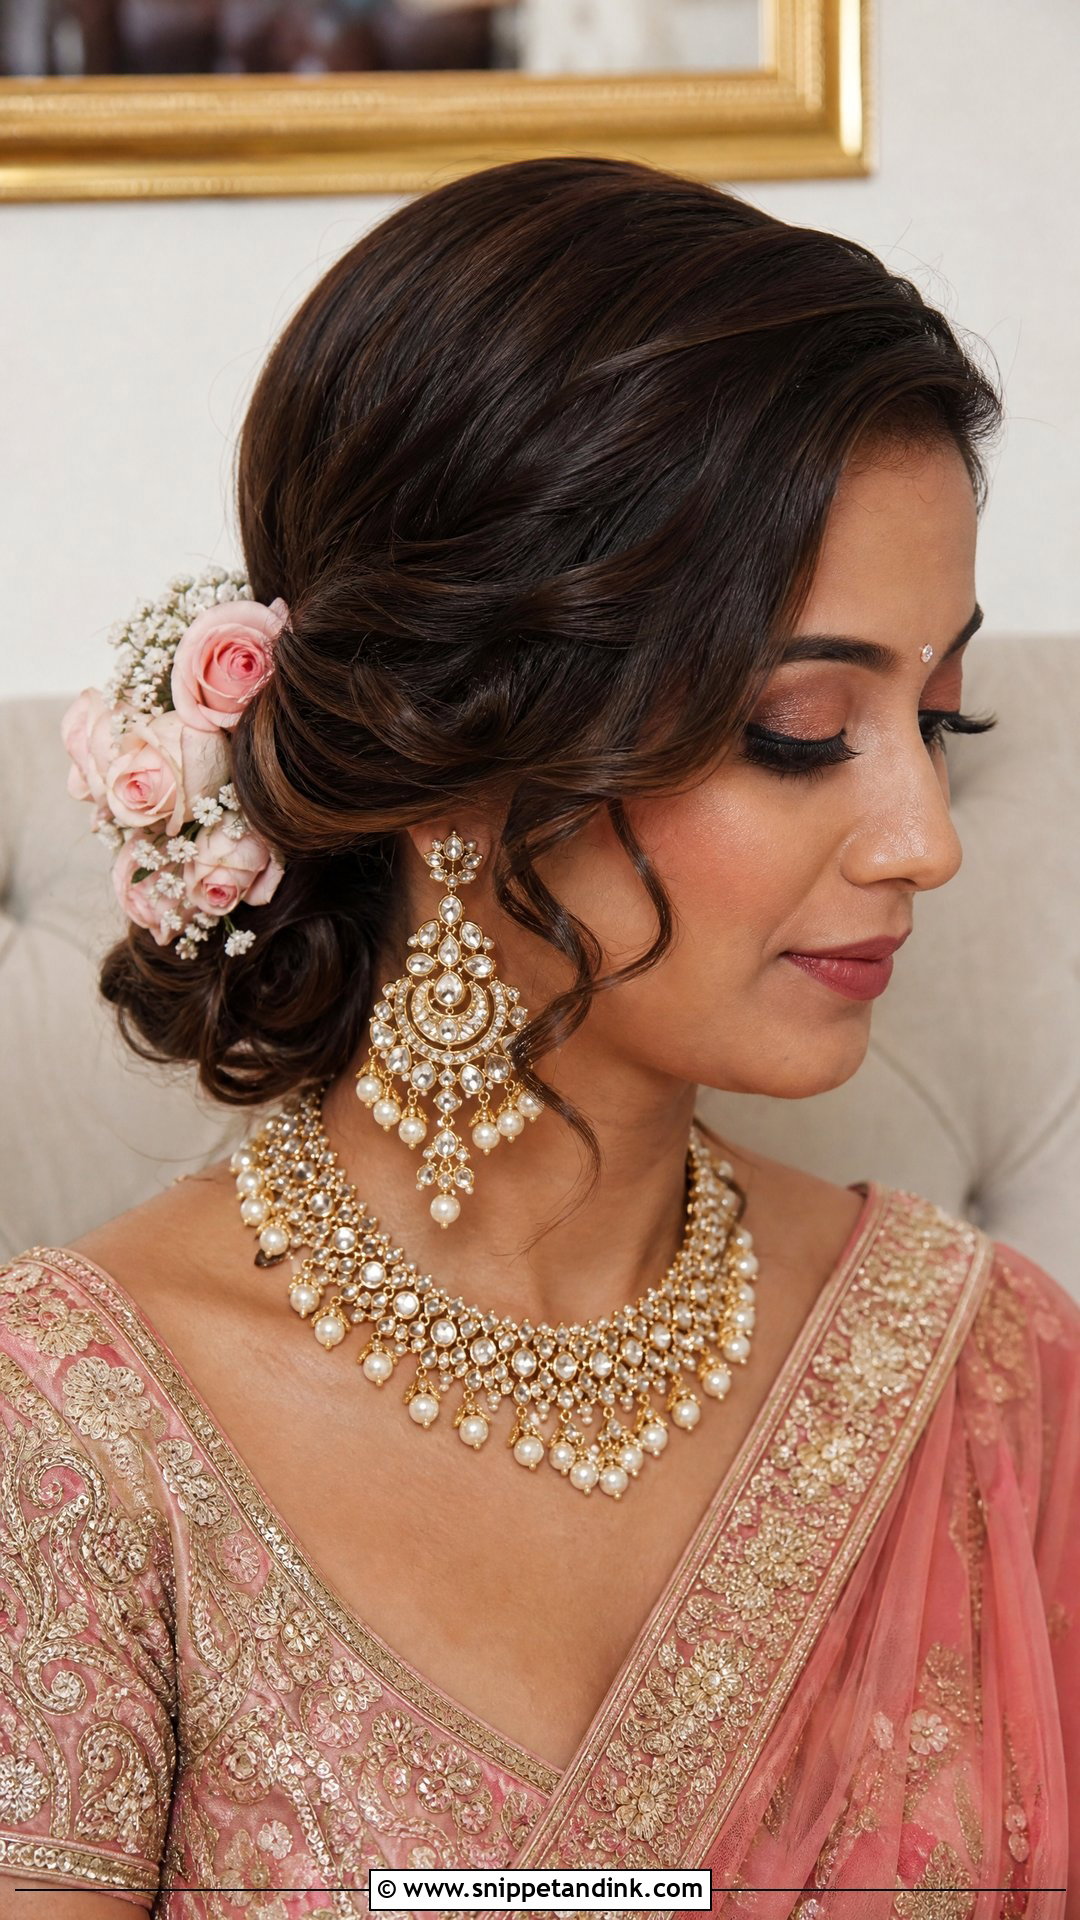
Sweep everything to one side and the same bun suddenly looks dressed-up. I set a side part, gather the hair low behind one ear and pin the bun flatter than a back bun, otherwise it presses into your neck every time you turn your head. It shows from the front in photos, which a nape bun doesn’t. One-shoulder blouses and a saree pallu on the opposite shoulder balance it well. Roses or mogra tucked around it add colour without much weight.
5. Indian Wedding Braided Bun
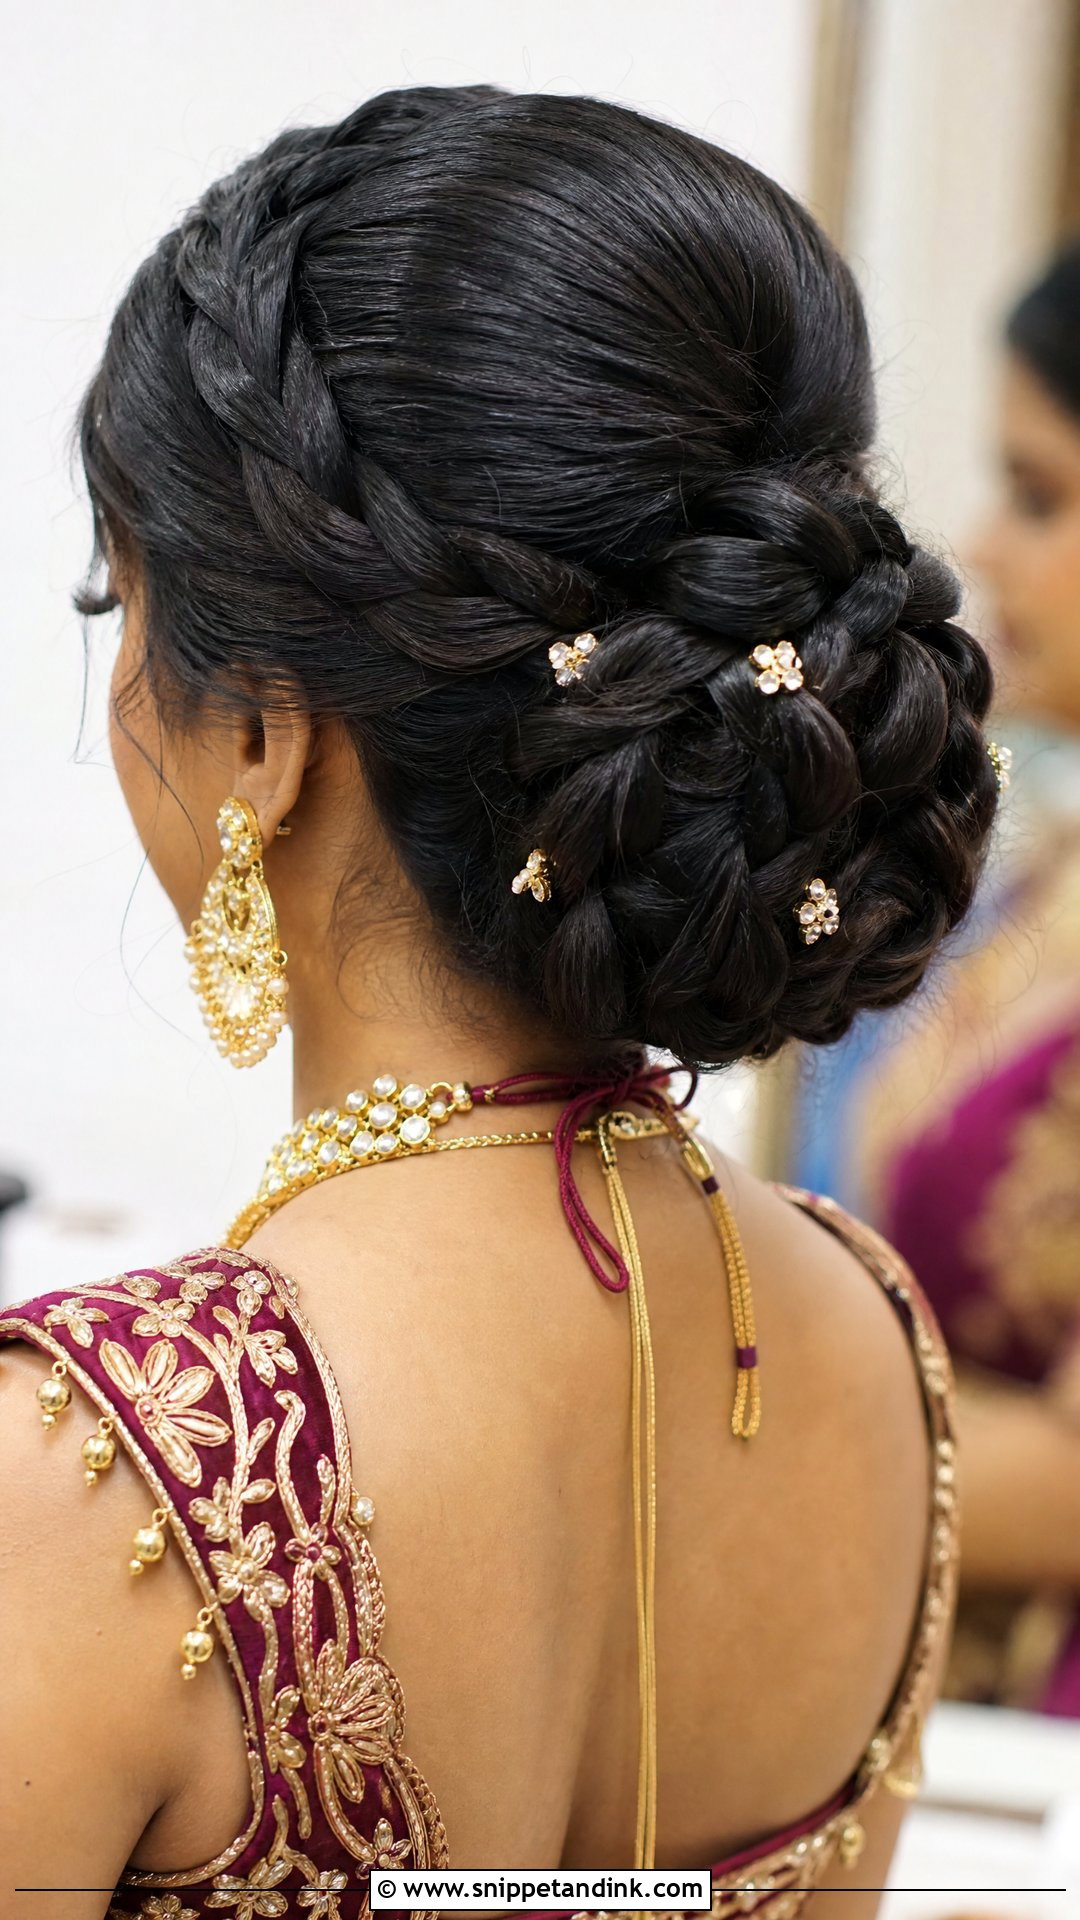
For hold, this is the strongest style on the list. I braid the length first, a plain three-strand or a fishtail, then coil the braid around itself and pin it close to the scalp. The woven texture gives every pin something to grip, so it stays put through hours of sitting and bending. That also makes it a reliable base for a dupatta. Tuck the braid’s end under the coil, not on top, or it pokes out in side-profile photos.
6. Indian Wedding South Indian Braid
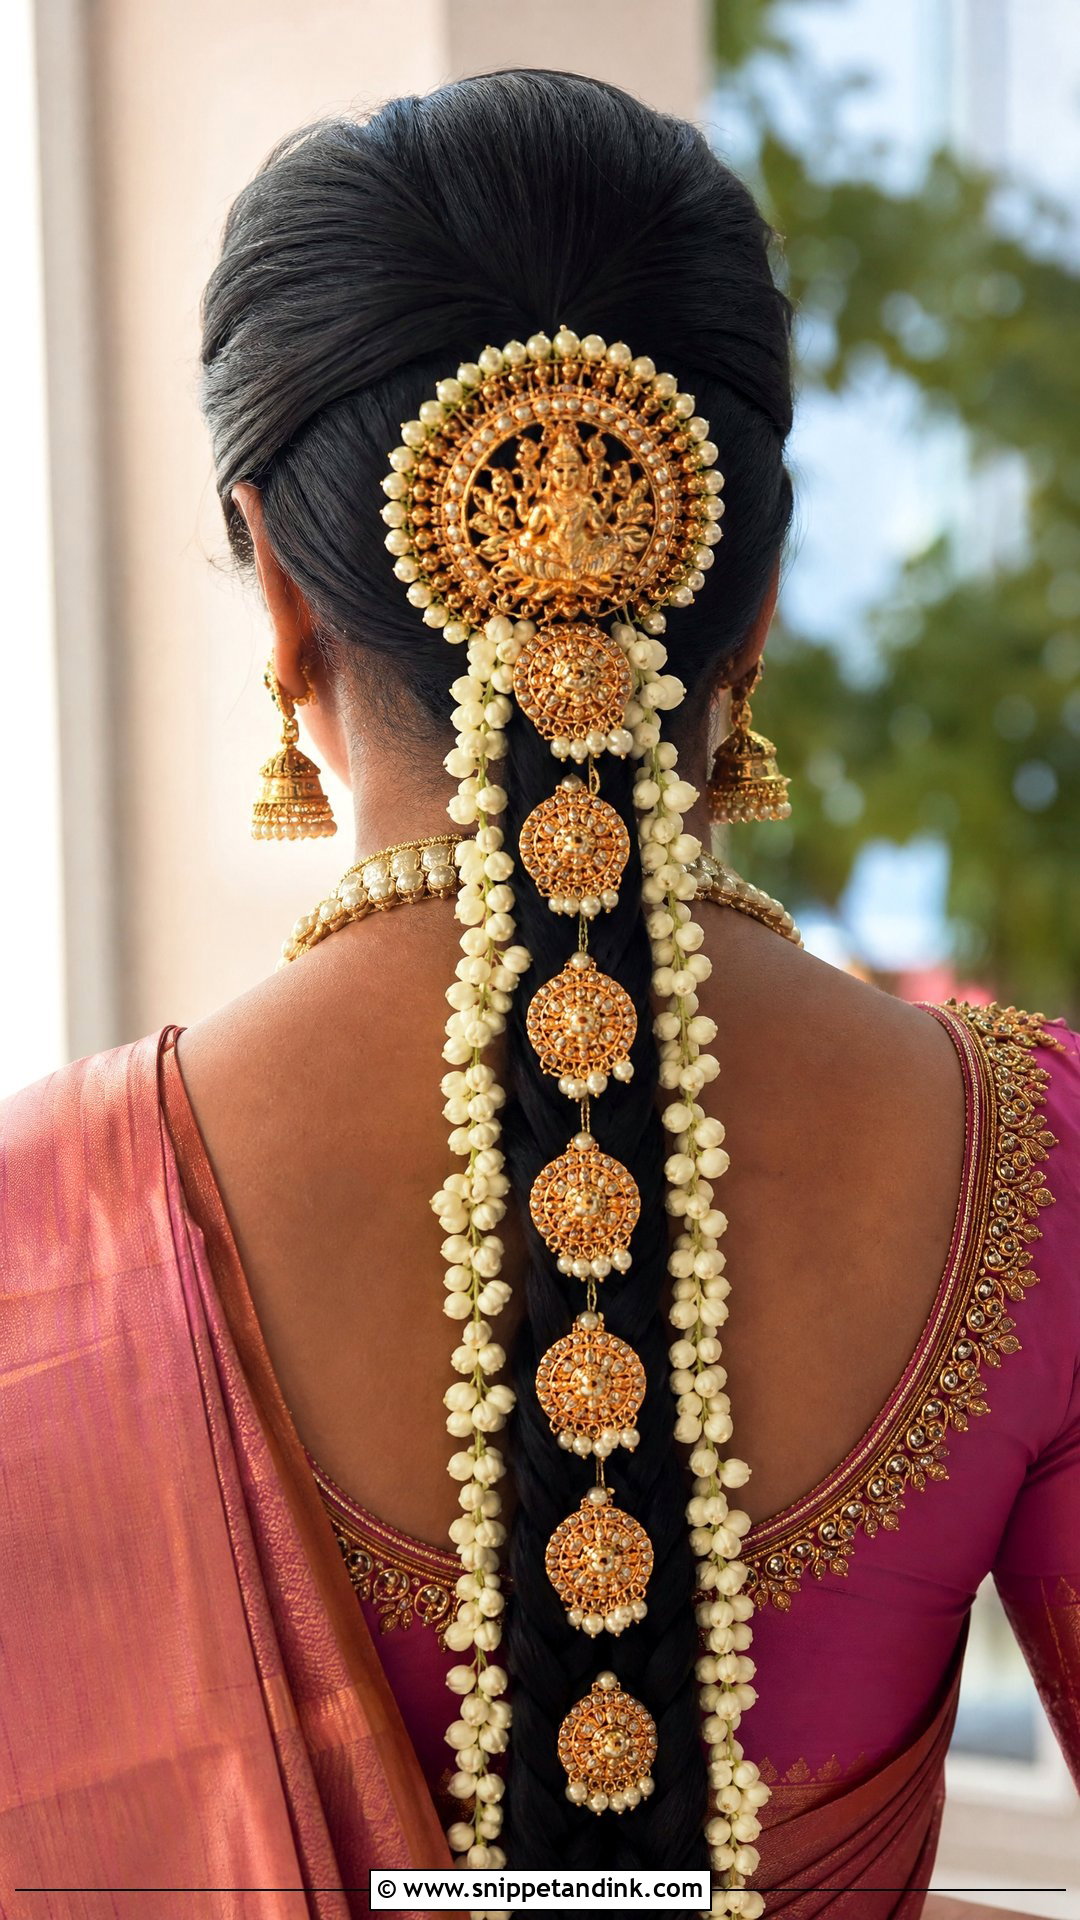
The long braid down the back is the classic I’m most careful with, because it’s so plain that every flaw shows. I start with a clean middle part, smooth the crown with a little serum, and braid with even tension all the way down. Finish the end with an elastic matching your hair colour, then add flowers, braid jewellery or a paranda. If your hair is shorter or thin at the ends, clip-in extensions give the long bridal shape; I’d colour-match them in daylight, not under bathroom lights. With silk sarees and temple jewellery, the back view is often the shot people remember.
7. Indian Wedding Fishtail Braid
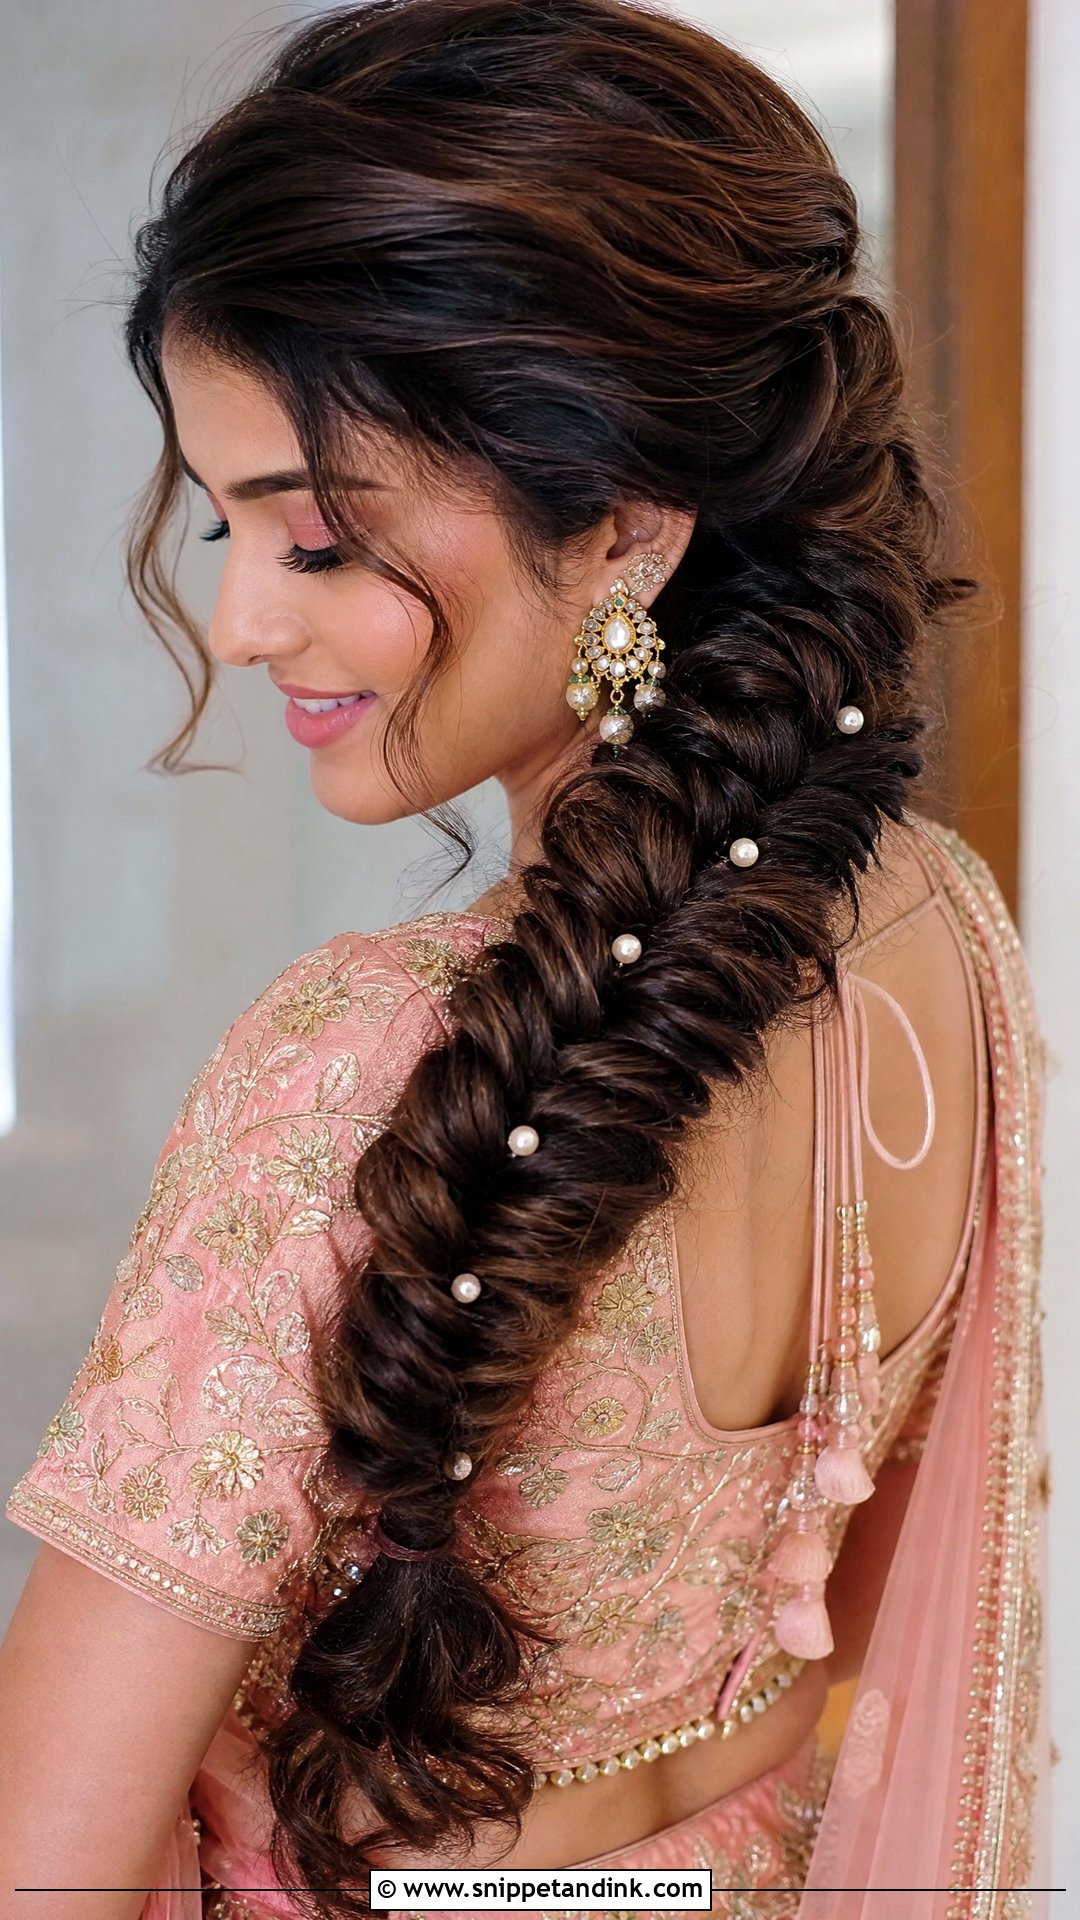
Do you want a braid that looks detailed without feeling formal? An Indian wedding fishtail braid suits engagement, sangeet, mehendi or a day wedding. It’s a two-section weave, so it looks more intricate than a regular plait while needing only patience, not skill. I add light waves first, because on very silky hair the small pieces slip out. Once the fishtail is finished, I gently pull the edges to widen it. Tiny flowers or a slim chain sit neatly in the weave.
8. Indian Wedding Bubble Braid
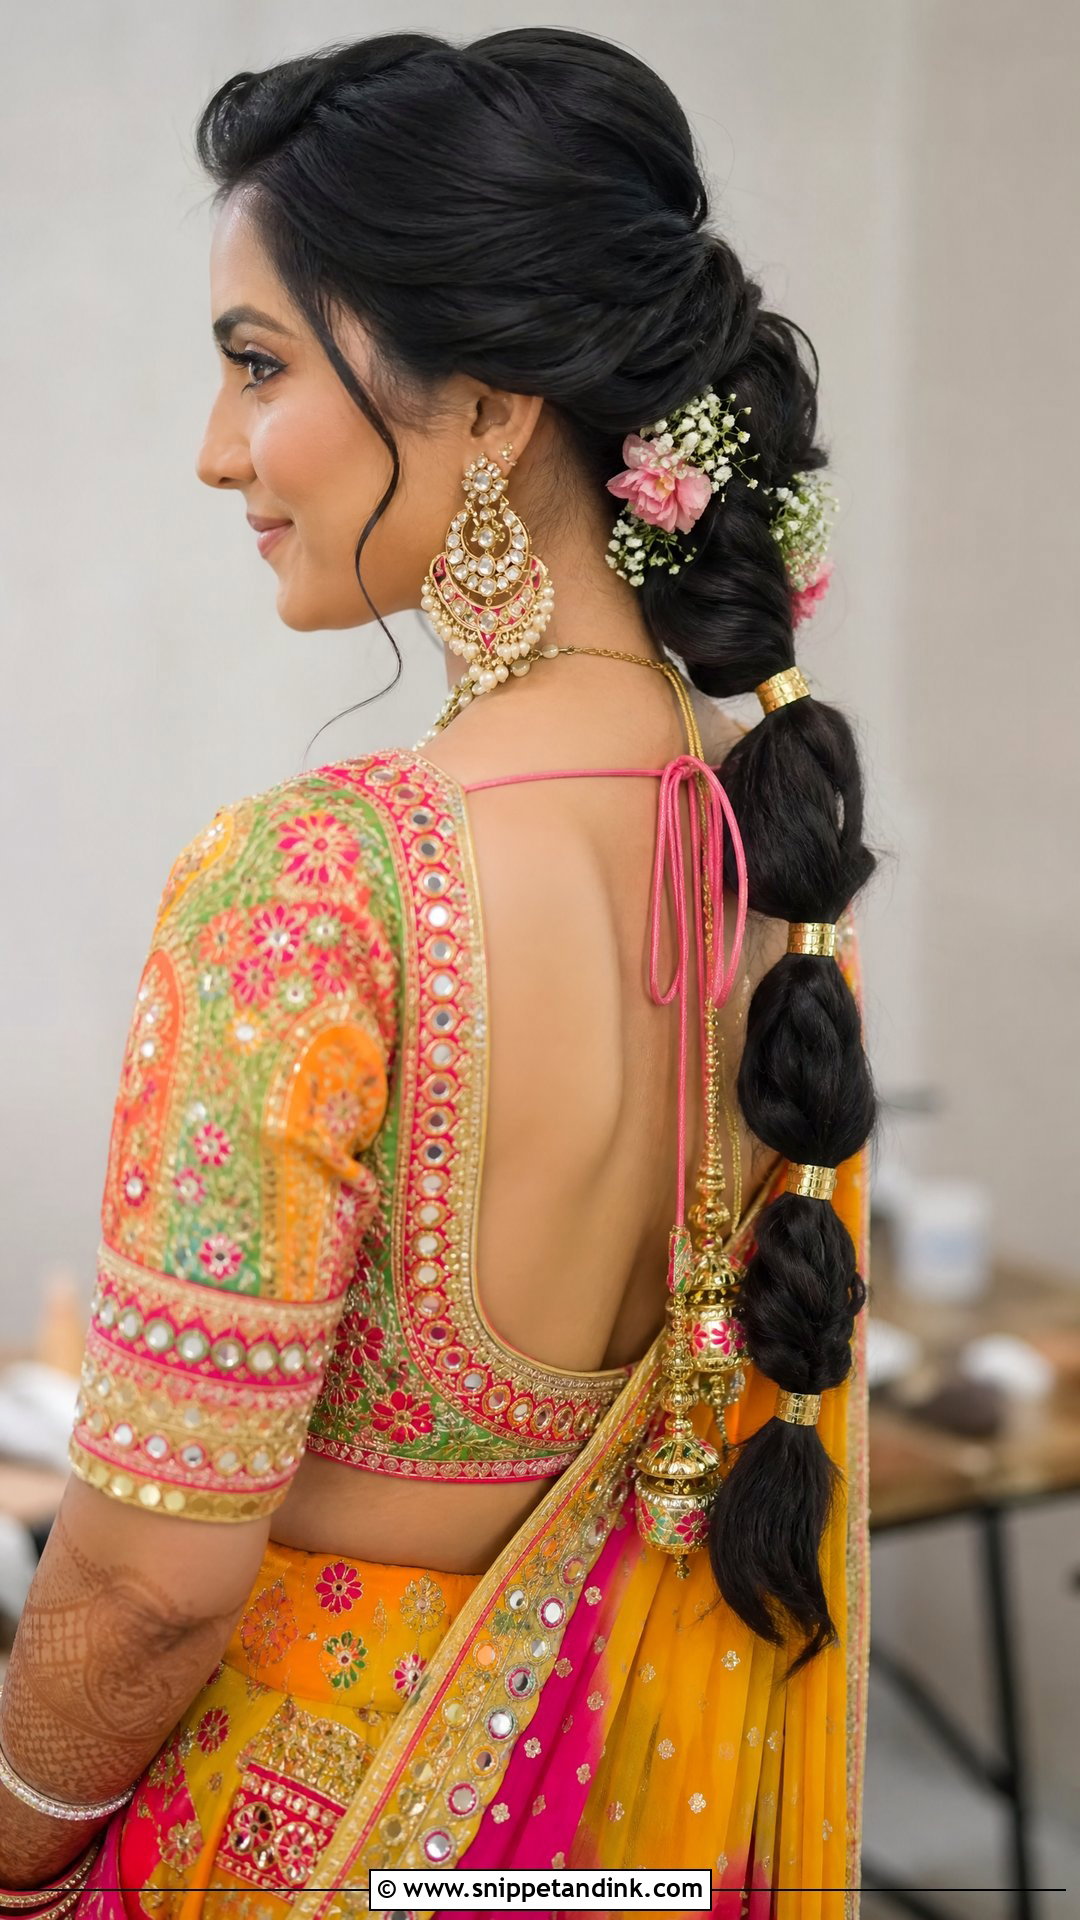
An Indian wedding bubble braid is what I suggest to anyone who can’t braid. You tie the hair at intervals with small elastics and pull each section outward into a rounded bubble. It can sit high, low or to the side. Cover each elastic with a strand of hair or a gold cuff. Use clear silicone elastics, not fabric ones, because they hold the bubble’s shape. It survives a full night of sangeet dancing, and flowers tucked between a few bubbles soften it.
9. Indian Wedding Half Up Half Down
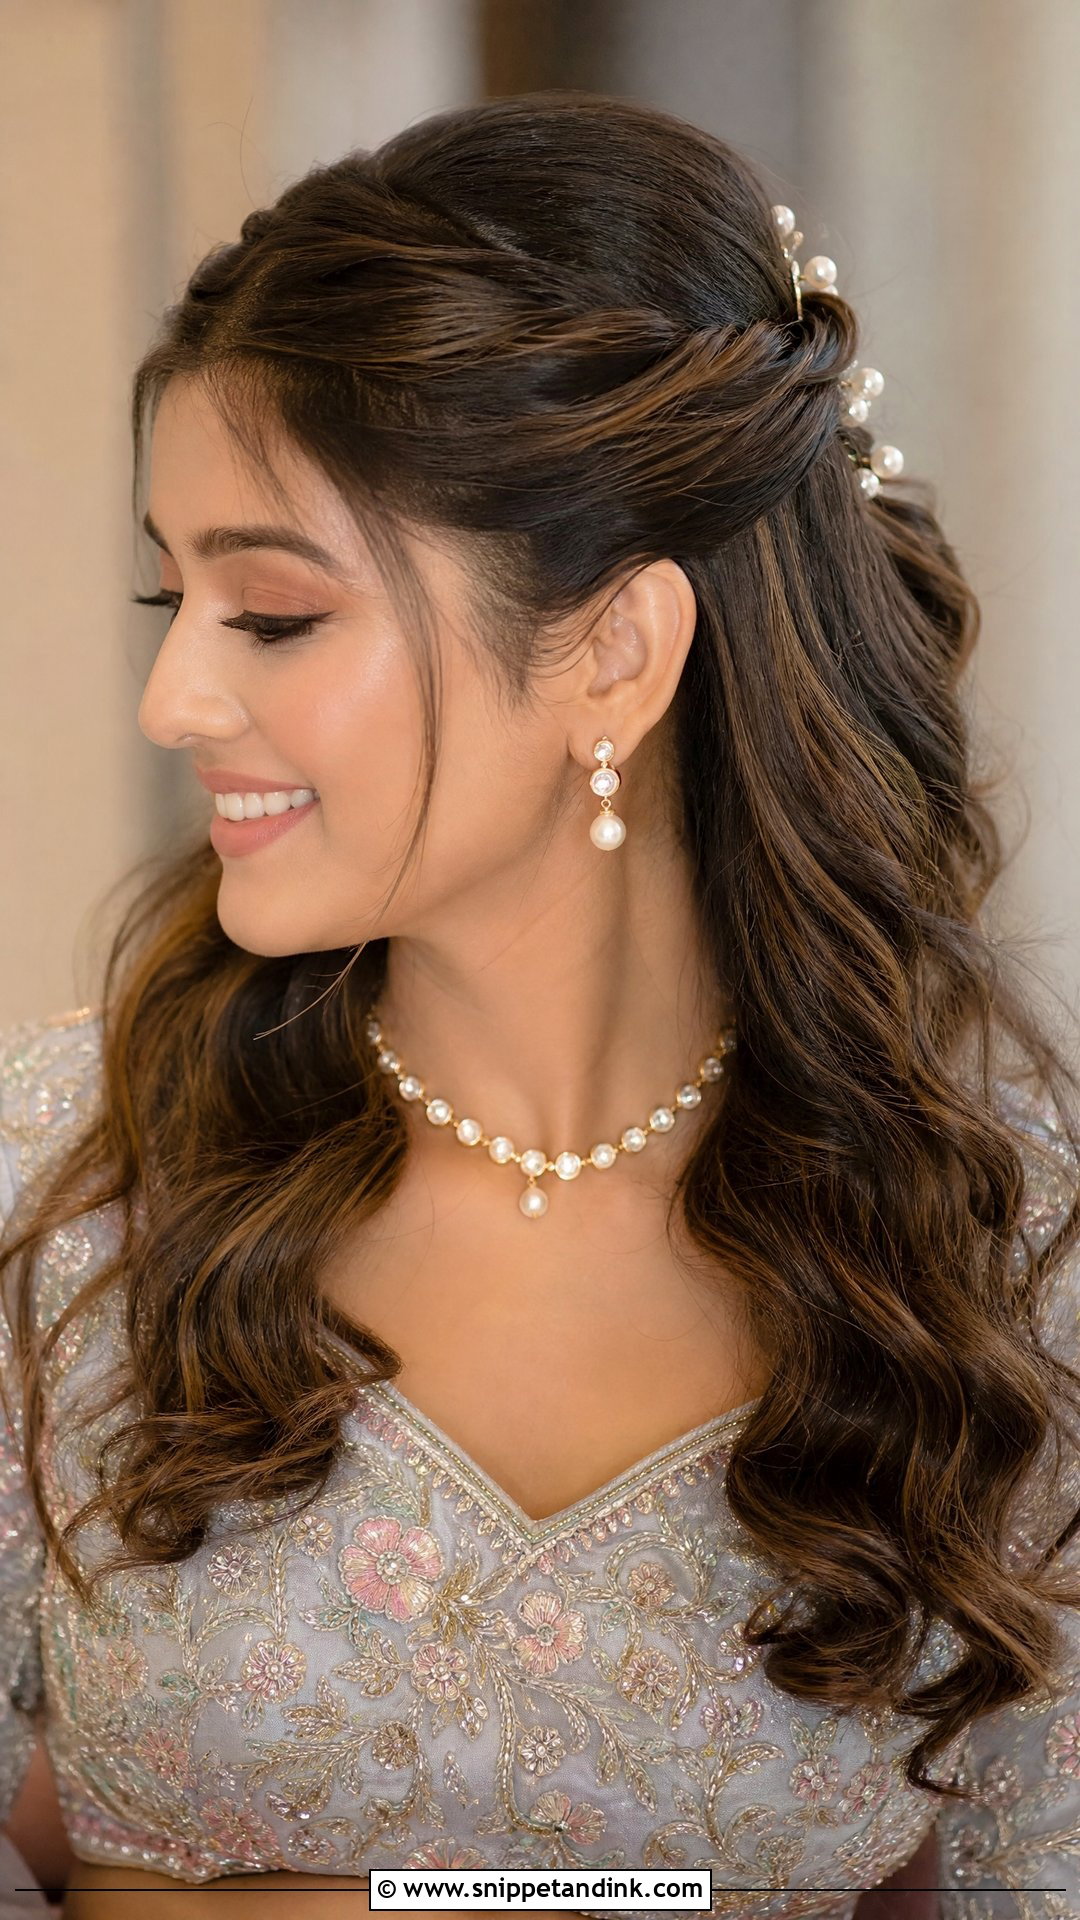
Half up, half down gives you open hair with a secure crown. I take two front sections, twist or braid them back and pin them at the center, then curl the rest in soft waves. That pinned center is useful: it gives a maang tikka something to anchor to, so the pendant doesn’t drift sideways. It’s best with lehengas, gowns and lighter sarees. I’d skip it under a heavy dupatta, though, because the loose curls get flattened against your back within an hour.
10. Indian Wedding Open Curls
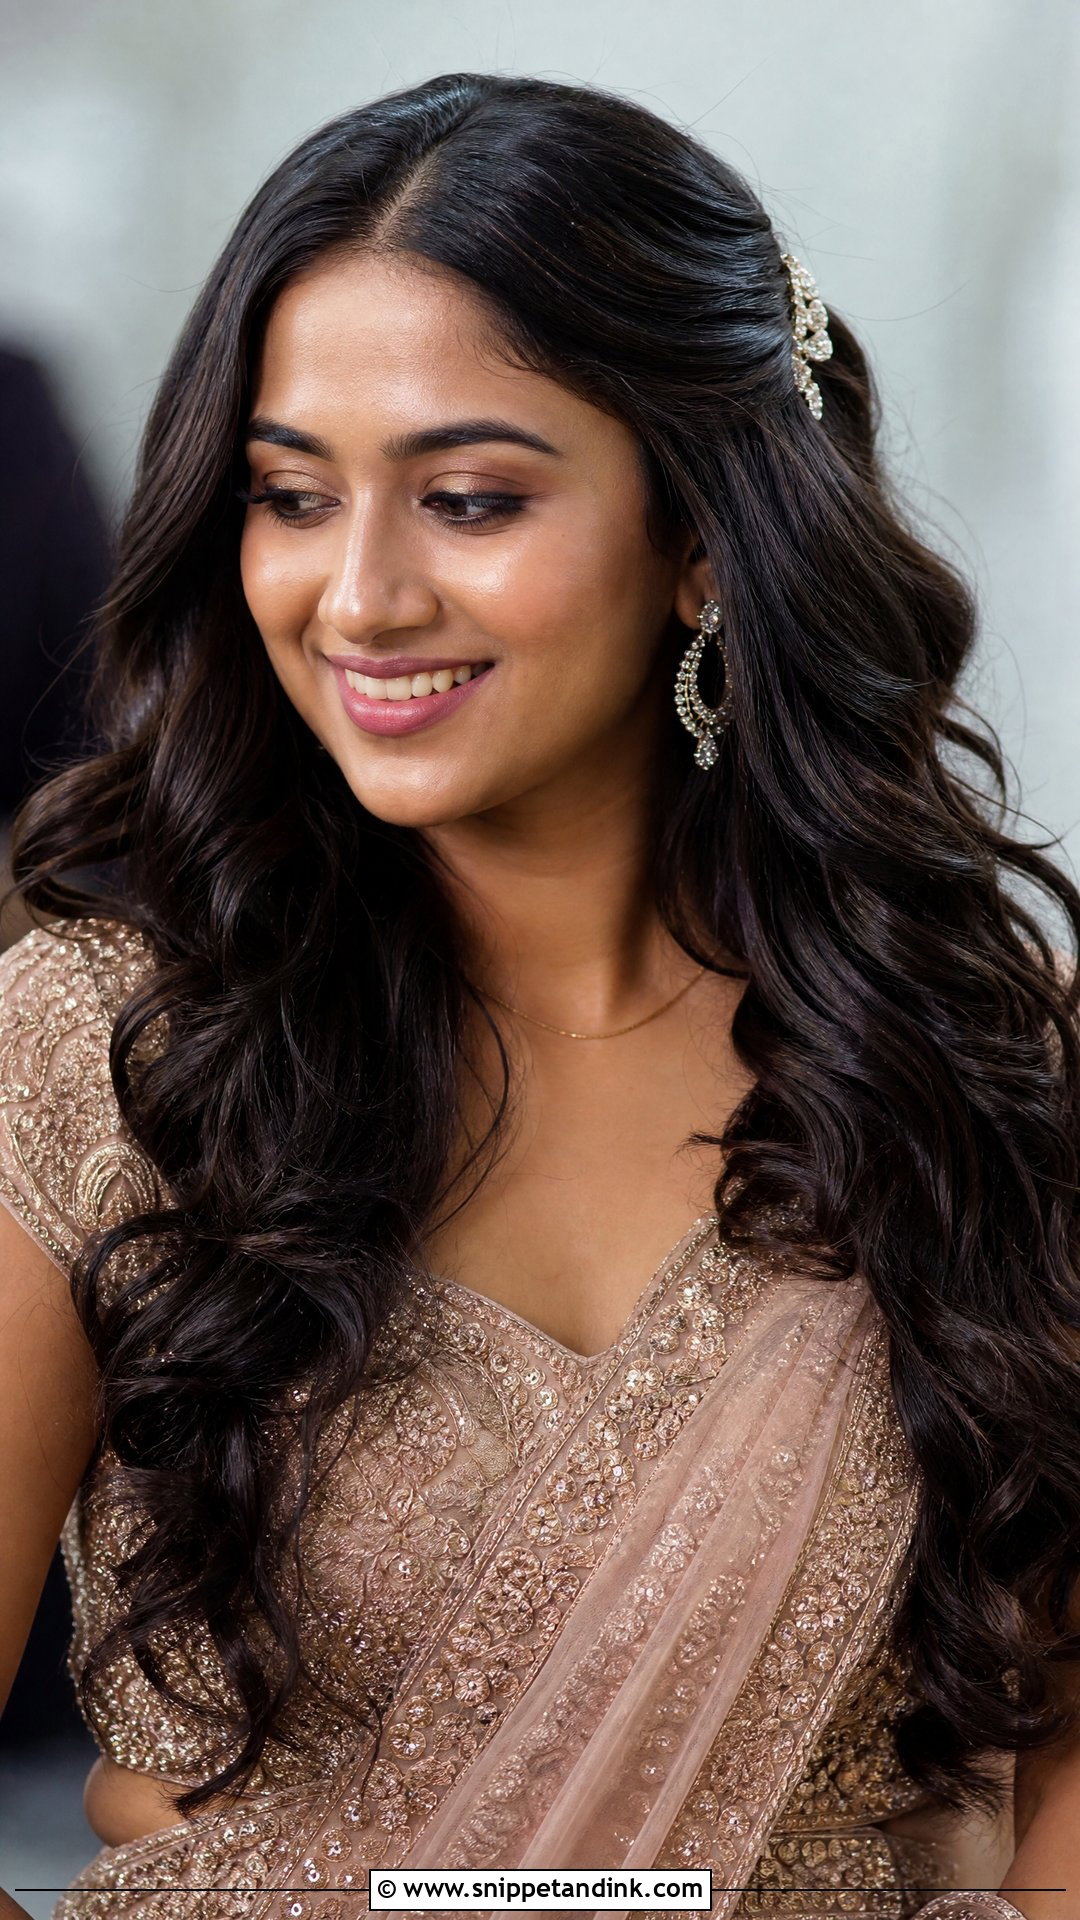
Open curls are a reception look in my book. They need a smooth crown and defined curls, and they go frizzy fast in a humid marquee, so I set them with rollers or a curling iron, let them cool fully, then brush them out lightly. A center part looks traditional; a deep side part gives more drama. I wouldn’t wear them under a heavy dupatta for long ceremonies. A decorative clip pinning one side back helps if you want some control.
11. Indian Wedding Sleek Ponytail
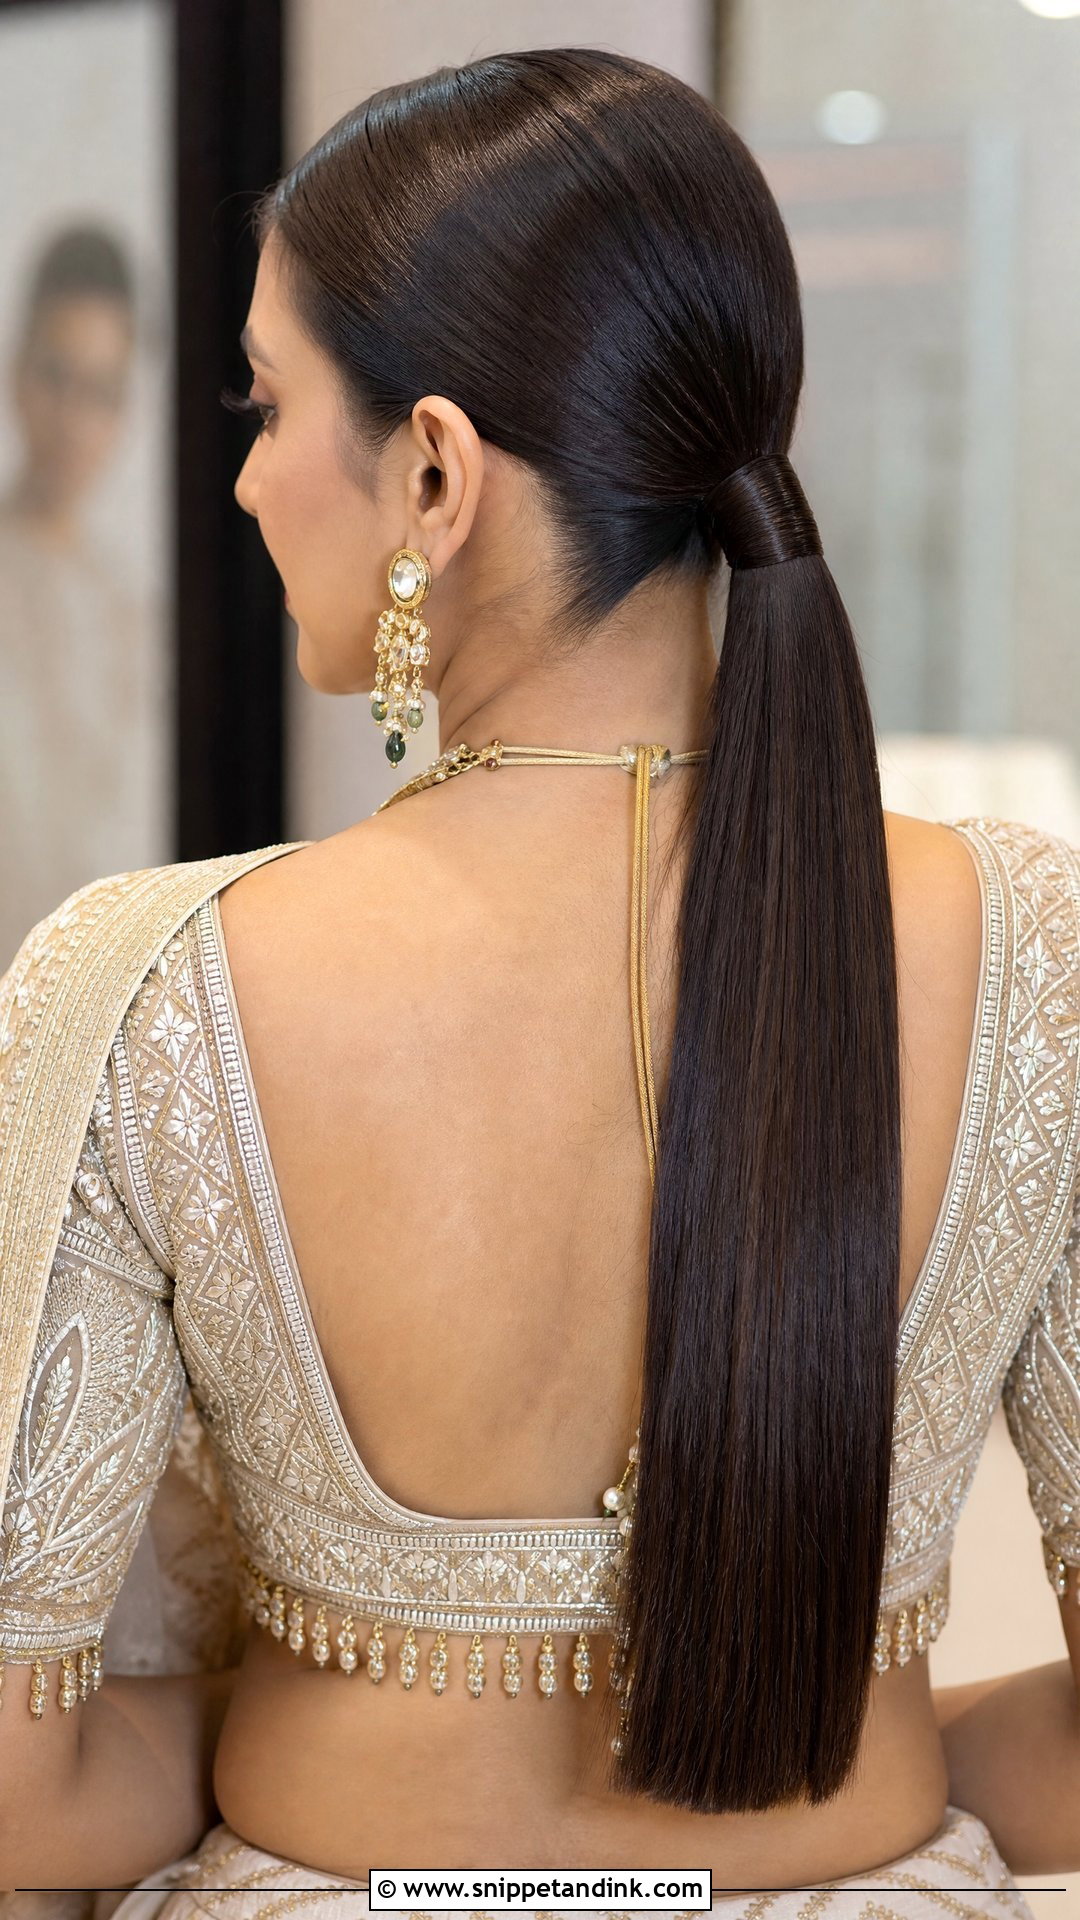
A sleek ponytail keeps the face and outfit completely visible, which is why it suits statement earrings, embellished blouses and high necklines. It’s quick to make, but the sleekness depends on prep: straightened or lightly waved hair, a sharp part, and a firm brush toward a low or mid ponytail secured tight. I wrap a strand around the elastic and pin it underneath. Leave the tail smooth or curl it. Fine flyaways along the hairline will show in flash photos, so a little gel on a toothbrush smooths them.
12. Indian Wedding Curly Ponytail
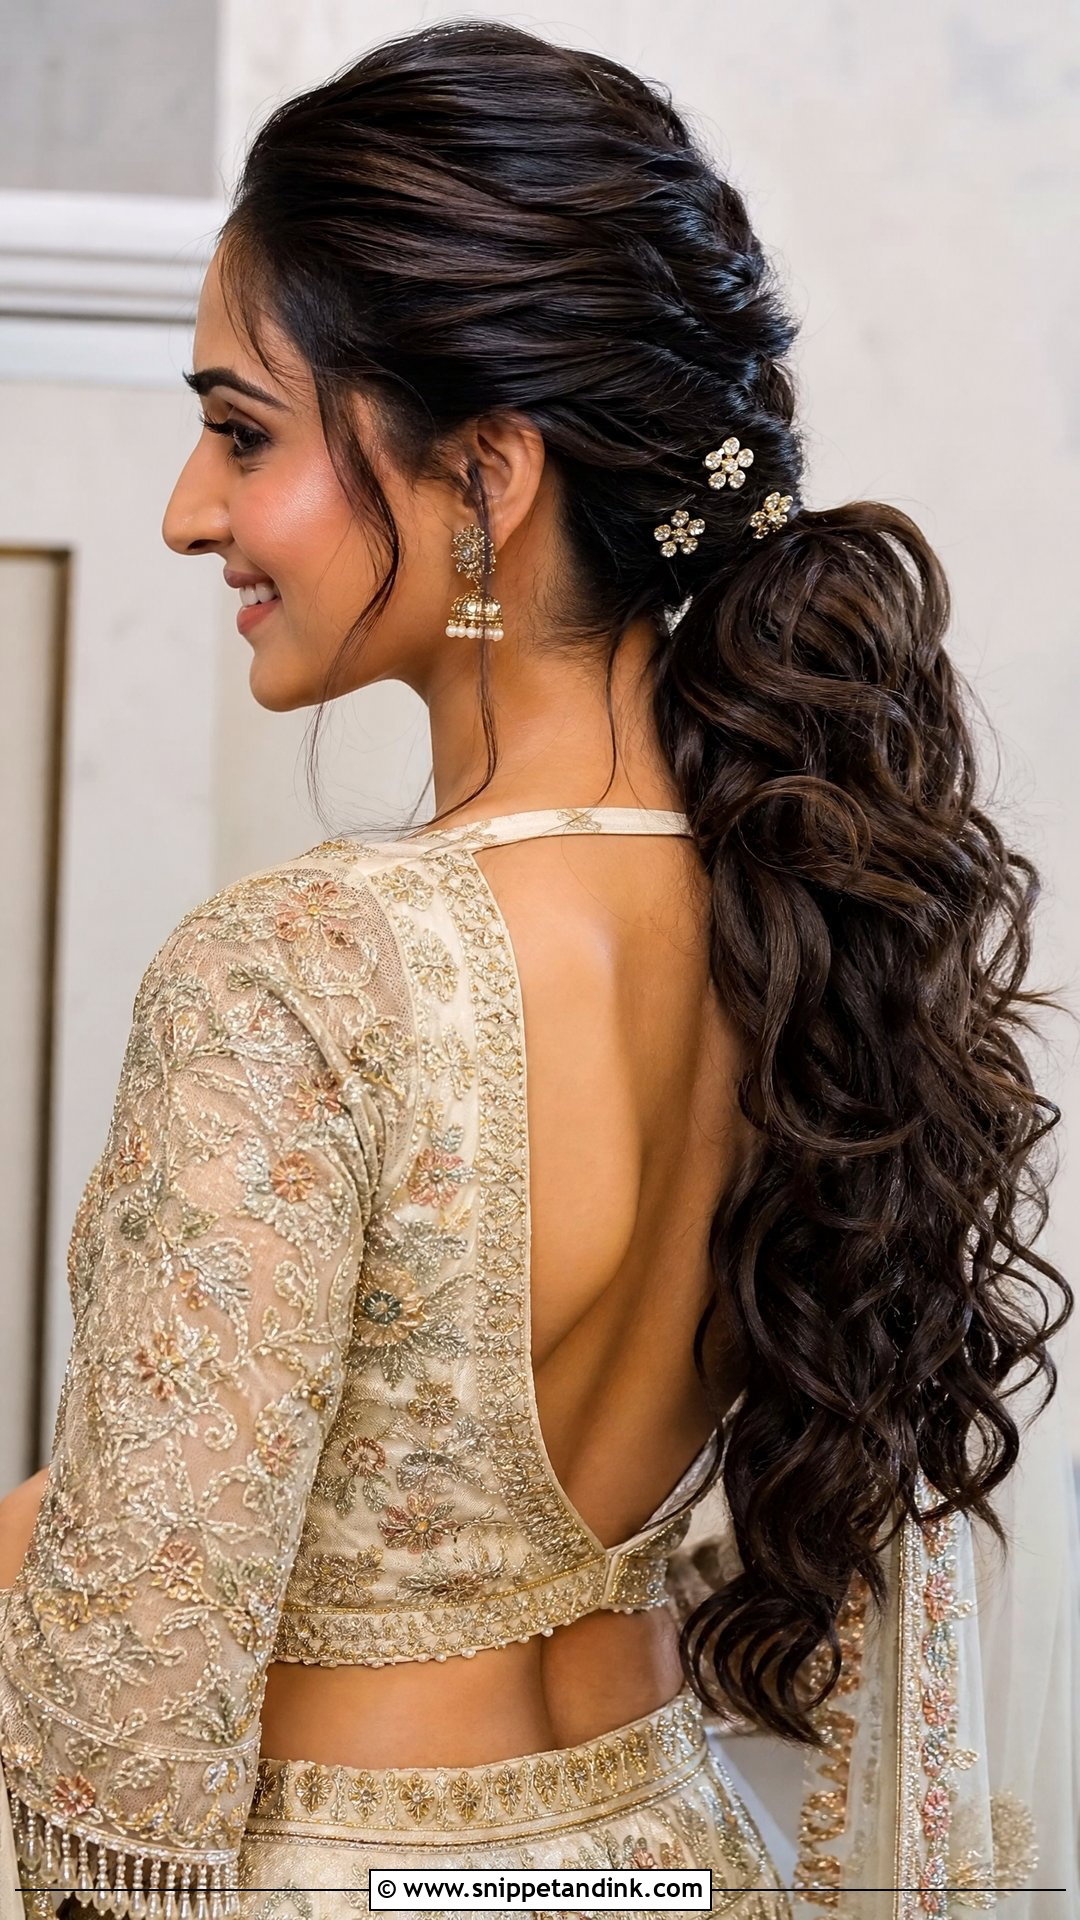
A curly ponytail gives you volume without wearing all your hair loose, and it handles dancing well. I curl first, then gather into a mid or low ponytail, keeping the crown either smooth or slightly lifted. Curls inside a ponytail drop faster than loose ones because of the weight hanging from one point, so I pin each curl to cool before brushing. Wrap the base with hair and add pearl pins or a small jeweled clip there. It pairs well with lehengas, shararas and reception gowns.
13. Indian Wedding Twisted Crown
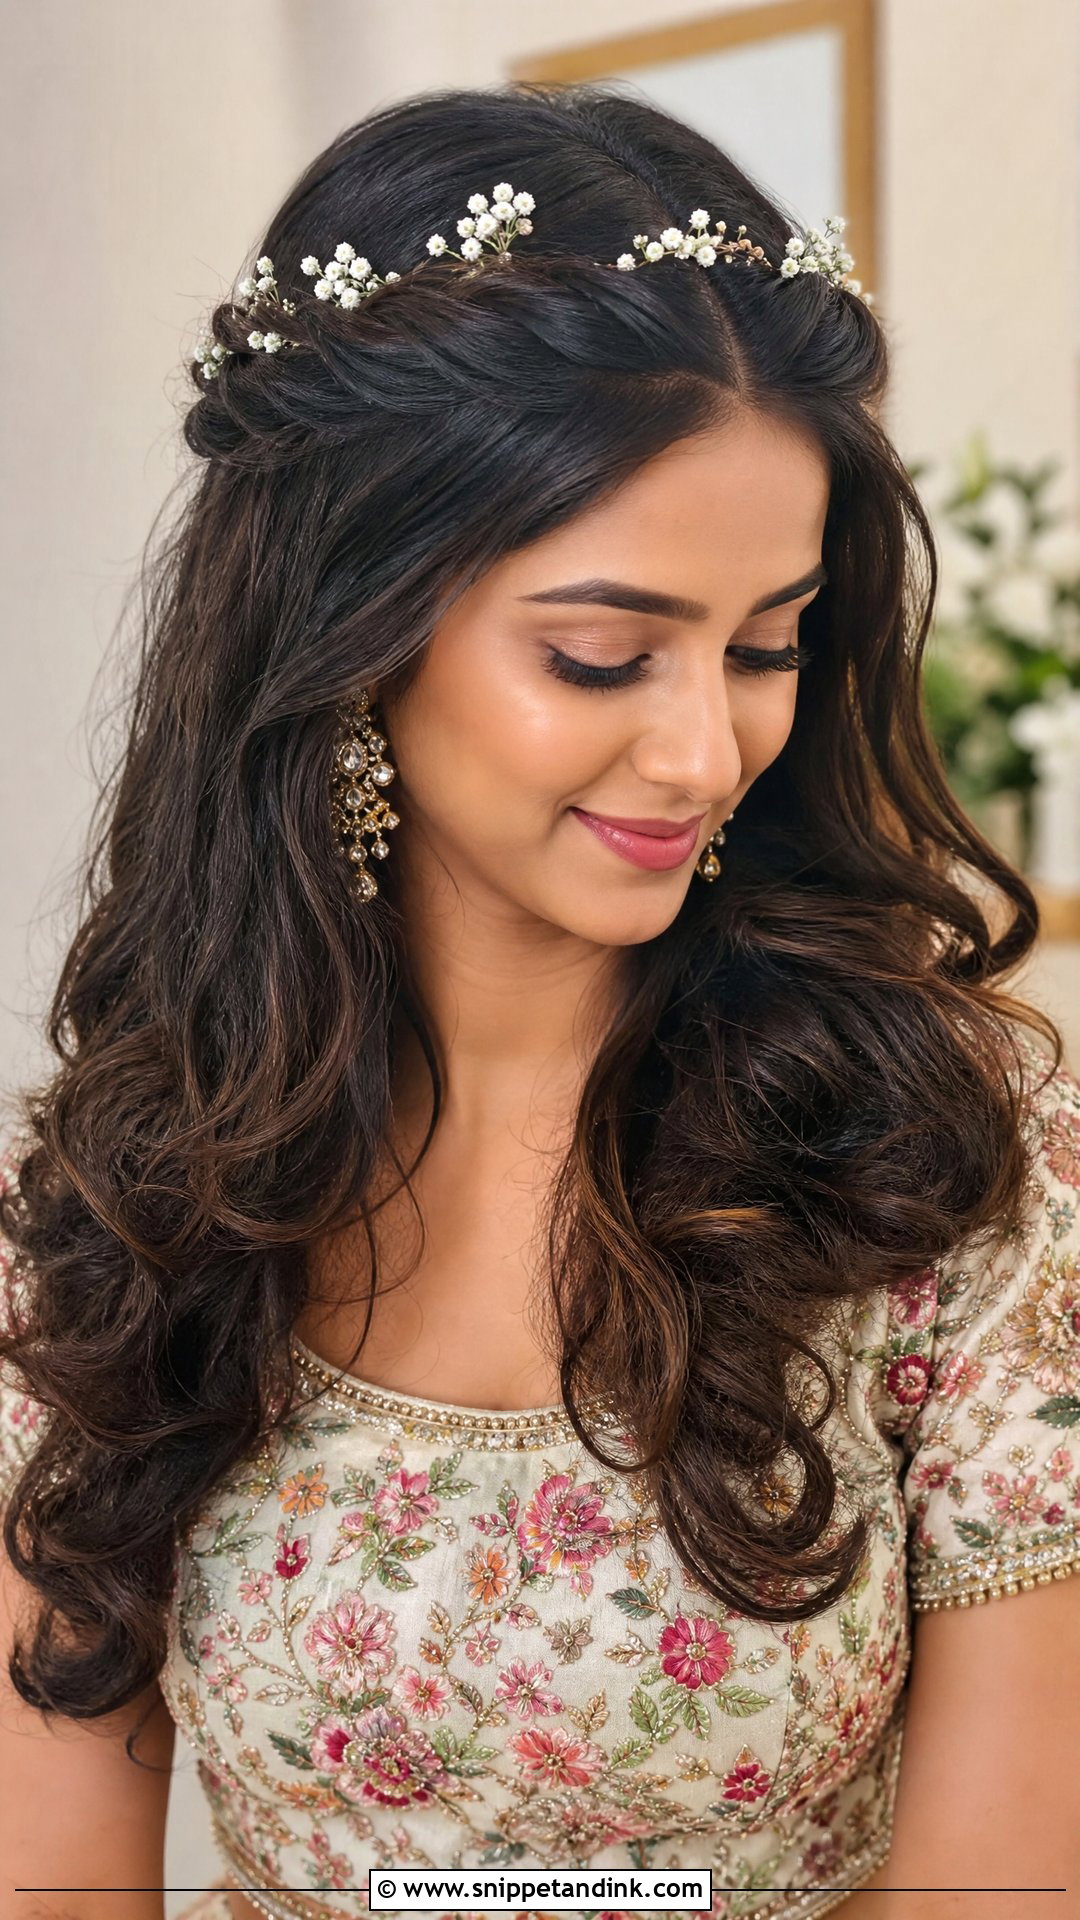
For guests and bridesmaids, a twisted crown gives the face a neat frame without the commitment of an updo. I take small sections from both sides of the front, twist them backward and pin them where they meet at the back. The rest can be wavy, curled or lightly straightened. It’s a natural fit for lighter jewellery, floral outfits and daytime functions. Keep the center part clean if you’re wearing a maang tikka. Small flowers along the twists suit a mehendi or haldi.
14. Indian Wedding Side Braid
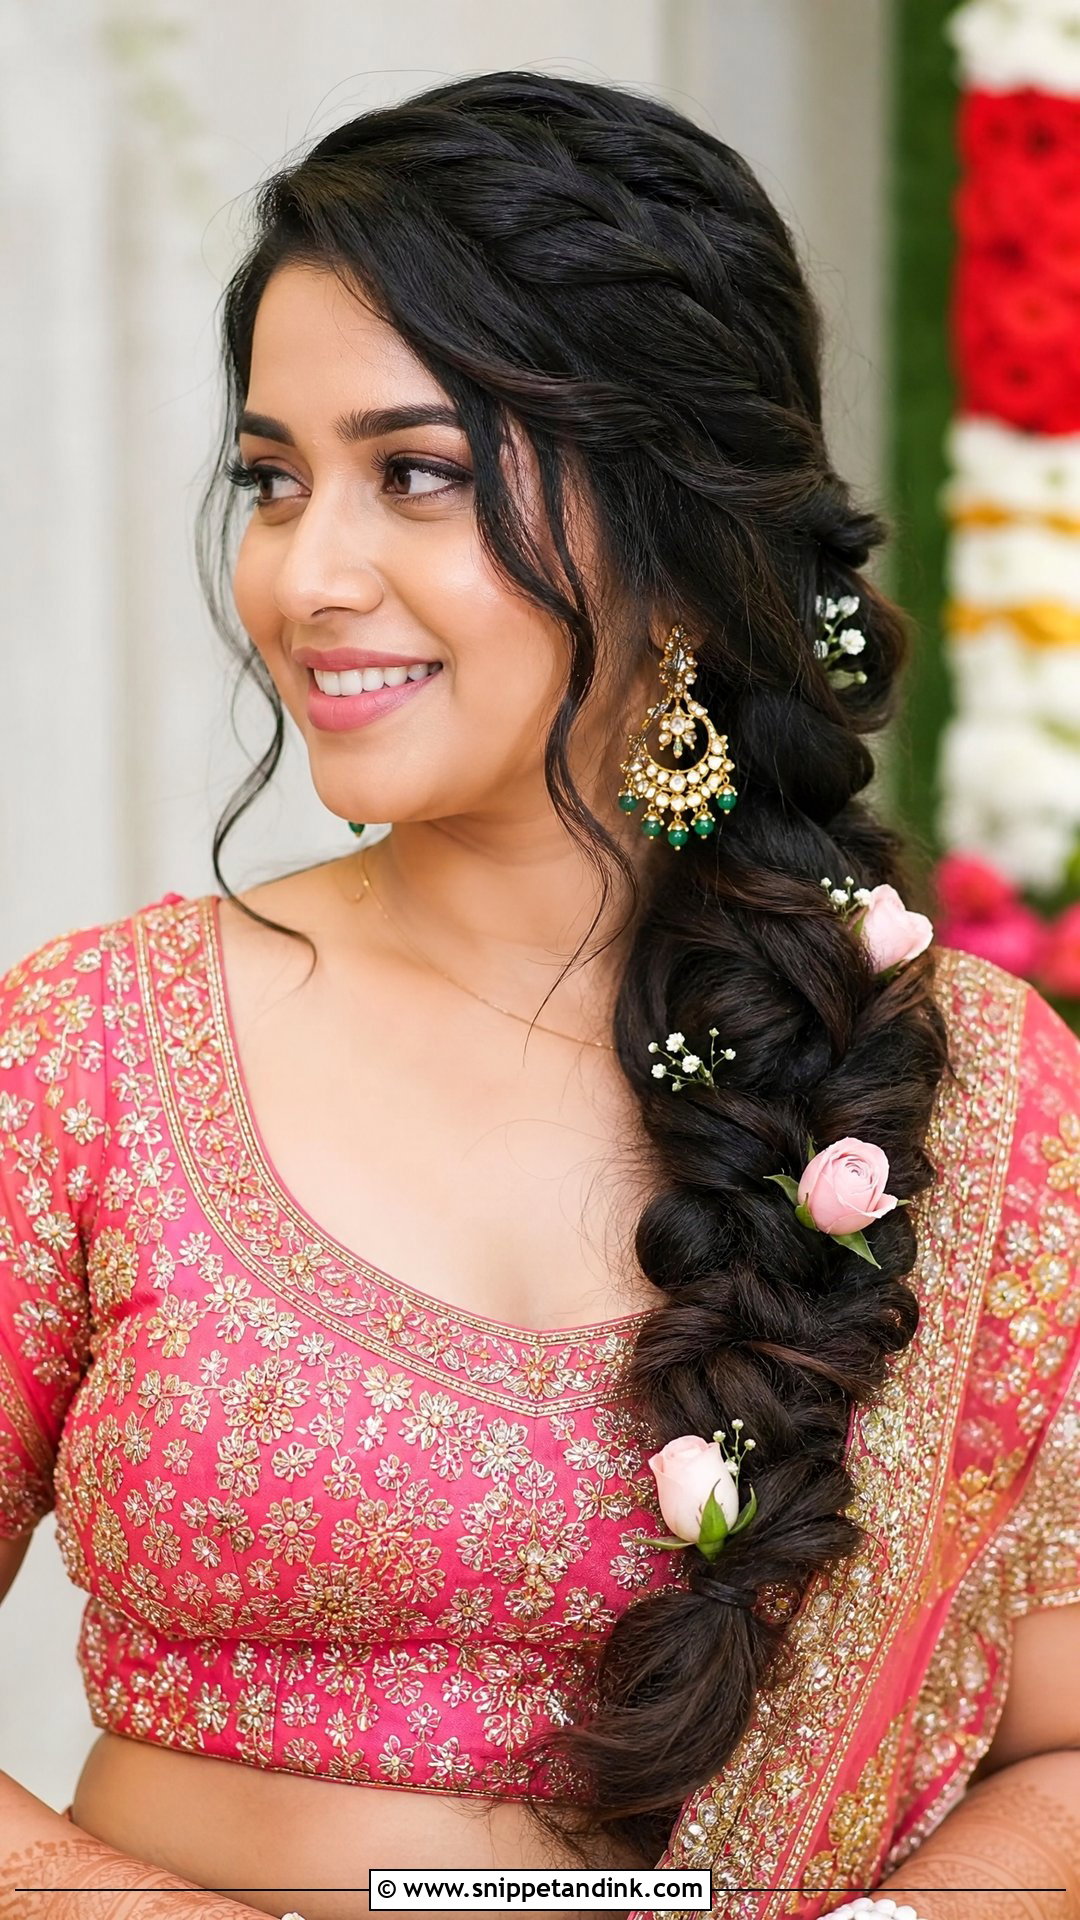
A side braid brings all the hair forward over one shoulder, so the back of the blouse and the earrings both show clearly in photos. I sweep the hair from a loose side part and braid it, regular, fishtail or rope depending on your comfort, then loosen it for fullness and finish with a decorative tie. Outdoors it keeps wind under control. My one caution: a thick braid lying on a heavily embroidered shoulder can catch on the work, so check that at your fitting. Fresh flowers or a paranda make it traditional.
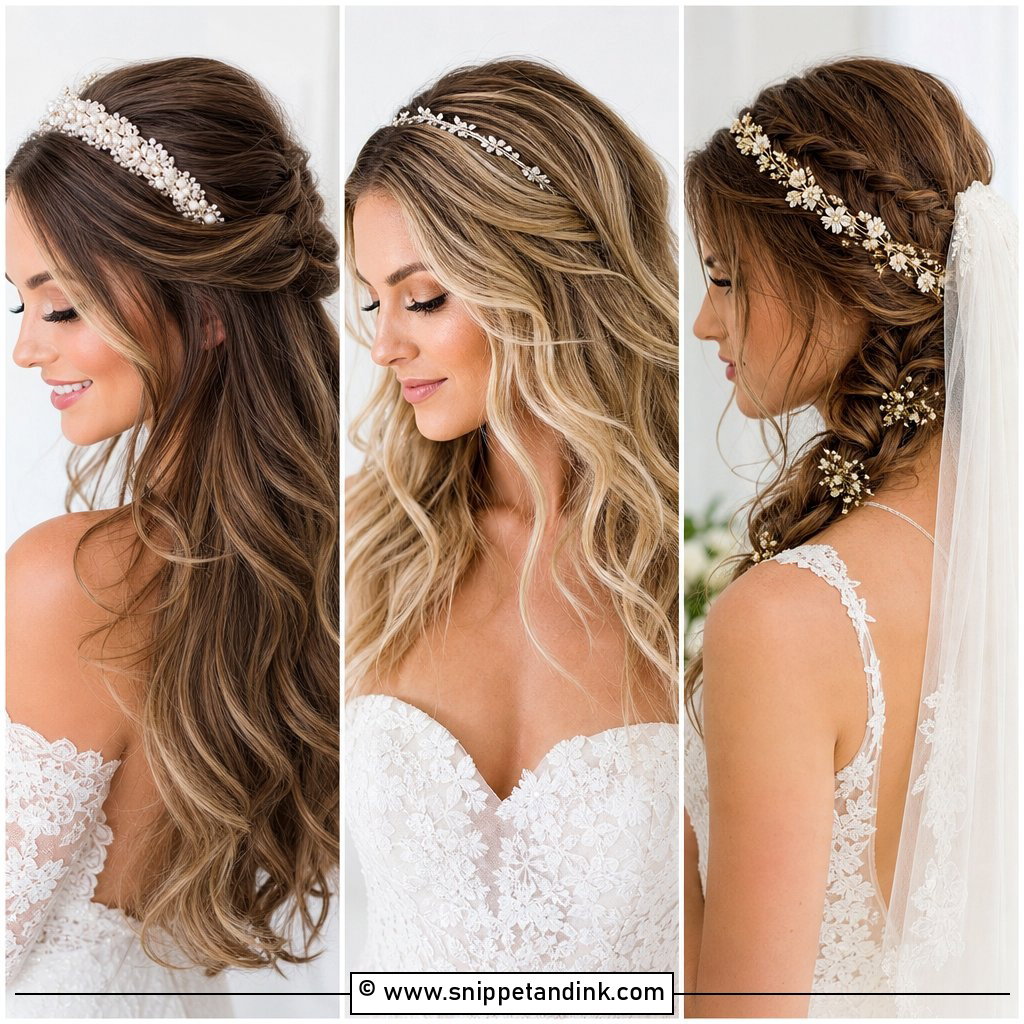
15. Indian Wedding Short Hair Waves
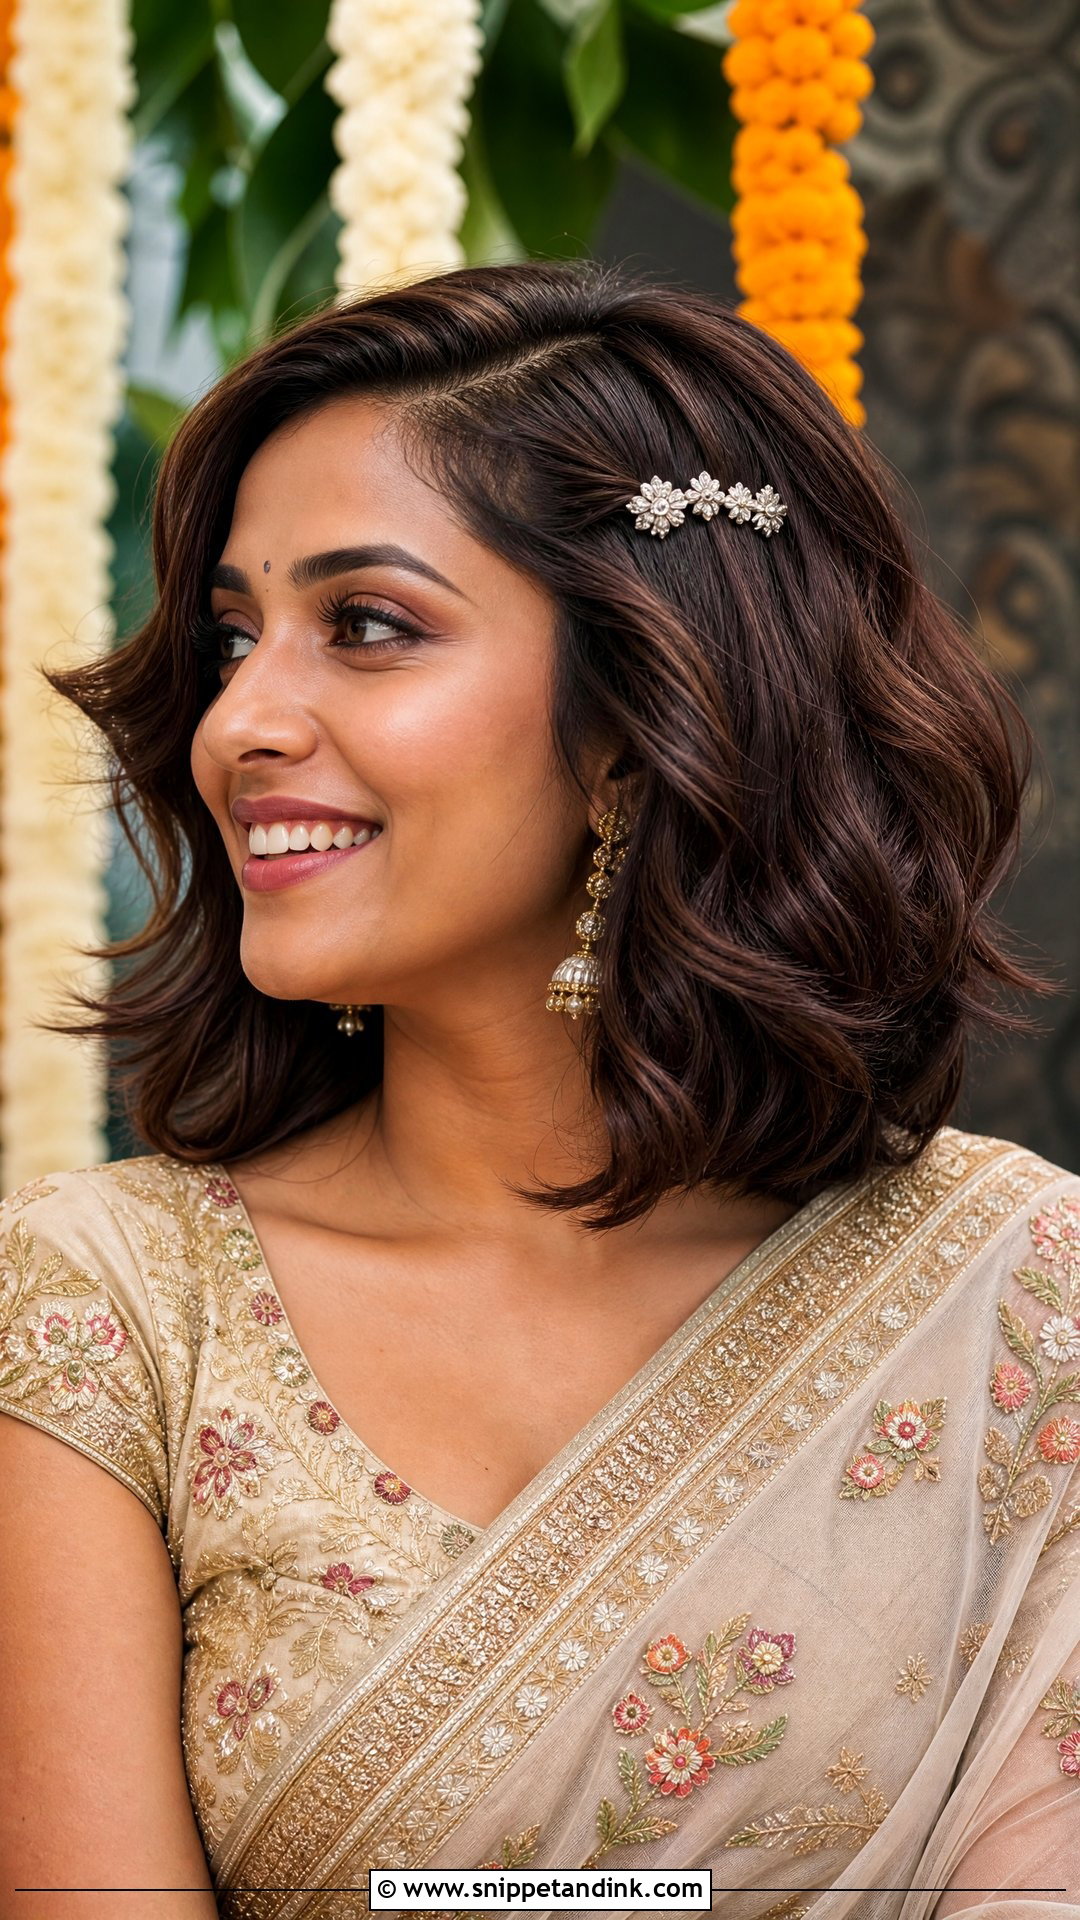
Short hair doesn’t have to be forced into a tiny bun to look festive. Soft waves give a bob, lob or shoulder-length cut volume and shape, and they suit Indian outfits better than many people expect. I make loose bends with a curling wand, leaving the ends straight so they don’t flick outward, then separate them with my fingers rather than a brush. Tuck one side back with a jeweled clip or small barrette so the earrings show. A center part reads more traditional, a side part more modern.
Jasmine Wilts Faster Than You Expect
Fresh gajra smells wonderful, but it’s a living thing and it doesn’t wait for the muhurat. In warm weather the white buds start to brown and soften within a few hours, and the heat of a crowded hall speeds that up.
- Buy or collect the strands on the day, as close to dressing time as you can, and keep them in the fridge wrapped loosely in a damp cloth until they go in your hair.
- Ask for strands with more closed buds than open flowers. They open gradually and look fresh for longer.
- I pin gajra with U-pins through the thread, not through the flowers, so it doesn’t sag off one side of the bun.
- If the event runs from afternoon into night, keep a second strand chilled and swap it before the reception photos.
Hair, Then Tikka, Then Dupatta
Most dupatta disasters come from doing things in the wrong order. I finish the hairstyle completely, then the maang tikka, then the dupatta. The tikka chain gets hooked into the parting with a small pin hidden under the hair, so it stays centered when the dupatta drapes over it.
A heavy net or velvet dupatta needs to be pinned into the bun or braid itself, never just into loose hair at the crown, or it slowly drags the front backward. If your earrings are heavy, ask for support chains (sahare) to be tucked into the hair behind each ear. It takes the weight off your lobes and keeps the earrings facing forward in photos.
Your Heaviest Earrings Decide the Hairstyle
The style that works is the one you stop thinking about an hour in, through the rituals, the photos, the food and the dancing. Buns carry dupattas and heavy pins. Braids handle outdoor heat and flowers. Ponytails and half-up looks keep things lighter for the sangeet. Open curls and short waves belong to the reception, when nothing is pinned on top of them. Whatever you choose, I’d try it once with the actual outfit and the real jewellery, not a photo of it. Earrings that pull, a tikka that slides or a dupatta that won’t sit are far easier to solve a week ahead.
You'll Like These Ideas:


Leave a Reply