
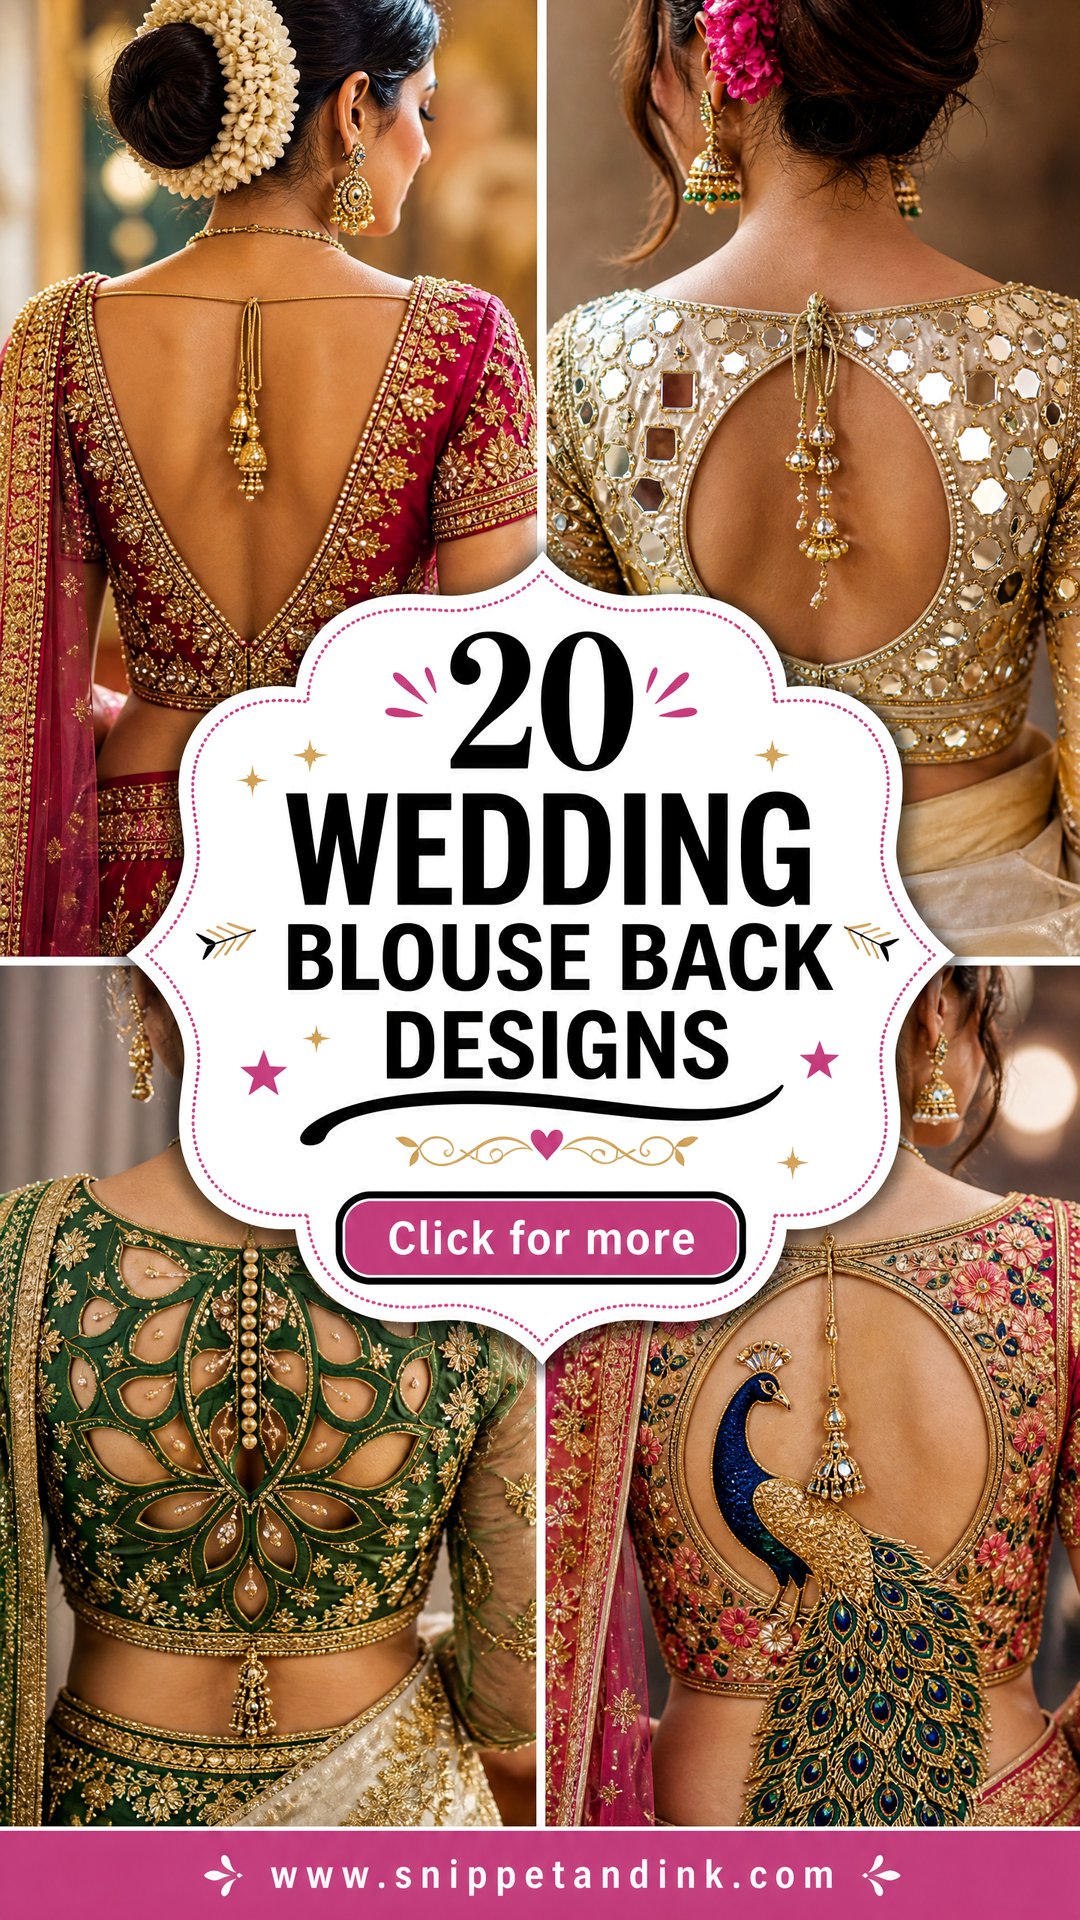
Guests see a bride’s back far more than they see her front. She walks away down the aisle, sits facing the fire during the pheras, and turns for the family photos, so the blouse back carries a surprising share of the whole look. The designs below range from classic U and V shapes to illusion panels, pearl strings, personalised embroidery and sculptural cutouts. When I plan one with a bride, I start from three things: the fabric and embroidery of the saree or lehenga, how much skin she’s comfortable showing for a long ceremony, and what will hold her up. A low or heavily worked back only looks good if the support and tailoring are right, and those decisions shape everything else.
What Holds Up a Low Back: Cups, Lining and Hooks
The first question a bride asks me about a deep back is what she wears underneath it. For anything lower than a regular bra band, the honest answer is nothing separate: the support has to be built into the blouse. A good tailor sews padded cups directly into the lining and shapes the front panels around them, so the blouse itself does the lifting.
- Built-in cups are the standard for deep U, V and open backs. Take your own bra to the first fitting so the tailor can match the cup shape.
- Cotton lining under silk or brocade absorbs sweat and stops the outer fabric from sticking. For summer weddings, it matters more than the embroidery.
- Front hooks are often the best closure for very open backs, since there is little fabric left behind to fasten.
- A firm lower band around the ribcage takes most of the weight. If it’s loose, no amount of tying at the top will help.
Heavier embroidery means more weight pulling the blouse down and outward, so the more ornate the back, the more structure I ask for inside it.
1. Deep V Wedding Blouse Back Design
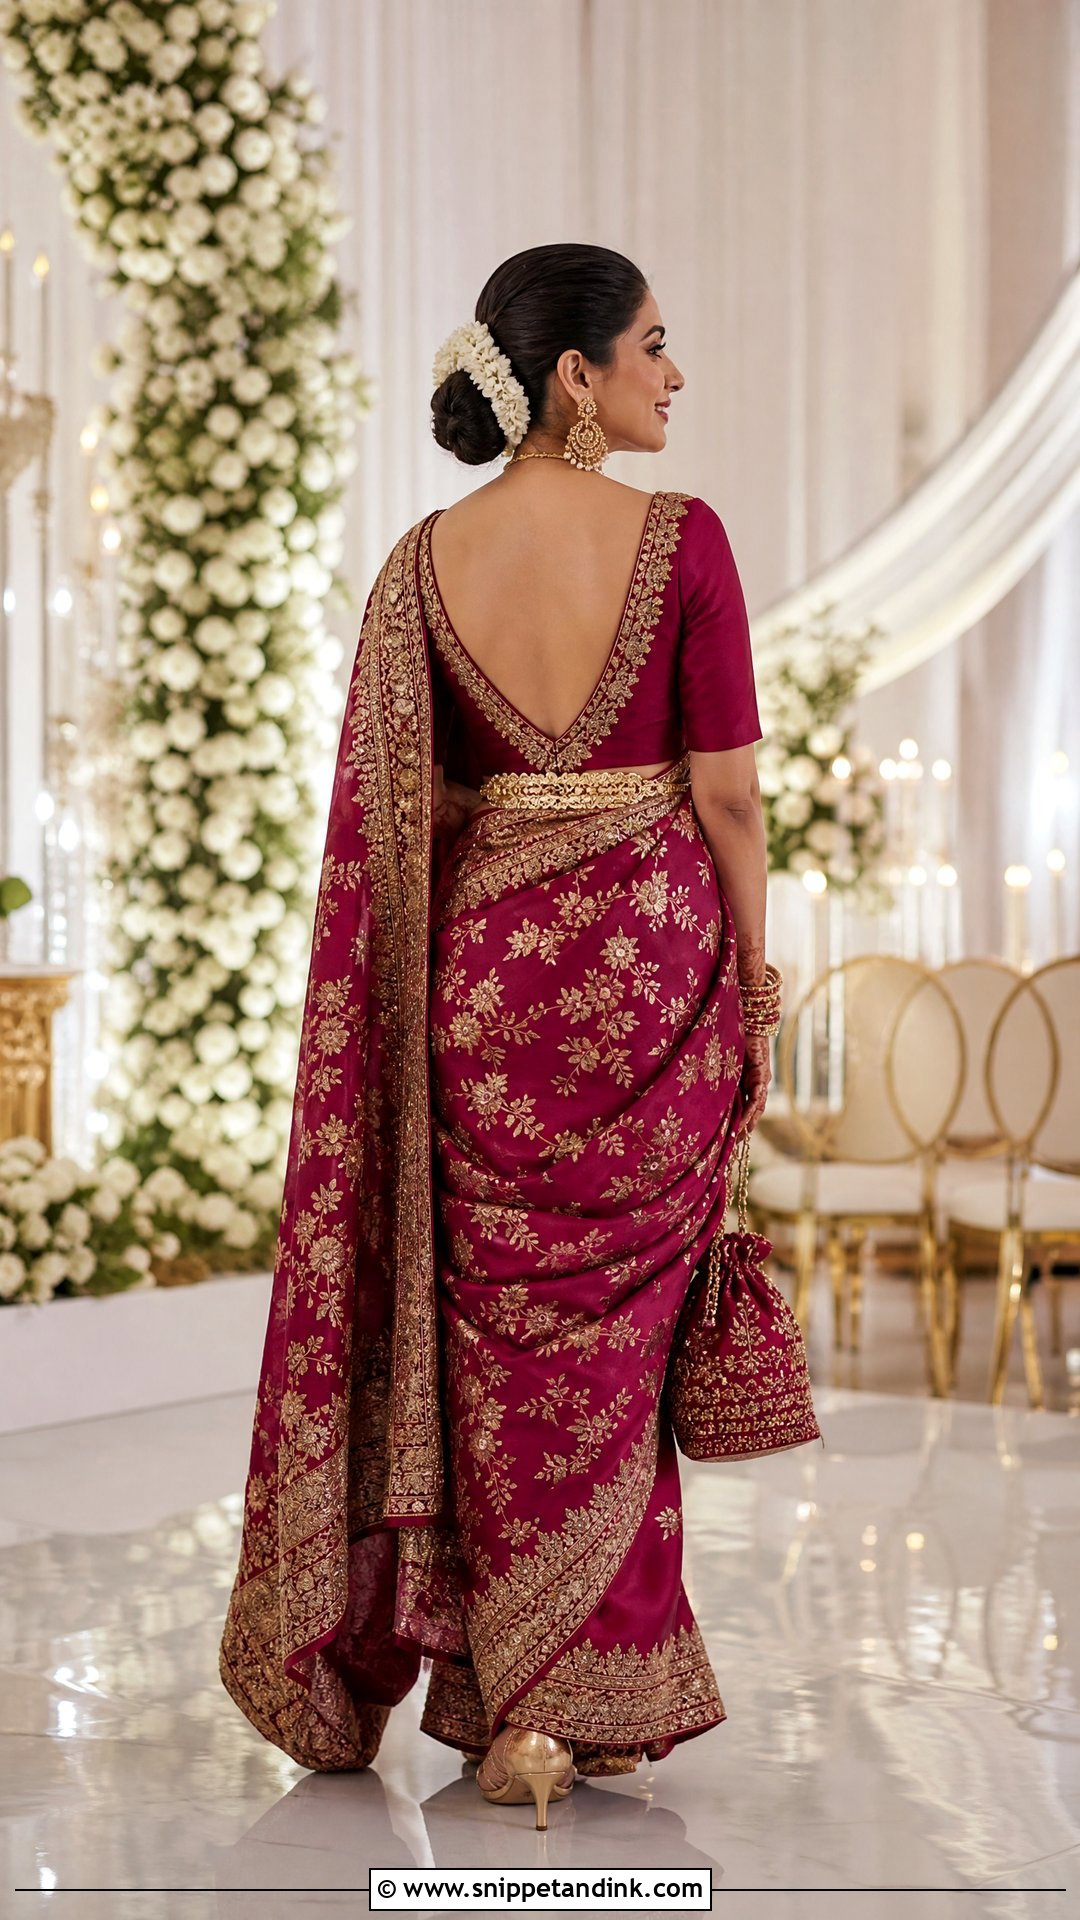
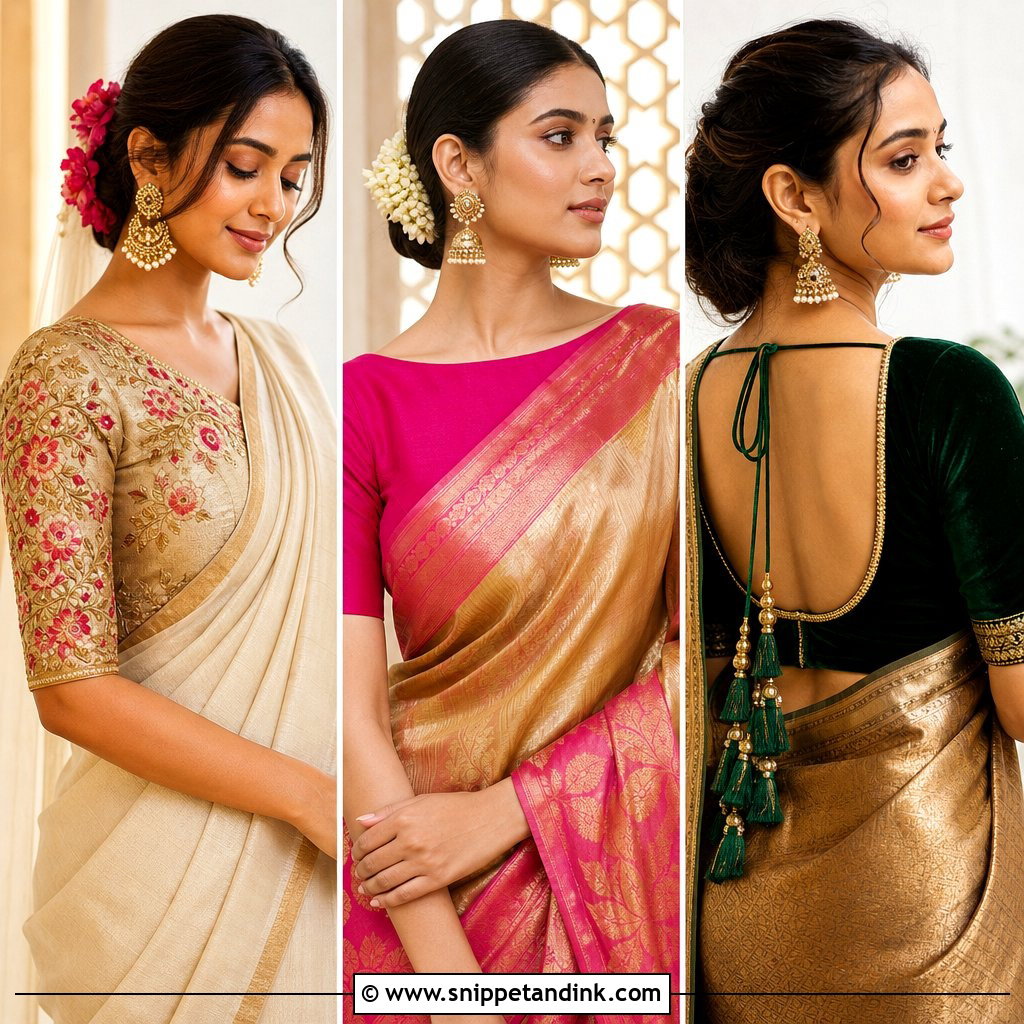
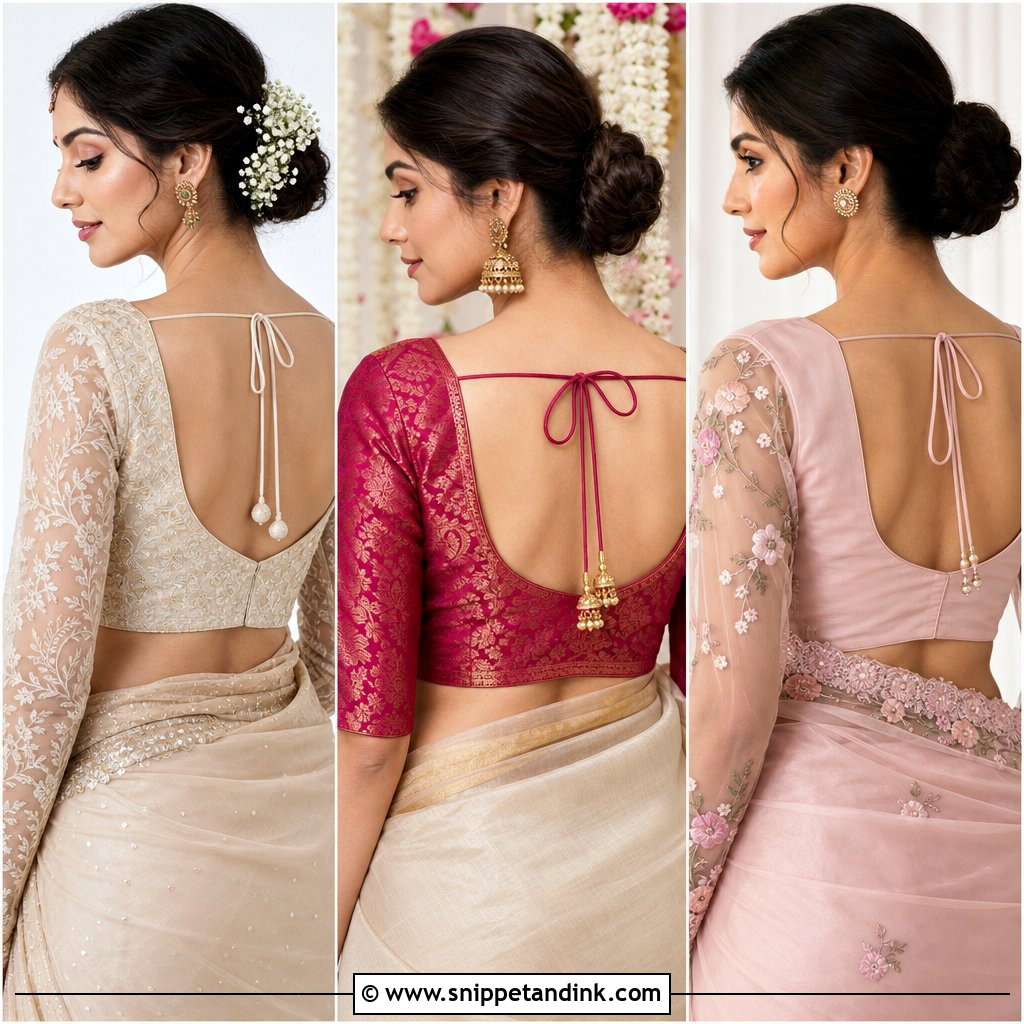
A deep V draws the eye down the spine and makes the back look longer, which is why it suits a heavy silk saree so well. The weak point is the shoulders: without something holding them, a deep V slides outward the moment you lift your arms. I always add a slim tie or a narrow band across the shoulder blades, and I ask the tailor to reinforce the neckline with a stay tape so the embroidery doesn’t stretch it. Edge the V with zardozi, beading or a border woven to match the saree. Keep hair in a low bun or braid. For more coverage, skin-toned net filled into the V keeps the long line.
2. Deep U Wedding Blouse Back Design
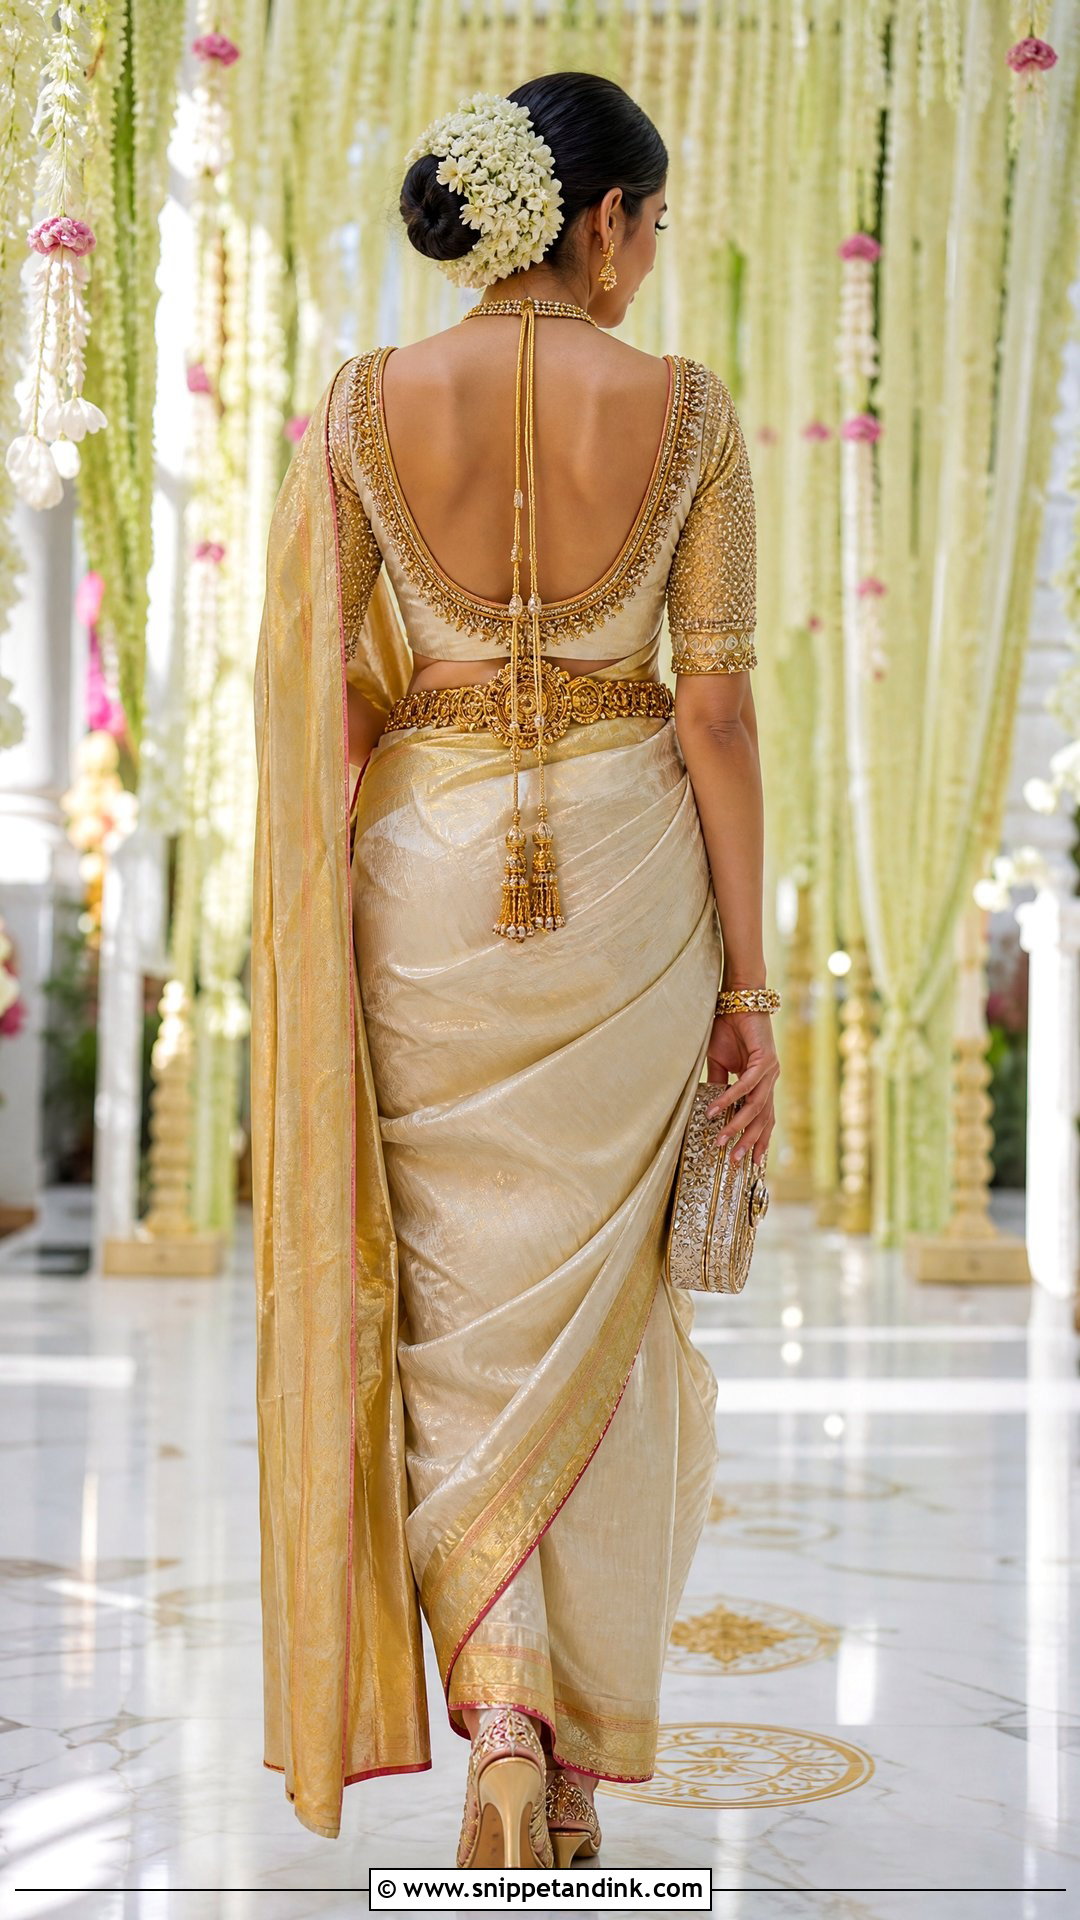
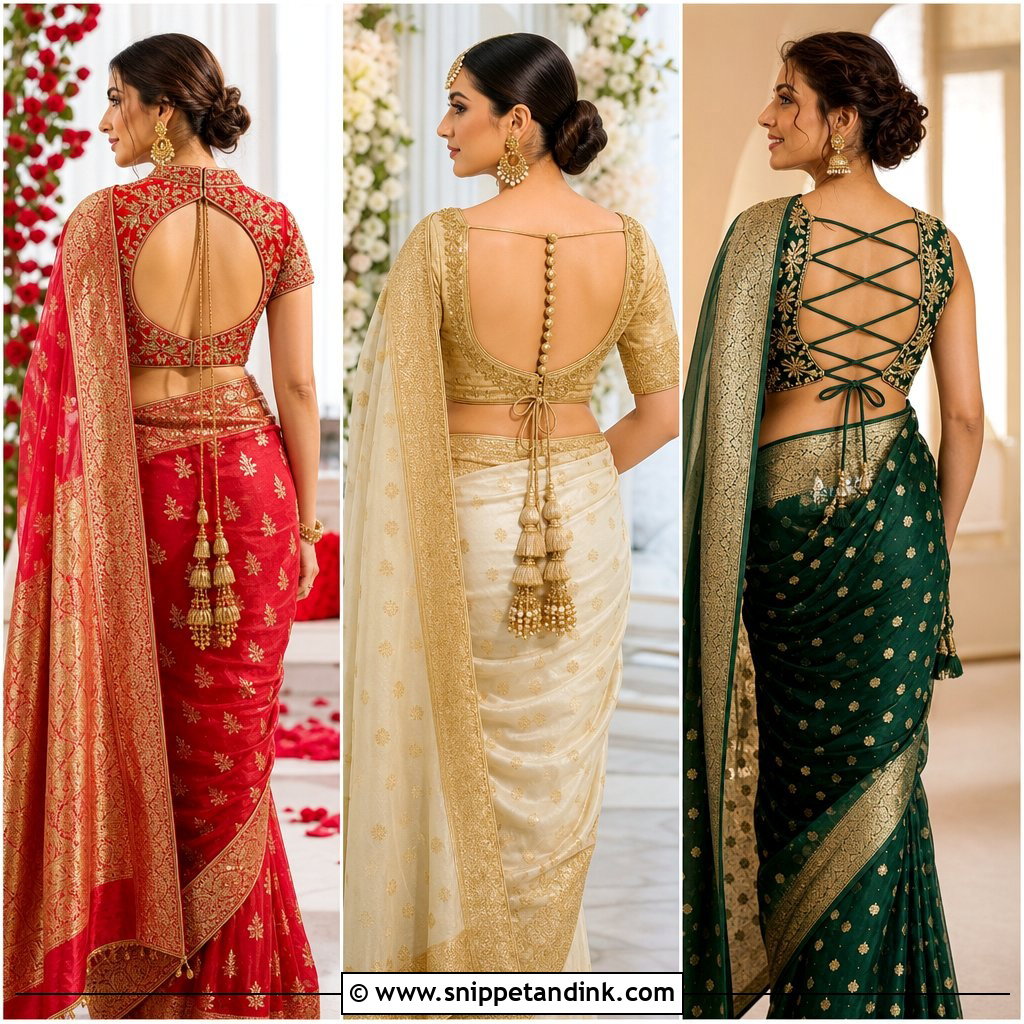
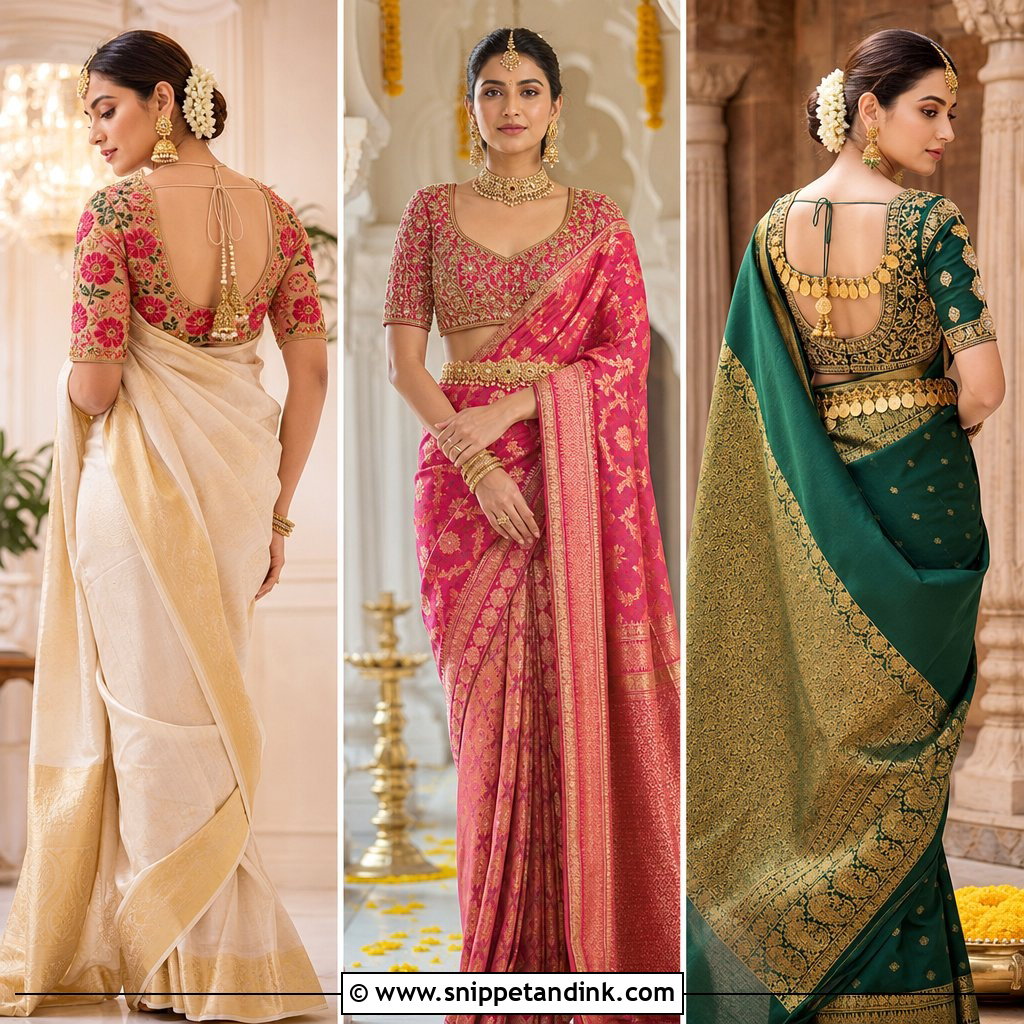
The deep U is the back I recommend most to brides who want a classic look with very little risk. Its curve sits comfortably under the weight of Kanjeevaram, Banarasi or brocade, and it frames a broad border well. Two long tassels at the lower closure add movement when she walks. Depth is adjustable, but the support isn’t optional: a concealed hook row, firm shoulder seams and a well-fitted band along the lower back are what keep it from gaping when she sits on the mandap for an hour. A floral bun shows off the curve, and a waist belt over the pleats ties the outfit together.
3. Round Cutout Wedding Blouse Back Design
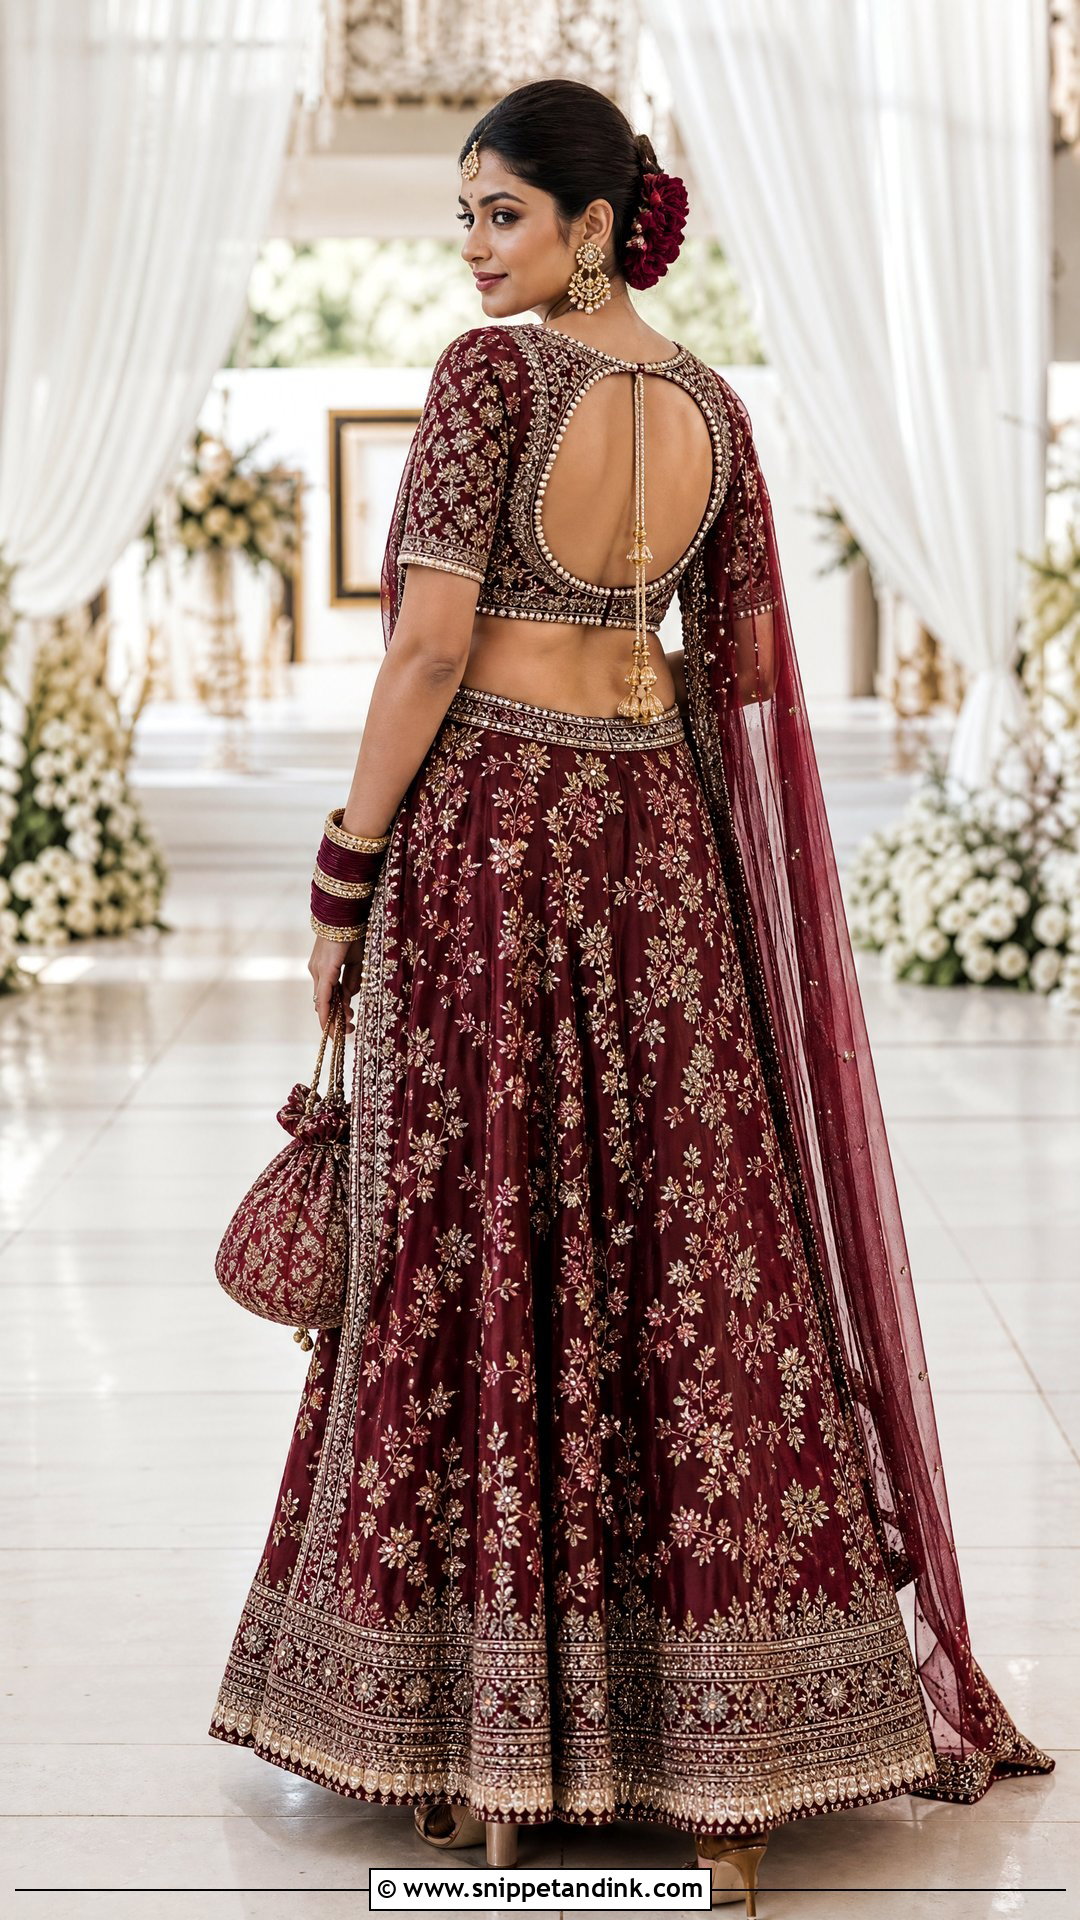
A round cutout gives one clear point of focus while keeping the shoulders and lower back covered, so it sits nicely between modest and bold. Edge the circle with pearls, metallic embroidery or velvet piping. Everything else on the back should stay quieter, or the circle gets lost. In fittings I watch the circle as the bride moves; a cutout placed even slightly too high pulls into an oval when she raises her arms. If a back closure would cut through the pattern, an invisible side zip is the cleaner solution. A small tassel hanging inside the opening adds a little swing.
4. Keyhole Wedding Blouse Back Design
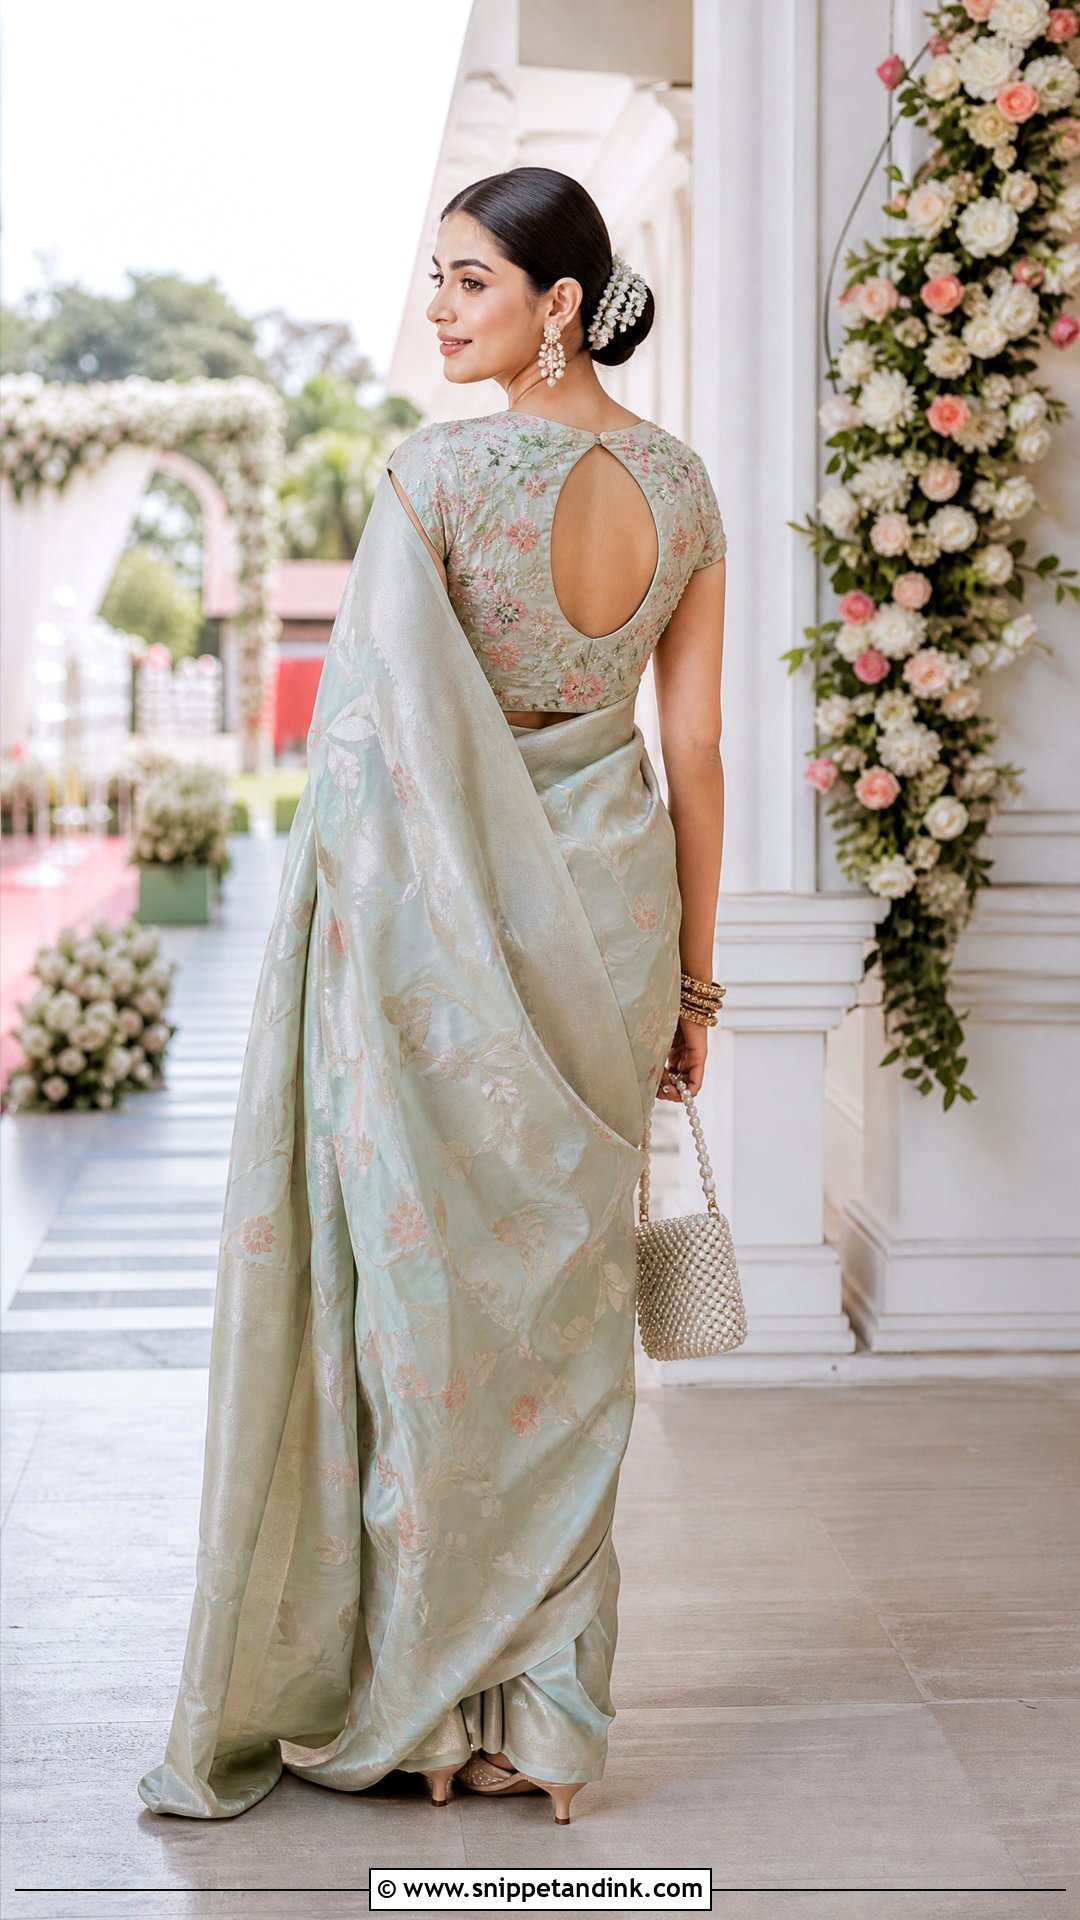
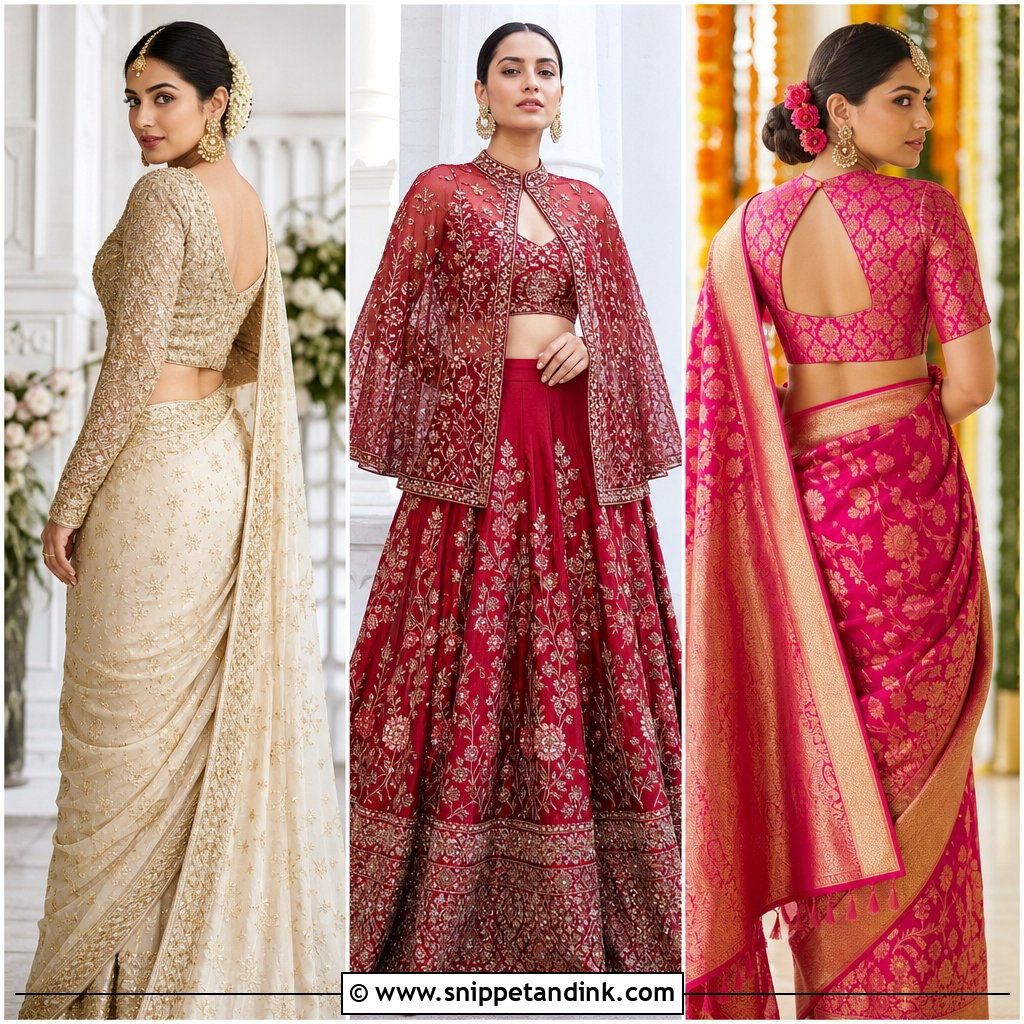
The keyhole back sits halfway between a closed blouse and a dramatic opening. A narrow teardrop keeps it subtle; a larger keyhole makes more of a statement. Because most of the back stays covered, this design copes well with heavy fabric and full sleeves. The single button at the neck is where things go wrong: if the loop is too tight, the keyhole pulls open into a diamond when she sits. I check it with the bride seated and arms raised. Floral threadwork around the edge can echo motifs from the saree, and it pairs neatly with a pastel silk for a daytime ceremony.
5. Illusion Net Wedding Blouse Back Design
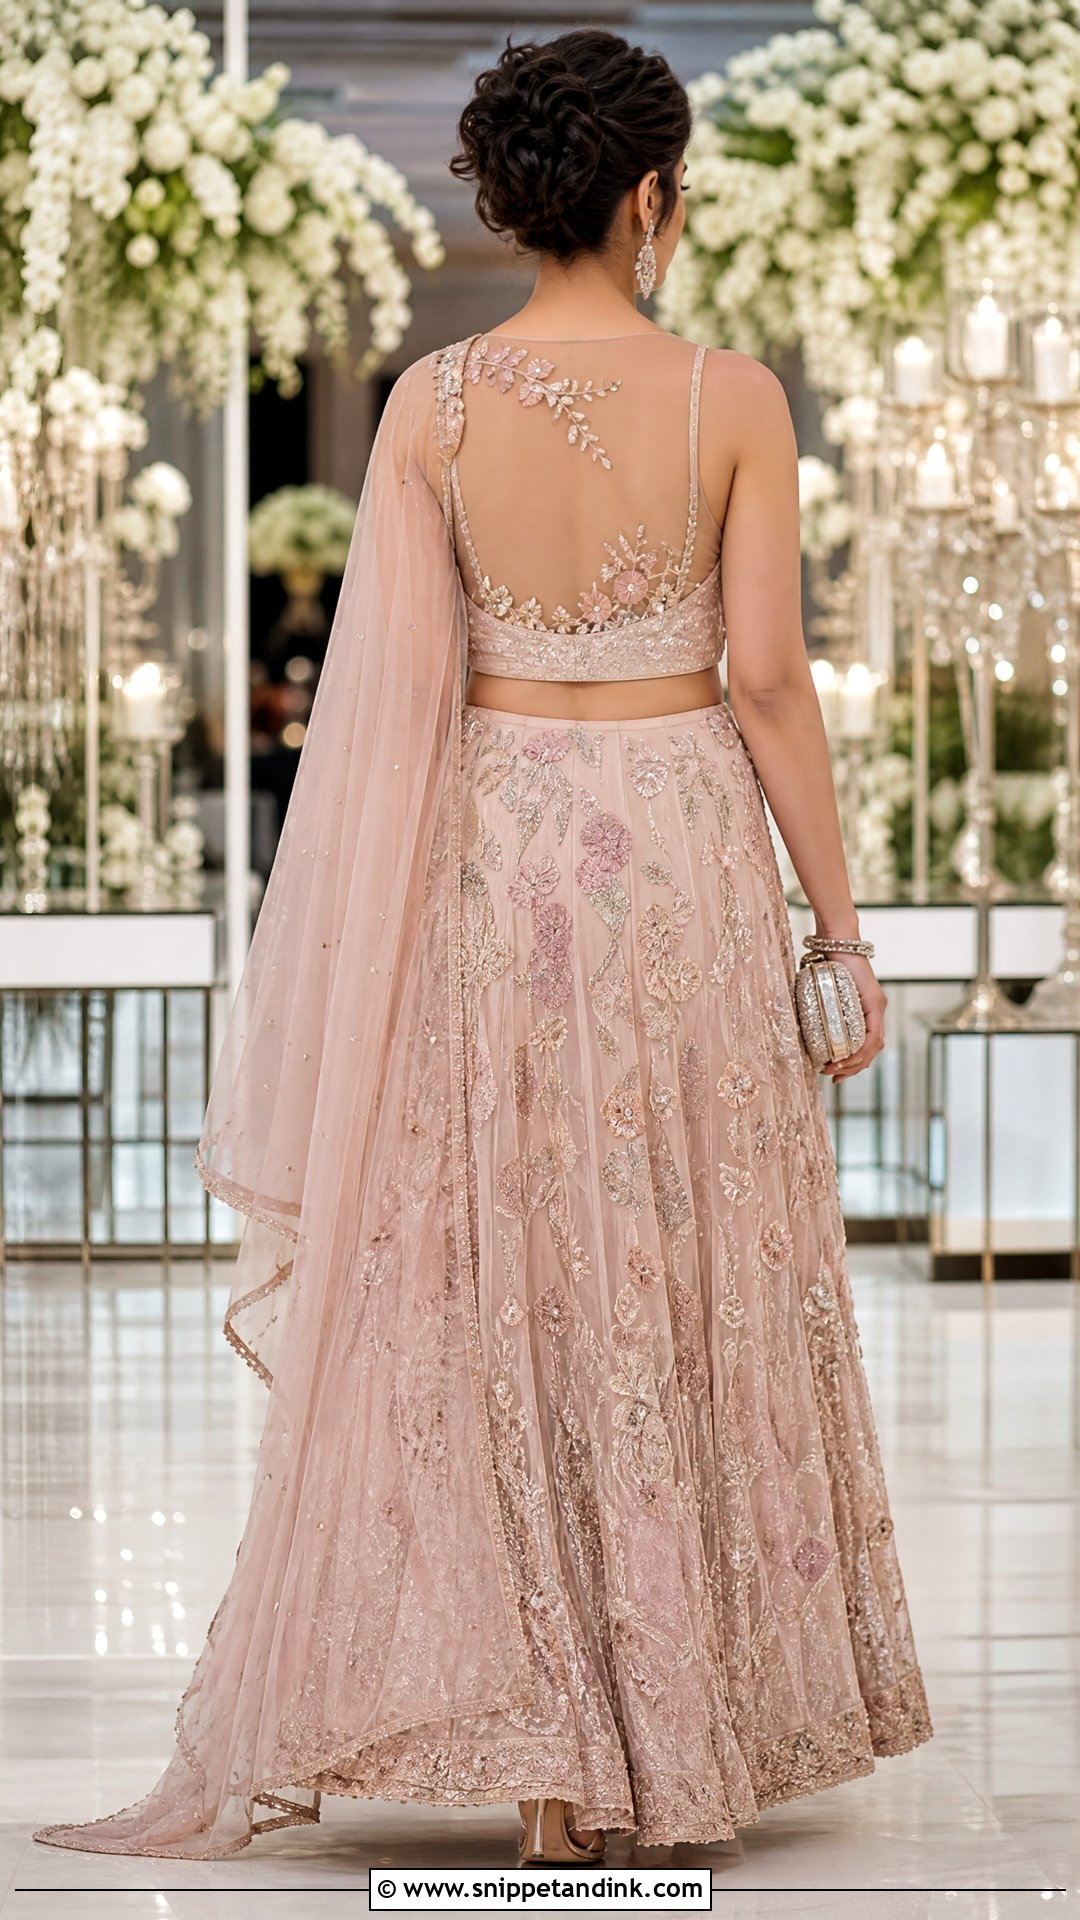
Illusion net lets embroidery look as though it’s floating on the skin while the net quietly does the structural work. The quality of net decides everything. Cheap net is stiff and scratchy, and it sags under appliqué within hours, so I look for a soft, strong mesh as close to the bride’s skin tone as possible, checked in daylight, not under shop lights. Floral appliqué, vines, crystals or scattered beads all work on it. Ask for clean seams around the shoulders and armholes, where net shows the stitching. A lined lower band adds support while the upper back stays light. An updo shows the panel from every angle.
6. Pearl String Wedding Blouse Back Design
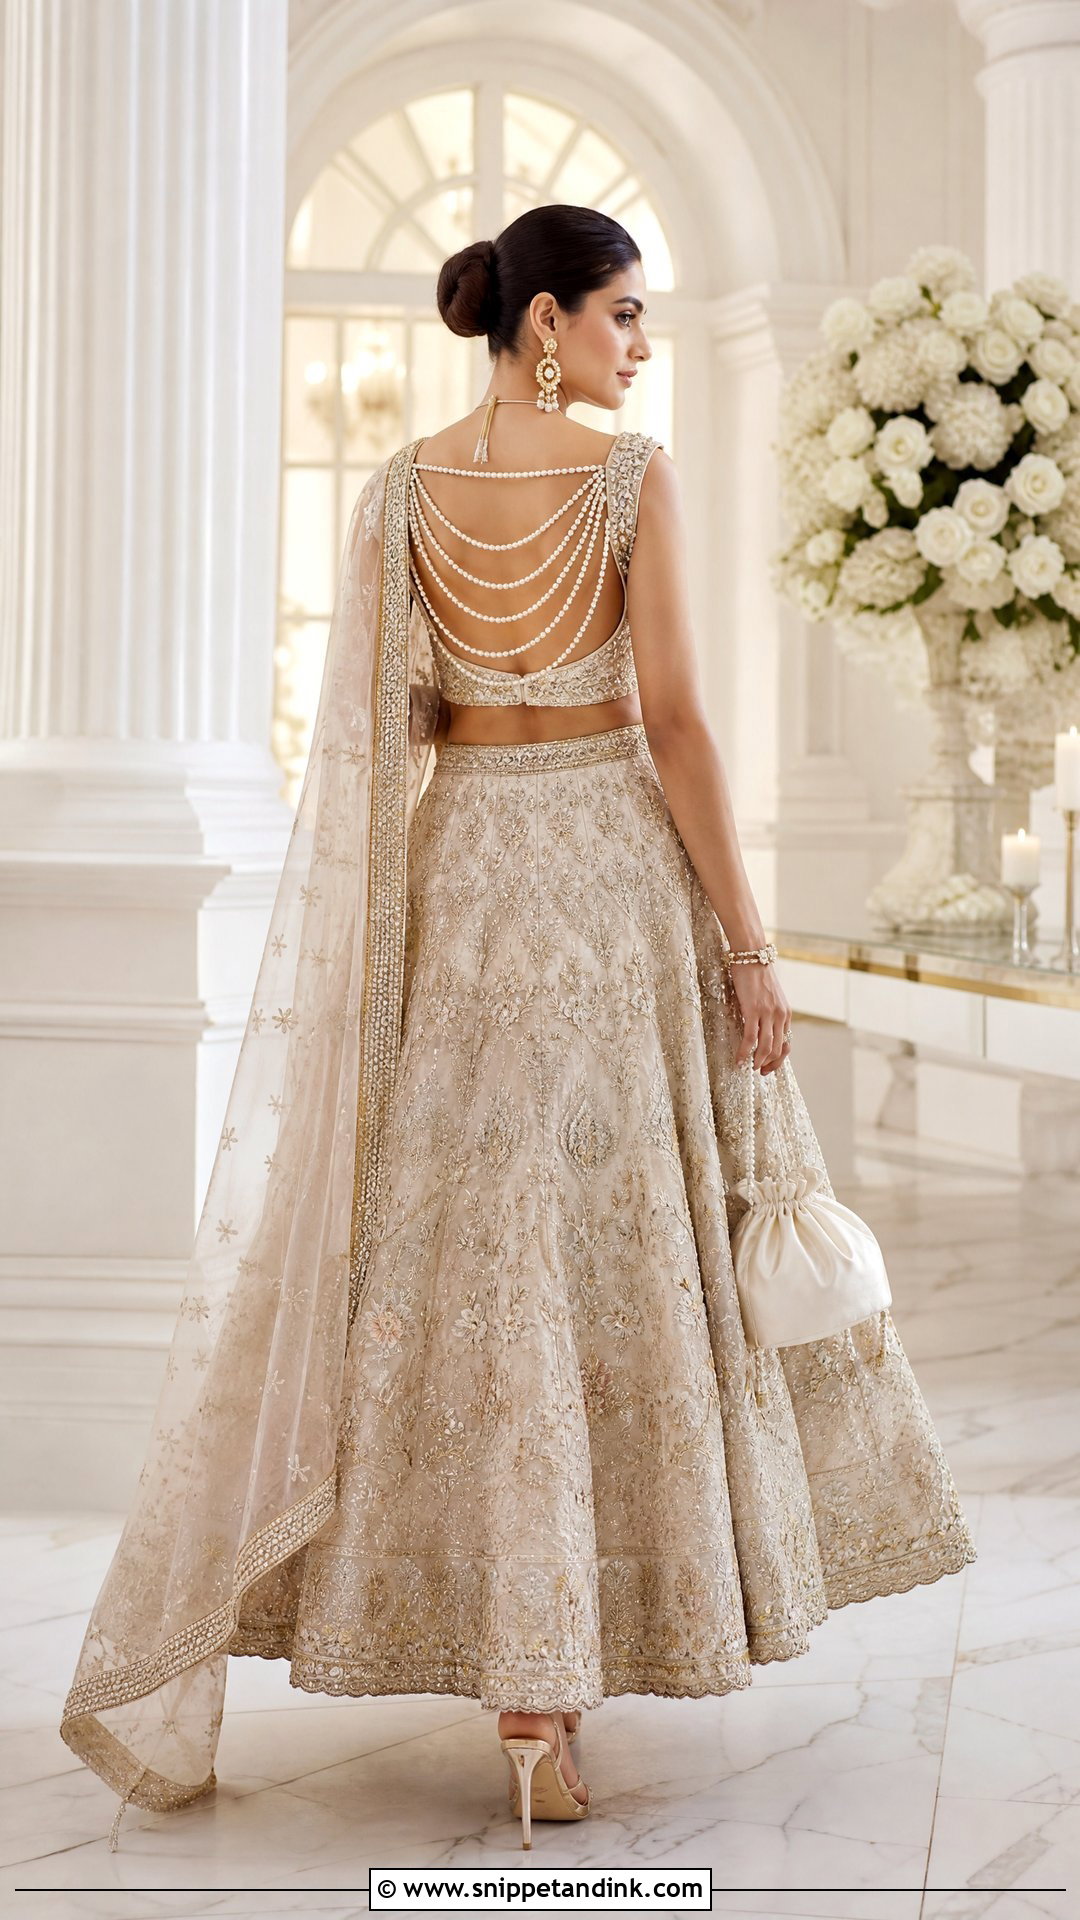
Pearl strings across an open back turn it into jewelry. They can run straight, drape in curves or form a geometric grid between embroidered side panels, and they suit ivory, blush, red or champagne lehengas. The construction is what I check most carefully: each string should be anchored separately, so that if one breaks, the others hold. A single long thread running through the whole design can unravel in one snag. For a long ceremony, a transparent support strap under the pearls takes the strain off them. Skip a busy necklace; pearl drops at the ears and a satin potli are enough.
7. Criss Cross Wedding Blouse Back Design
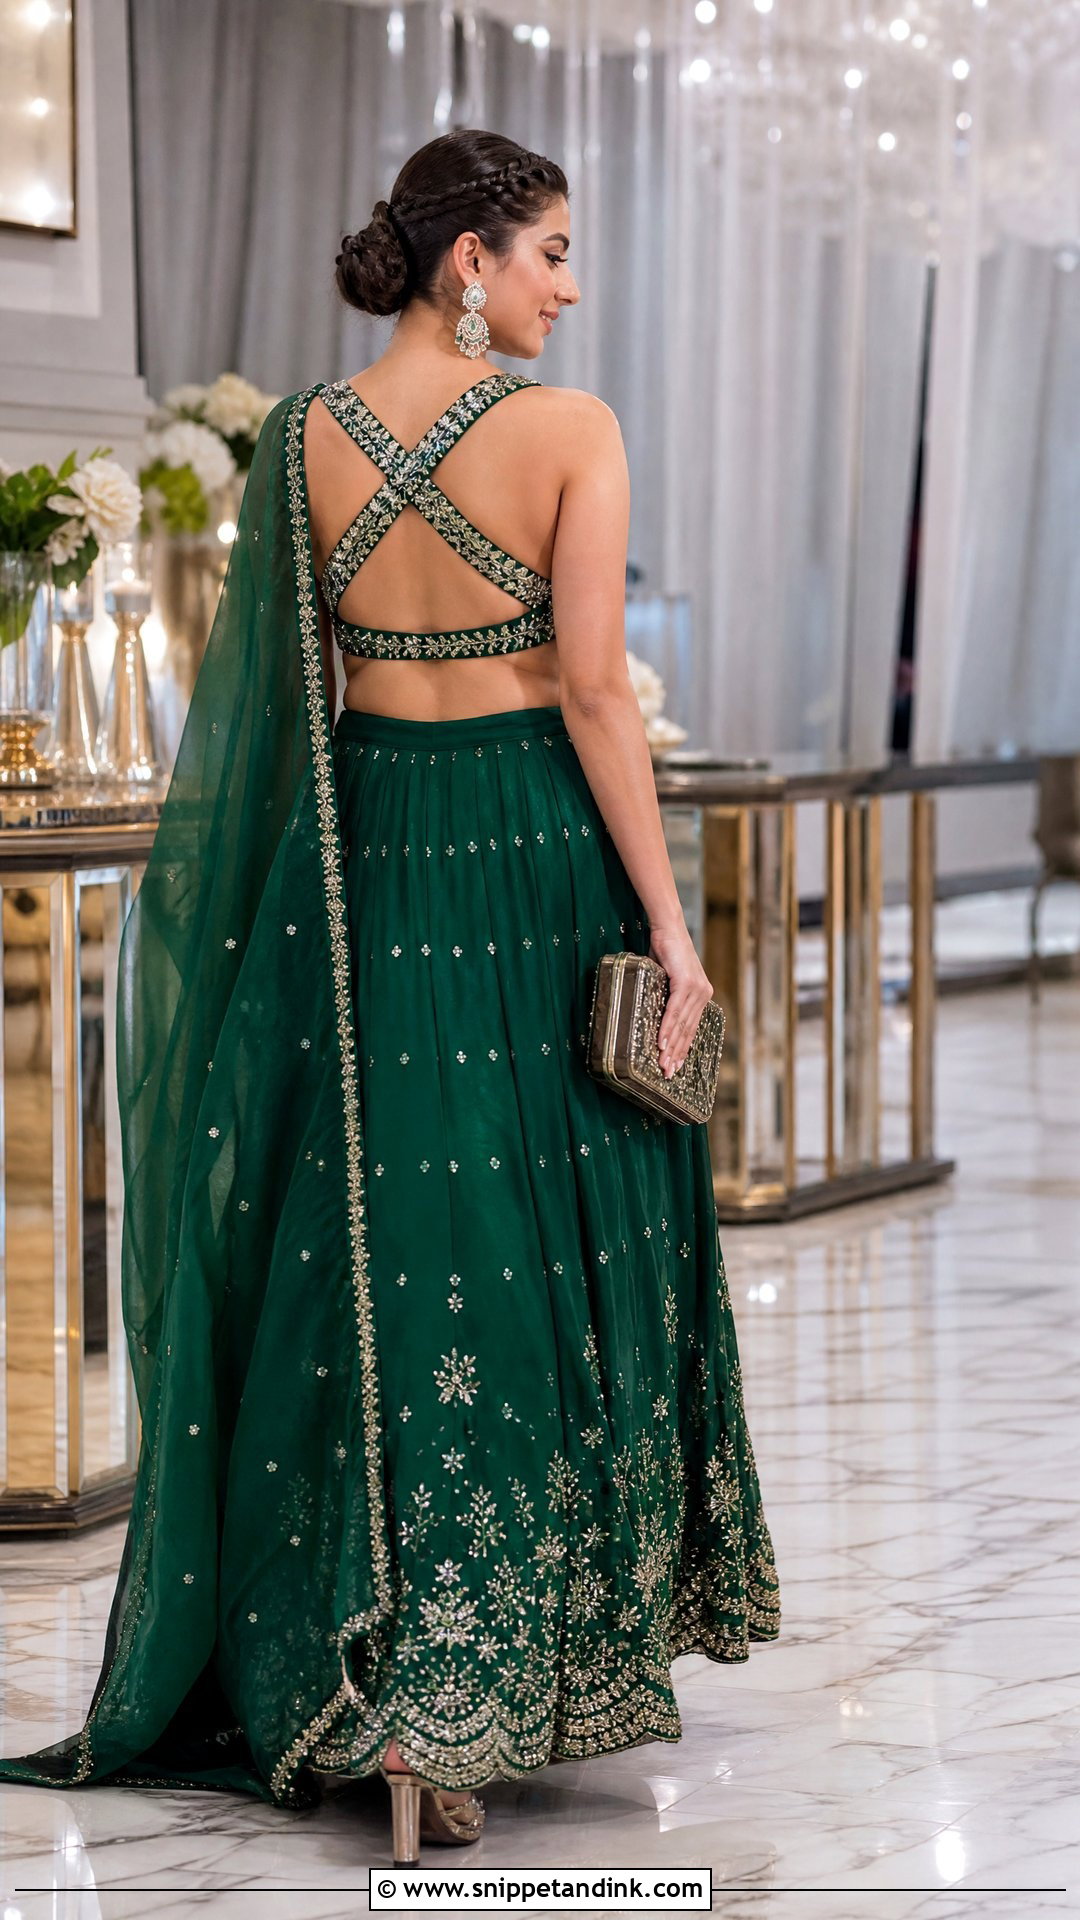
Crisscross straps bring a modern geometry to a lehenga or pre-draped saree, which is why I like this back most for the reception. The straps can be embroidered fabric, velvet ribbon, pearls or fine metallic cord. Wider fabric straps are more comfortable across a long evening; thin cords look delicate but can dig in. Never copy strap placement from a photo. Where the straps cross has to be mapped on the bride’s own back, or they sit awkwardly on her shoulder blades. Firm anchor points and a supportive lower band keep everything in place. A sleek ponytail or braided bun keeps hair off the pattern.
8. Dori Wedding Blouse Back Design
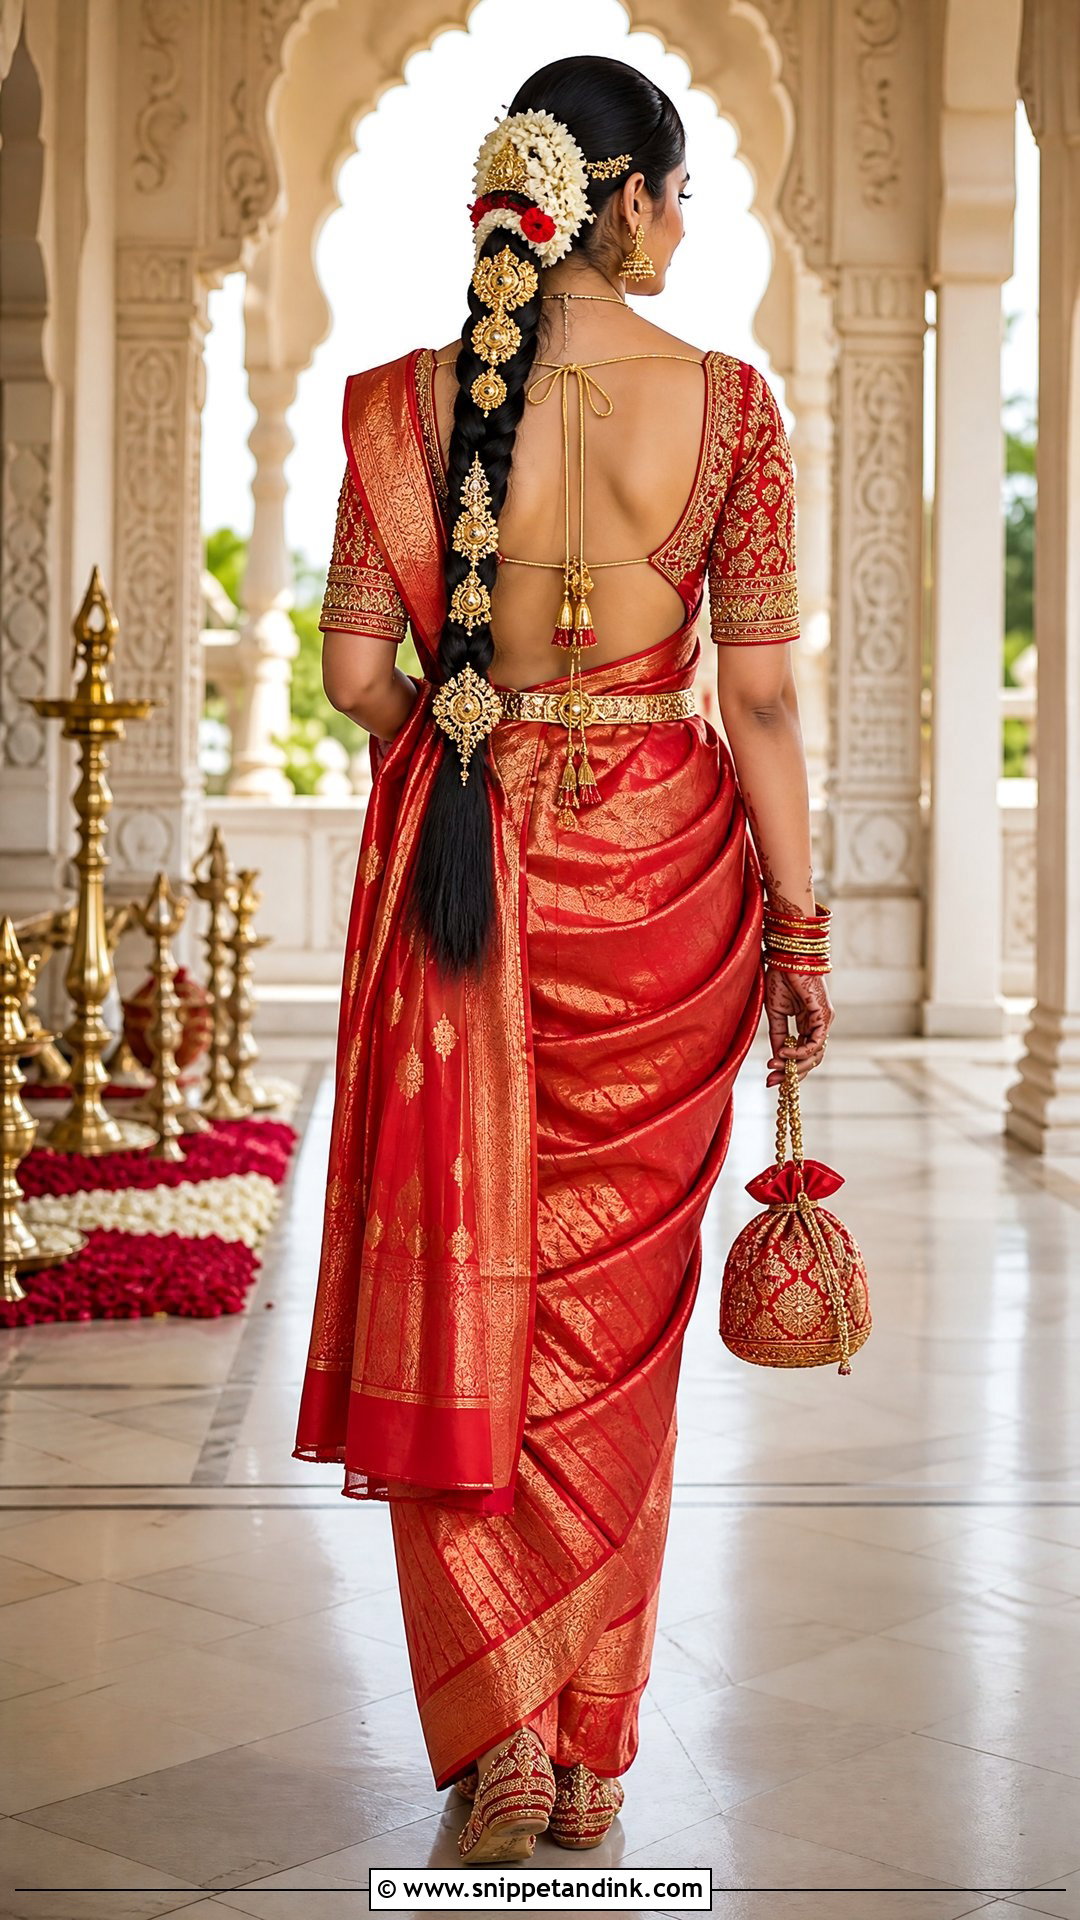
A classic dori back is about as traditionally bridal as a blouse gets, and it has a practical side: the ties let you adjust the fit a little on the day. One dori at shoulder level secures a deep neckline, and a second at the lower back tightens the fit. Decorate the ends with silk tassels, pearls or small fabric flowers, but keep heavy tassels hanging low; tied high, their weight drags the neckline back. I always put hidden hooks under the dori so the ties are decorative, not structural, because knots loosen over a long ceremony. A red silk saree with temple jewelry suits it.
9. Bow Tie Wedding Blouse Back Design
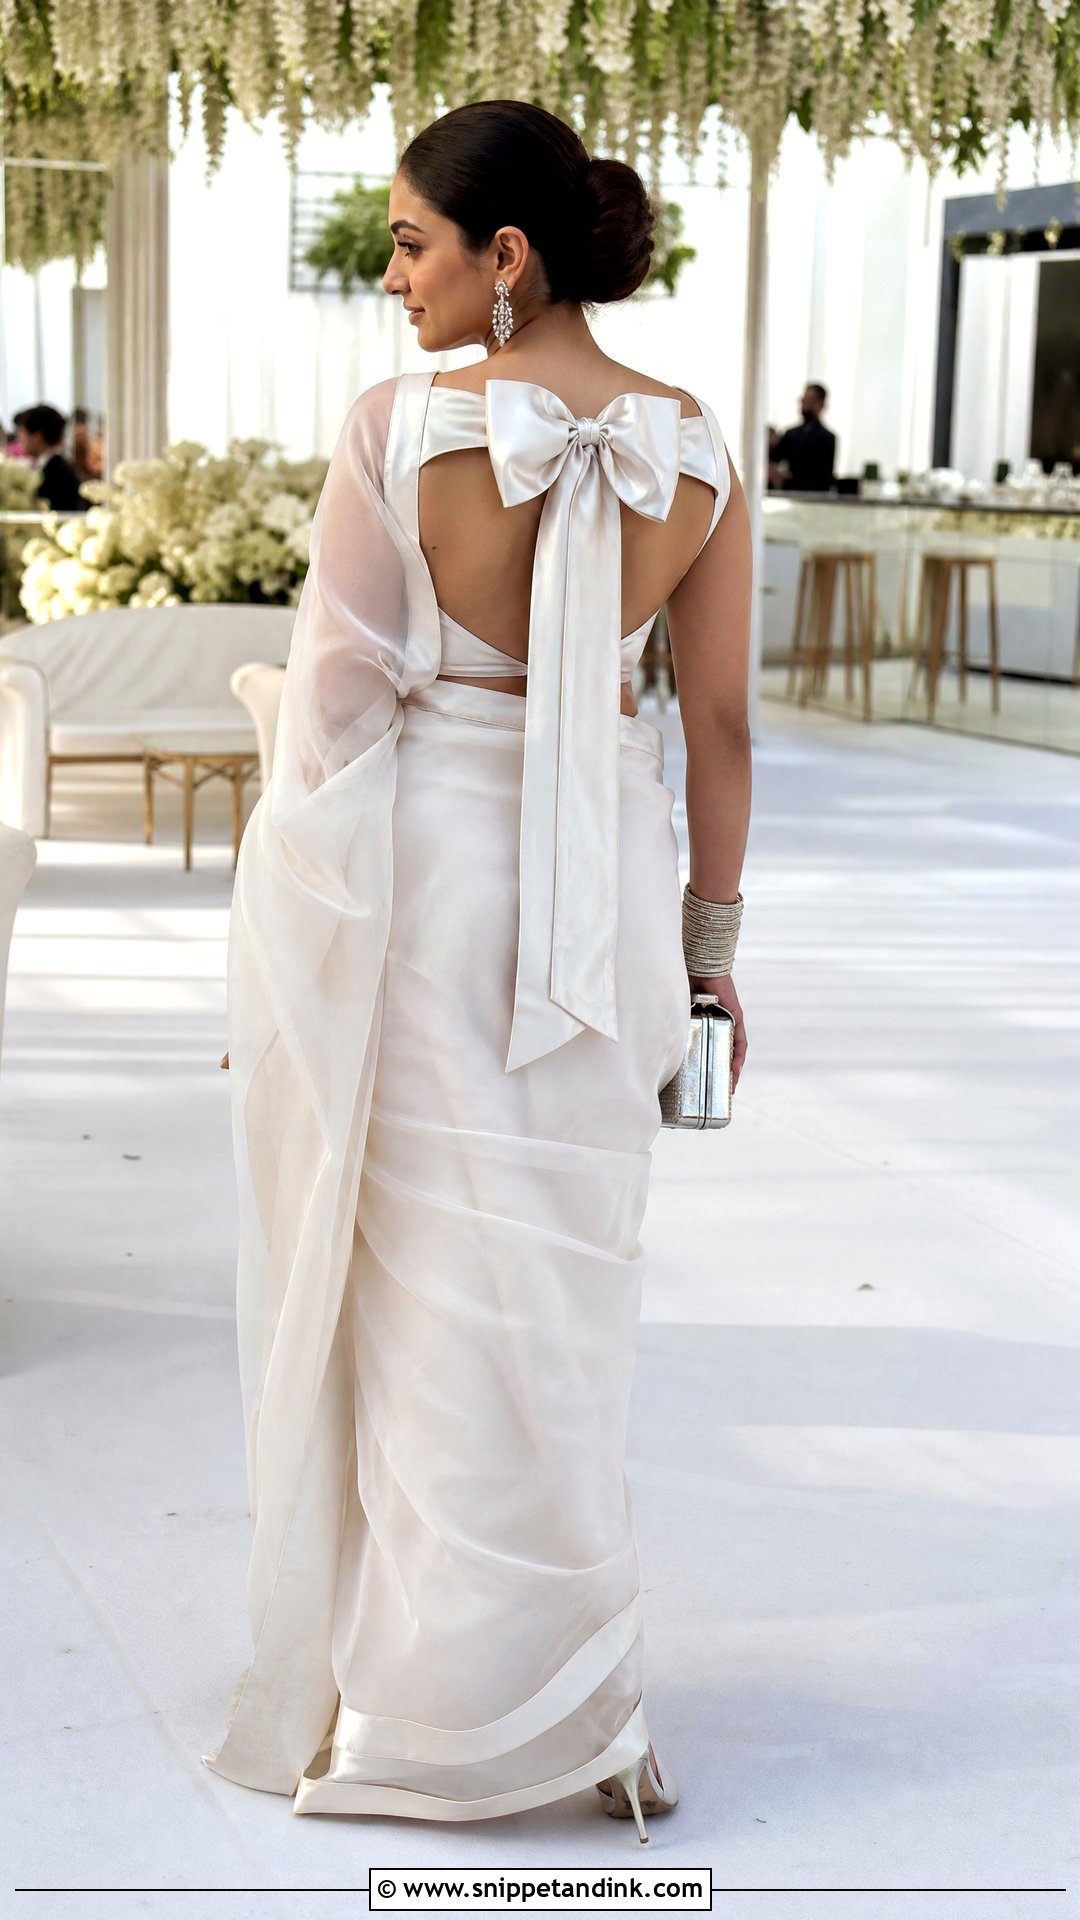
A bow at the back softens a saree or lehenga in a contemporary way, but the fabric has to have body. Silk, satin, velvet and structured brocade hold a bow’s shape; a soft georgette bow collapses within an hour. Proportion matters too, because an oversized bow can swamp a petite bride. Use one statement bow at the neckline or two smaller ties across an open back. As with the dori, I insist on concealed hooks underneath so the bow is purely decorative and isn’t holding the blouse together. Pair it with a plain or lightly worked organza saree and lift the hair so the bow stays visible.
10. Square Wedding Blouse Back Design
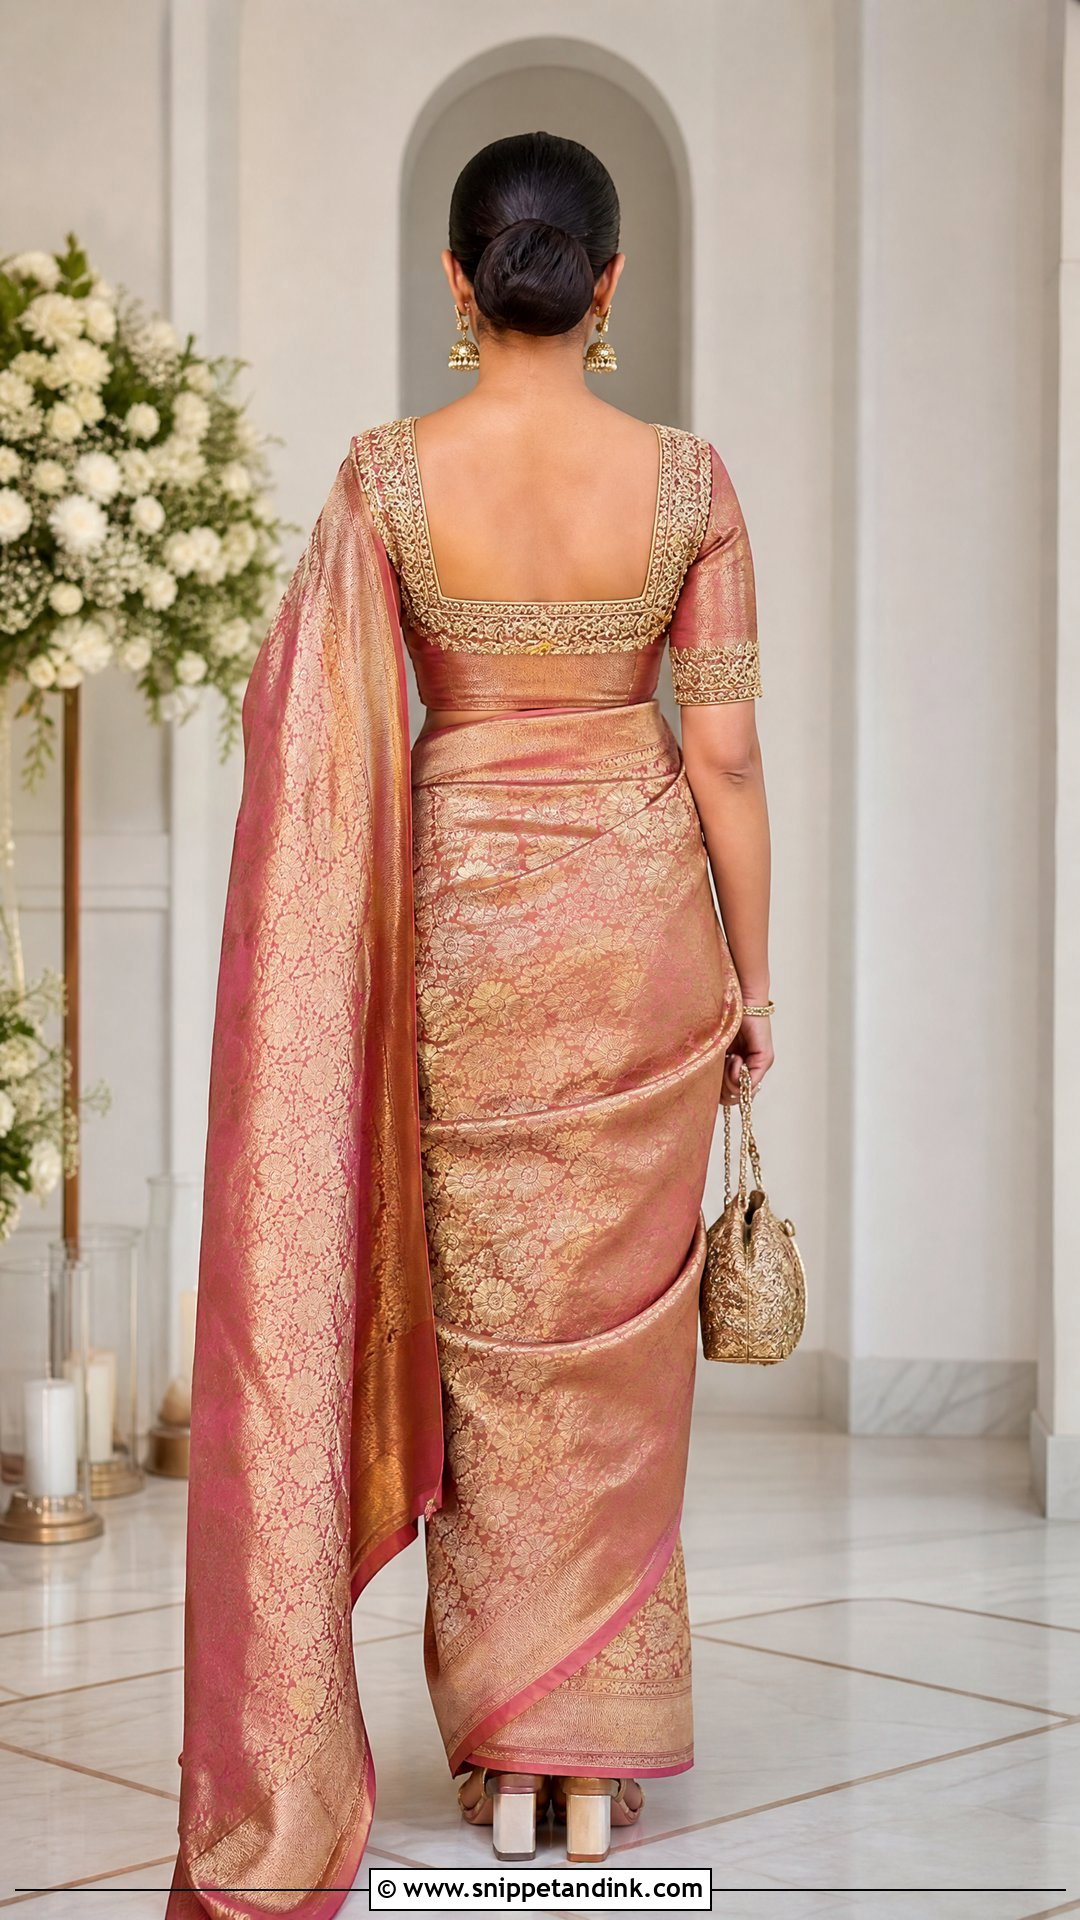
A square back looks crisp and architectural, and it works best with a saree whose border has geometric motifs. Its weakness is precision. Uneven corners are visible from across a room, so I ask the tailor to stabilise the neckline with interfacing and check that both corners sit at the same height when the bride stands naturally. A shallow square gives more coverage, a deeper one more drama. A broad embroidered border emphasises the shape, and tiny buttons or tassels add detail without rounding it off. Elbow sleeves balance it well. Leave enough room through the armholes for the arm movements of the rituals.
11. High Neck Wedding Blouse Back Design
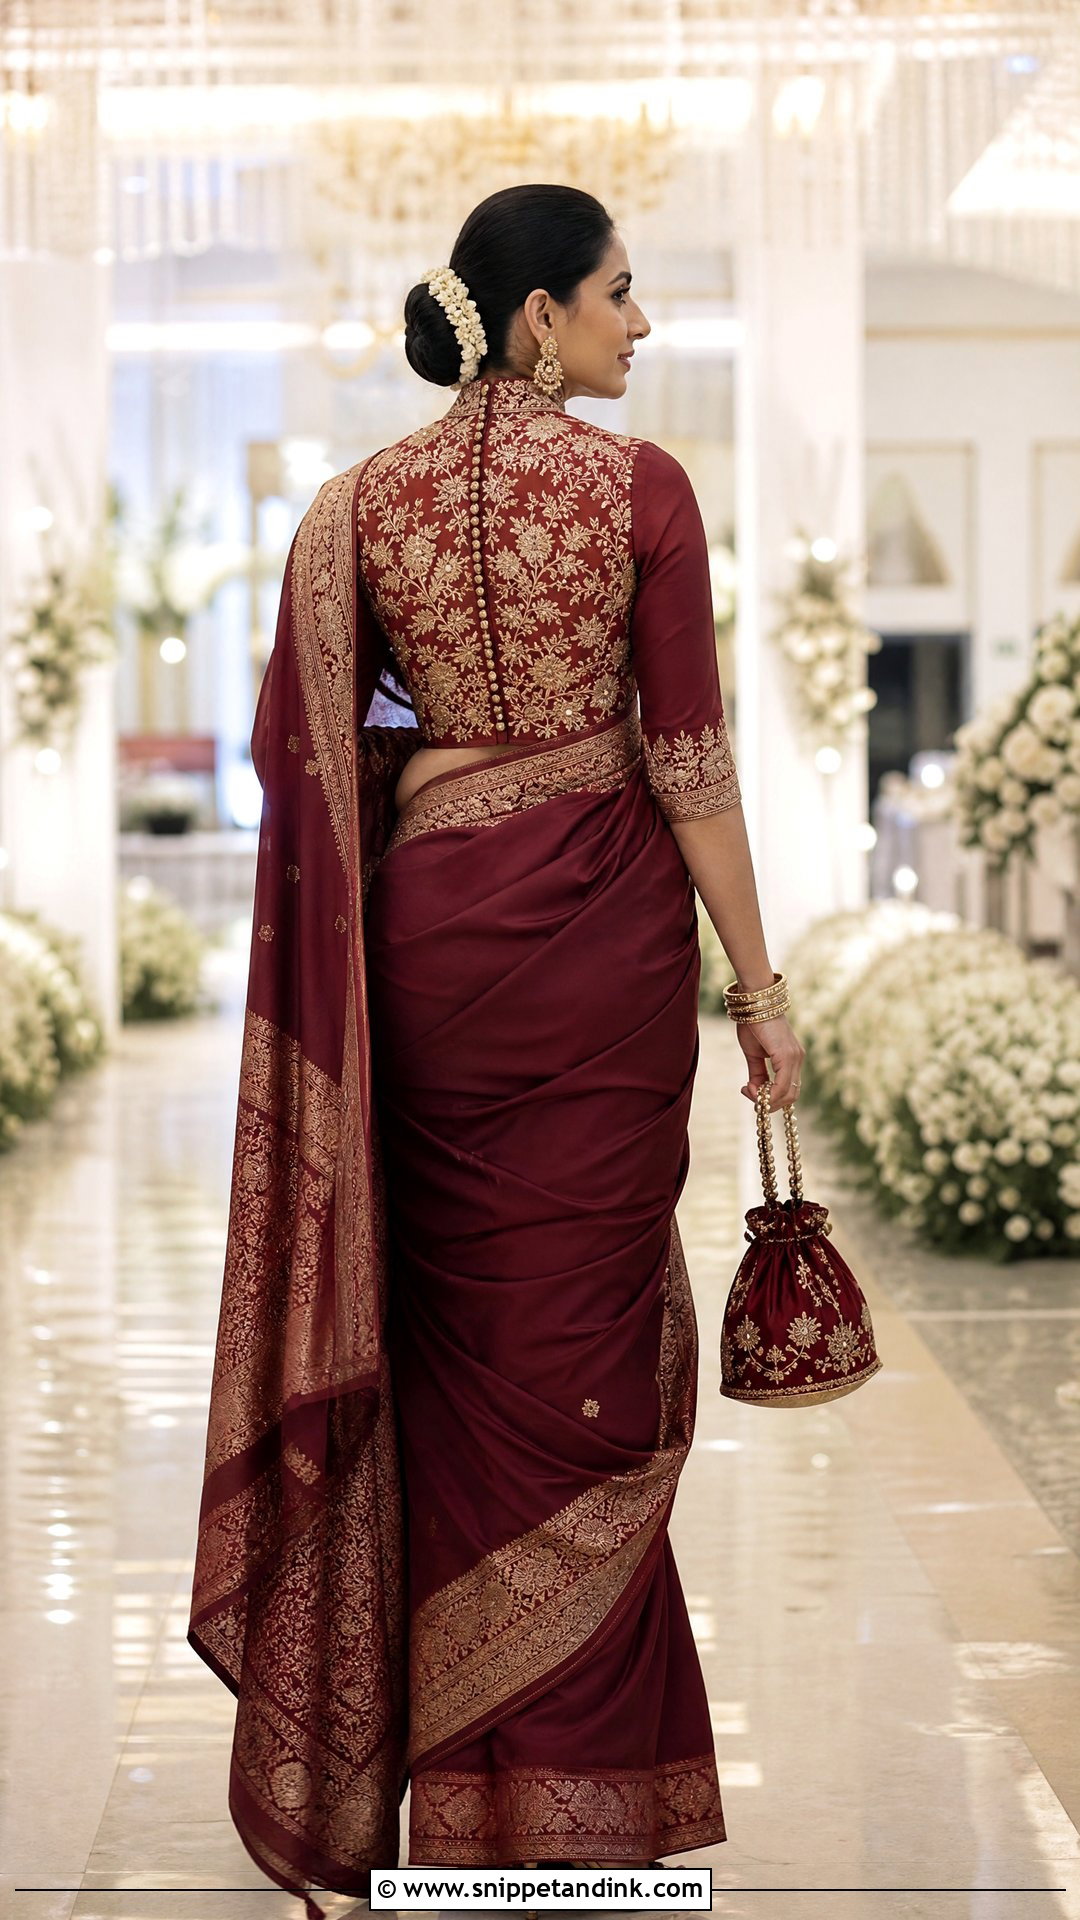
A high-neck back gives brides full coverage and a big canvas for embroidery. Floral vines, temple motifs, paisley patterns or personal symbols can spread right across the upper back. Since the neck is closed, skip a heavy necklace and let earrings or hair ornaments carry the jewelry. Comfort is my main concern with high necks: rough zardozi or stones placed directly against the skin at the nape will chafe over a long day, so I ask for a soft lining and keep heavy work an inch or so below the collar. A central zip or covered button row can be part of the design. It’s a natural choice for winter ceremonies.
12. Button Row Wedding Blouse Back Design
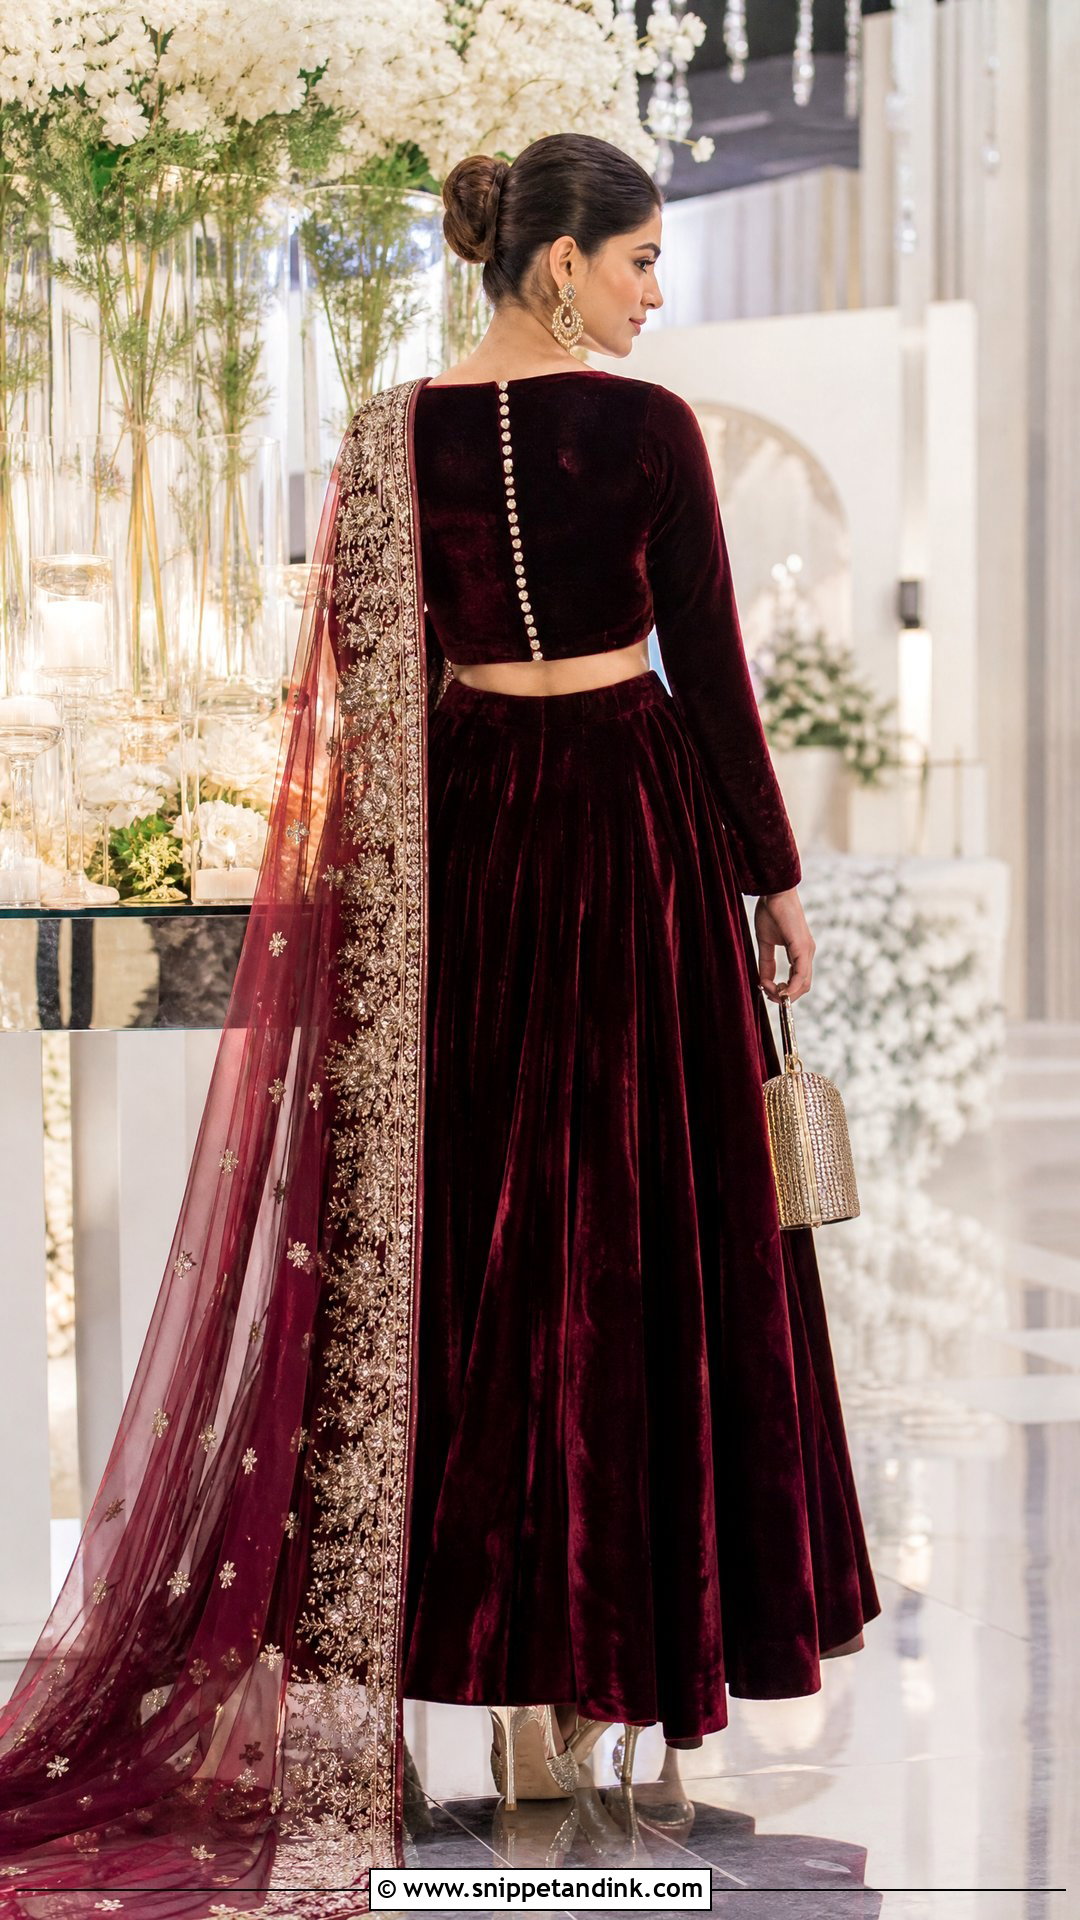
A row of fabric-covered buttons gives the back a tailored, slightly vintage line. The buttons can run all the way from neck to waist or stop above a small cutout, and they can match the blouse or contrast in pearl or metal. I’ll be honest: dozens of working loops take forever to fasten with nervous hands on the morning of the wedding. Make the buttons decorative and put an invisible zip or hidden hook opening underneath. Closely spaced buttons look more refined and make the back look longer. It pairs well with a velvet lehenga and a neat bun.
13. Corset Wedding Blouse Back Design
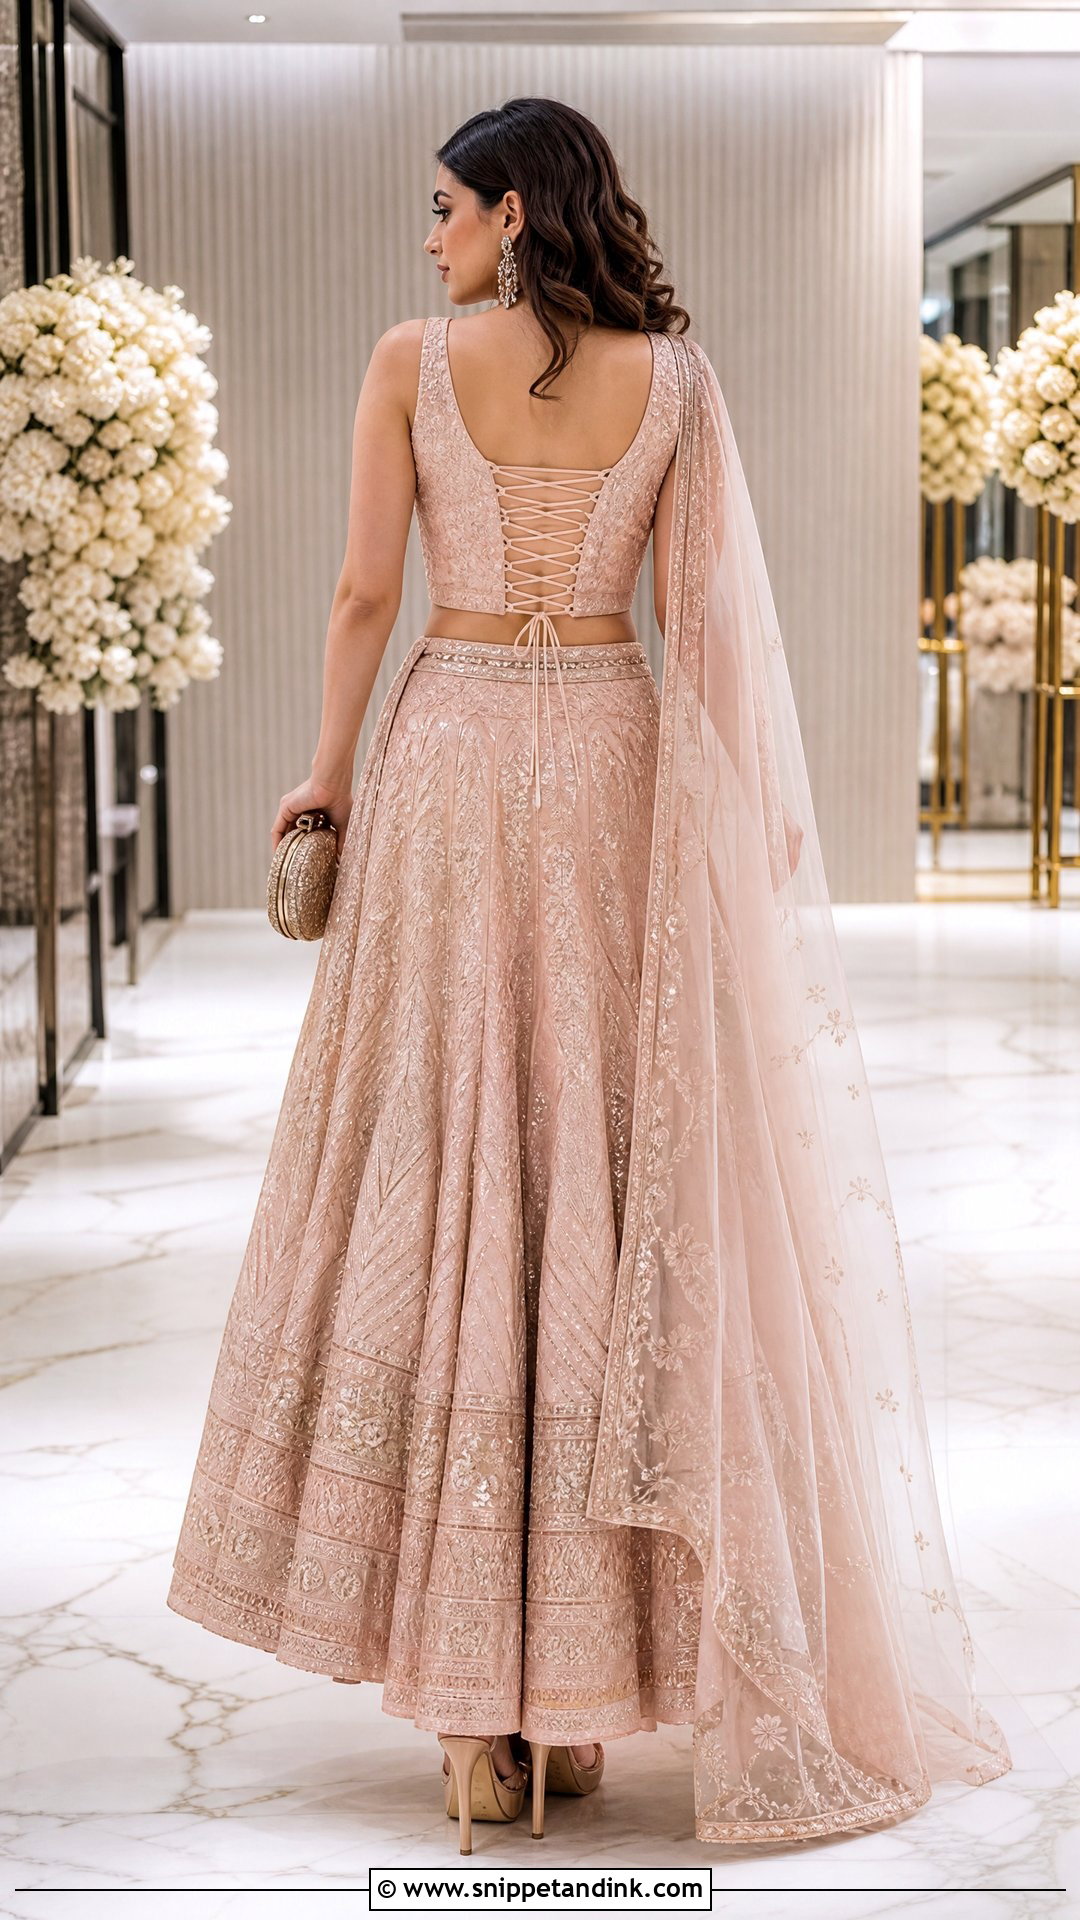
Corset lacing makes a blouse adjustable, which is useful if a bride’s weight shifts slightly in the final weeks. Ribbon, embroidered cord, velvet ties or crystal-trimmed laces can run through reinforced loops down the back. The loops are what fail, so they should be evenly spaced and stitched firmly into a strong backing, not just the outer fabric. A modesty panel under the lacing gives coverage and stops cords from rubbing the skin. Do every fitting in the undergarments you’ll wear on the day, since lacing amplifies small differences. Wider ribbon reads romantic; narrow metallic cord, sharper.
14. Mirror Work Wedding Blouse Back Design
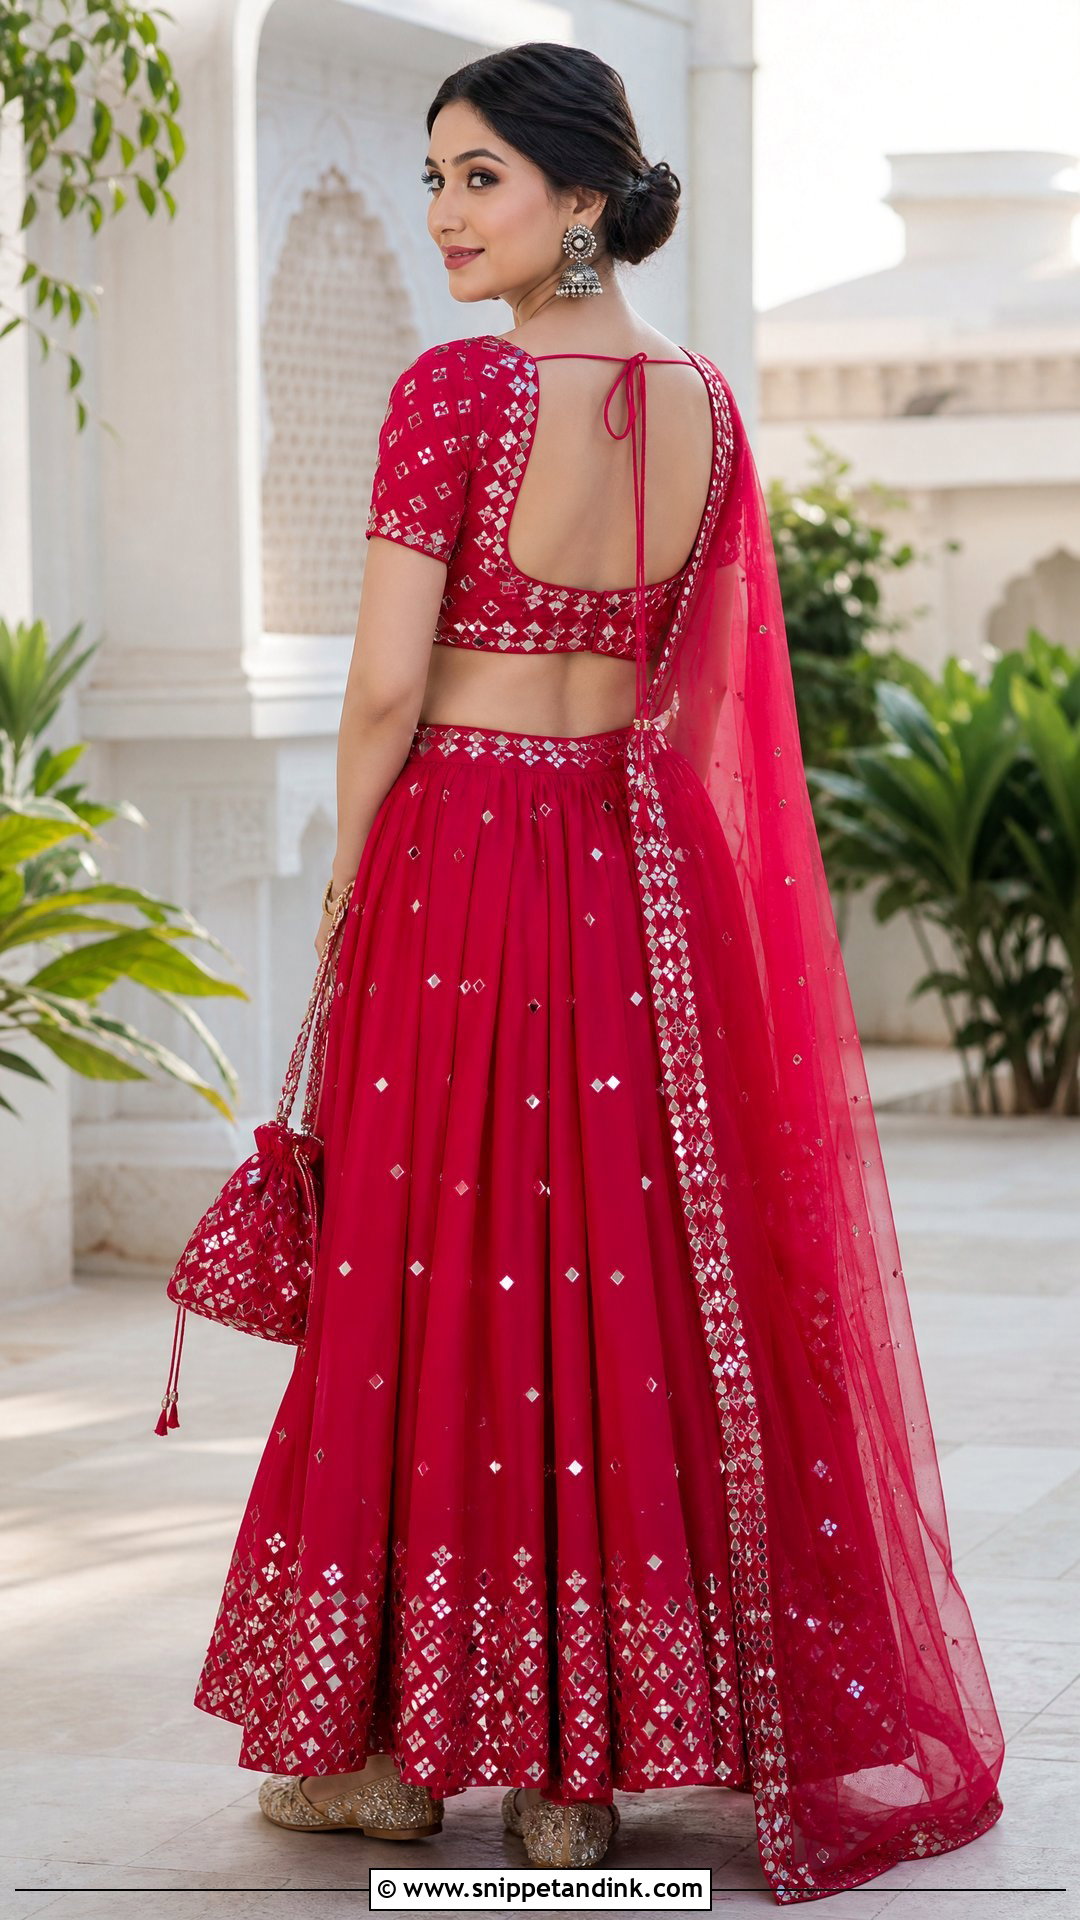
Mirror work gives a blouse sparkle that feels handcrafted rather than glitzy. Small mirrors can outline a cutout, cover the upper back or form floral and geometric patterns on a closed panel. The practical issue is edges: if the thread casing around each mirror isn’t secure, a sharp rim can scratch skin or catch on a delicate dupatta. I check by running the dupatta across the back during the fitting. A soft lining is essential. Keep the lehenga skirt plainer so the blouse leads. Smaller mirrors look refined, larger ones festive, and mirror work catches daylight well at a morning ceremony.
15. Cutwork Wedding Blouse Back Design
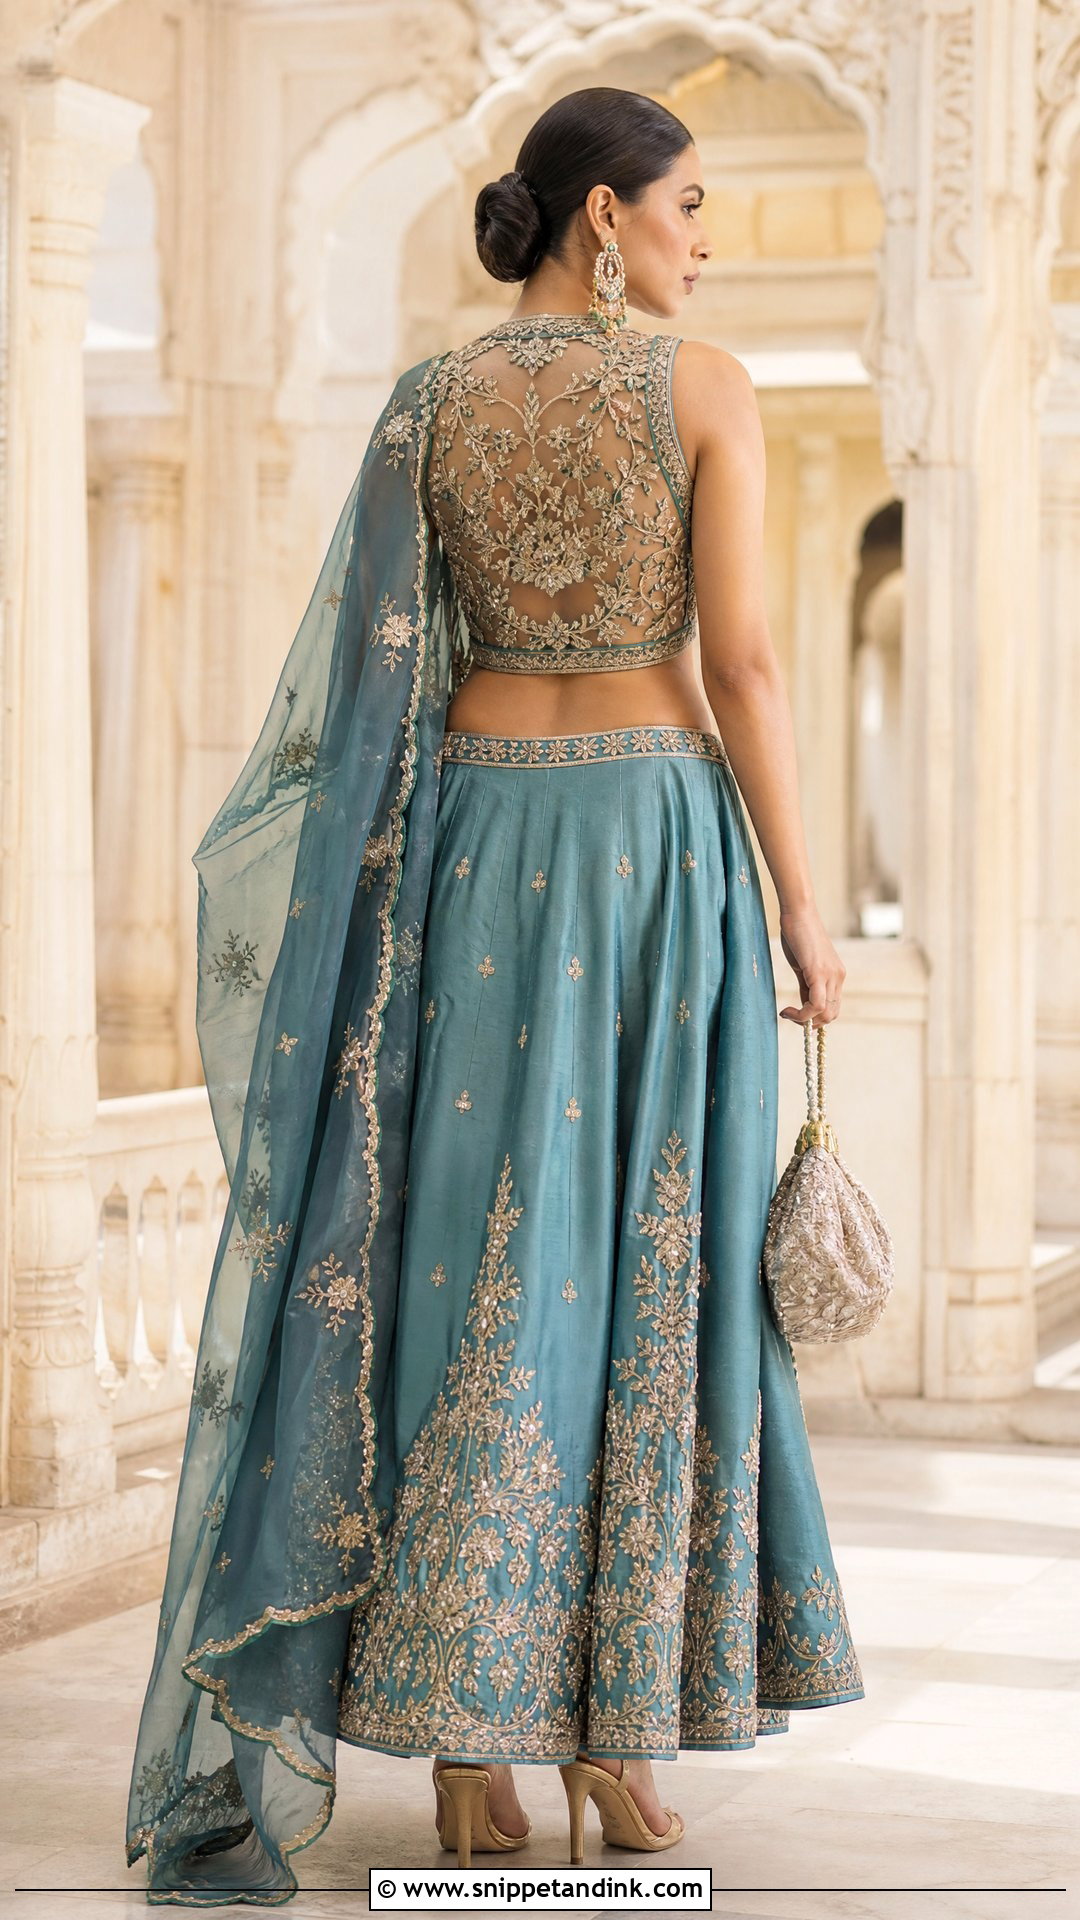
Intricate cutwork gives a blouse a lace-like, hand-finished look. Floral, paisley, scalloped or geometric openings across the upper back can be framed with embroidery. Fabric choice decides whether it works. Sturdy raw silk holds fine cutwork crisply, while lightweight georgette or satin can fray or distort, so I always ask the tailor to sample the pattern on the actual fabric first. Every opening needs a properly finished edge, and skin-toned net underneath adds stability without hiding the craft. Keep accessories coordinated rather than layered, because the back already has plenty going on.
16. Lotus Wedding Blouse Back Design
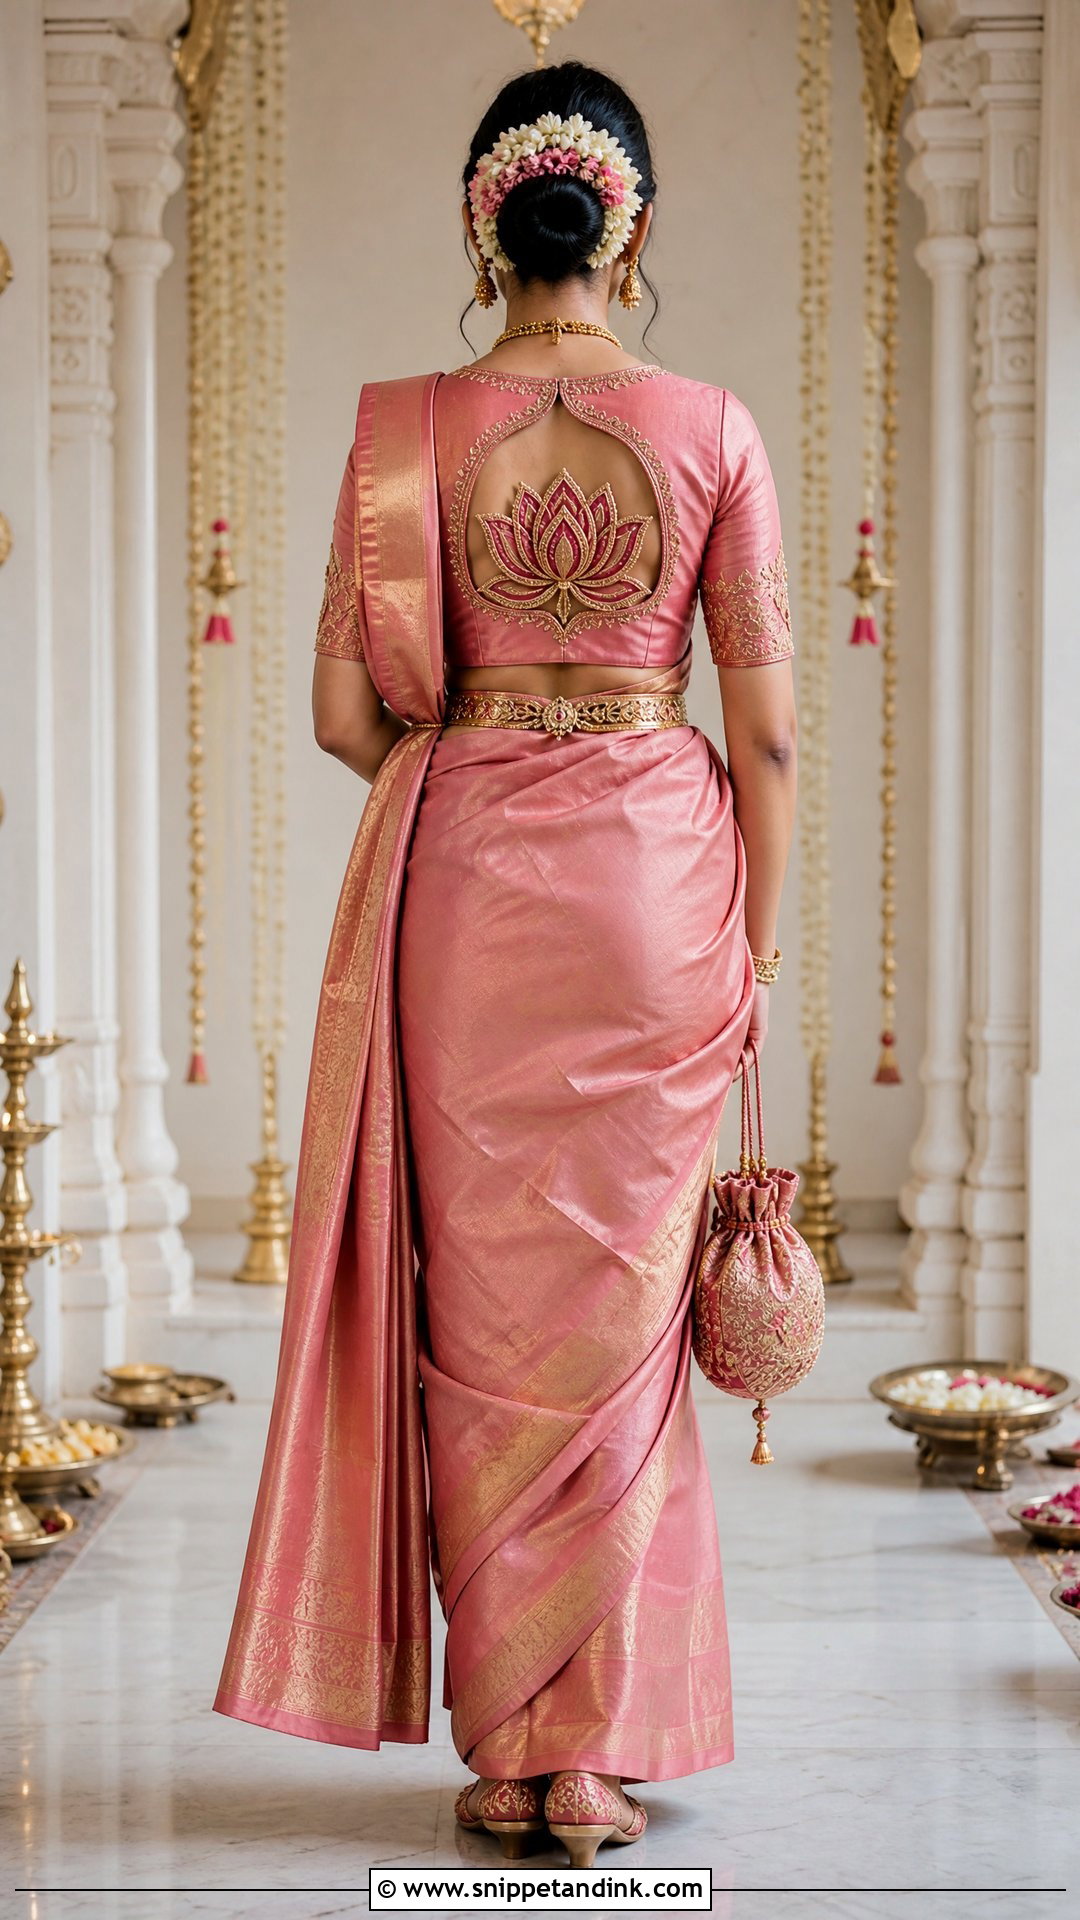
A lotus brings a motif with deep meaning in many Indian traditions, and on a blouse back it can be a cutout, an embroidered outline, layered appliqué or scalloped fabric petals. One clearly defined flower always looks better than several competing ones. Placement is personal: I position the lotus by measuring the bride’s torso so it sits centred and visible above where the saree pallu falls, not hidden beneath it. A net base supports delicate petals. Repeating a small lotus on the sleeves or waist belt links the outfit without overdoing it. Pink, red, maroon and gold sarees with temple jewelry suit it.
17. Peacock Wedding Blouse Back Design
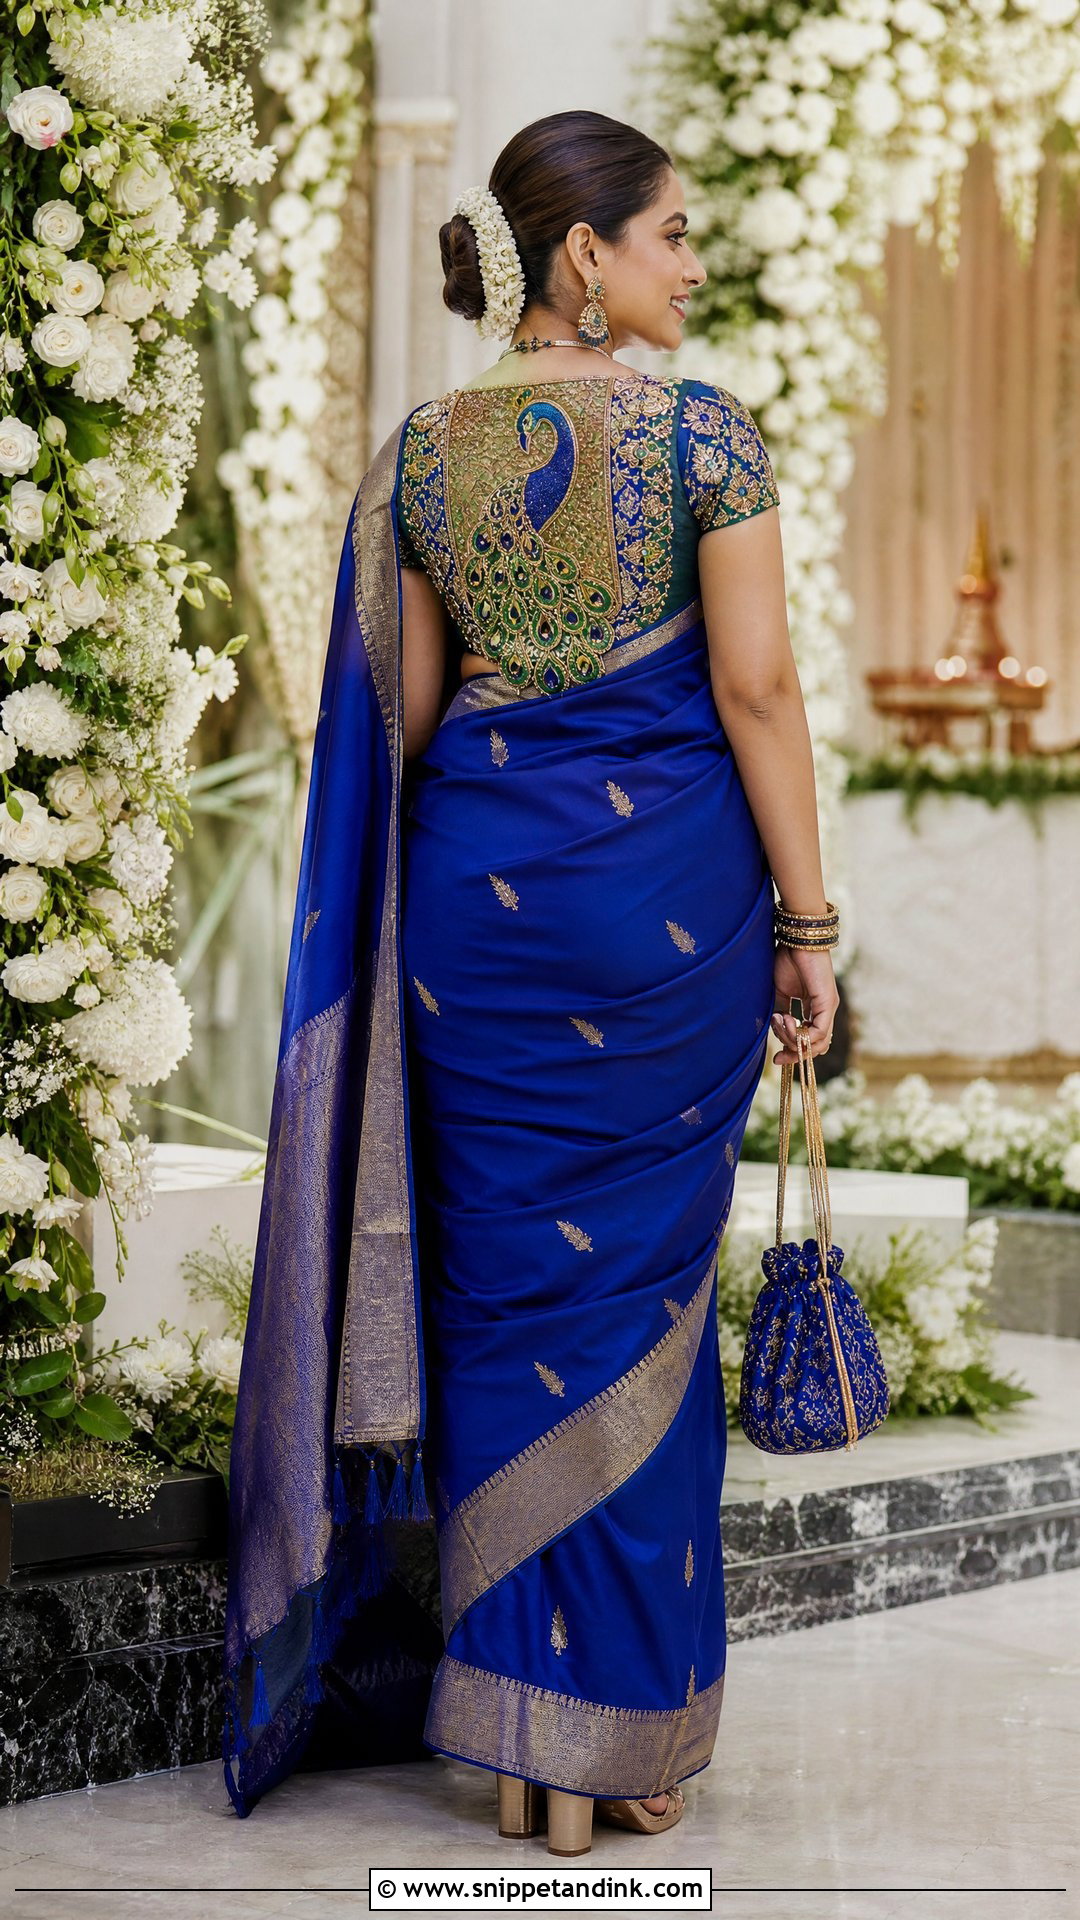
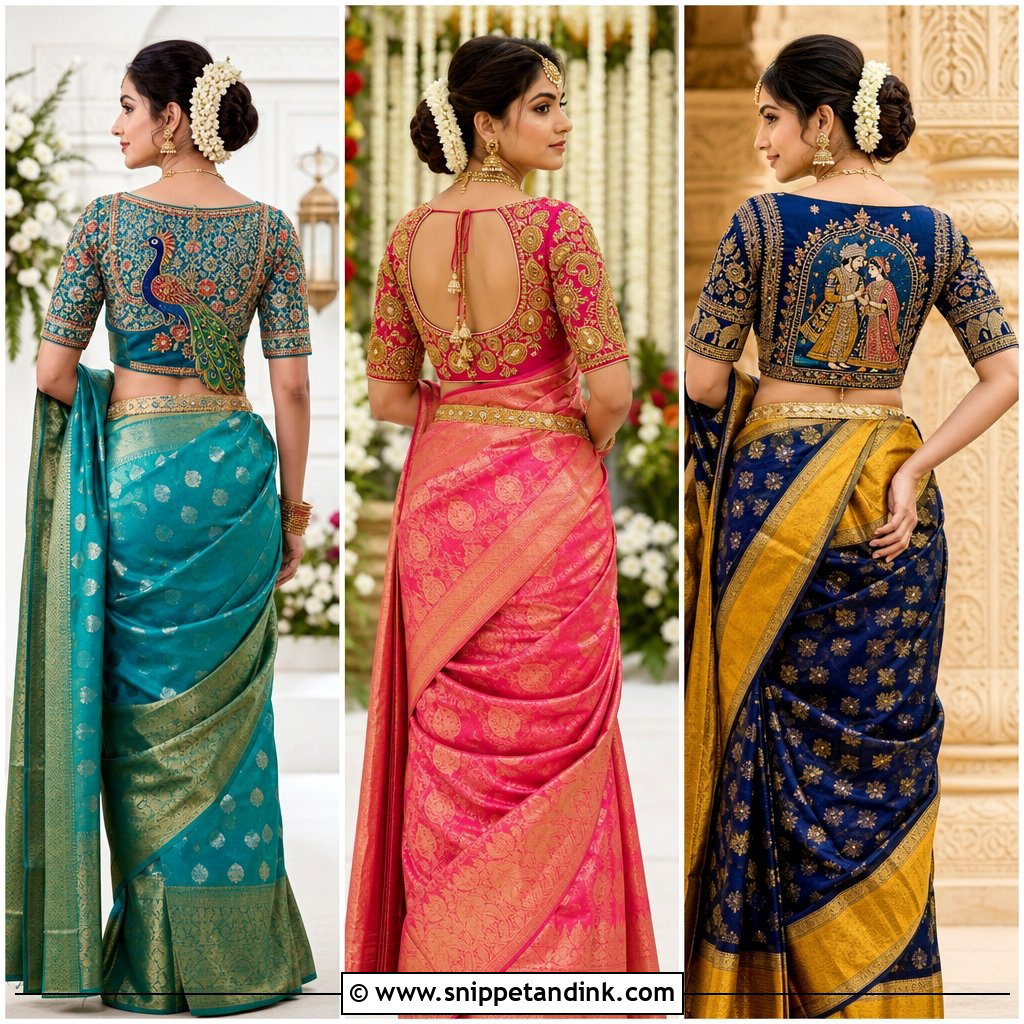
A peacock is one of the richest motifs you can put on a blouse back, built up in aari work, zari, beads, coloured thread or sequins. The design should follow the curve of the back so the bird’s body runs with the spine and the feathers spread toward the shoulders; drawn flat, it looks like a patch stitched on. Emerald, royal blue, purple and antique gold outfits suit it. Pin the pallu slightly open so it doesn’t cover the main embroidery. For a quieter version, embroider only the feather outlines; for more impact, carry the feathers onto the sleeves.
18. Personalized Wedding Blouse Back Design
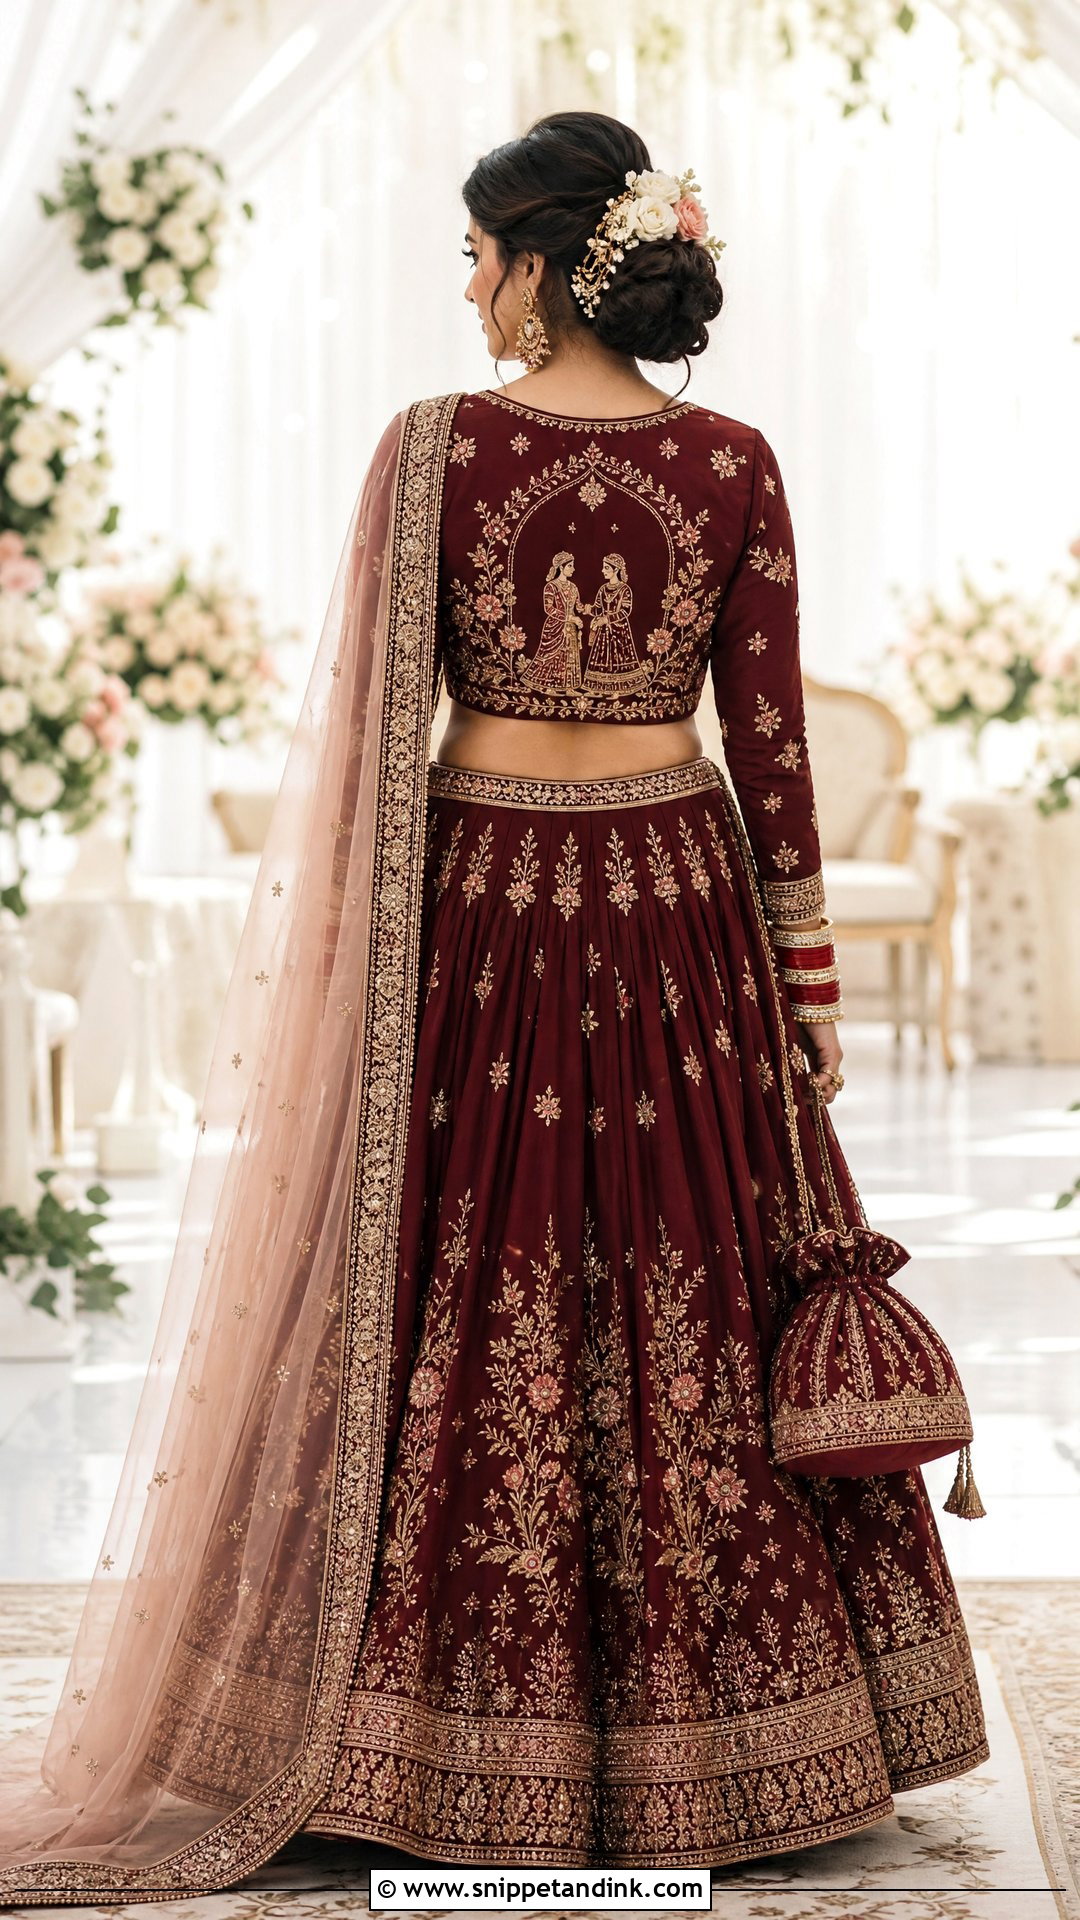
Personalised embroidery turns the blouse into a keepsake. Initials, the wedding date, a city skyline, a baraat scene or a family motif can be worked into a closed or partly open panel. Scale is where these go wrong. Small lettering in heavy stones becomes unreadable, while fine threadwork keeps detail clear, so I ask for a full-size sketch and approve it before anything is stitched. Keep heavy jewelry and the dupatta away from the artwork in photos. Allow extra time; custom work usually needs sampling and corrections before the final fitting.
19. Scalloped Wedding Blouse Back Design
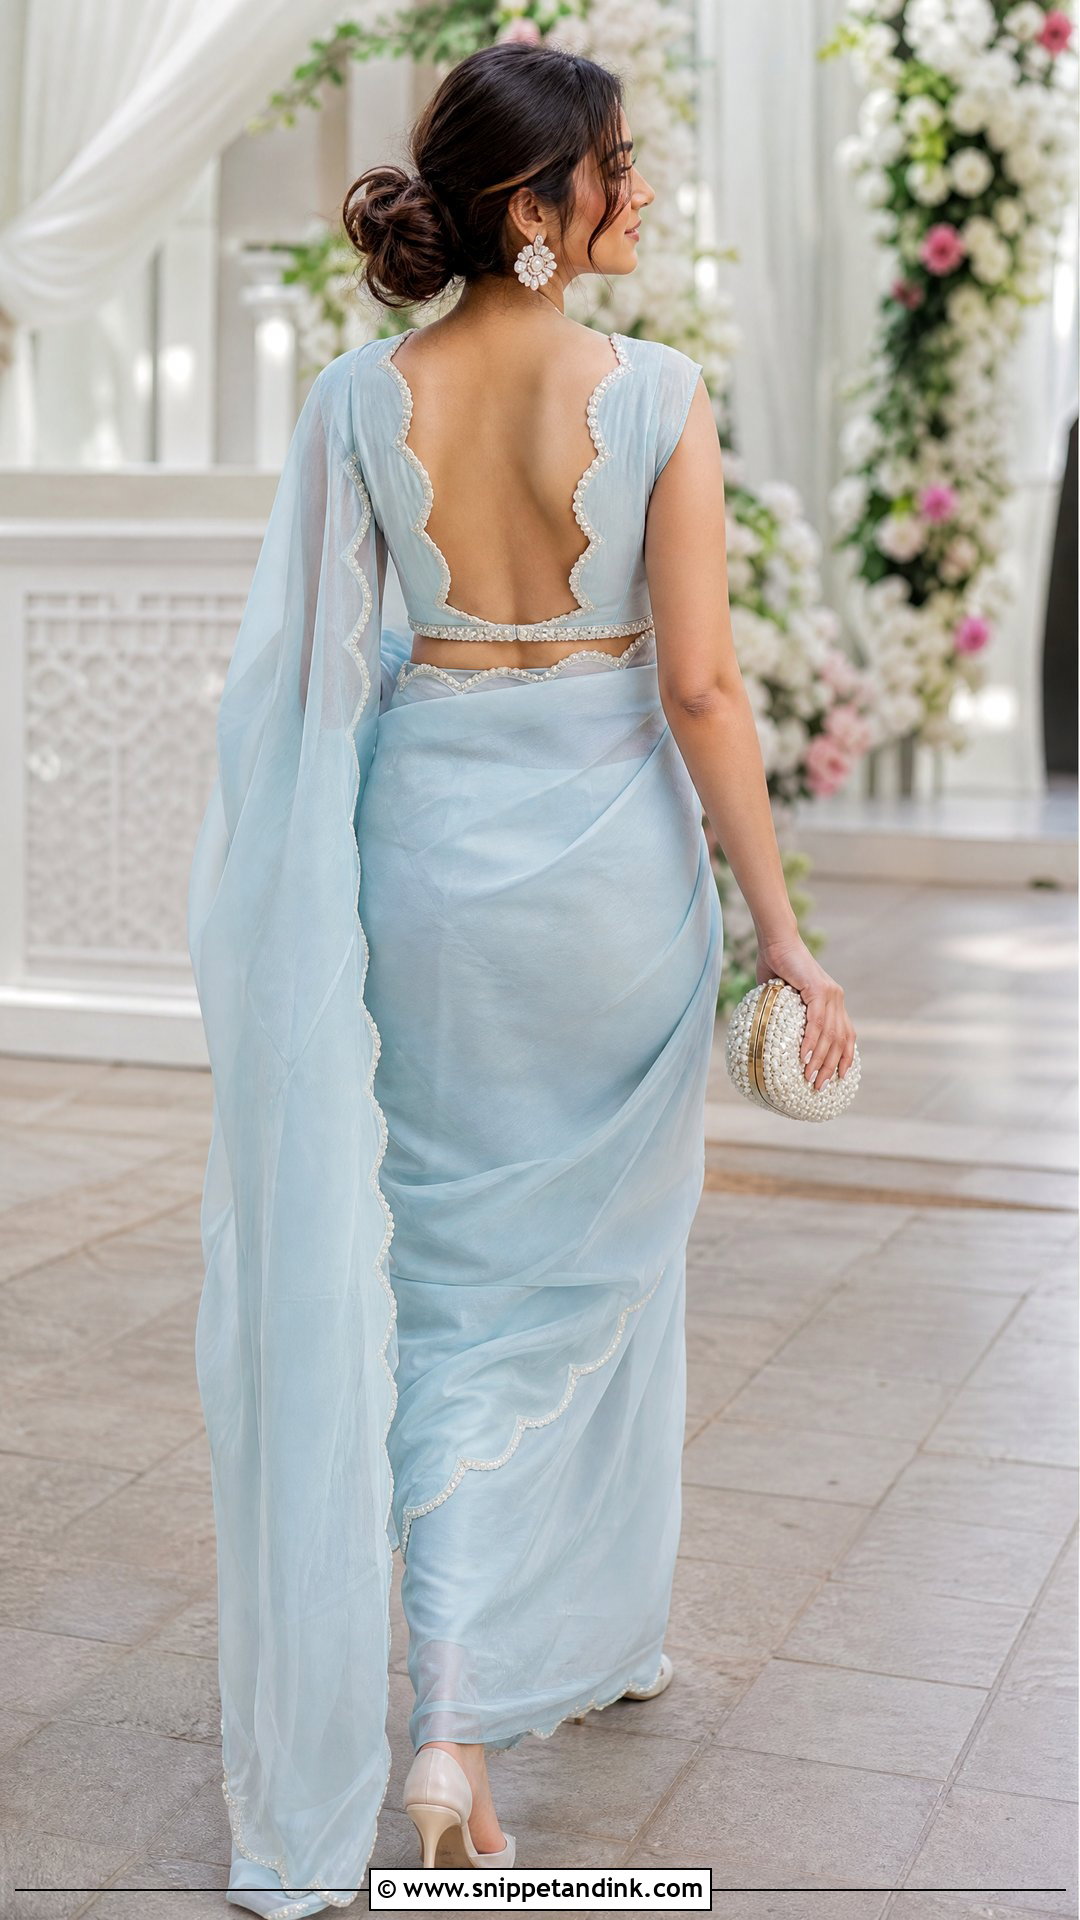
Scalloped edges soften any neckline, whether a U, V, square or fully open back, and can be finished with pearls, beads, threadwork or fine piping. The construction detail I look for is reinforcement inside each curve. Without it, the scallops fold inward after a few wears and the edge looks limp. Larger scallops look bold and modern, smaller ones delicate. A contrasting border makes the shape read clearly in photos. Repeating the scallop on the sleeves or saree border ties the pieces together, and it suits a pastel organza for daytime.
20. Sheer Cape Wedding Blouse Back Design
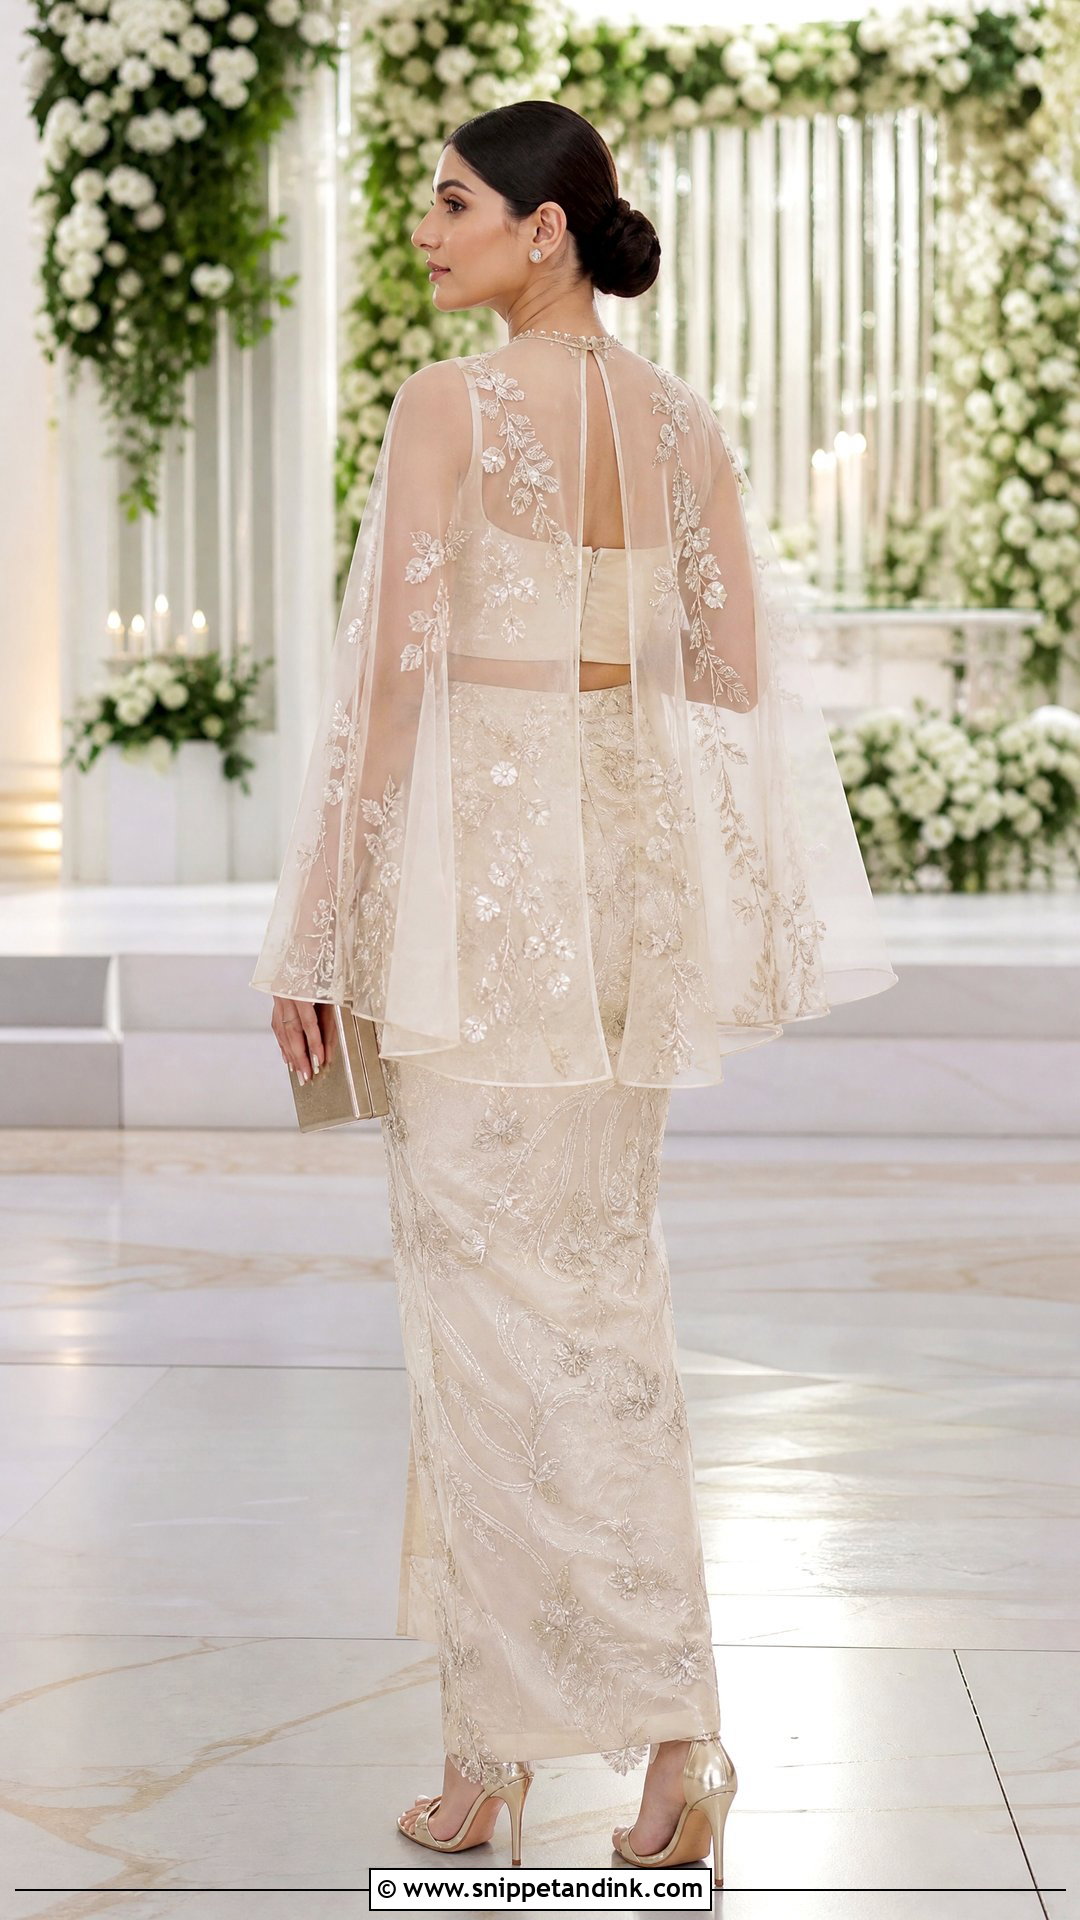
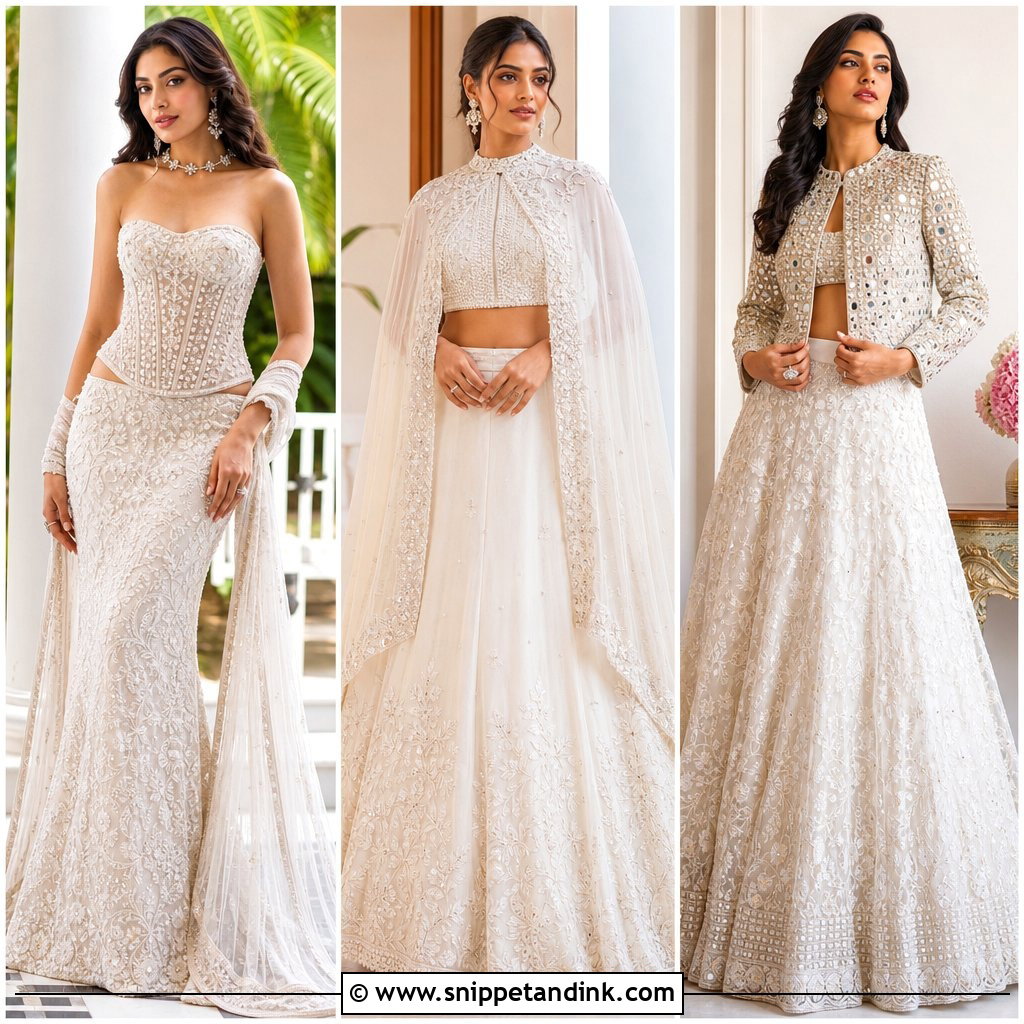
A sheer cape turns the back into something that moves as the bride walks. It can fall to the waist, the hips or the floor, in embroidered tulle, organza or soft net over a fitted blouse and a streamlined lehenga. A long cape and a heavy dupatta fight each other, so I usually swap the dupatta for a narrow shoulder drape or drop it entirely. Attachment is the real engineering: the cape needs several reinforced anchor points across the shoulders, or its weight pulls the neckline back. Have someone step on the hem at the fitting to see how it behaves. Metallic heels and a low bun finish it.
How Long a Bridal Blouse Really Takes
Hand embroidery is slow. Zardozi, aari and dense mirror work on a bridal blouse can take several weeks on their own, before stitching even starts, and a busy tailor during wedding season will be working on many brides at once. I advise ordering as early as your measurements are likely to stay stable, and booking at least two fittings.
Bring the real saree or lehenga, the jewelry and the shoes to the fittings, not just the blouse fabric. The pallu changes how much of the back shows, and heavy earrings can catch on high necks or capes. The final fitting should leave enough time for small adjustments, since a blouse that is a little loose can be taken in more easily than one that is too tight can be let out.
Where the pallu goes on the day
A saree pallu pinned high on the shoulder can hide half of a carefully planned back. Ask whoever drapes you to pin it so it falls toward the side rather than straight down the centre, and practise once in front of a mirror. Long hair braids and garlands cover the back too, so plan the hairstyle with the blouse in mind.
Test the Blouse the Way the Ceremony Will
A blouse back works when you plan it with the whole outfit rather than on its own. Match the neckline to the fabric and scale of the saree or lehenga, then to your jewelry, hairstyle and how much coverage you want. Deep V and corset backs bring drama; high-neck, keyhole and illusion designs give more support. Lotus, peacock, dori and cutwork bring craftsmanship and tradition. Whatever you choose, book at least one fitting just for movement. Sit cross-legged, walk, raise your arms as if taking a garland and test every closure. That fitting tells you more than any mirror.
You'll Like These Ideas:


Leave a Reply