
Feet are where I spend the most patient hours of a bridal booking, and they’re often the part a bride thinks about last. Foot mehndi shows every time you step into a ritual barefoot, lift your hem on a staircase or sit for the pheras, so it deserves its own plan rather than whatever time is left after the hands. The designs below run from full Indian coverage and Arabic trails to lotus anklets, Moroccan grids, jaali and open negative-space work. Use them to decide how much skin you want covered, then read my notes on what each one asks of your feet before you settle on bridal henna feet mehndi designs for your own booking.

Feet Take Henna Differently Than Hands
The skin on the soles is thick and stains very dark, while the top of the foot takes color more like the back of the hand, usually a shade lighter. That’s why I keep the finest detail on the top of the foot and let denser fill run along the sides and toes, where it reads well from a distance. Warmth helps a stain develop, and feet tend to run cool, so I ask brides to keep their feet under a shawl or blanket while the paste sits.
Getting your feet ready in the days before
- Book your pedicure, foot scrub and any waxing two or three days before your mehndi, never after. Exfoliation lifts a fresh stain.
- Skip lotion and oil on your feet on the day itself. The paste needs clean, dry skin to bind properly.
- Ask whether the cones are freshly mixed natural henna. So-called black henna can contain PPD, which can cause serious skin reactions, so refuse it on your feet as anywhere else.
- Arrive in loose slip-on shoes, or none, and bring open sandals for the trip home.
Ask your artist how long your chosen coverage will take on both hands and feet together. Brides almost always underestimate it, and a rushed foot is where shortcuts show.
1. Full Foot Bridal Mehndi Design
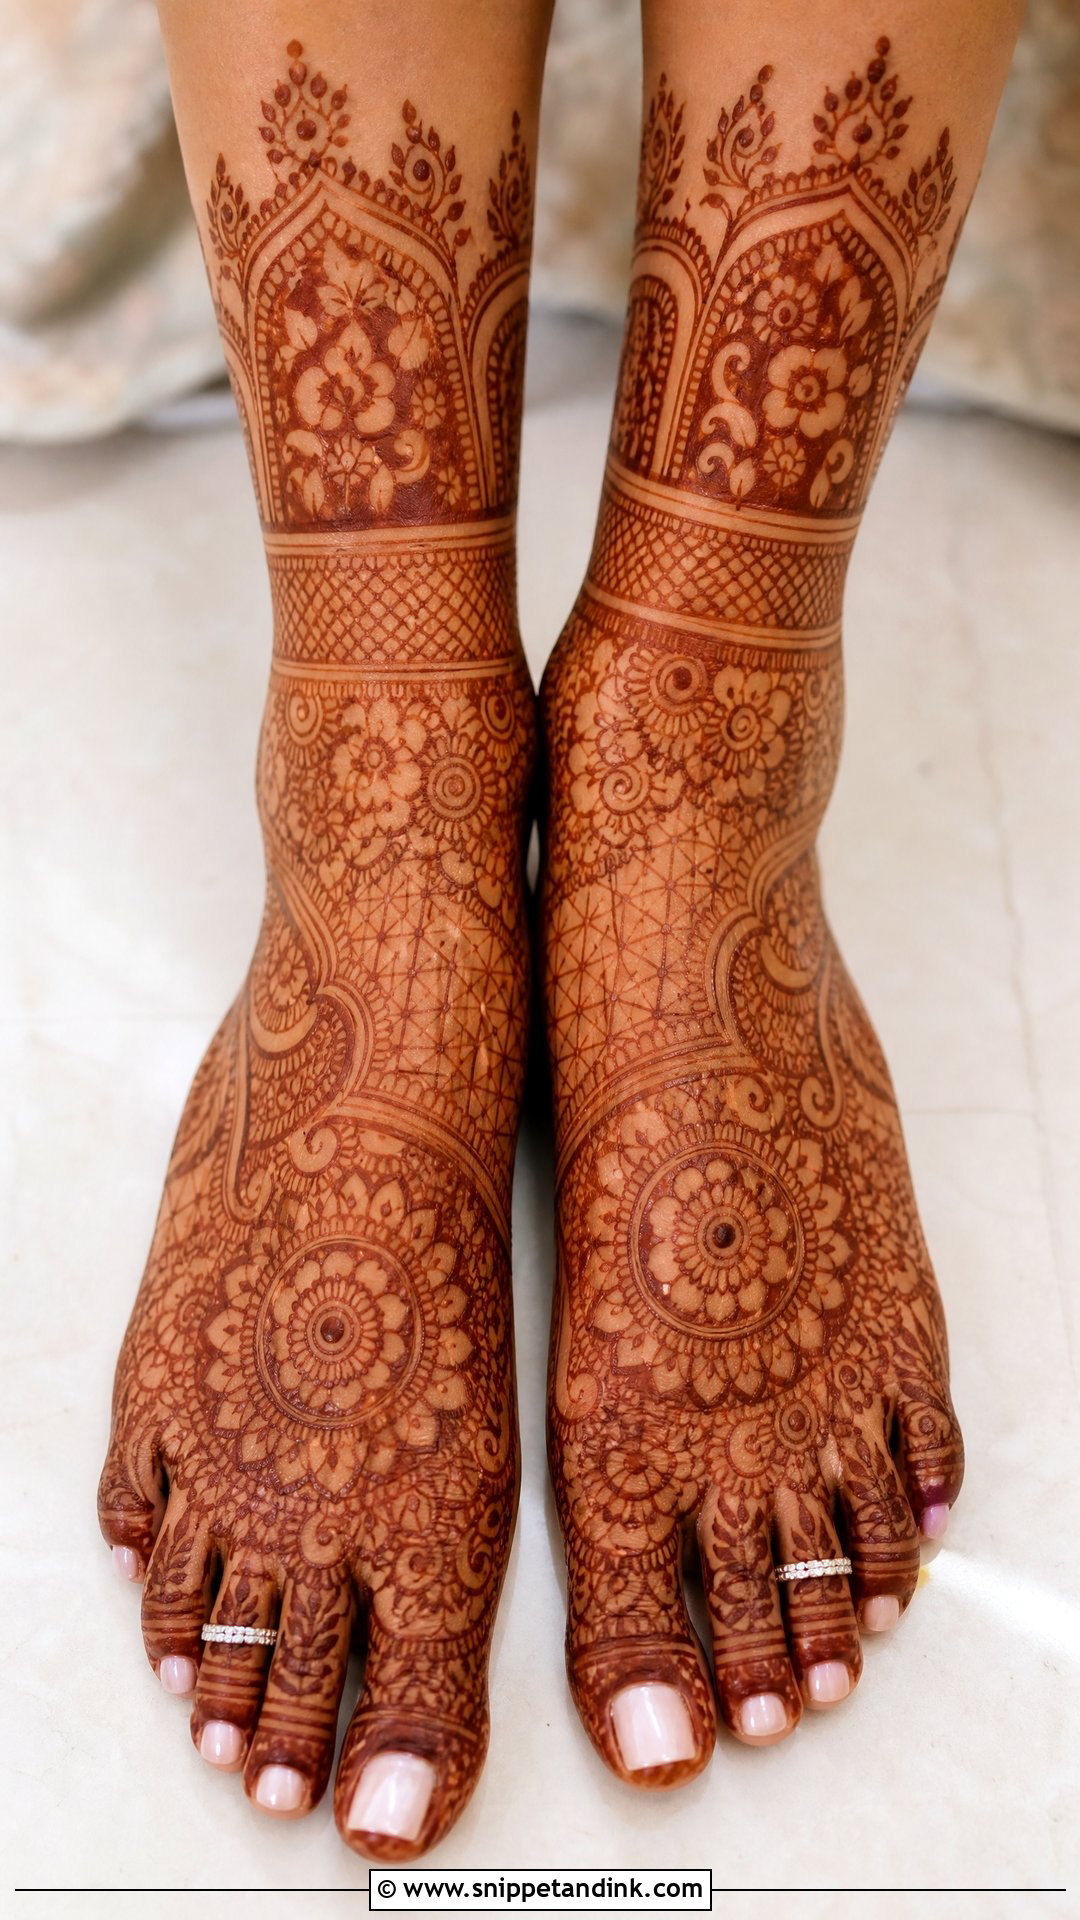
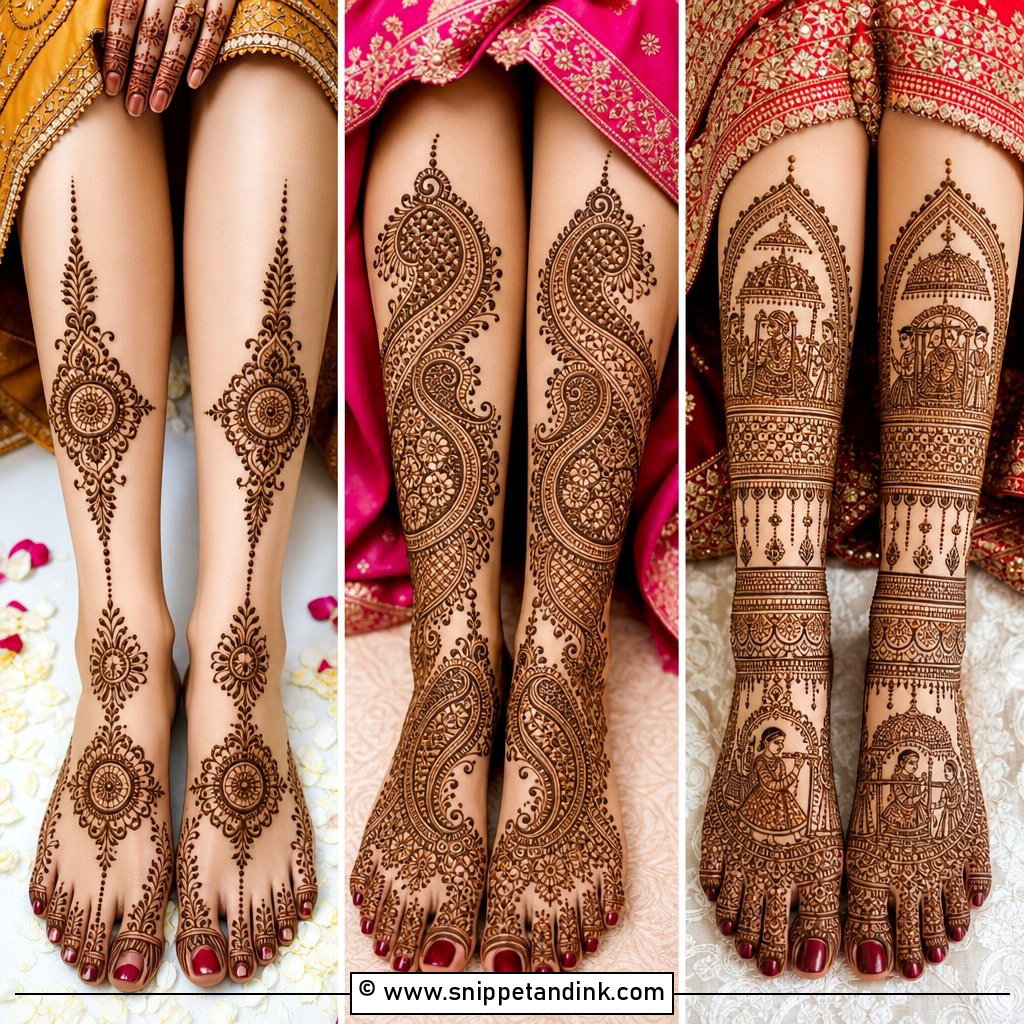
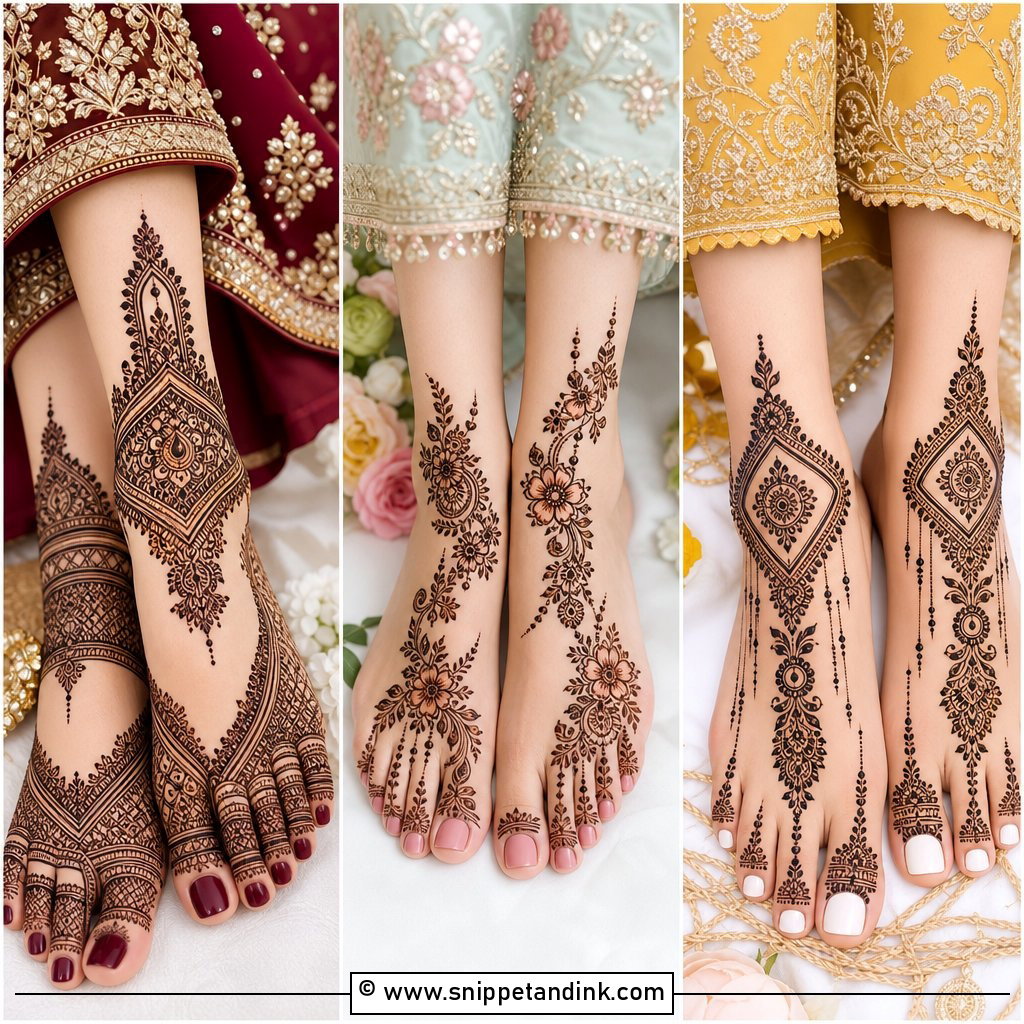
Full coverage takes the paste over the toes, the top of the foot, both sides and the ankle, sometimes climbing onto the lower leg. Paisleys, florals, a mandala and fine vine fillers usually share the space. The real work here is mirroring. I draw the main motif on both feet before filling either, because if I finish the left foot completely, the right one always ends up a few millimeters off. Expect to sit with your legs out for a long stretch, and don’t plan on walking until the paste has set.
2. Indian Bridal Feet Mehndi Design
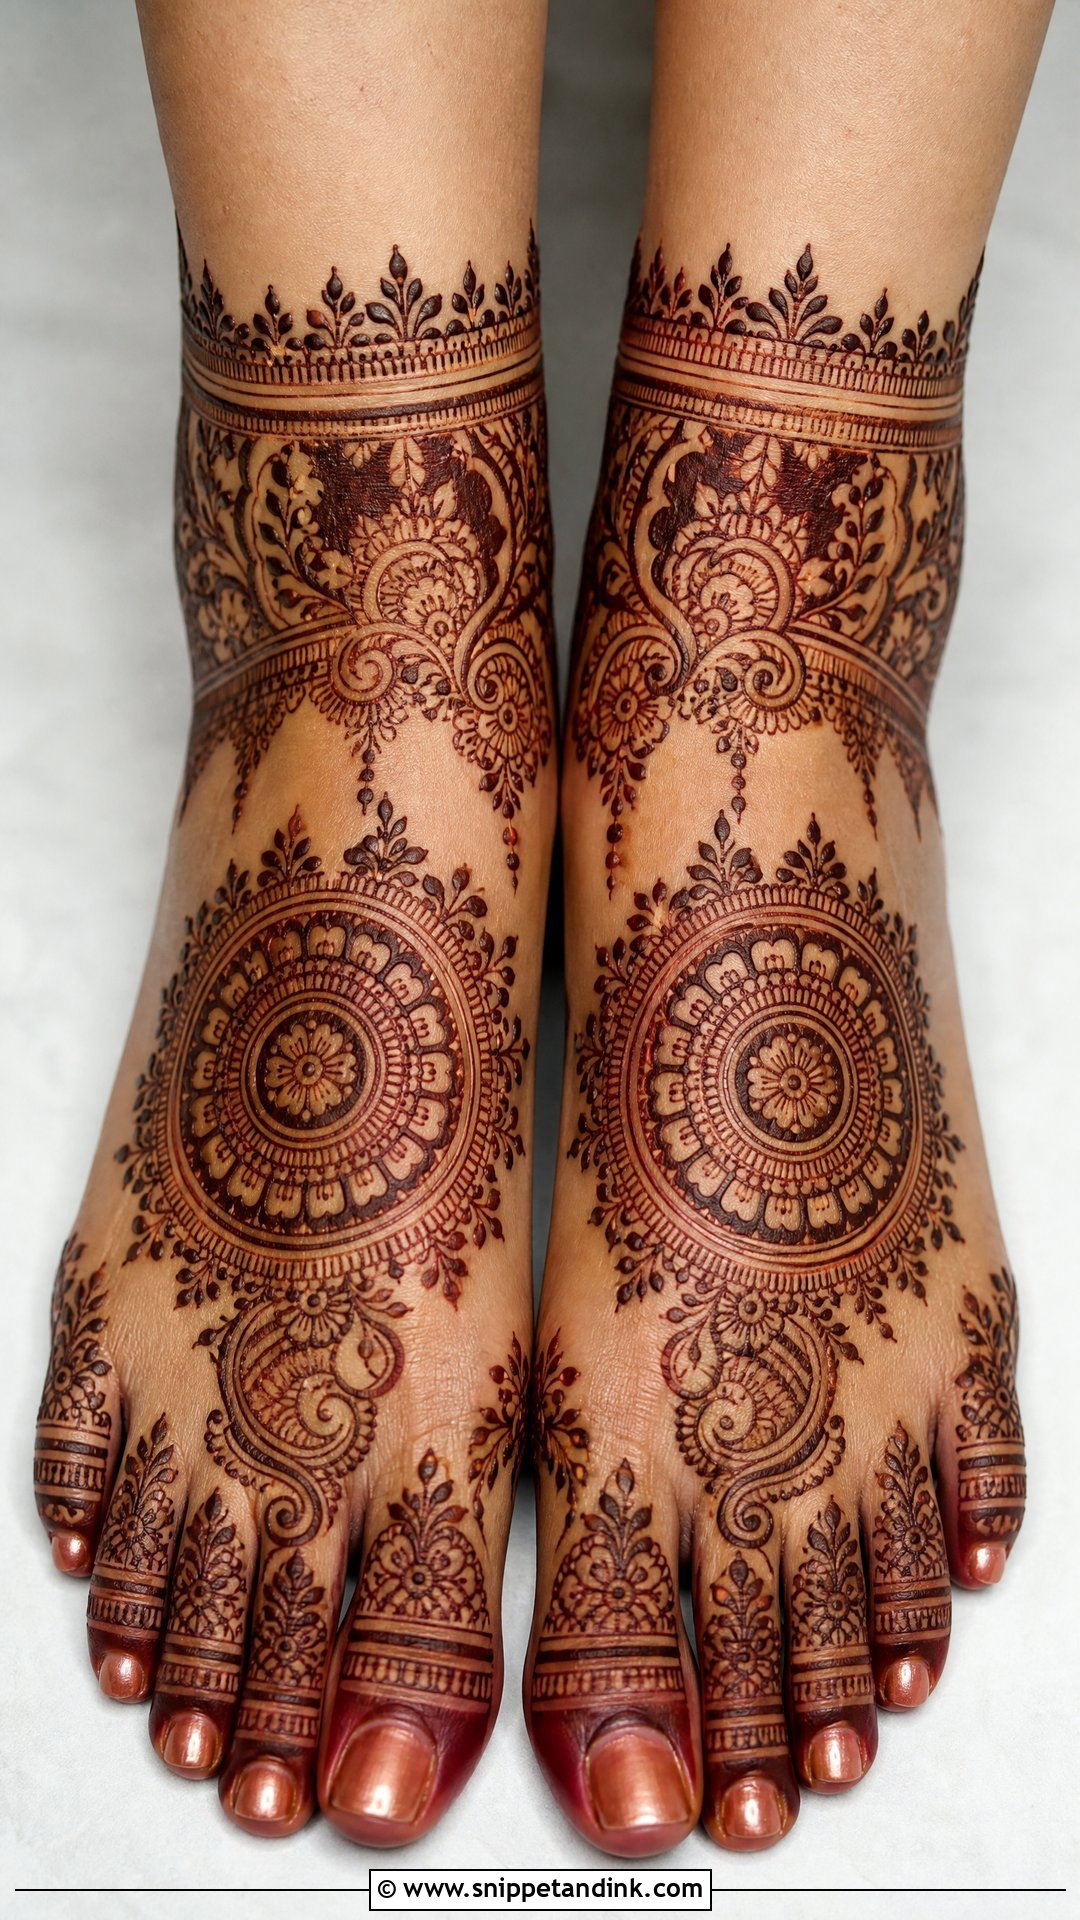
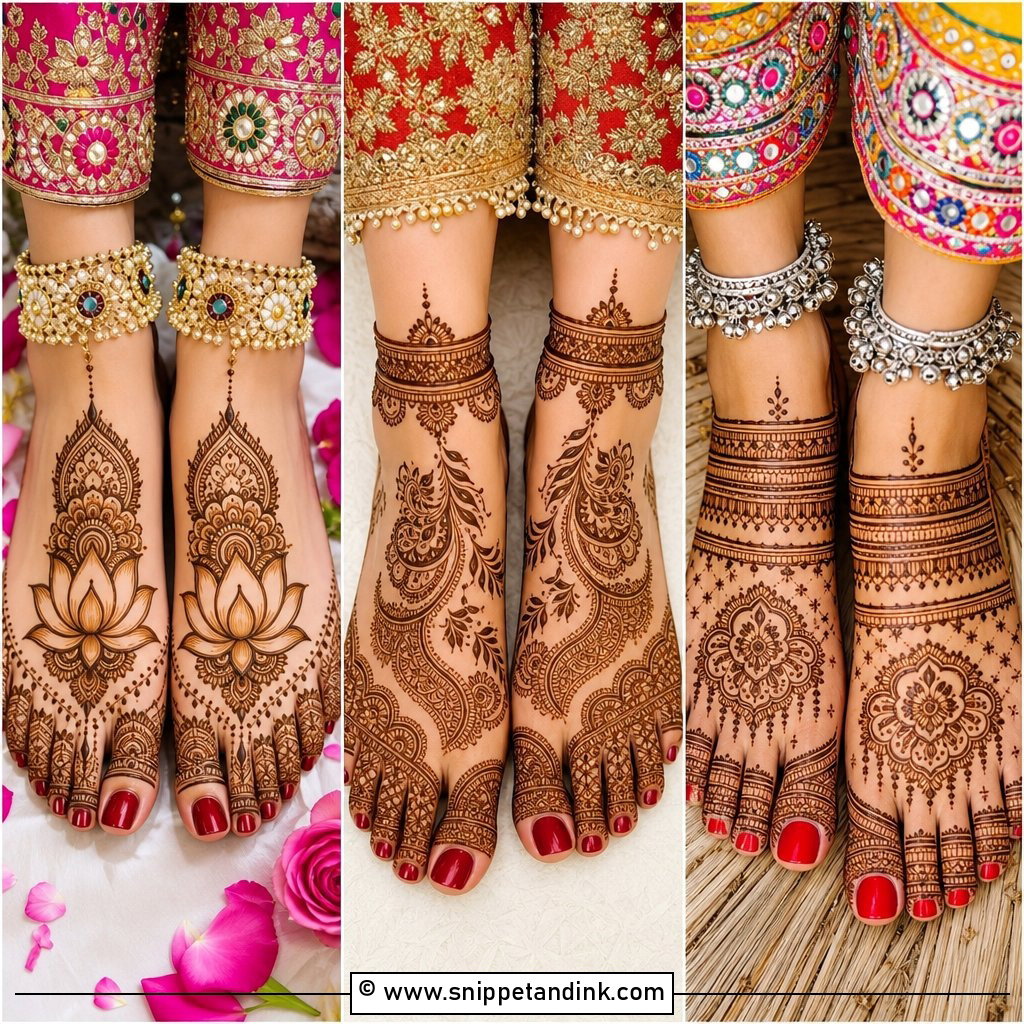
An Indian bridal feet mehndi design usually starts from a central mandala or lotus on the top of each foot and grows outward with peacocks, paisleys, vines and checkered fills. I finish the toes with ring bands and dots and often close the ankle with a payal-style border. Initials or a wedding date can be hidden in the fillers, but tell me before I start, since tucking them in afterward crowds the layout. Dense work like this needs fresh paste and a bride who can stay still, because one smudge inside a checkered fill is very hard to repair.
3. Arabic Bridal Feet Mehndi Design
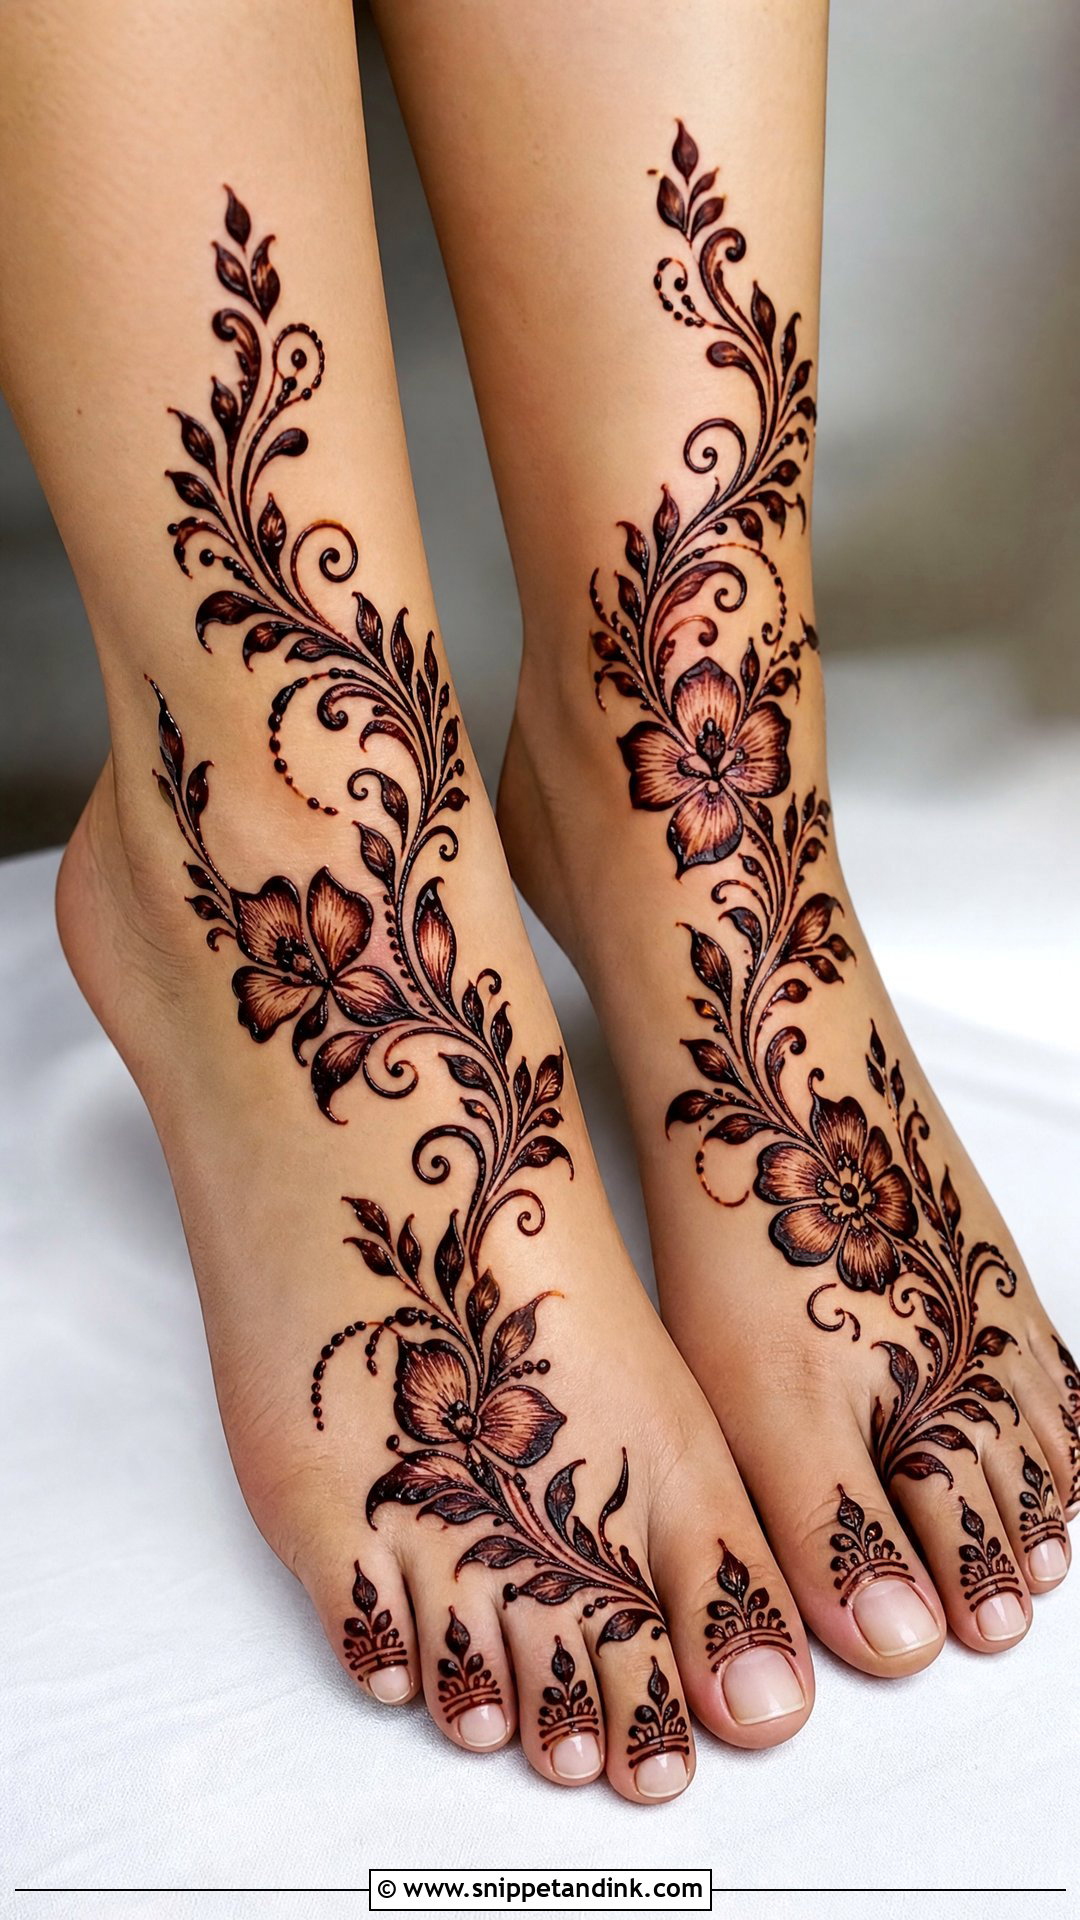
Arabic work leaves skin showing on purpose. Wide shaded leaves, big paisleys and curved vines run diagonally from the toes toward the ankle, so the design reads clearly from across a room. It goes on much faster than full Indian coverage, which matters if your feet are scheduled after a long hand session. If your outfit already carries heavy embroidery, Arabic foot henna keeps the lower half of the look from competing with it. Shading is done by spreading the paste thin, so ask your artist to show you a shaded leaf before she commits to the whole trail.
4. Lotus Bridal Foot Mehndi Design
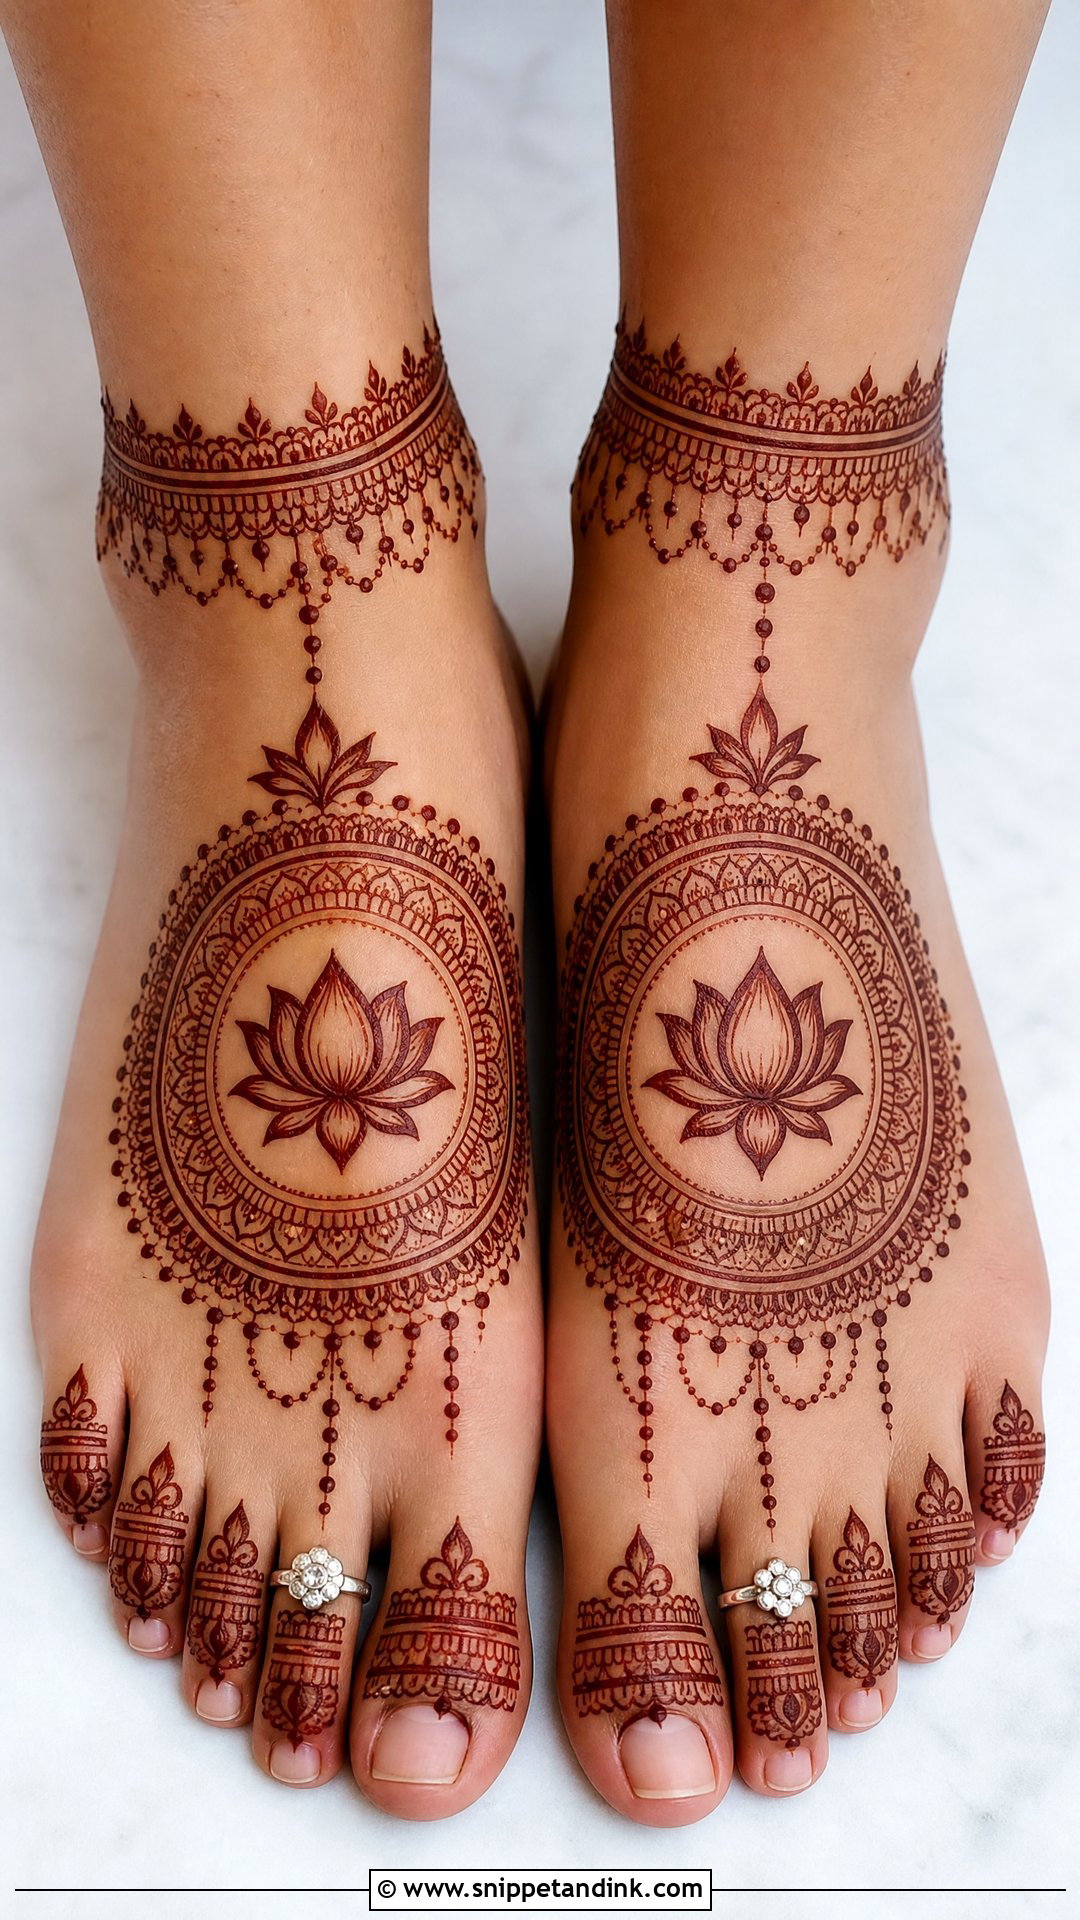
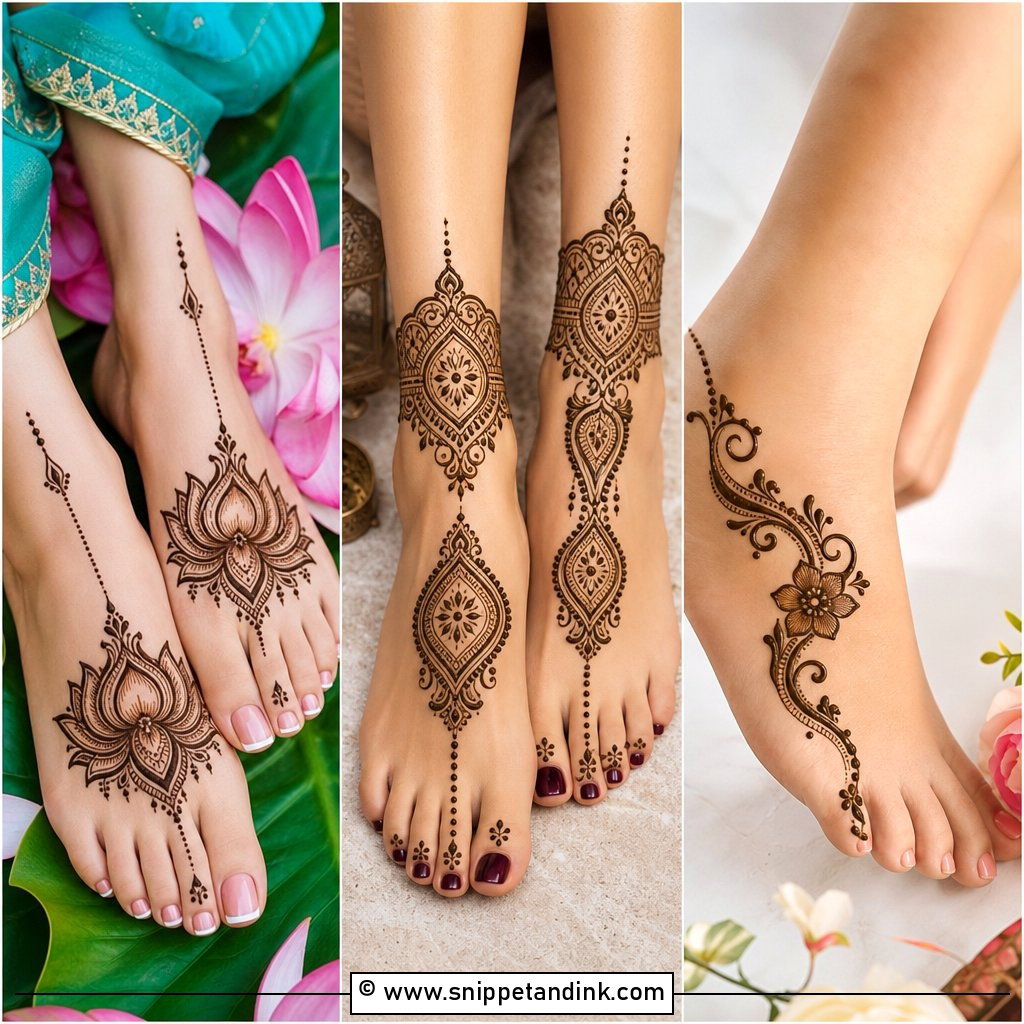
A lotus on the top of each foot gives the whole design a clear center. I usually set it inside a round mandala or an open petal frame, then add dotted chains, tiny leaves and arches out to the toes. For many families the lotus carries the meaning of purity and a new beginning, which is why it comes up so often at Hindu weddings. Keep it medium weight for open sandals, or let it grow into a full leg pattern if your hem will lift during rituals. One caution: big petals need crisp outlines, because a wobbly petal edge shows far more than a wobbly filler.
5. Bridal Foot Mehndi With Anklet Pattern
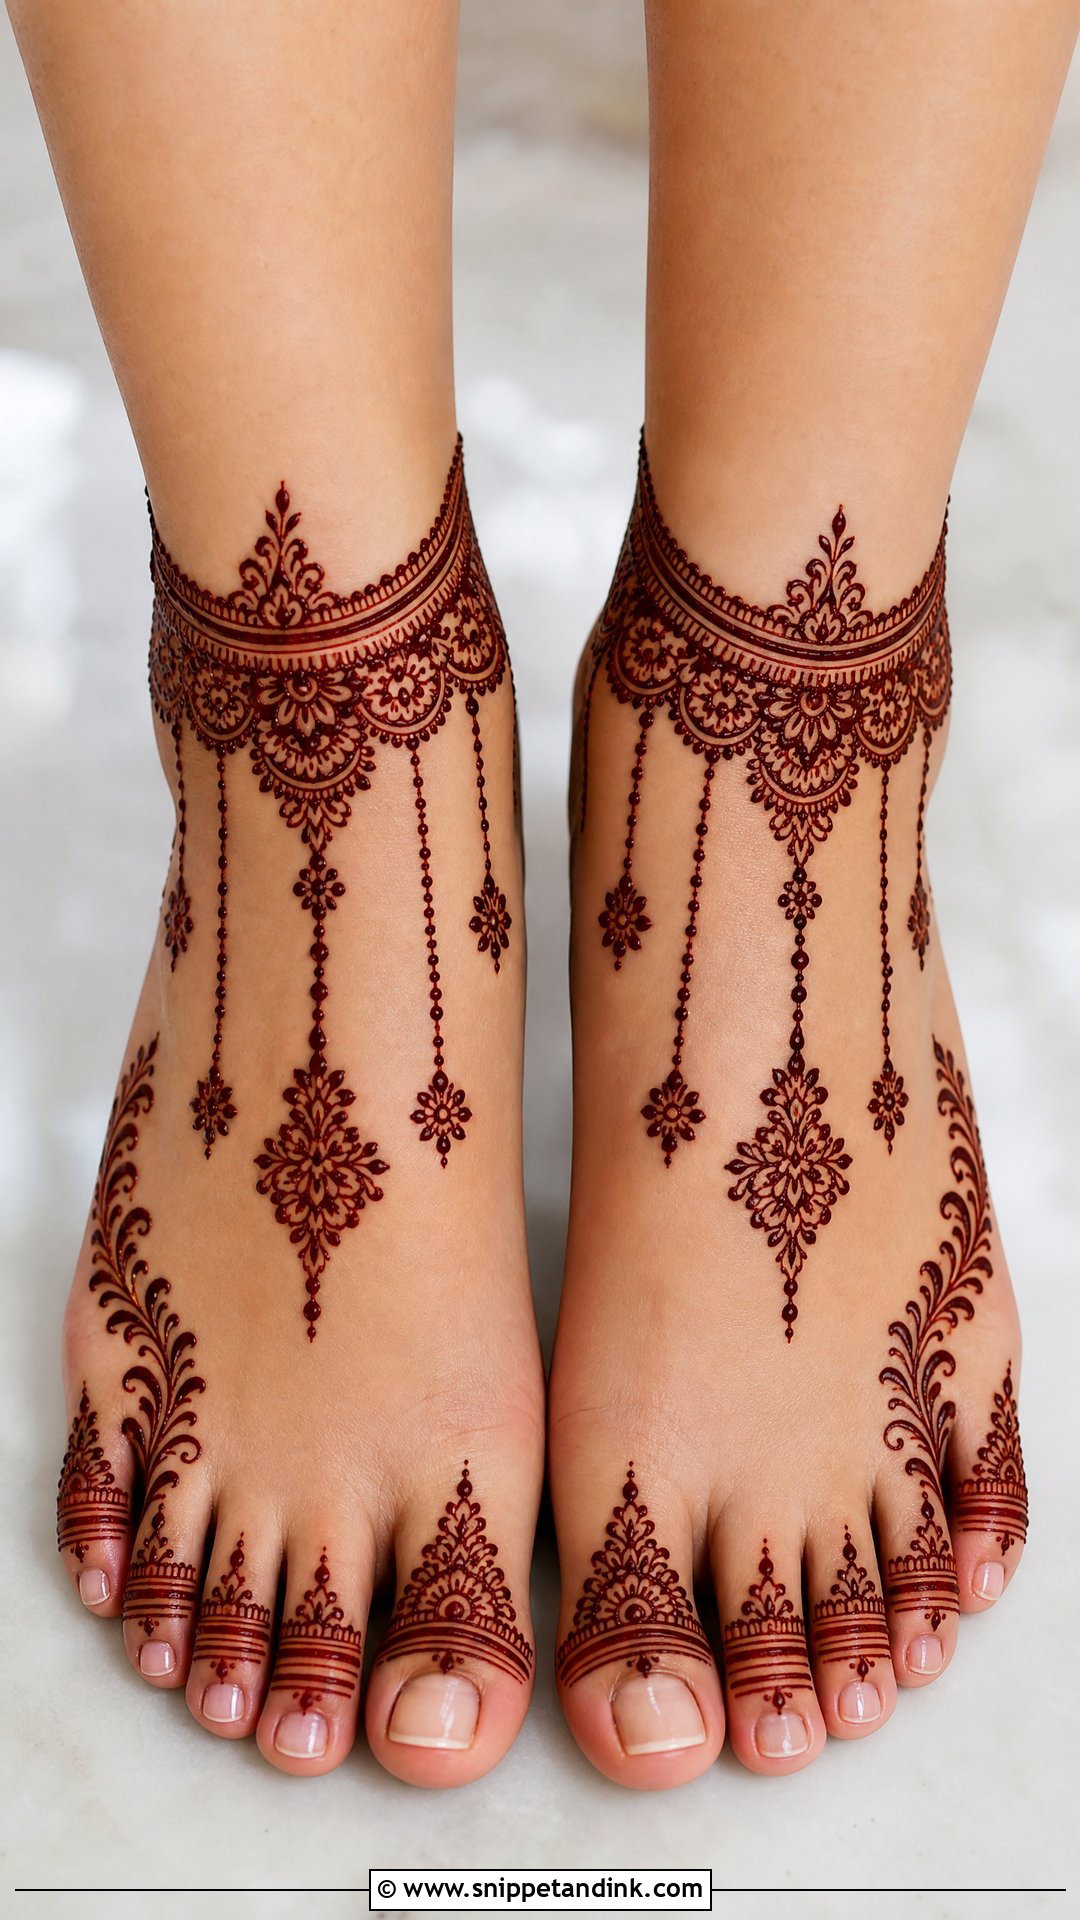
This one draws the jewelry onto the skin: a band around the ankle, hanging chains, bead dots, little floral charms and ring shapes on the toes. The hardest part is the ankle band. An ankle isn’t a straight cylinder, so I mark the band at the front and the back of the bone first and then join the sides, otherwise it slopes down toward the heel. If you’ll wear real payal as well, show me the pair so the drawn band sits just above or below the metal instead of hiding under it.
6. Mandala Bridal Feet Mehndi Design
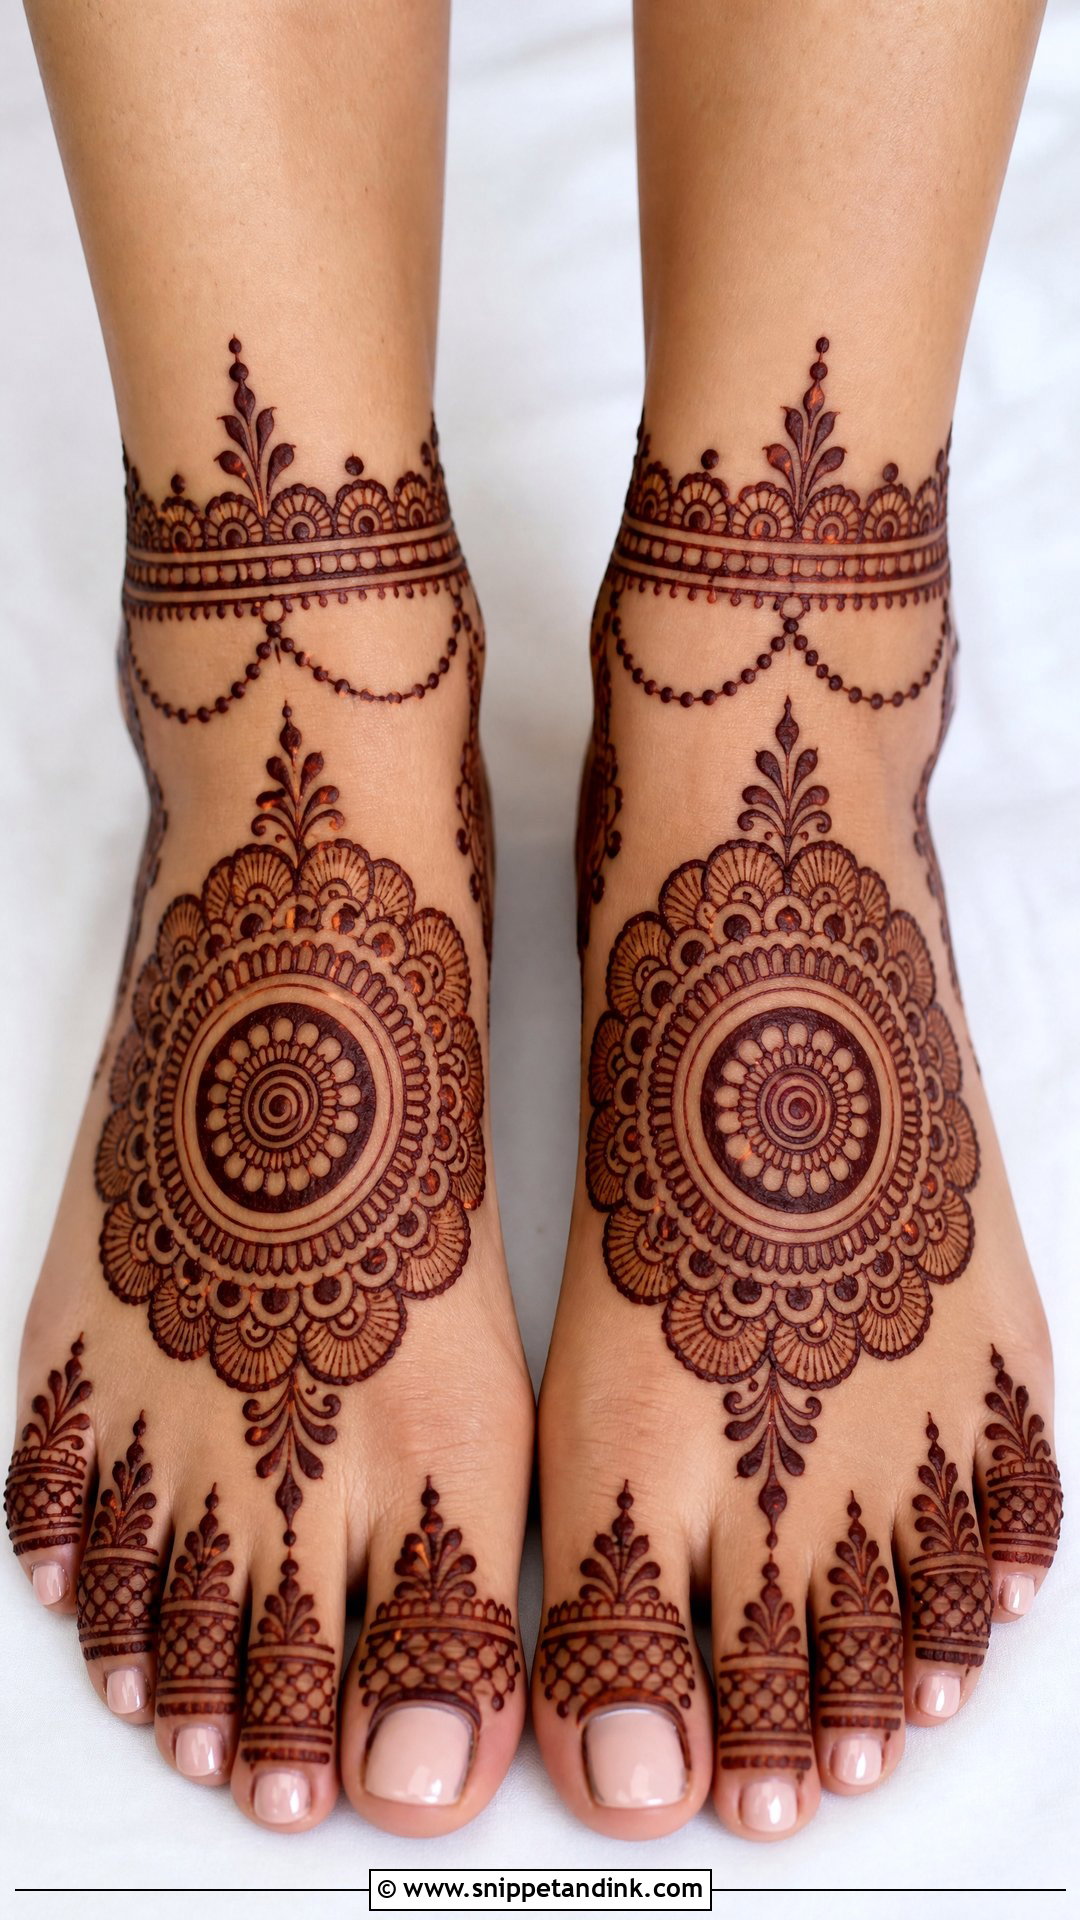
One circular motif sits in the middle of each foot, ringed with petals, dots, scalloped borders and geometric fill. I find the mandala the most forgiving layout for a first-time bride, because the structure is obvious and the stain reads cleanly in close-ups. You can keep it to one bold circle with light toe work or connect it up to the ankle and lower leg. Mandala foot mehndi sits nicely with round jewelry and mirror-work outfits. What I check first is where your foot bends, since a mandala placed too close to the ankle crease distorts every time you flex.
7. Jaali Bridal Foot Mehndi Design
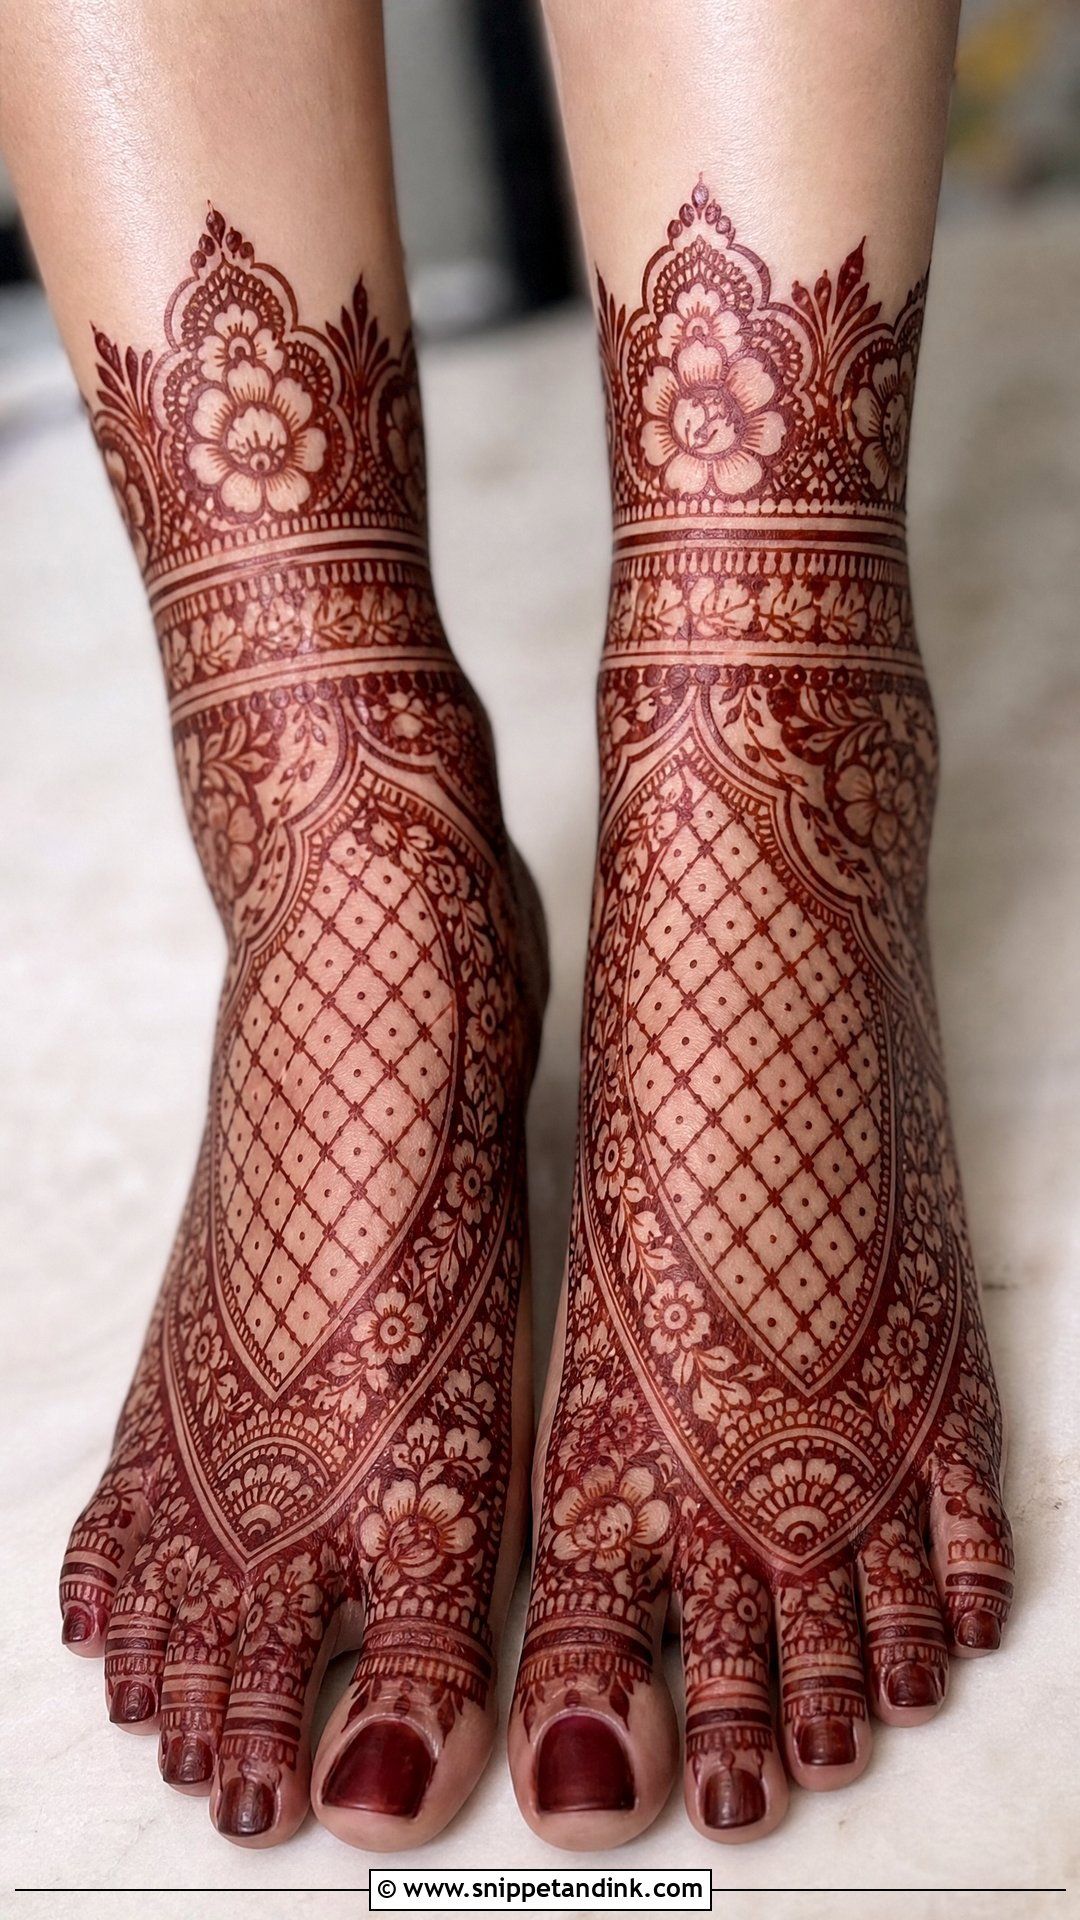
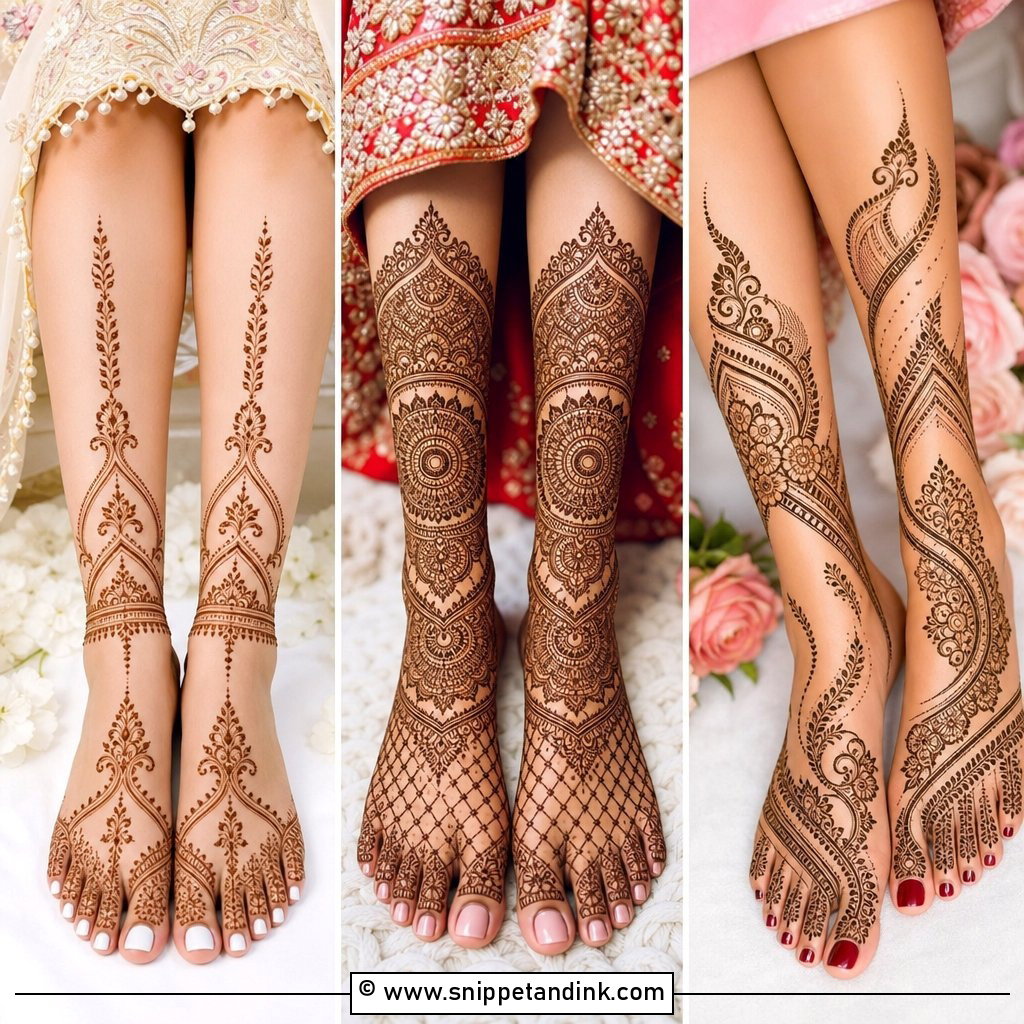
Jaali is mesh. Diamond lines, tiny checks or netting with a dot in each gap cover the top of the foot or wrap the ankle between floral borders, giving a dressed, lace-like surface that still lets skin through. The grid lines must be thin and evenly spaced, and that’s where cone quality shows: a cone that blobs fills the gaps and turns the net into a dark patch. I frame jaali with bold outlines so it reads as a panel rather than a smear.
8. Peacock Bridal Feet Mehndi Design
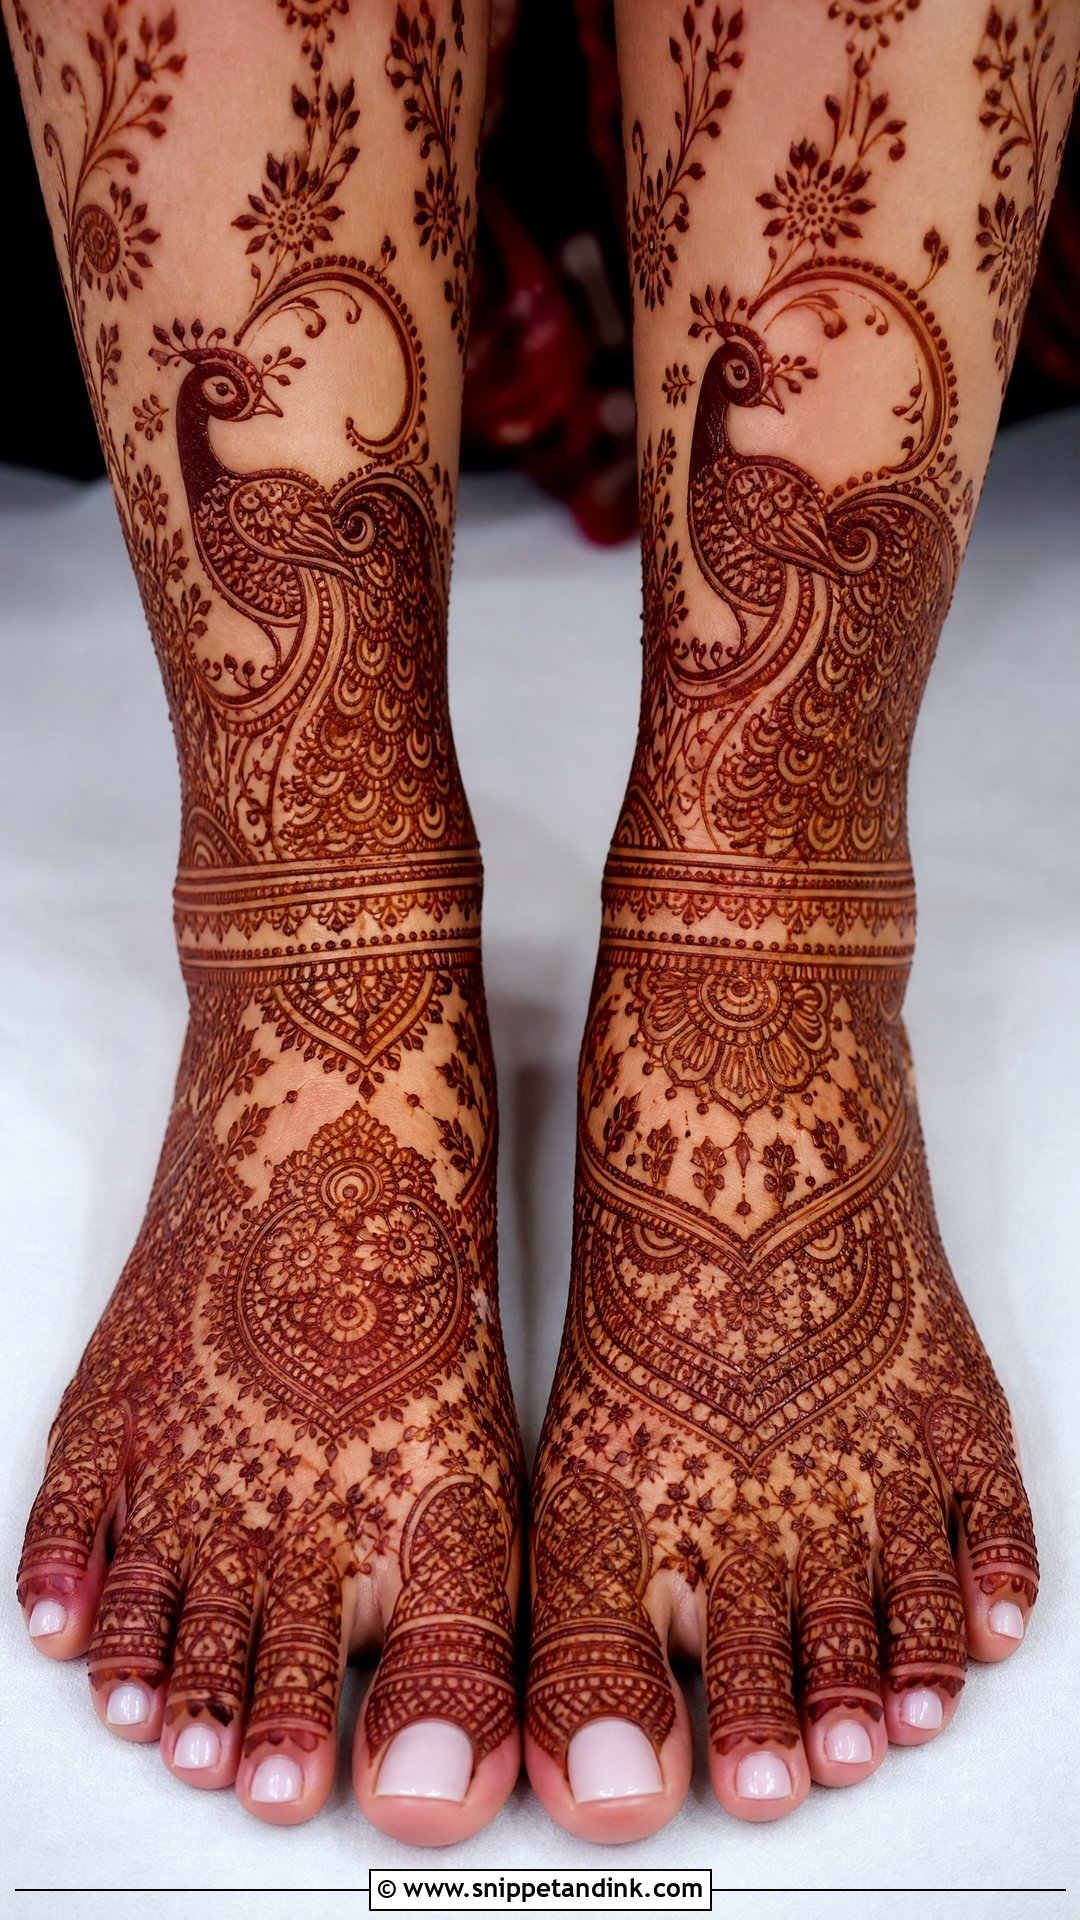
Peacocks fit along the outer edge of the foot or near the ankle, where the body can curve with the bone and the tail feathers fan toward the toes. The feathers give me room for fine lines, dots and shading. Where this design goes wrong is crowding. Bury the bird in fillers and nobody can find it in a photo, so I keep a clear margin around the neck and head. It sits naturally with classic Indian outfits, silk sarees and heavily embroidered lehengas.
9. Rajasthani Bridal Foot Mehndi Design
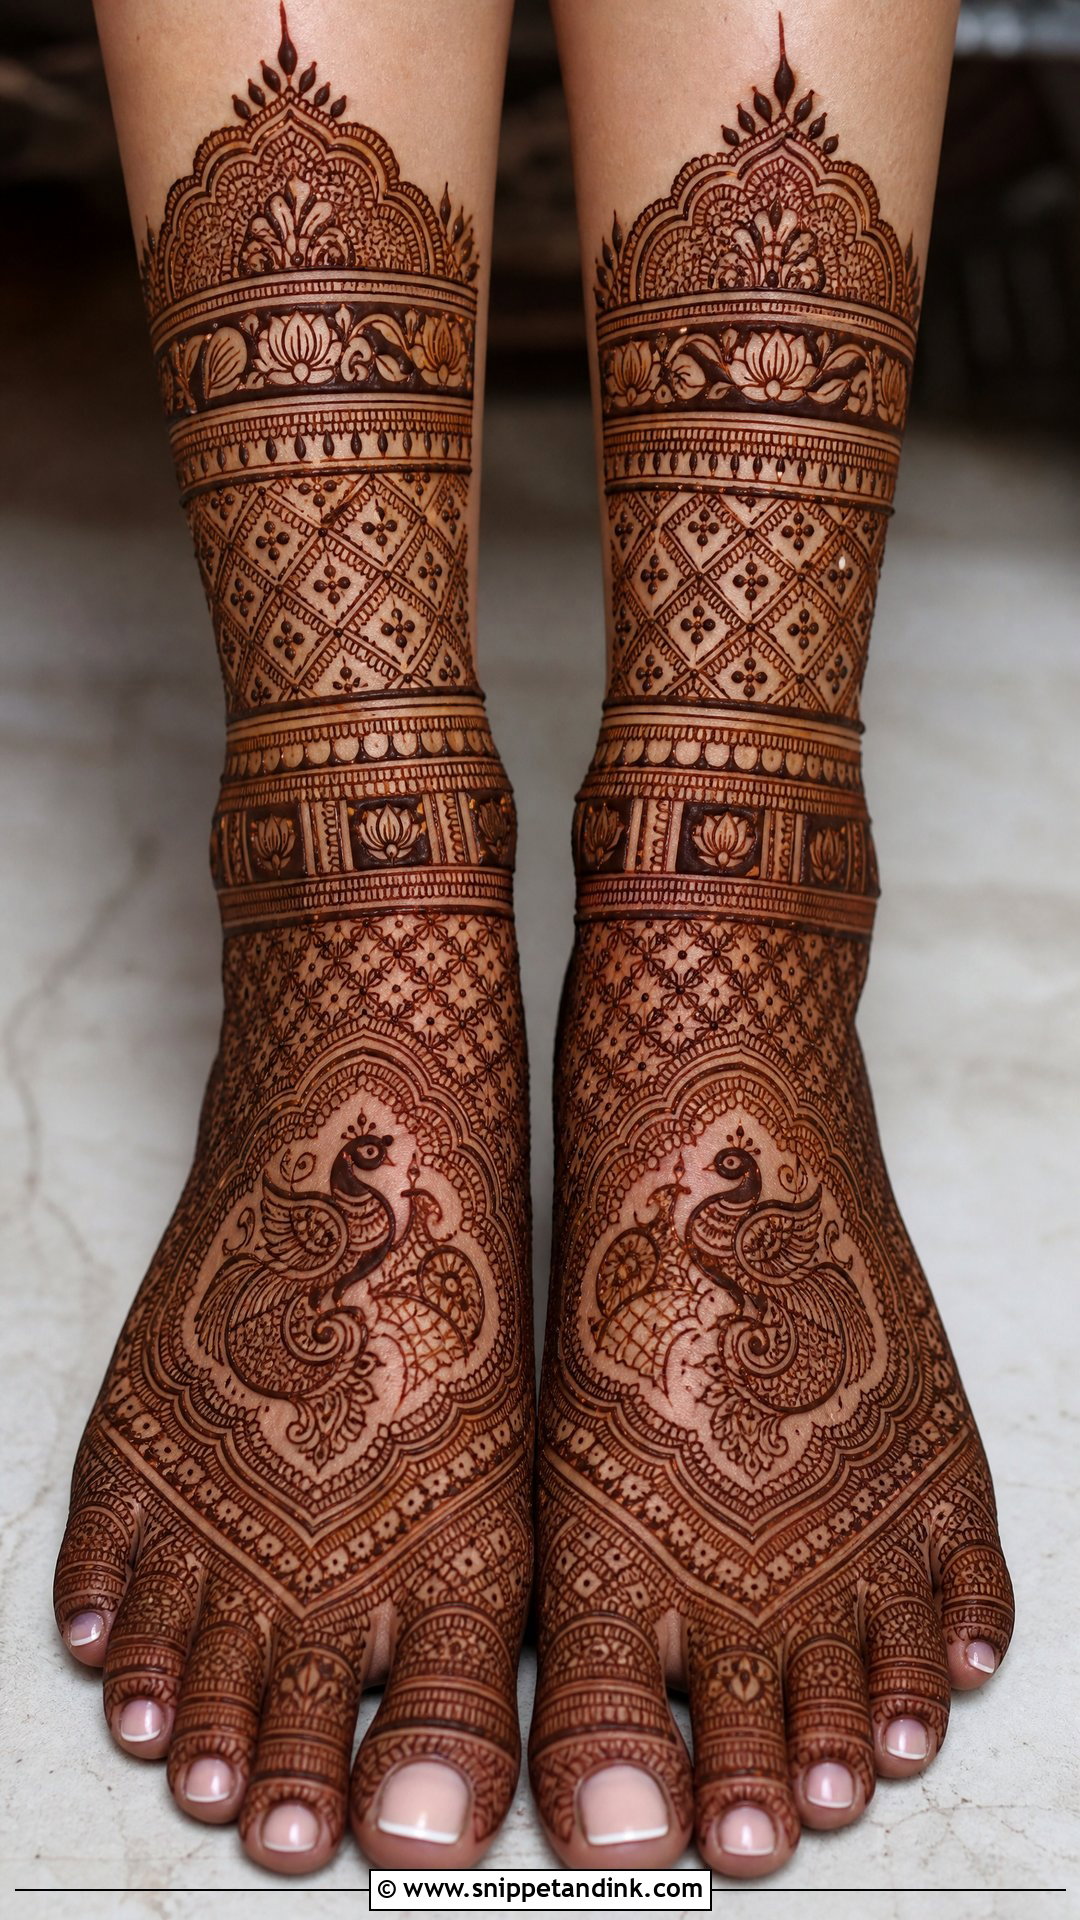
Rajasthani work is the densest pattern on this list: paisleys, domes, peacocks, floral grids and sometimes tiny figures or wedding symbols. It usually covers the whole foot and can run up toward the calf. Only book it with an artist whose foot work you’ve seen in person or in unedited photos, because the figures need steady, very fine lines and there’s nowhere to hide a shaky hand. Budget the most sitting time for this one, and save your heaviest anklets and traditional toe rings to wear with it.
10. Indo Arabic Bridal Feet Mehndi Design
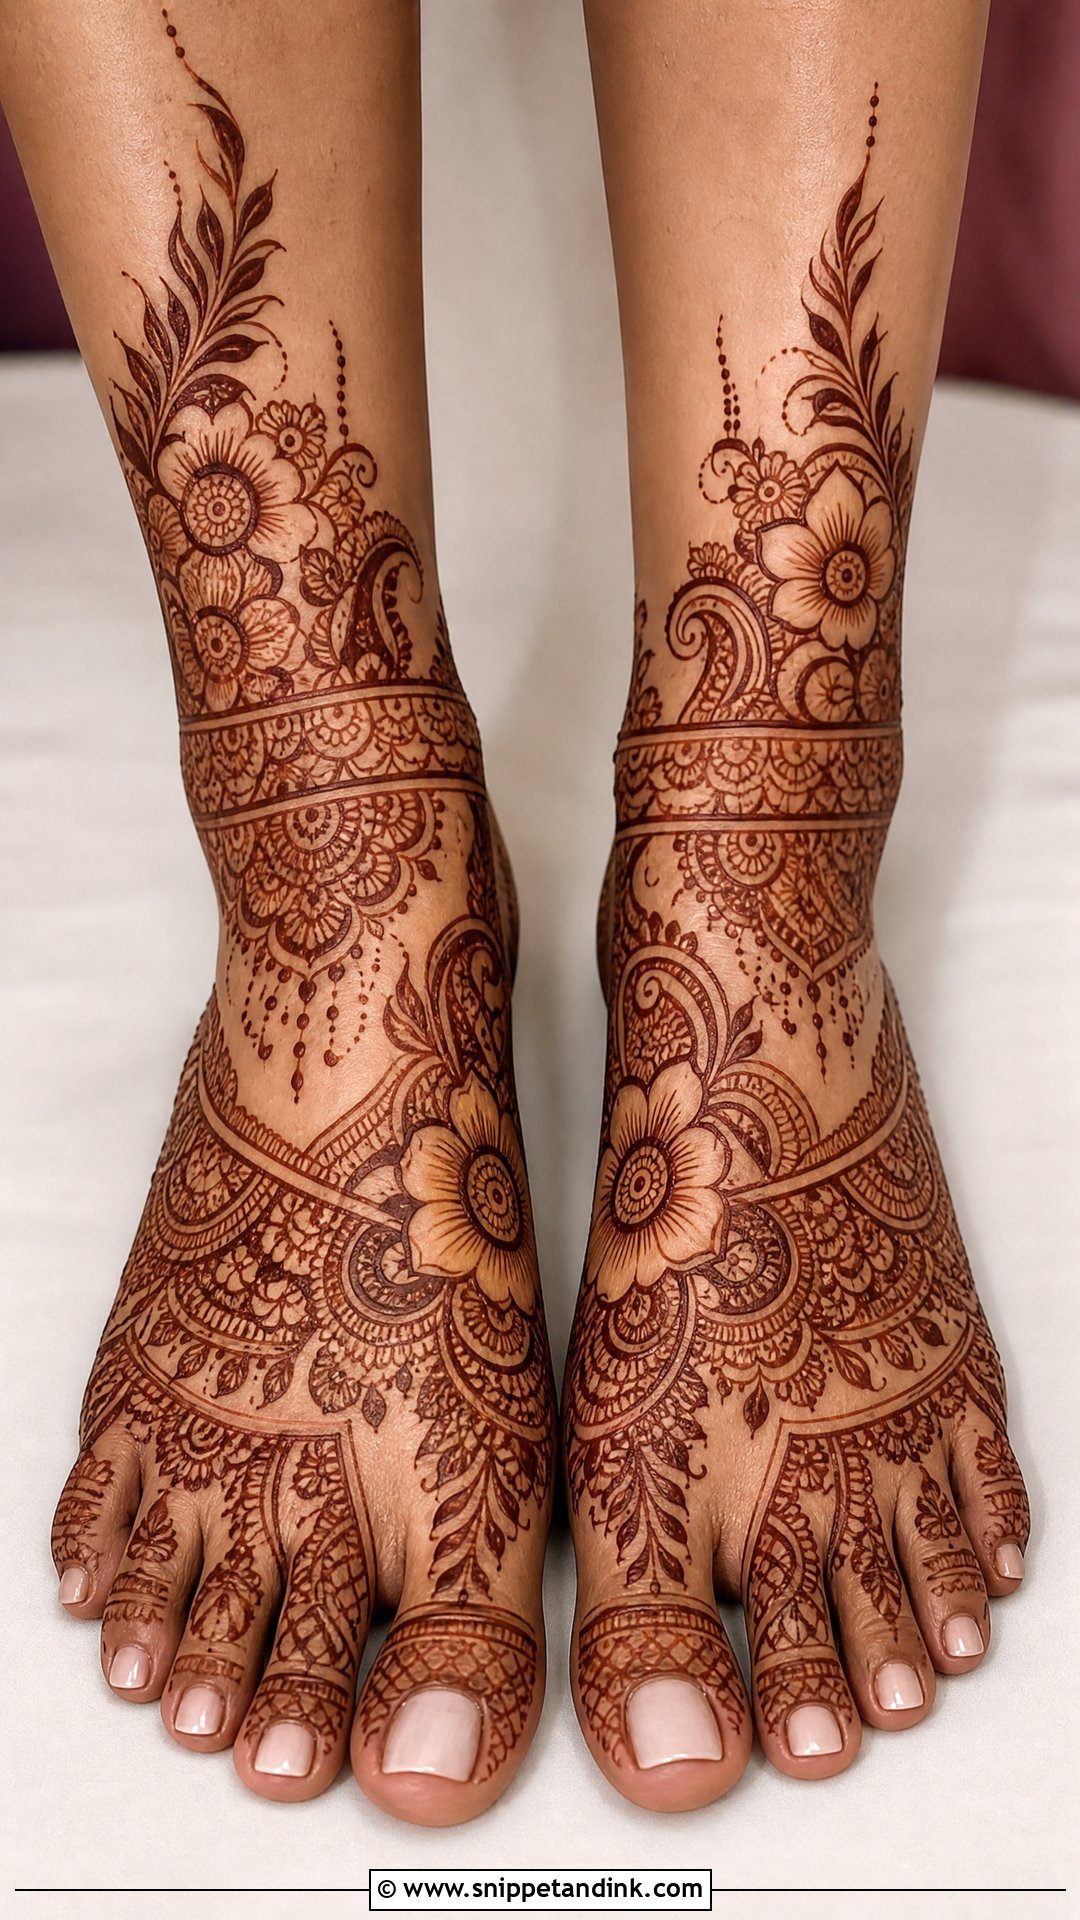
Indo-Arabic takes the trails and shading of Arabic work and fills some of the gaps with Indian mandalas and medium fillers. It’s my usual suggestion when a bride wants detail but still wants to see her skin. The layout can run diagonally from toe to ankle or sit as a balanced semi-full design on both feet. Because the density is so adjustable, it’s also the easiest style to scale down if your appointment runs short.
11. Moroccan Bridal Foot Mehndi Design
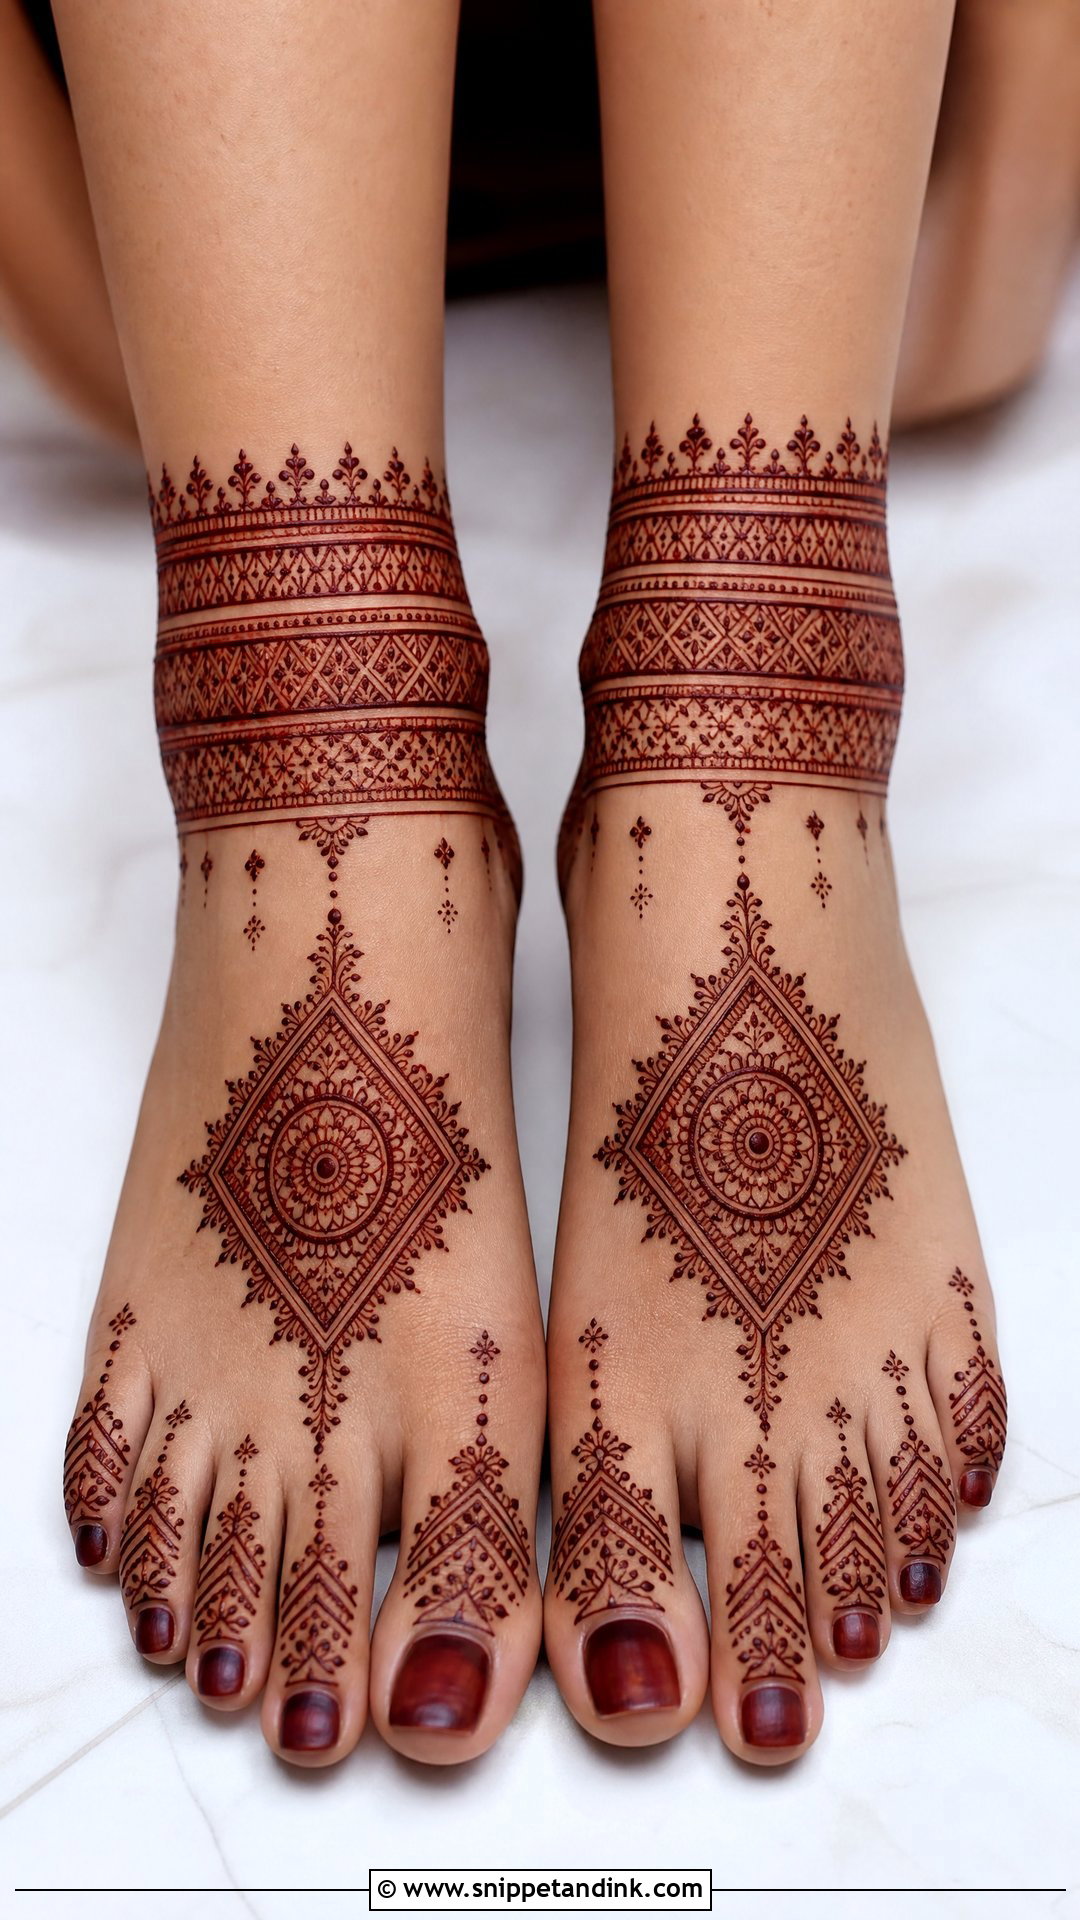
Moroccan foot henna swaps flowers for geometry: diamonds, triangles, grids, heavy straight lines and tile-like sections. It can cover the top of the foot in blocks or wrap the ankle like a patterned band. Straight lines are less forgiving than curves on a foot that slopes and bends, so I place a few guide dots first and pull each line through them in one stroke. Some brides ask me to soften the grid with leafy edges or a central mandala. The shapes are easy to read in photographs either way.
12. Minimal Bridal Feet Mehndi Design
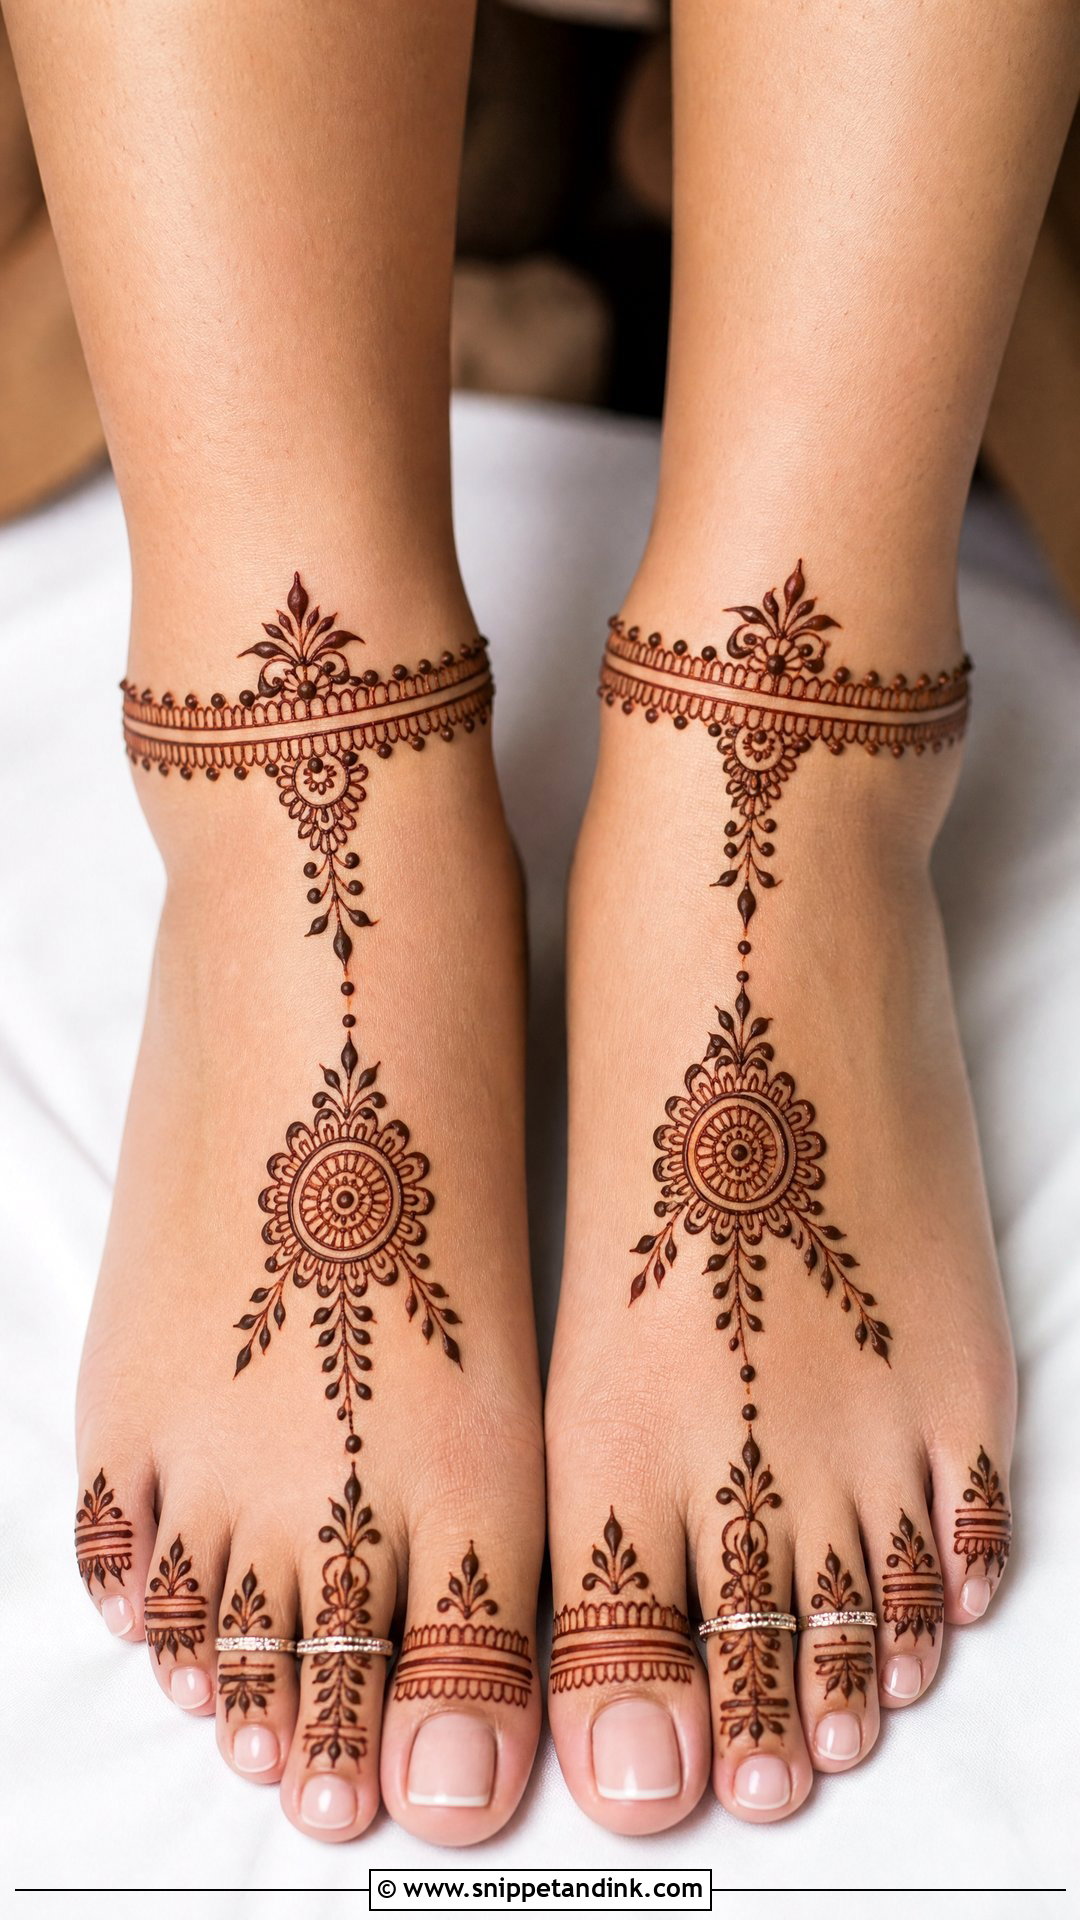
Light coverage only works if the empty skin looks planned. An ankle band, simple toe details, a small floral or a light mandala on each foot is enough, as long as both feet match. I often suggest it for intimate weddings, engagement events or a bride whose outfit is already very busy. It’s also the kindest option if sitting still for hours is hard for you.
13. Heavy Bridal Feet Mehndi Design
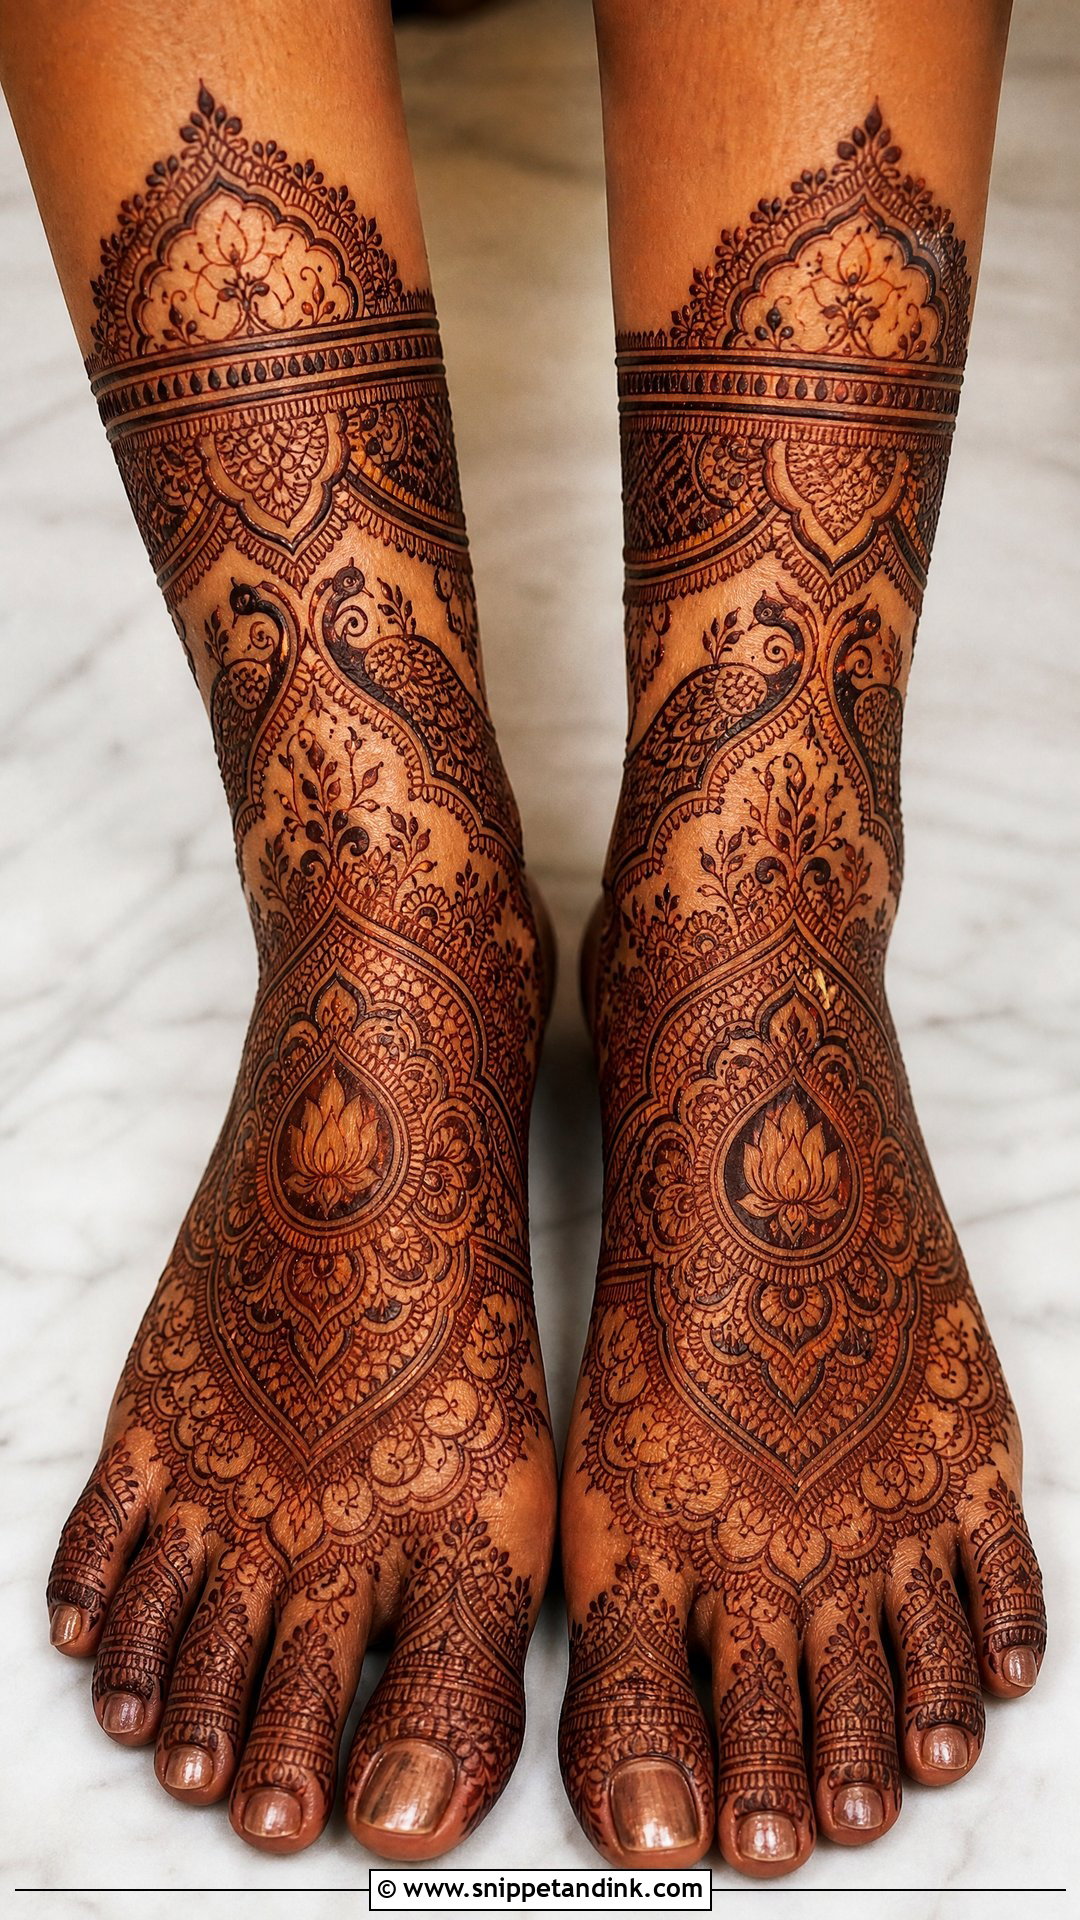
Heavy foot mehndi runs dense from the toes up the lower leg, with paisleys, peacocks, lotus, mandalas, jaali sections and layered borders. Here the timing matters more than the pattern. I’d book it a day or two before the main ceremony so the stain has time to move from orange to its deepest red-brown. It reads like jewelry in portraits next to bold anklets and embroidered hems, but only if you’ve kept it away from water for that first day.
14. Simple Bridal Foot Mehndi Design
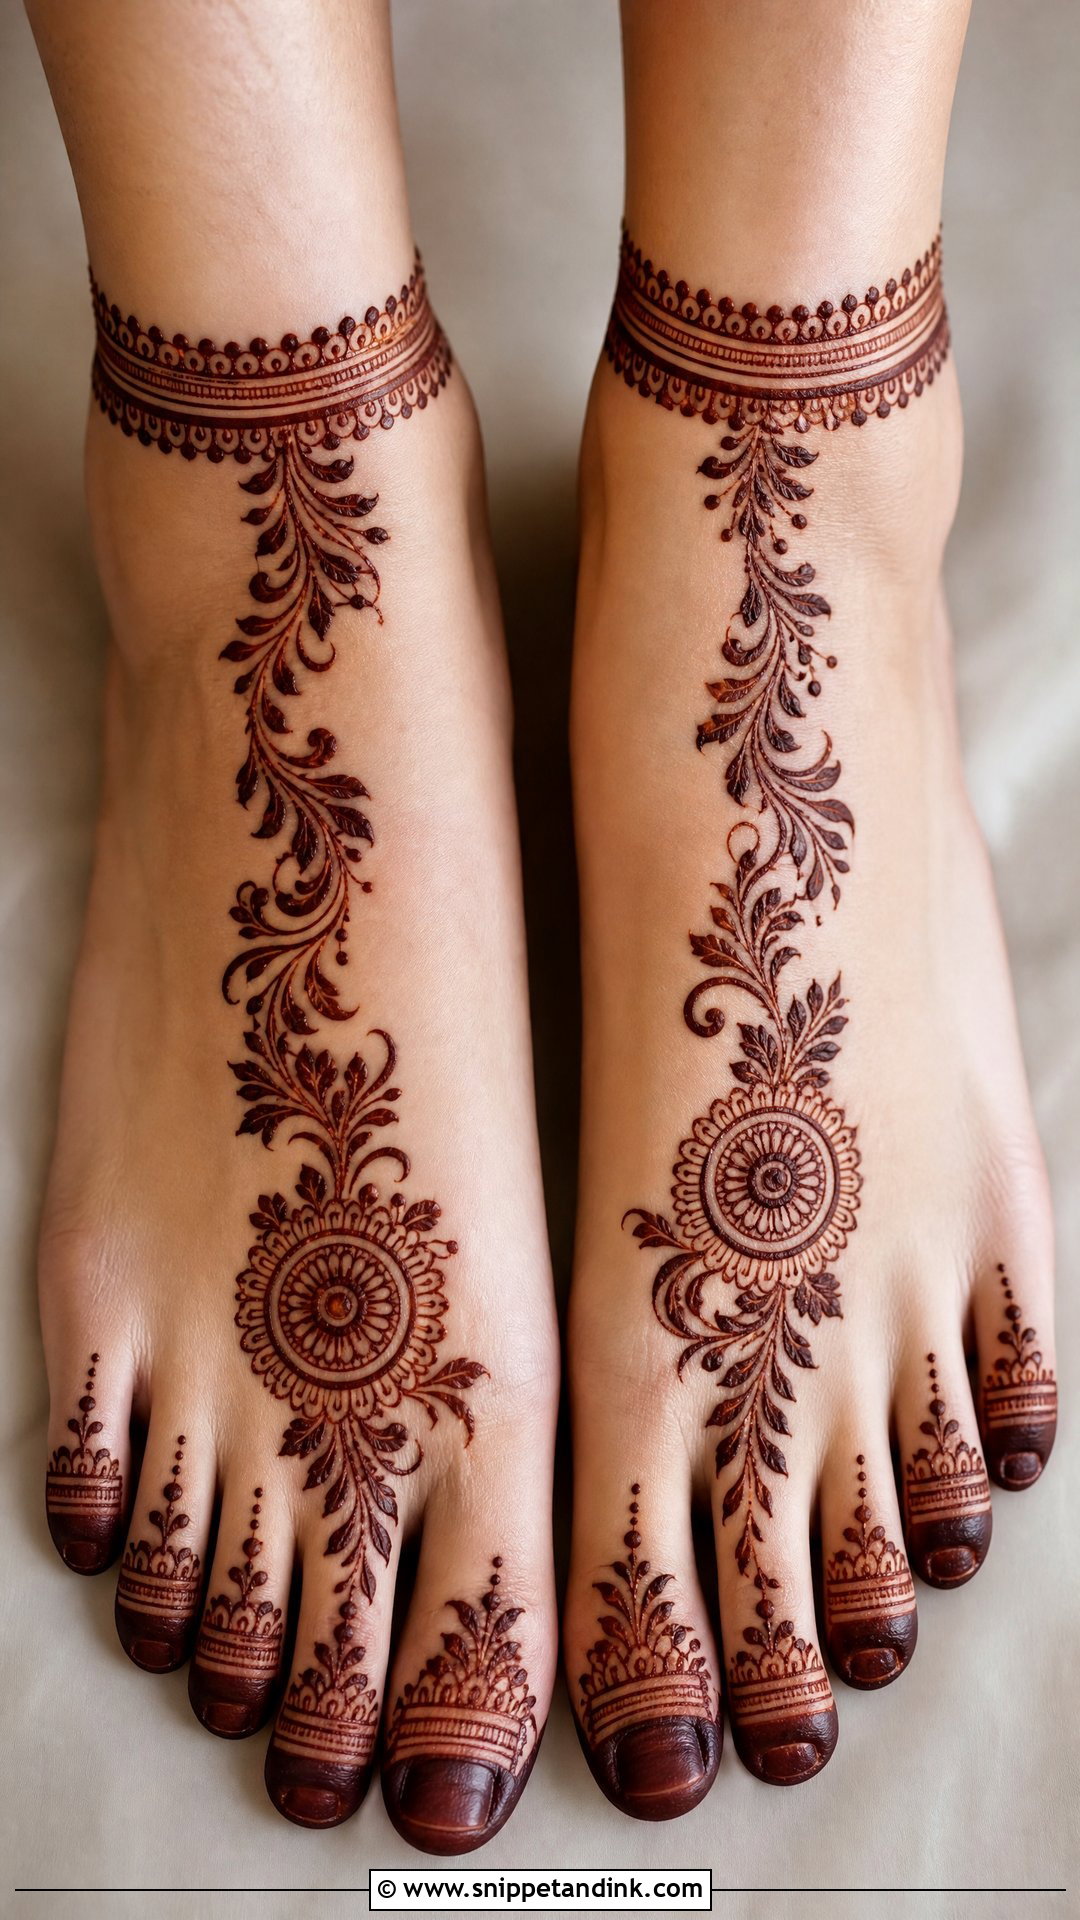
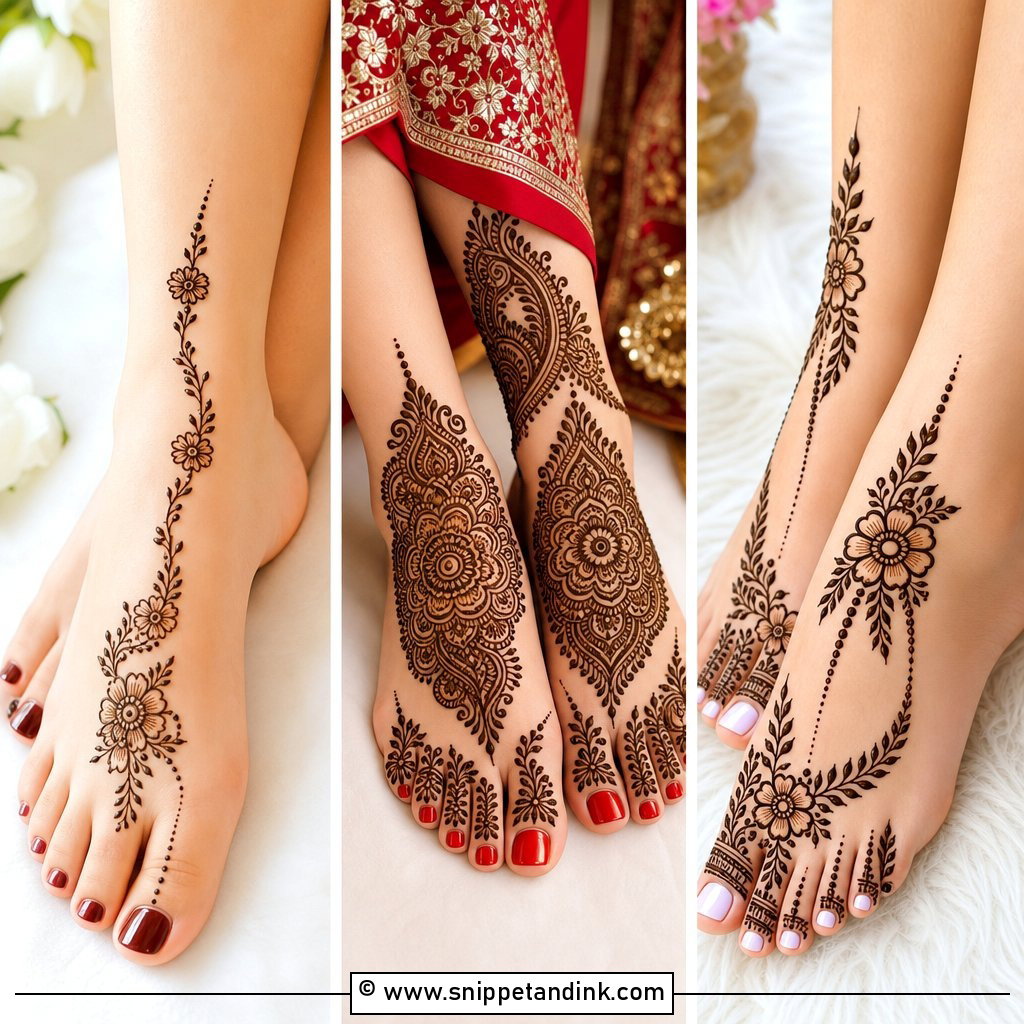
Simple doesn’t mean careless. A floral trail from the big toe to the ankle, a small mandala on top or a neat anklet border with toe patterns all look bridal when the spacing is even and both feet match. This is what I recommend when time is tight or the bride prefers a softer stain, and it sits well with destination weddings and modern outfits. If there’s time left at the end, it’s easy to add a toe band or a second vine.
15. Bridal Leg And Foot Mehndi Design
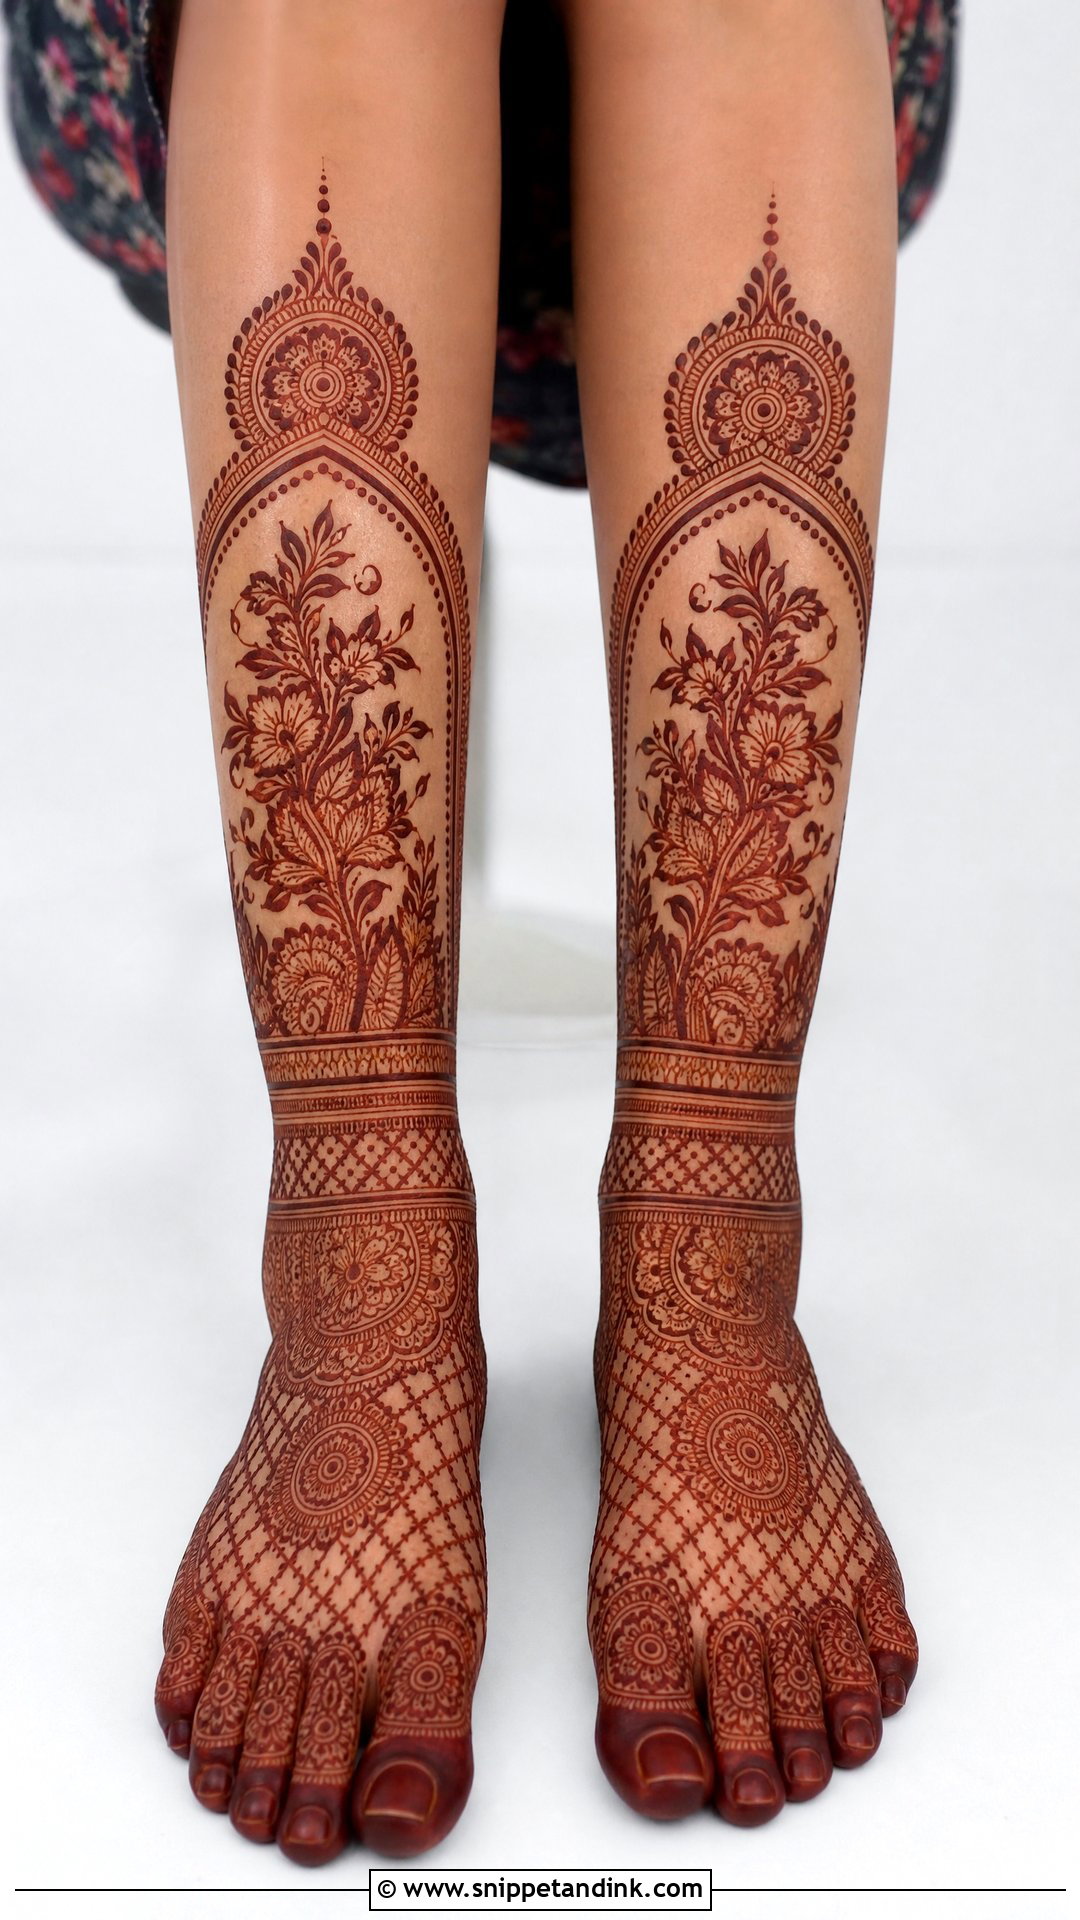
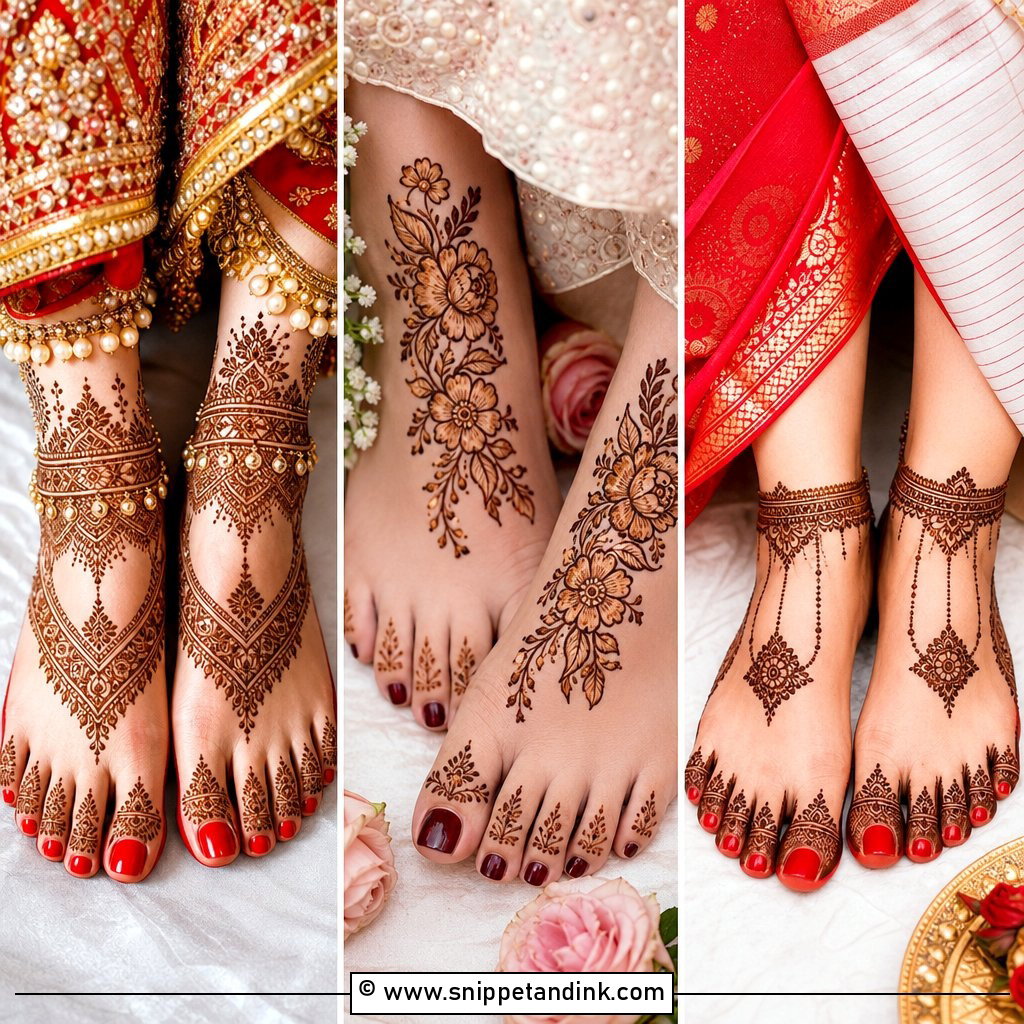
This design carries the work from the toes into a full foot pattern and then up the lower leg with anklet bands, vines, paisley panels or jaali. It only earns its hours if your outfit actually shows the leg, so check how high your lehenga, sharara or saree rises when you sit down or walk around the fire. The join between foot and leg is the weak spot. I draw the ankle band first, so both sections have one shared border to meet at and the whole thing reads as a single piece.
16. Bridal Toe Ring Mehndi Design
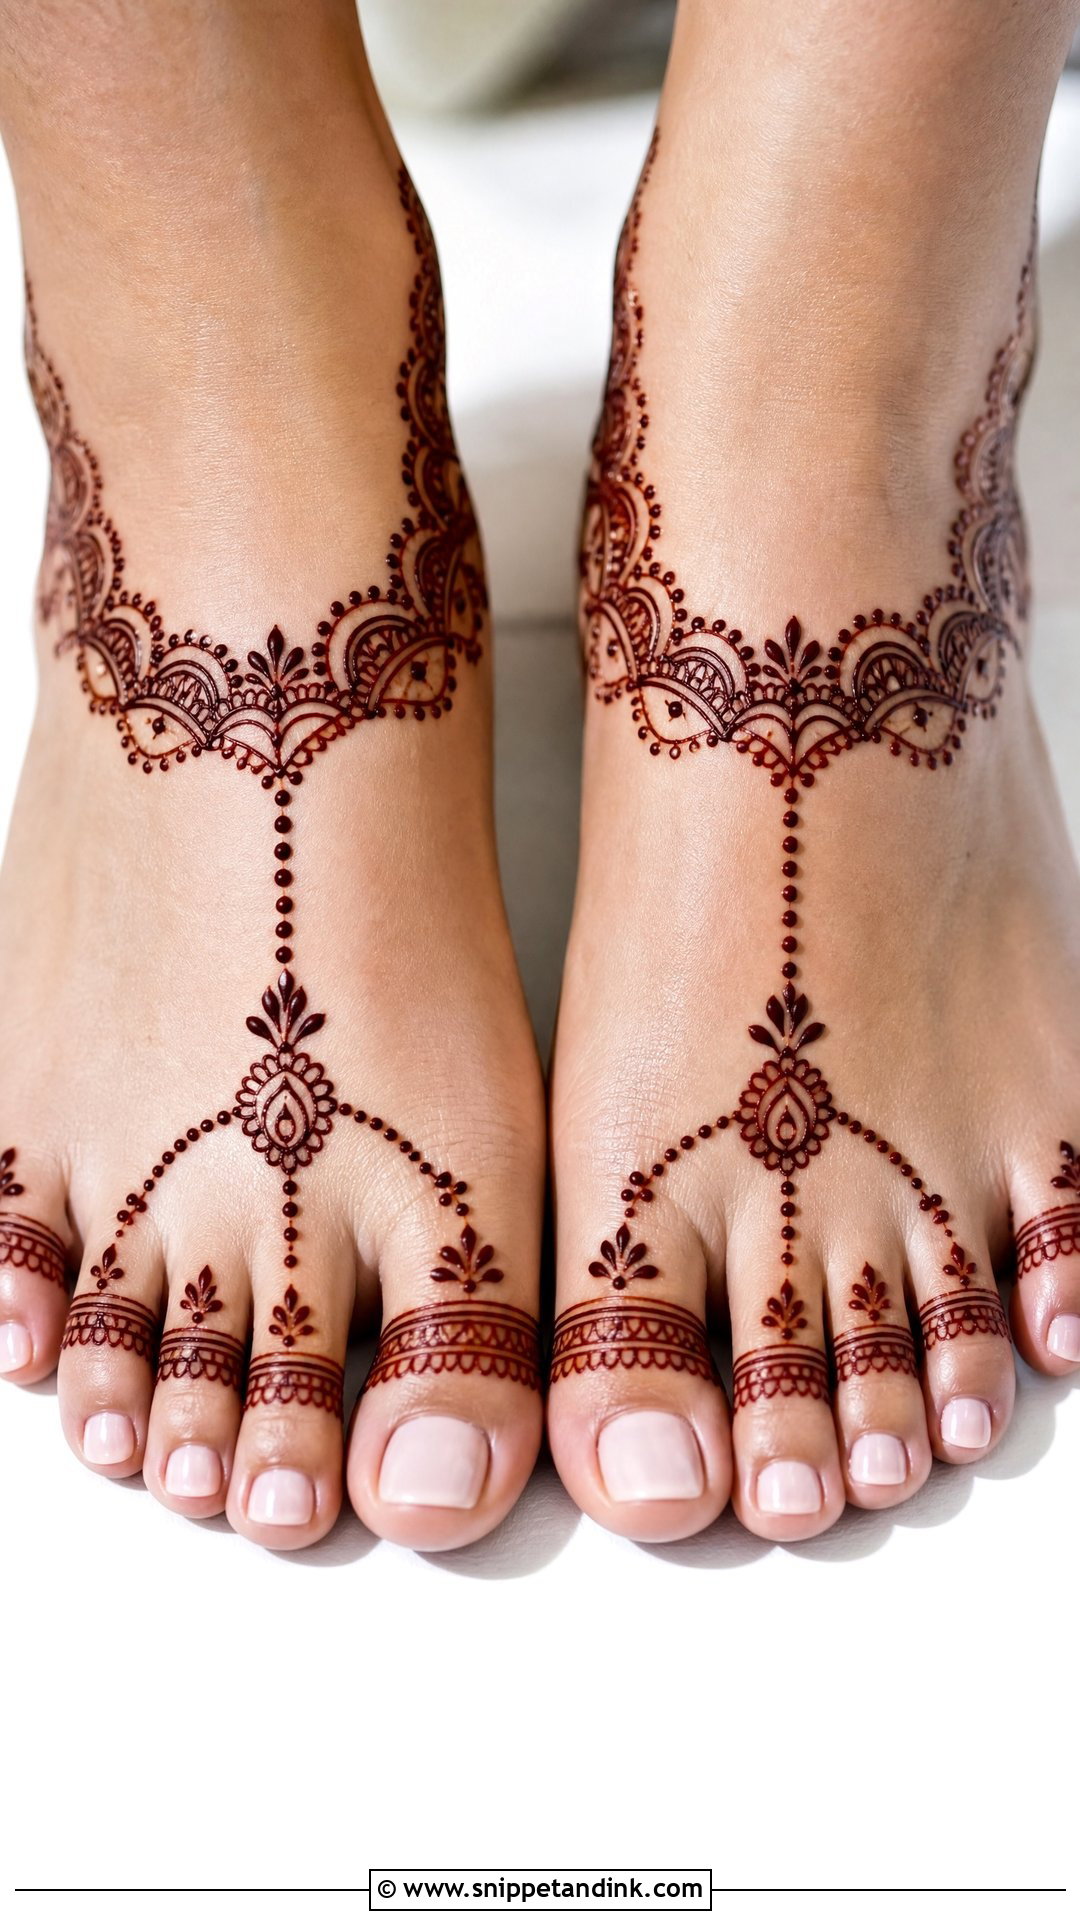
Toe work means ring bands on each toe, dotted chains, small petals and a connecting pattern along the base of the toes. It can finish a larger design or stand on its own for a minimal bride. Toes are where smudges show most, because they press together the moment you stand. I ask brides to keep tissue between their toes until the paste is dry, and I’d only push this design if you’ll be barefoot for rituals or in open sandals.
17. Floral Bridal Feet Mehndi Design
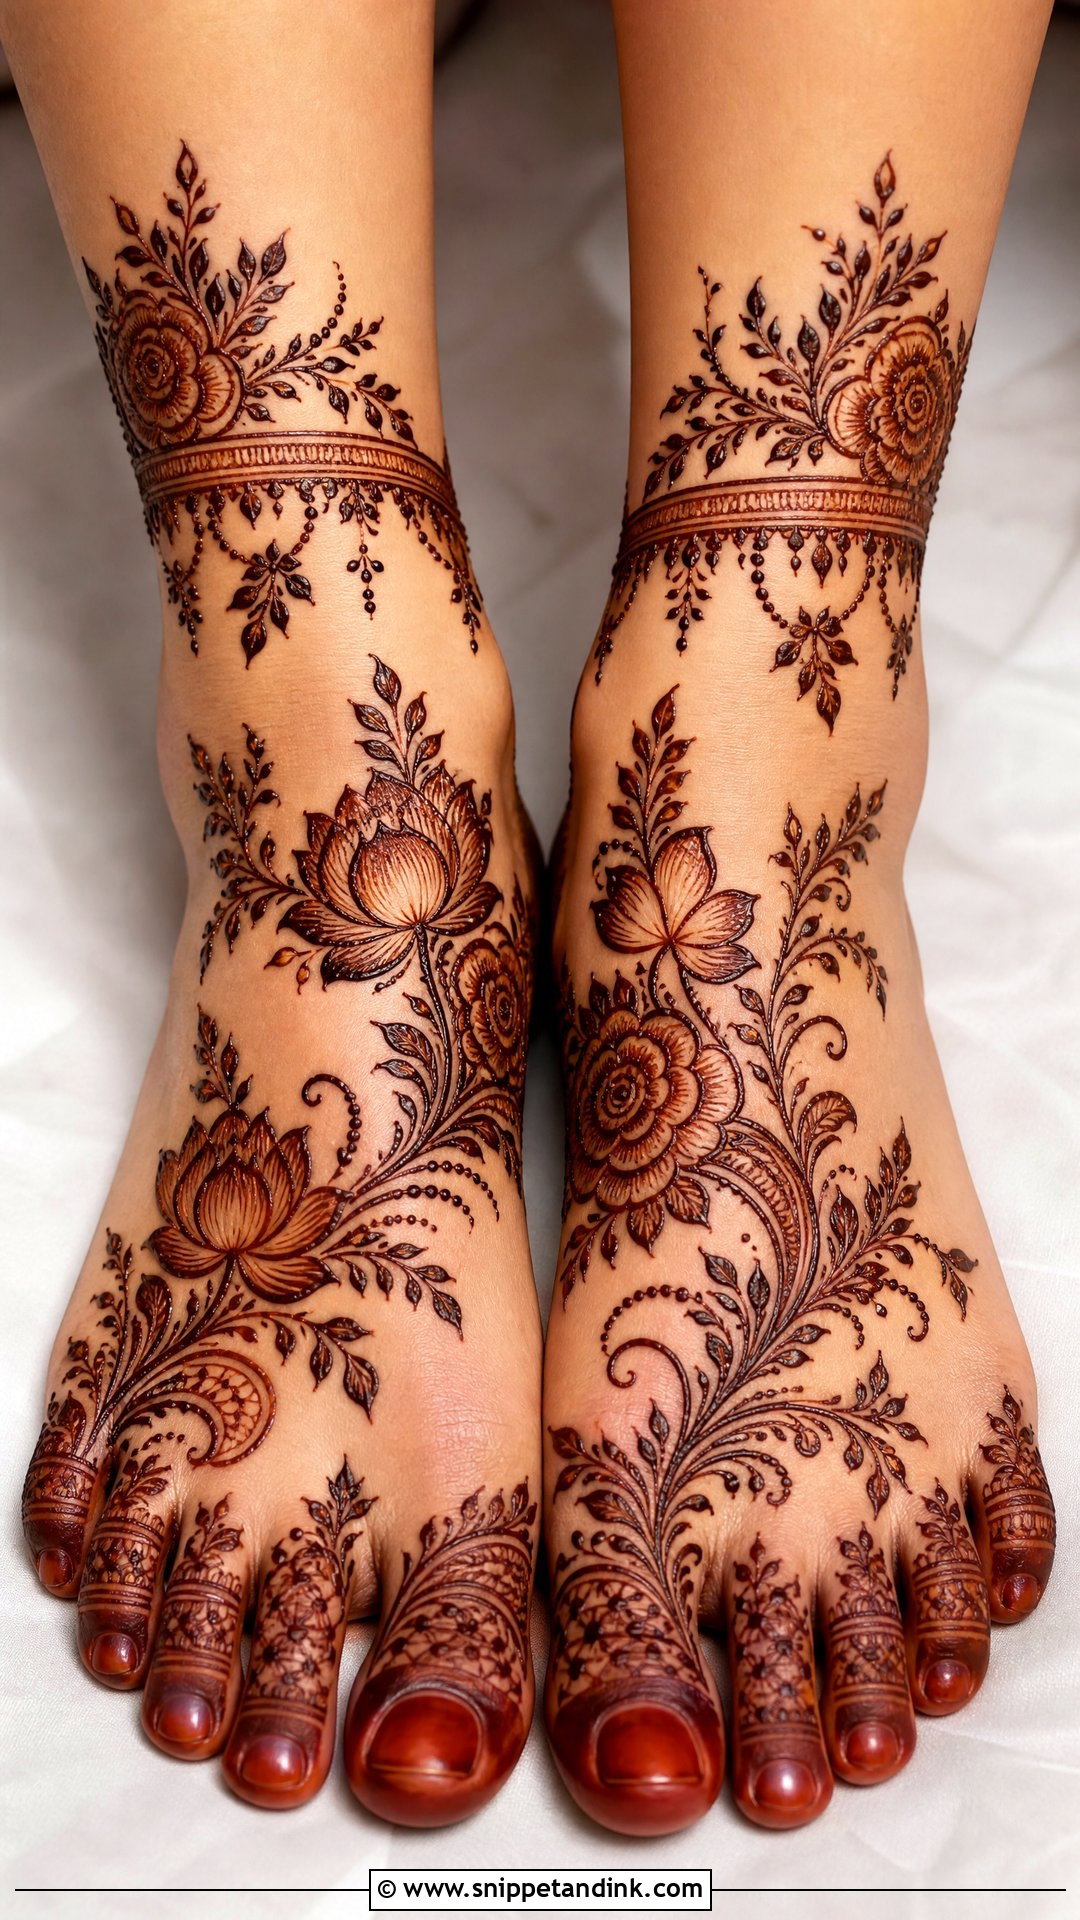
Roses, lotus, buds and leafy vines can sit in the center of the foot, trail from the toes to the ankle or frame the sides. Florals adapt to Arabic, Indo-Arabic and Indian layouts, which is why so many brides end up here. I shade the petals by thinning the paste near their base and keep the outlines fine so the flowers stay readable once the stain darkens. Too many small flowers of one size look like printed fabric, so I mix one or two large blooms with smaller fill.
18. Bridal Foot Mehndi With Paisley Pattern
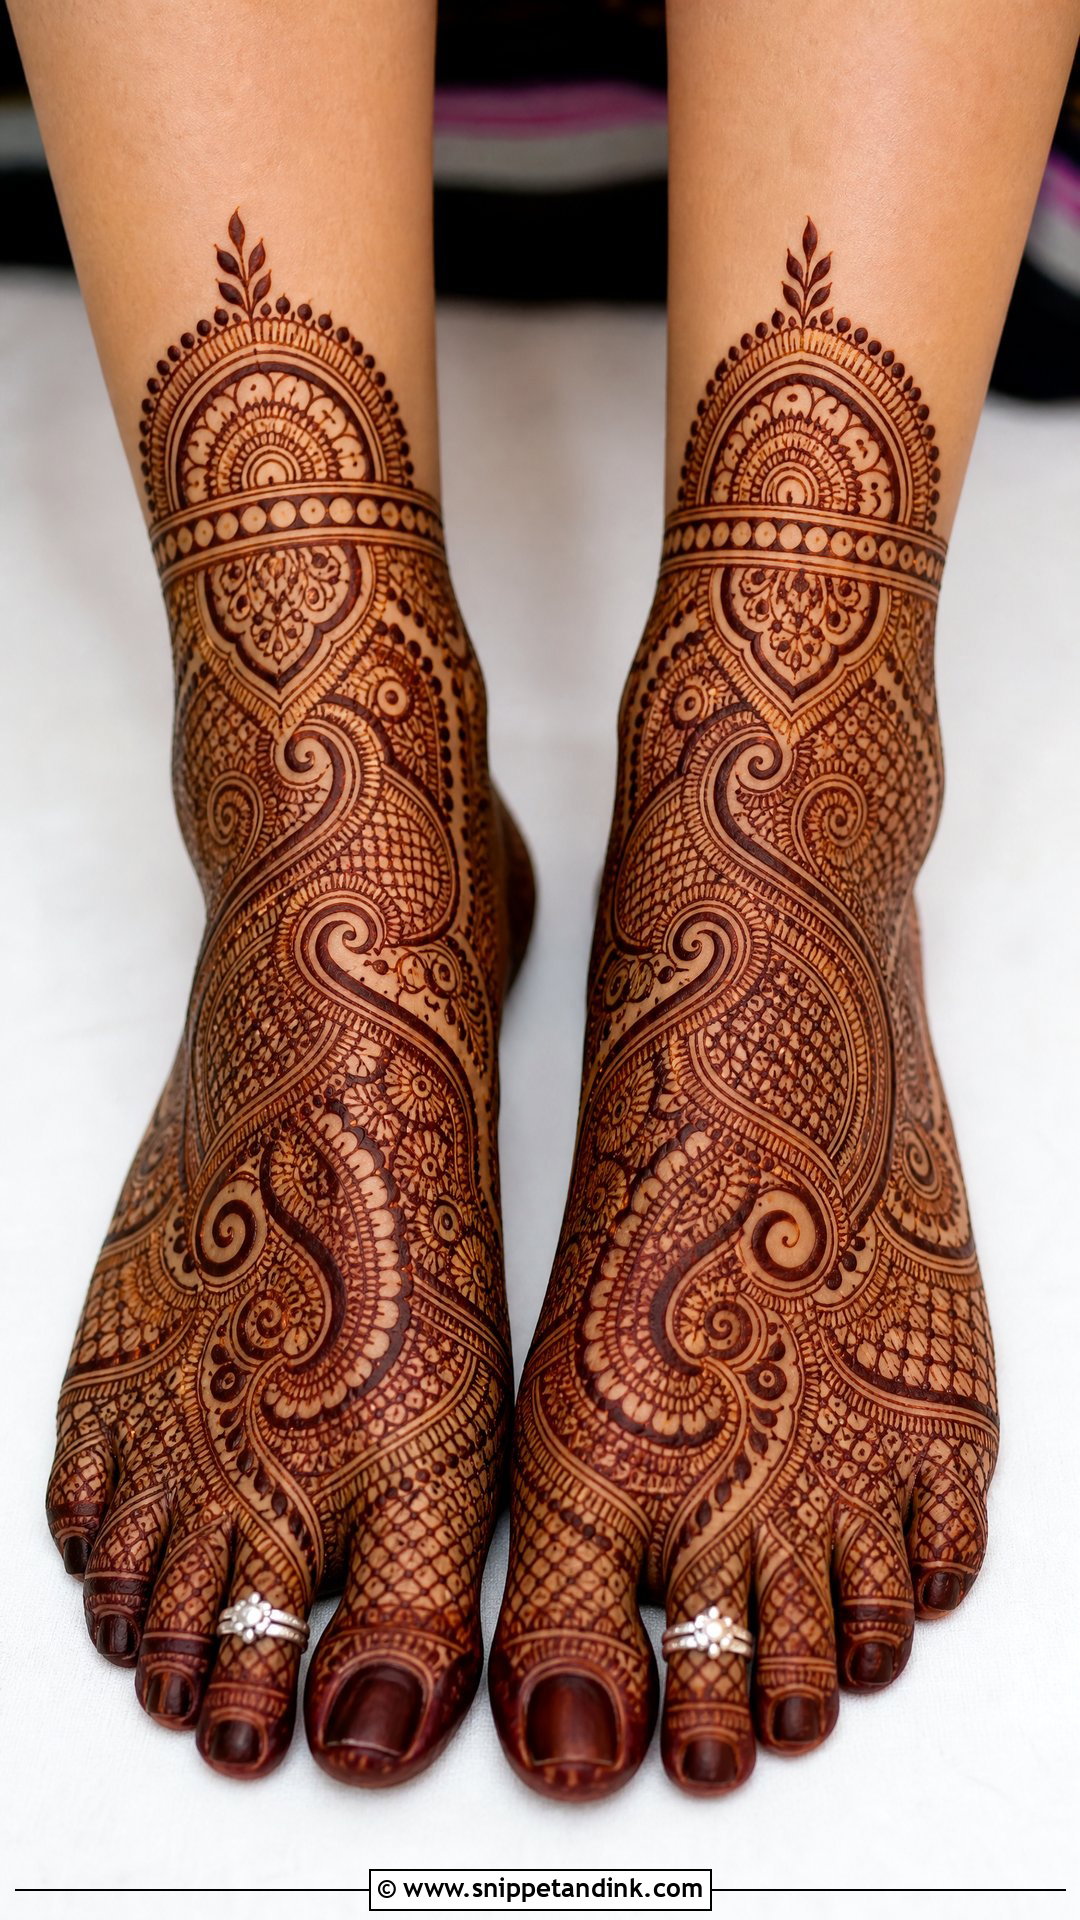
Paisleys follow the curve of the foot, which is why they sit so comfortably along the sides, near the ankle and across the top. I fill them with tiny flowers, dots or checks and often link them to a mandala or a jaali panel. The tip of each paisley should flow toward the toes or wrap around the ankle; point it up the leg against the foot’s shape and the design looks like it’s sliding off. Medium or heavy, it suits anklets, toe rings and embroidered footwear.
19. Negative Space Bridal Feet Mehndi Design
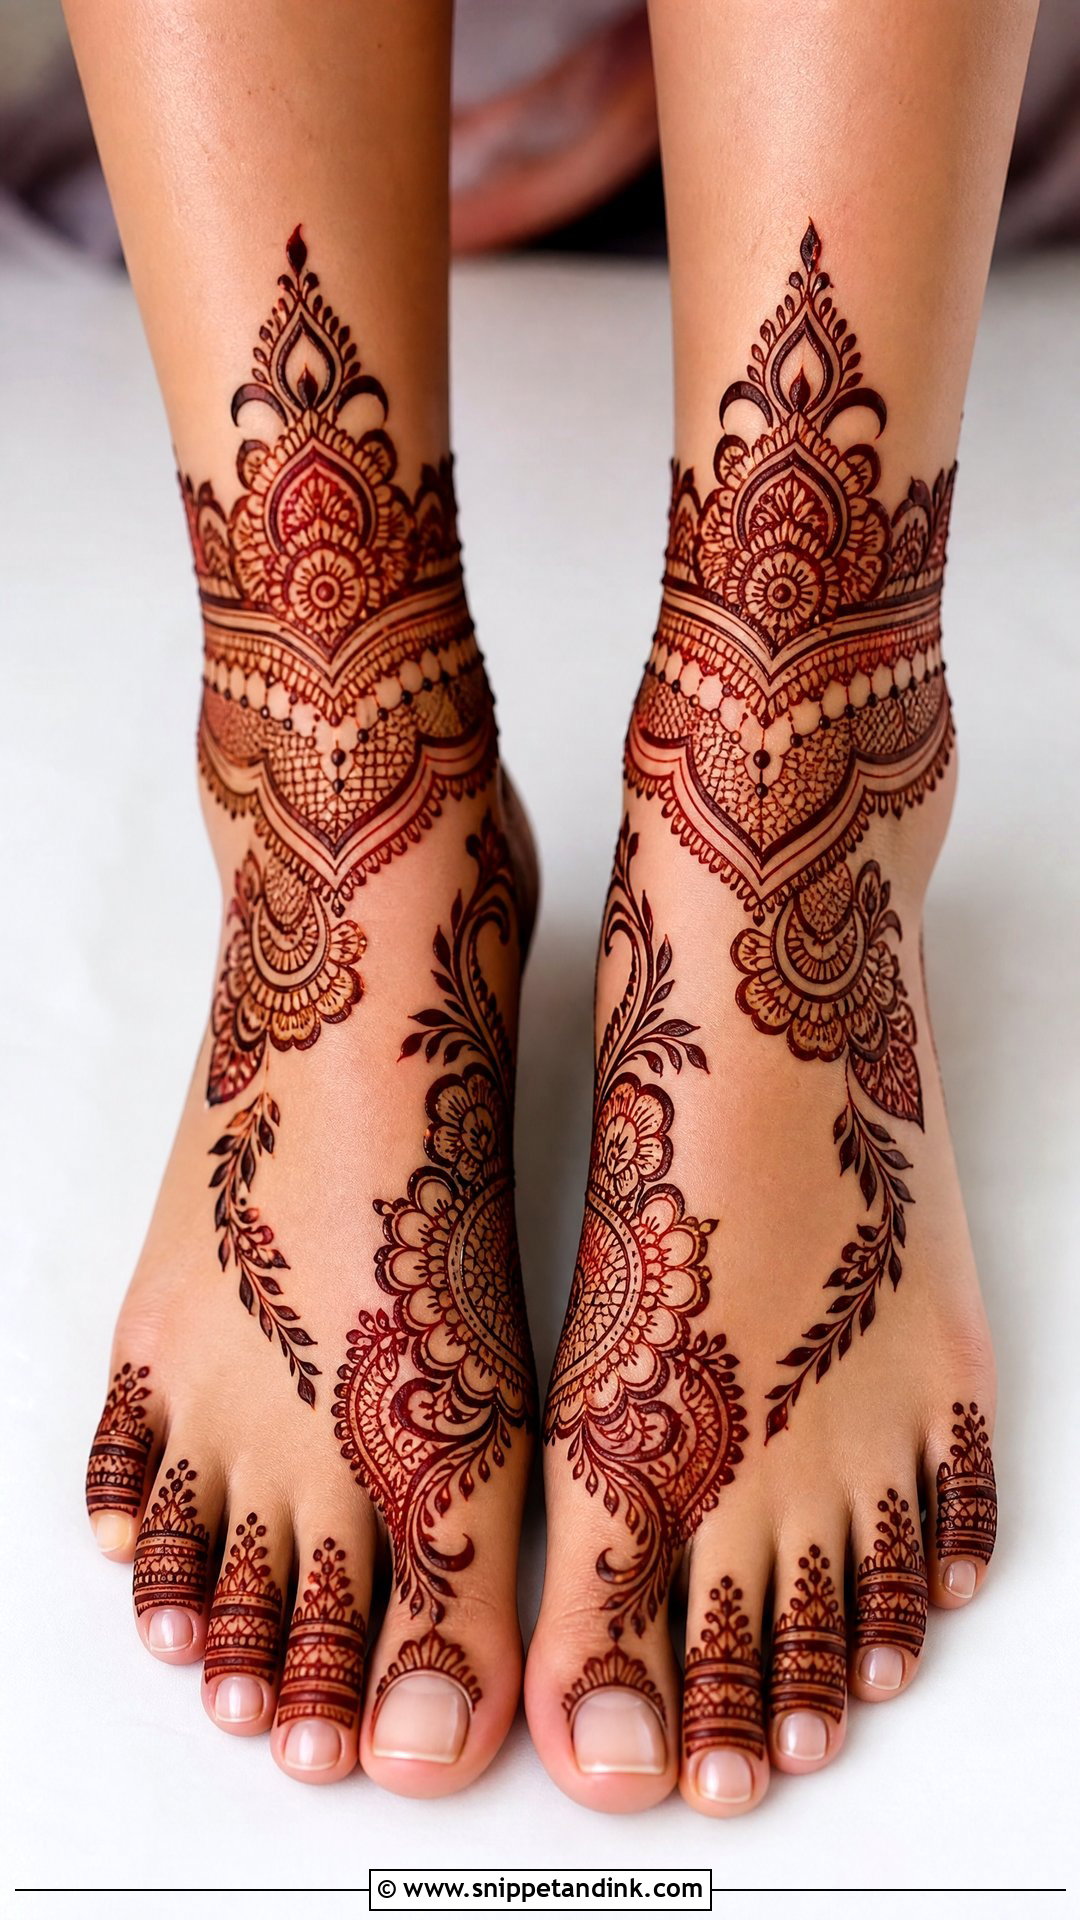
Here the open skin is part of the design. Bold motifs, borders and trails sit with clear gaps between them, so each flower, mandala or jaali panel stands on its own. It looks current while staying rooted in tradition, and it stops the feet turning into one dark mass in distant photos. The outlines have to be bold and the spacing equal on both feet, or the gaps read as mistakes rather than choices.
20. Gulf Bridal Feet Mehndi Design
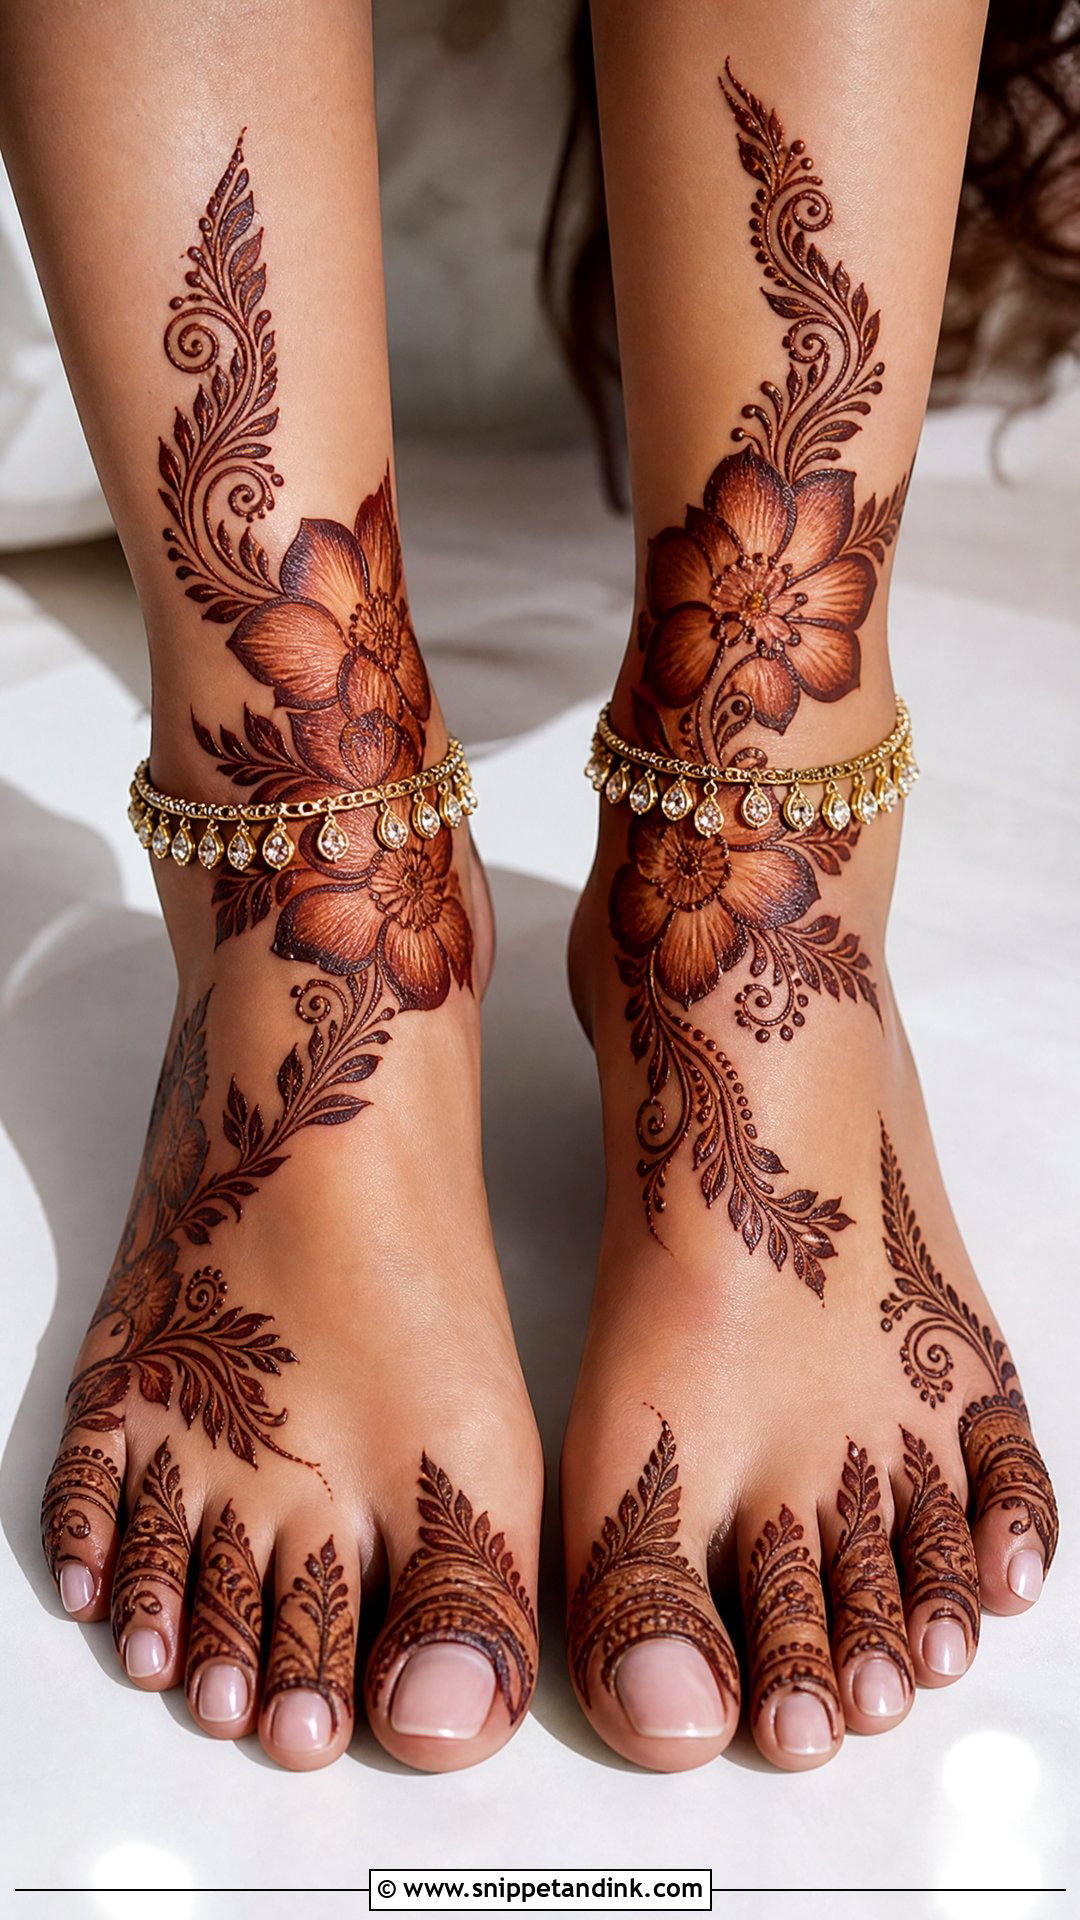
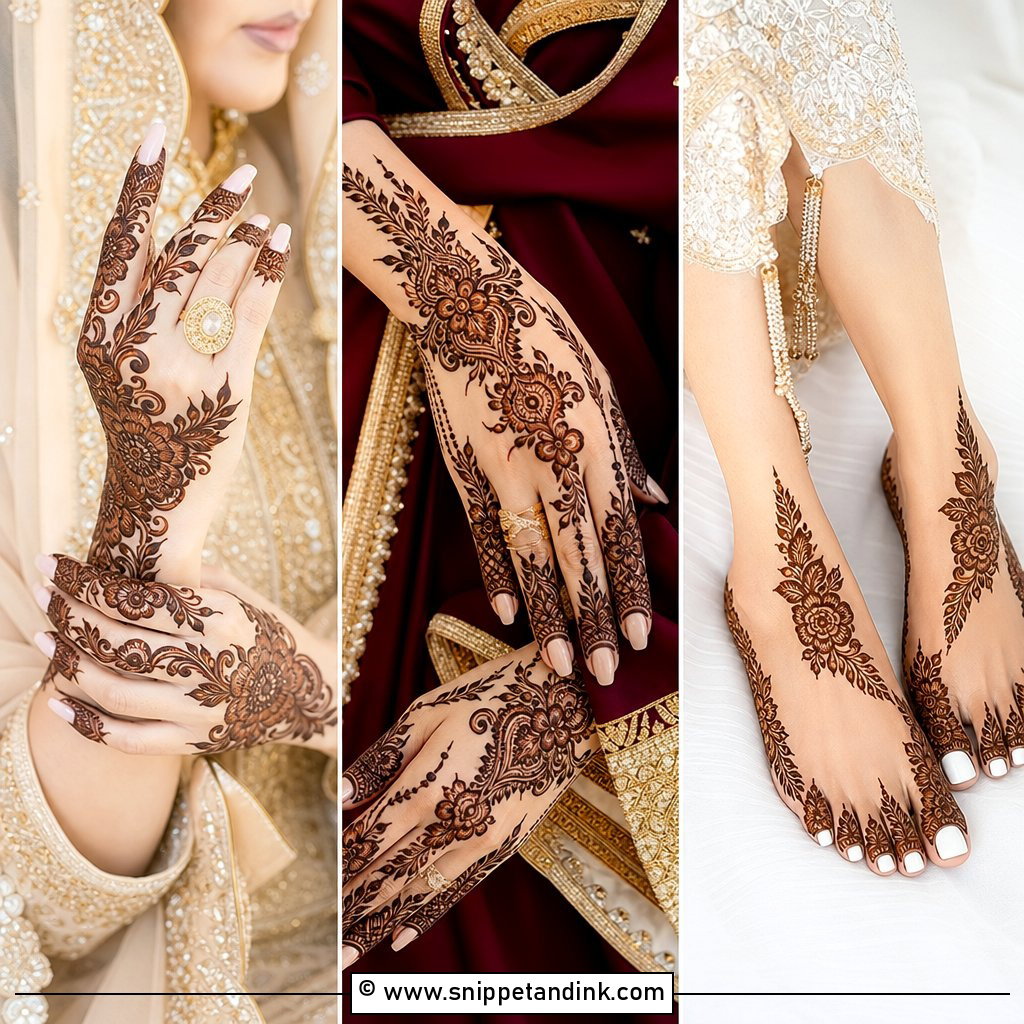
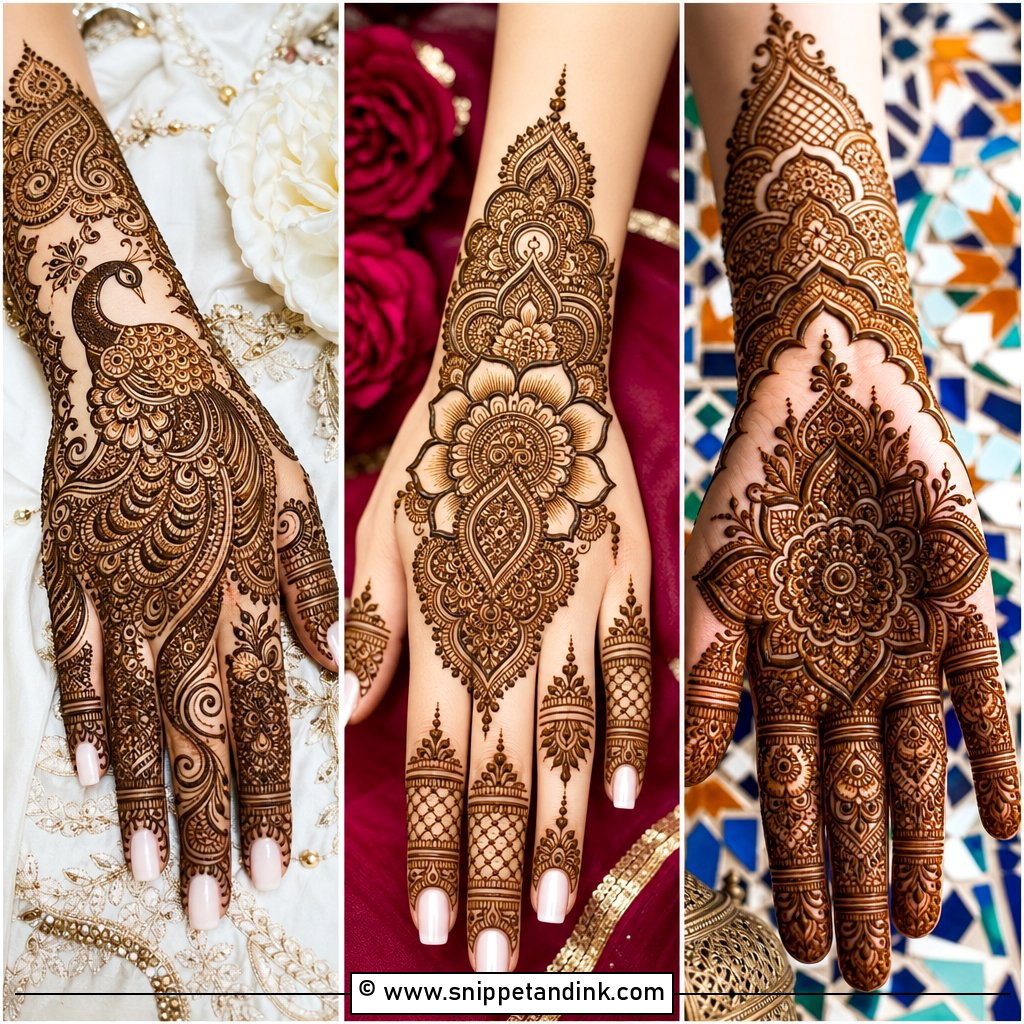
Gulf work, often inspired by Khaleeji henna, uses large florals, leafy vines, thick outlines and shaded petals with open space around them. The pattern typically sweeps from the toes across the foot toward the ankle in one confident curve. Thick outlines need a slightly wider cone tip and paste that won’t crack as it dries, so I test a line on my own hand before starting. Gold jewelry and rich fabric bring it out best.
The Hours After the Cone Leaves Your Feet
The first day decides how dark your stain will be. Leave the paste on as long as you can bear, ideally six to eight hours or overnight. Once it starts to dry, I dab a lemon and sugar mix over it so it stays stuck to the skin and keeps releasing color.
- Don’t walk on wet paste. Plan the bathroom trip before I start, and have someone else carry your shoes.
- To sleep with the paste on, wrap each foot loosely in tissue and pull an old cotton sock over it so the paste stays put overnight.
- Scrape the dried paste off with a blunt edge or your fingernail instead of washing it off, and keep water away until the next morning if you can.
- Before your first bath, rub a little coconut oil or balm over the design so soap and hot water don’t strip it.
Shoes, rituals and friction
Bright orange is normal when the paste first comes off. The color deepens over the next one to two days, which is why I book feet inside that window before the wedding. Closed shoes rub the stain off toes and heels faster than anything, so stay in open sandals that week and save tight bridal footwear for the day itself. If one patch stays pale, it’s usually where the paste cracked off early, and there’s no reliable fix, which is exactly why the sealing step matters.
Let What Shows Under Your Hem Decide
Start from what will show. If your hem lifts and you’ll be barefoot for rituals, full Indian, Rajasthani, peacock or paisley work earns its hours. If you’d rather keep skin visible, Arabic, floral, minimal and negative-space layouts are much lighter to sit through. Anklet and toe-ring designs give you jewelry without the weight, and Moroccan or Gulf patterns suit a bride who leans modern. Whatever you pick, book an artist whose foot work you’ve actually seen, and give the stain its full two days.
You'll Like These Ideas:


Leave a Reply