
Feet are the part of a bridal mehndi I plan most carefully, because a foot is not a flat canvas. Toes, the ankle bone, the arch and the crease where the foot bends all pull a design out of shape if the layout ignores them. Some brides want dense Indian coverage up to the shin; others want an Arabic trail, a henna anklet or just decorated toes. Current feet mehndi trends borrow from mandalas, jaali, paisleys and Moroccan geometry, and you will find all of them below, each with my notes on how it wears and stains on a foot.
Why a Foot Is Harder to Henna Than a Hand
The skin on top of the foot is thinner than a palm and stains a shade lighter, while the soles take color deeply but lose it fastest because every step rubs them. Feet also run cooler than hands over a long day, and warmth is what helps a stain develop. Before I choose a single motif, I plan around three things.
- Your shoes. Bring them to the appointment. Straps, a closed heel or the vamp of a jutti decide where henna will actually show.
- The ankle bone and the bend at the base of the toes. Lines drawn straight across either one distort when you stand, so I curve borders around them.
- How long you can keep still. Paste on a foot needs to stay undisturbed for a good while, and nobody can walk on wet soles.
I’d also avoid having hands and feet done at the same moment by two artists unless someone is there to help you. With all four covered you can’t eat, hold a phone or get up for an hour or more, and that is usually when brides start fidgeting and smudging.
1. Bridal Feet Mehndi Design
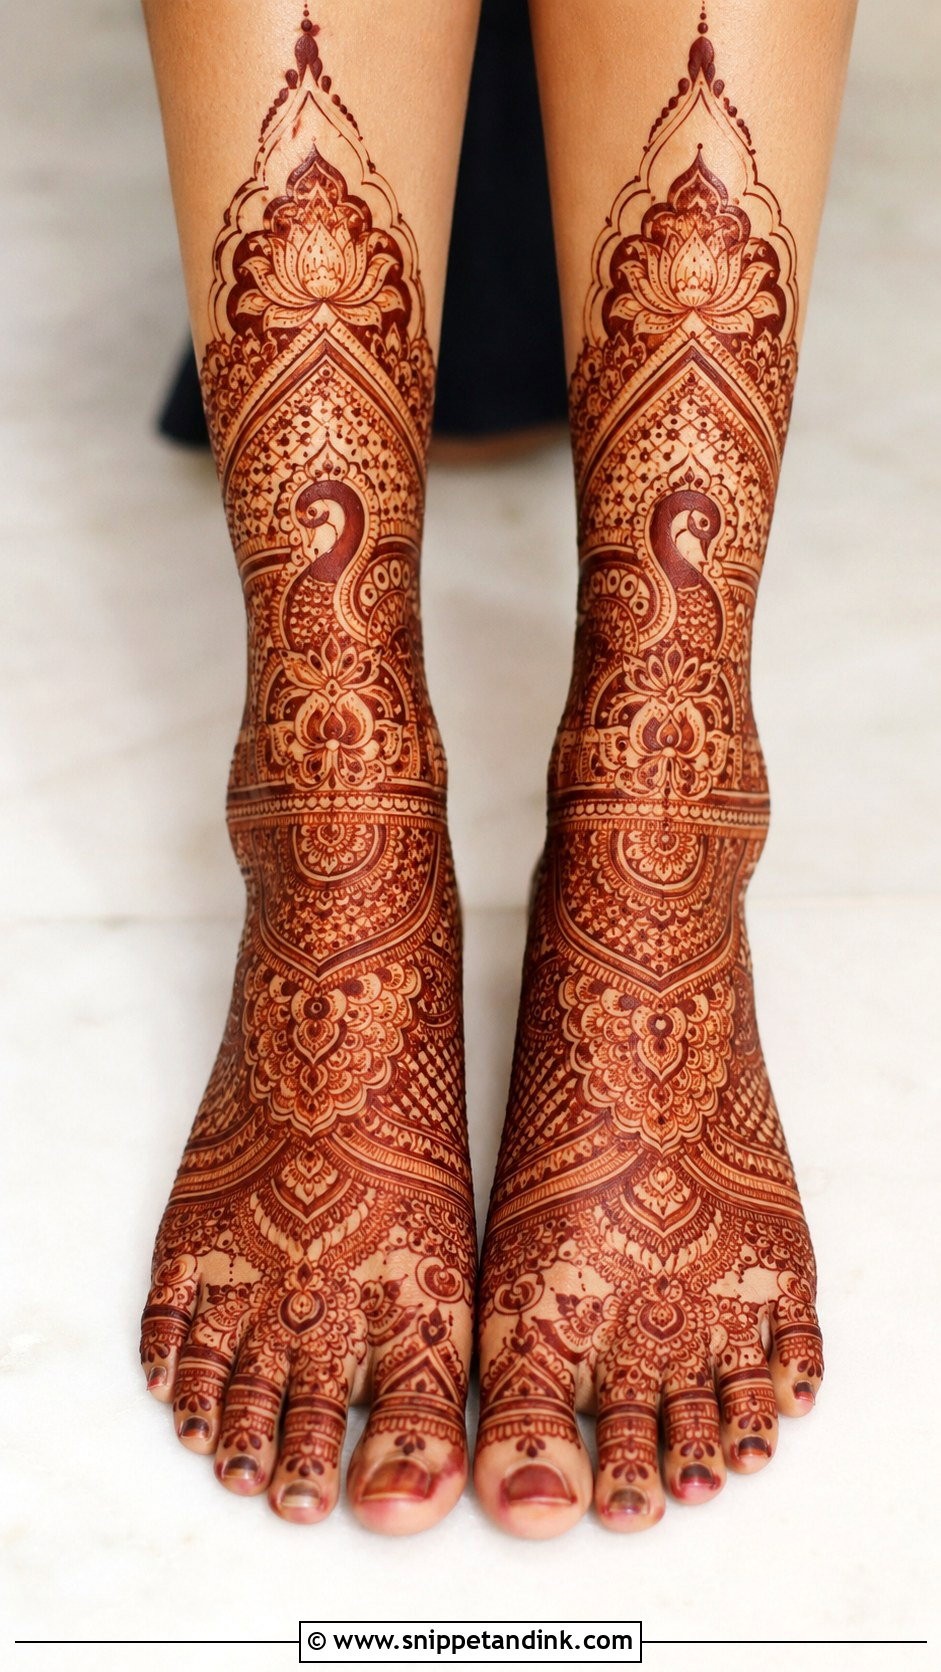
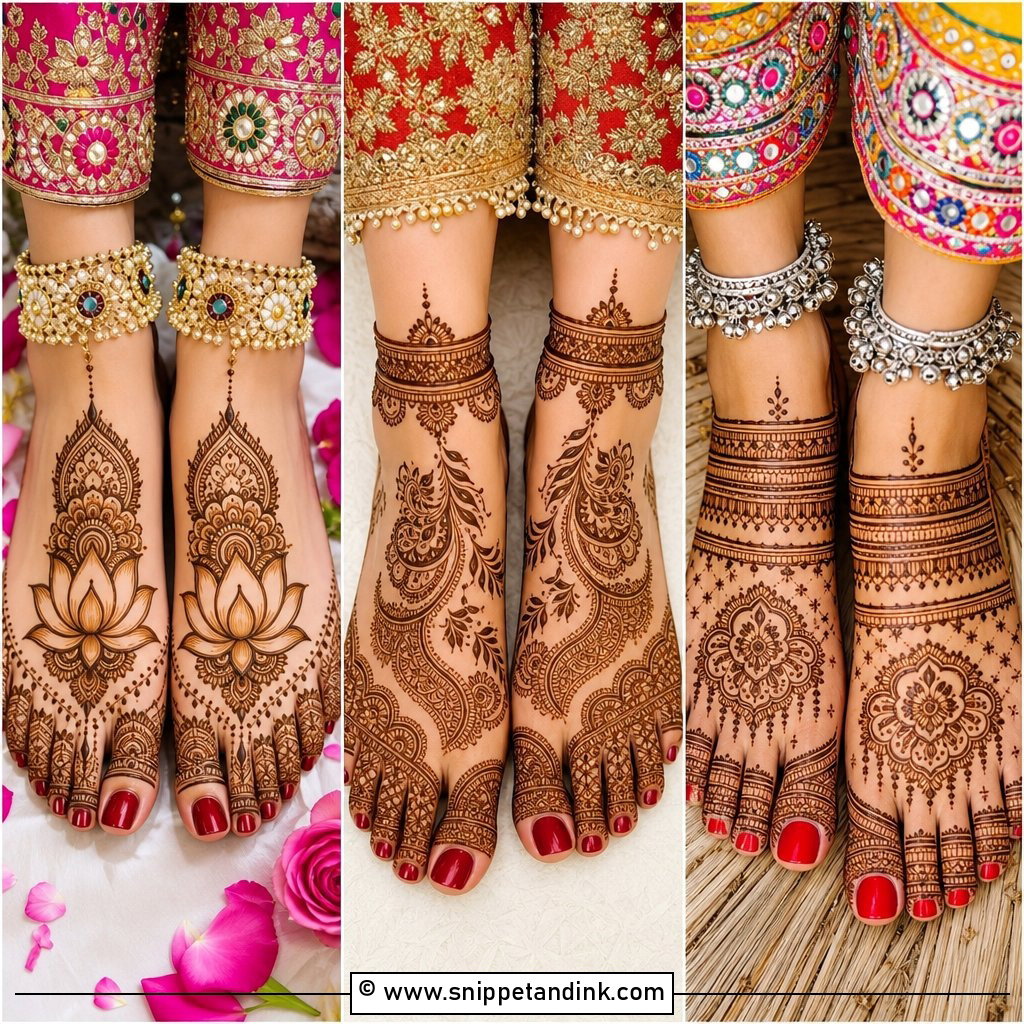
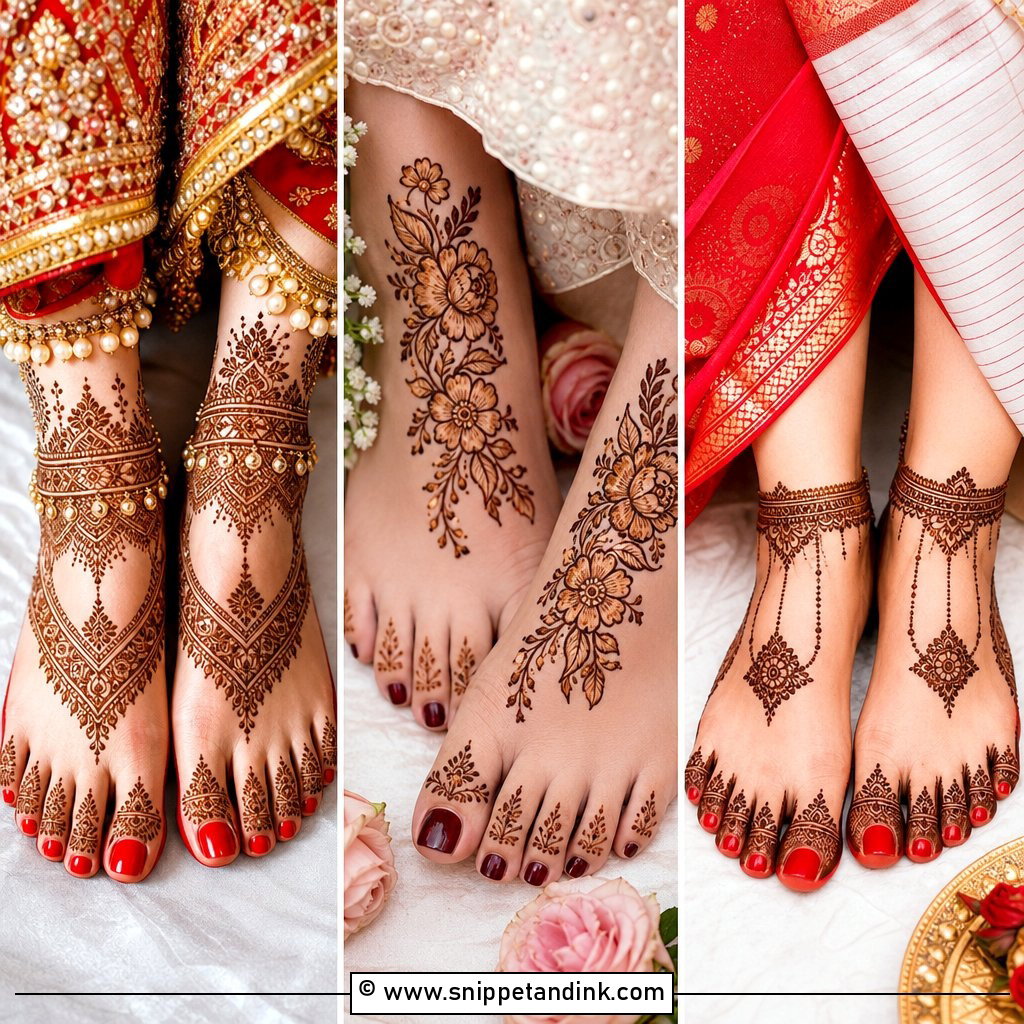
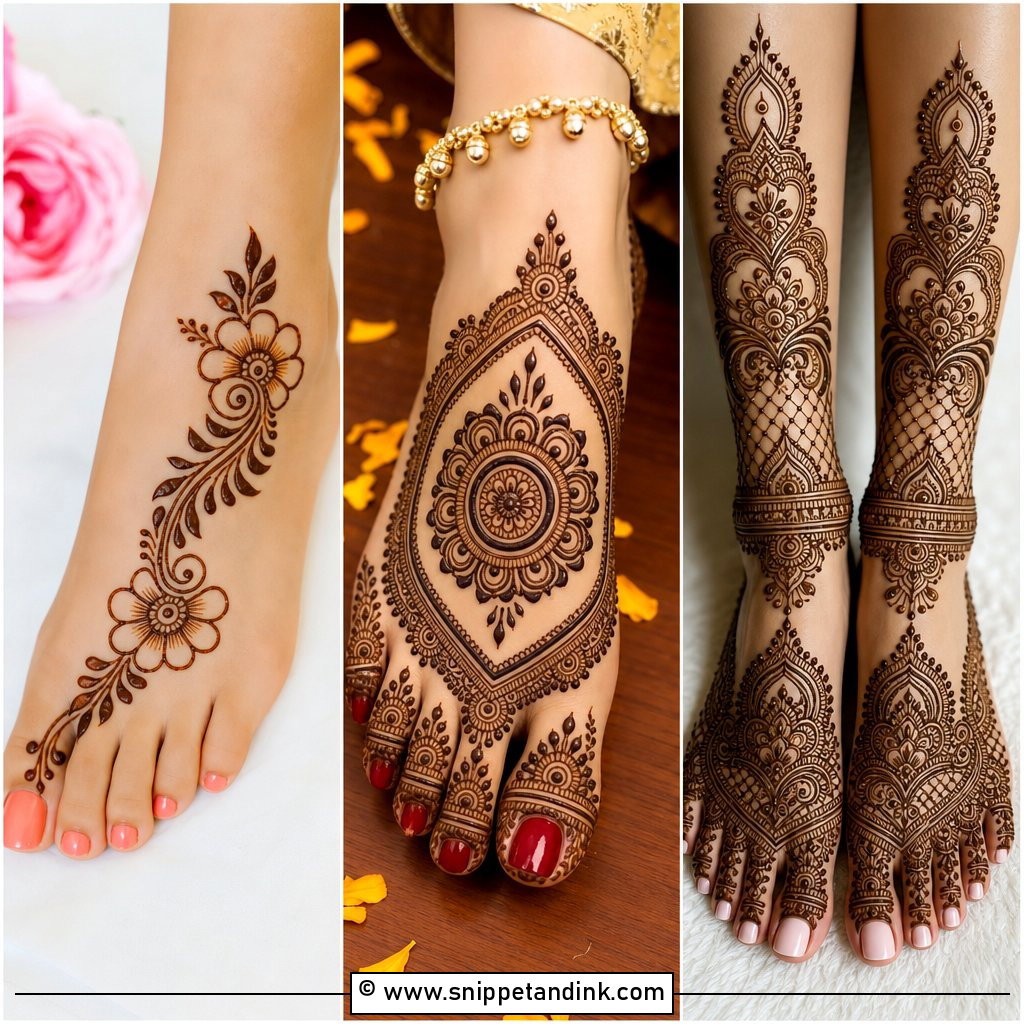
This is the layout I’m asked for most at weddings: toes, the top of the foot and the ankle filled, sometimes continuing up the lower leg. Paisleys, lotus, peacocks and fine filler lines carry the weight, so you rarely need extra foot jewelry. The part I take most care with is symmetry, because feet are photographed side by side and a few millimeters of difference at the ankle band shows. Leave the paste on for at least six hours and keep water off for the rest of the day; the color you see when it flakes off is only the start.
2. Simple Feet Mehndi Design
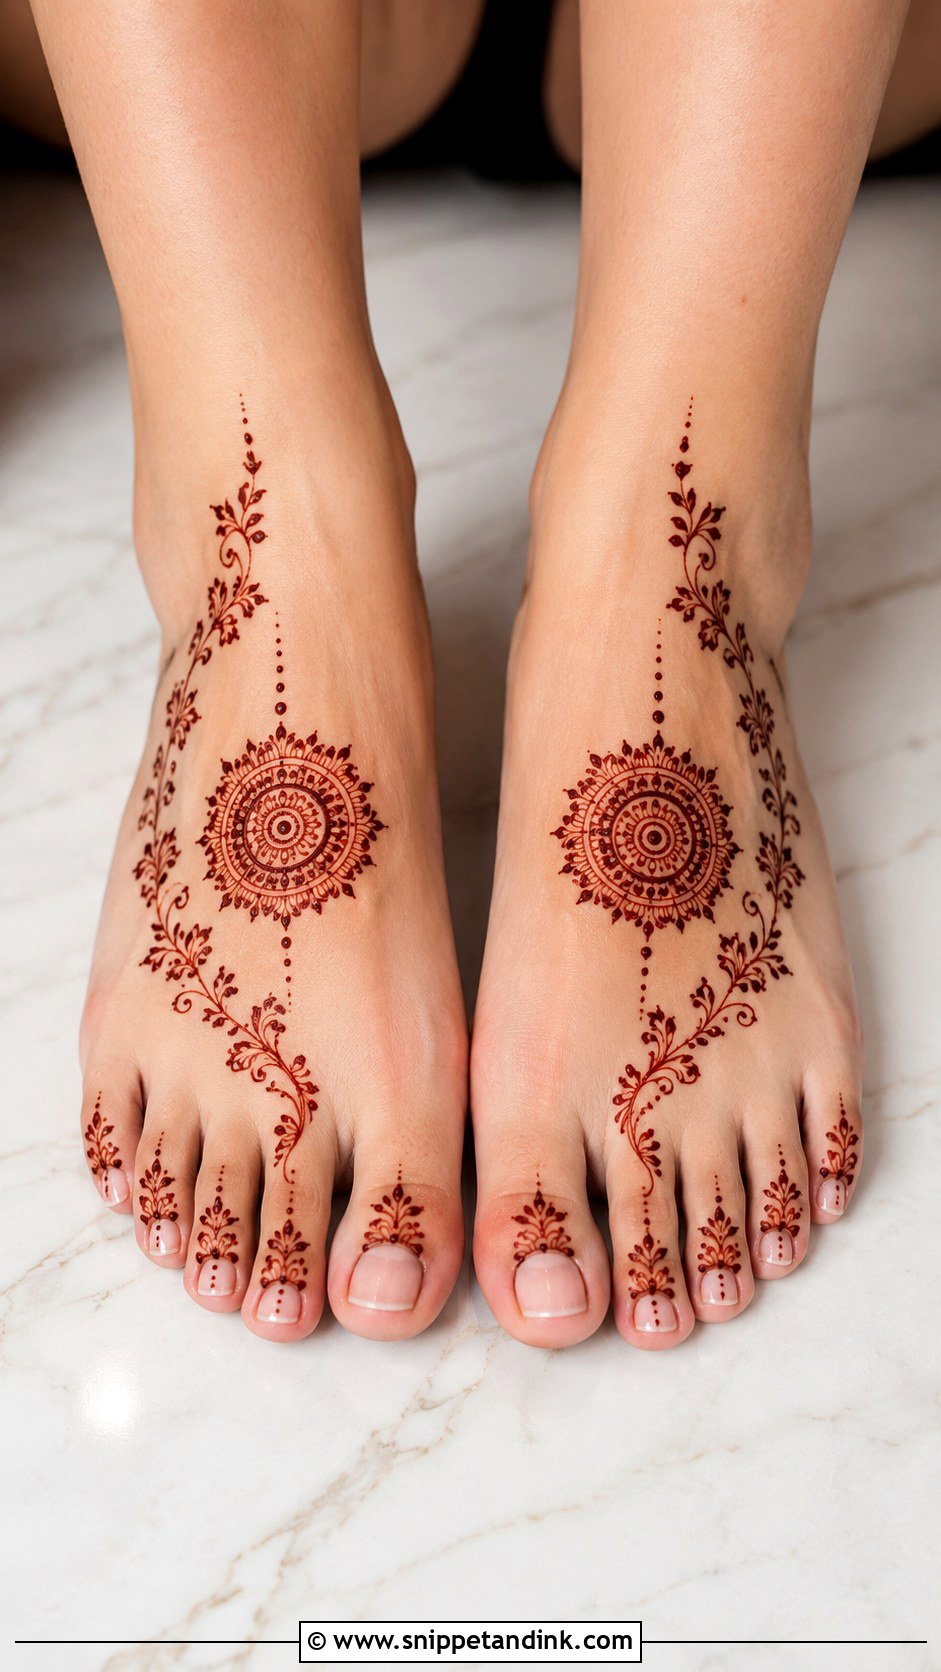
Small mandala, a leafy trail down the center, a little detail on each toe. That’s the whole design, and it takes me a fraction of the time a bridal foot does, which is why I suggest it for Eid, Diwali, a mayun or a small function where you’ll be on your feet soon after. The open skin is doing half the work, so the lines need to be crisp; a wobbly outline has nowhere to hide.
3. Arabic Feet Mehndi Design
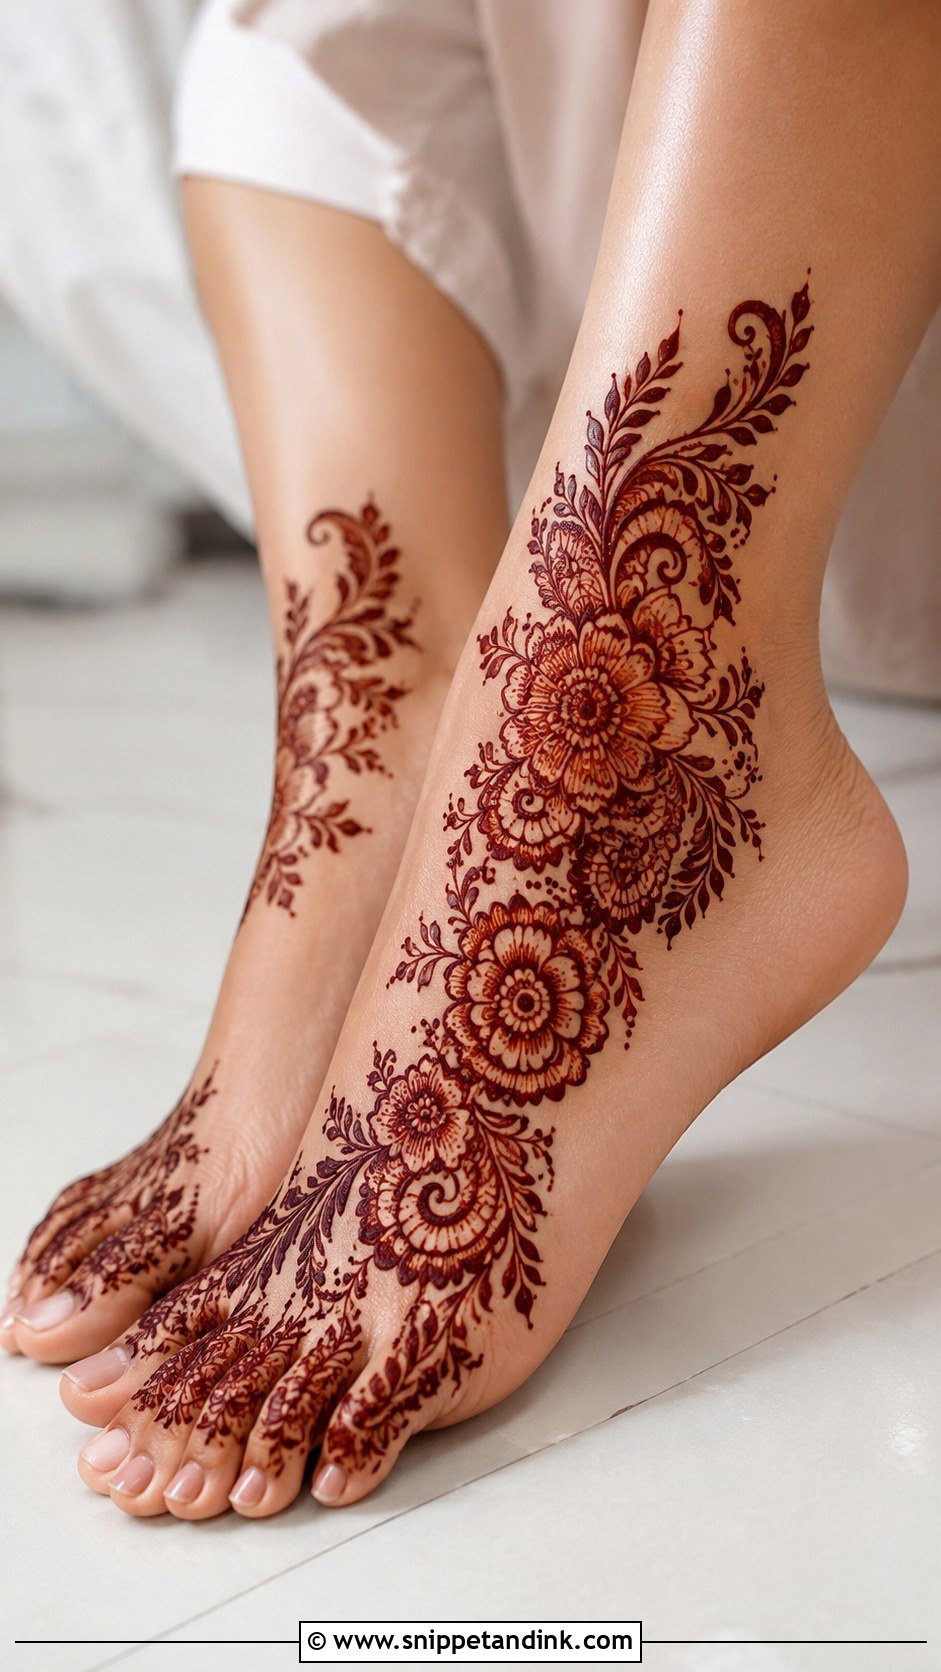
Arabic placement runs diagonally, usually from the outer toes across to the inner ankle in one curved trail, with plenty of bare skin left around it. Bold flowers, leaves and shaded petals read clearly from across a room, which makes it a favorite with bridesmaids and guests. What makes it look professional is contrast. I pipe the outer outlines with a thicker cone tip and keep the inner shading fine, because if both come out the same weight the design goes flat once it stains.
4. Full Feet Mehndi Design
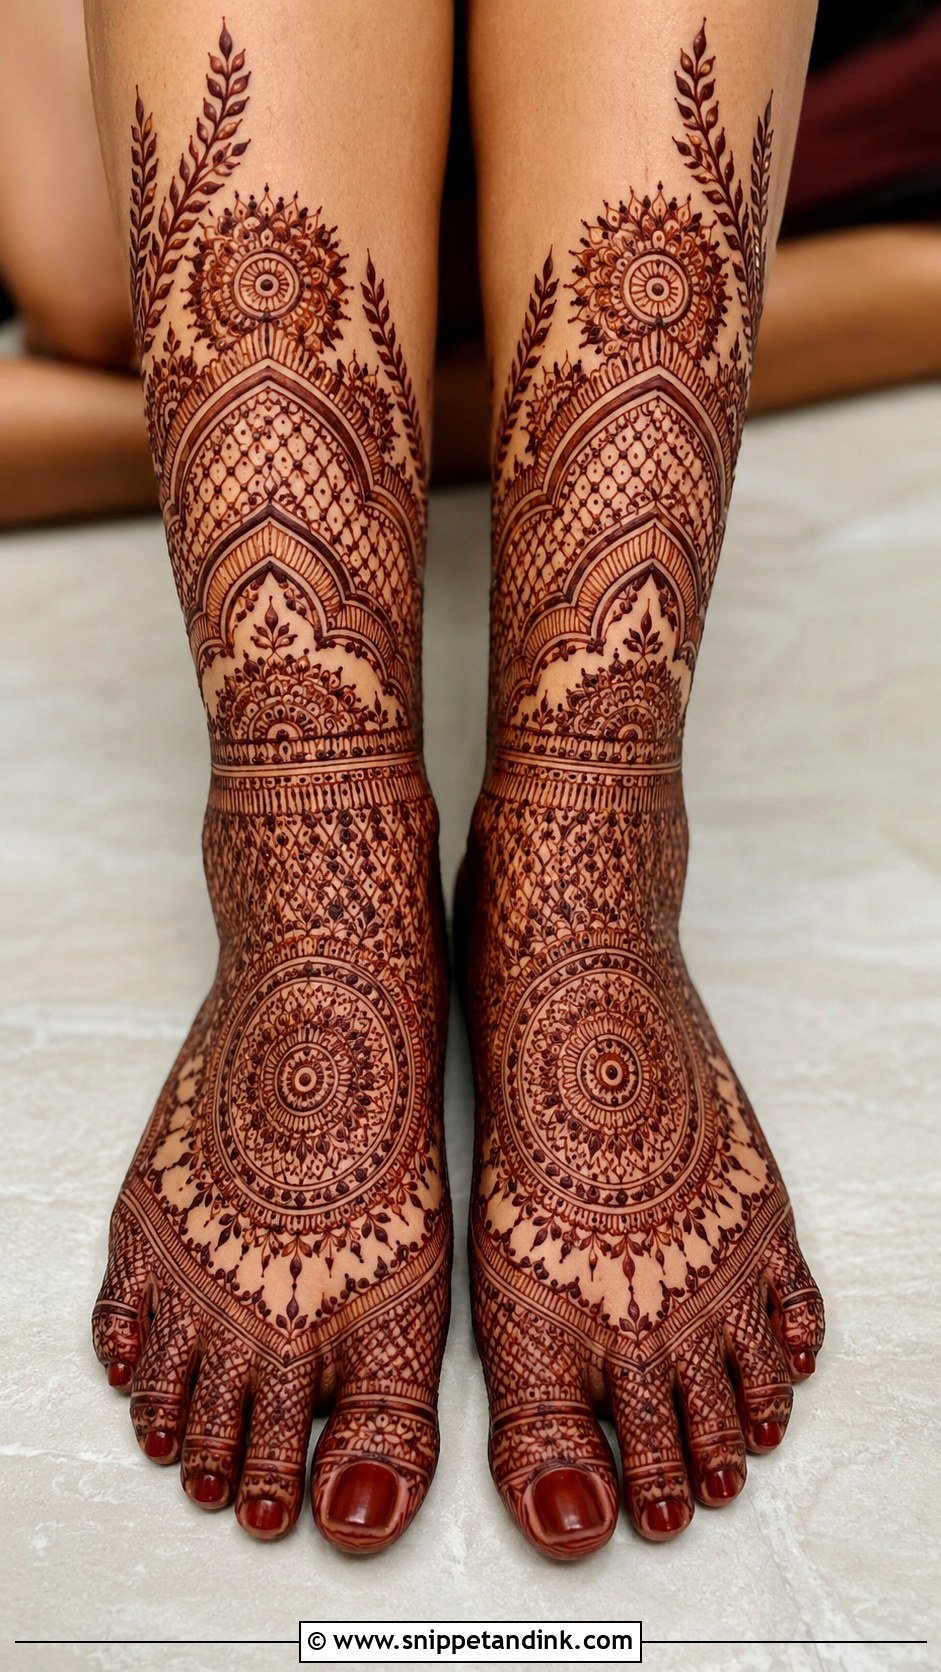
Full coverage takes in the toes, the arch, the sides and the ankle, sometimes the lower leg too, using mandalas, vines, lace borders, paisleys and mesh. It sits naturally with lehengas, sarees, ghararas and traditional anklets. My rule is to split the foot into zones with bands or borders before I fill anything, since a fully covered foot without that structure can stain as one muddy patch. Expect the top of the foot to come up a shade lighter than your palms. The skin there is thinner, and that’s normal, not a sign of weak paste.
5. Back Feet Mehndi Design
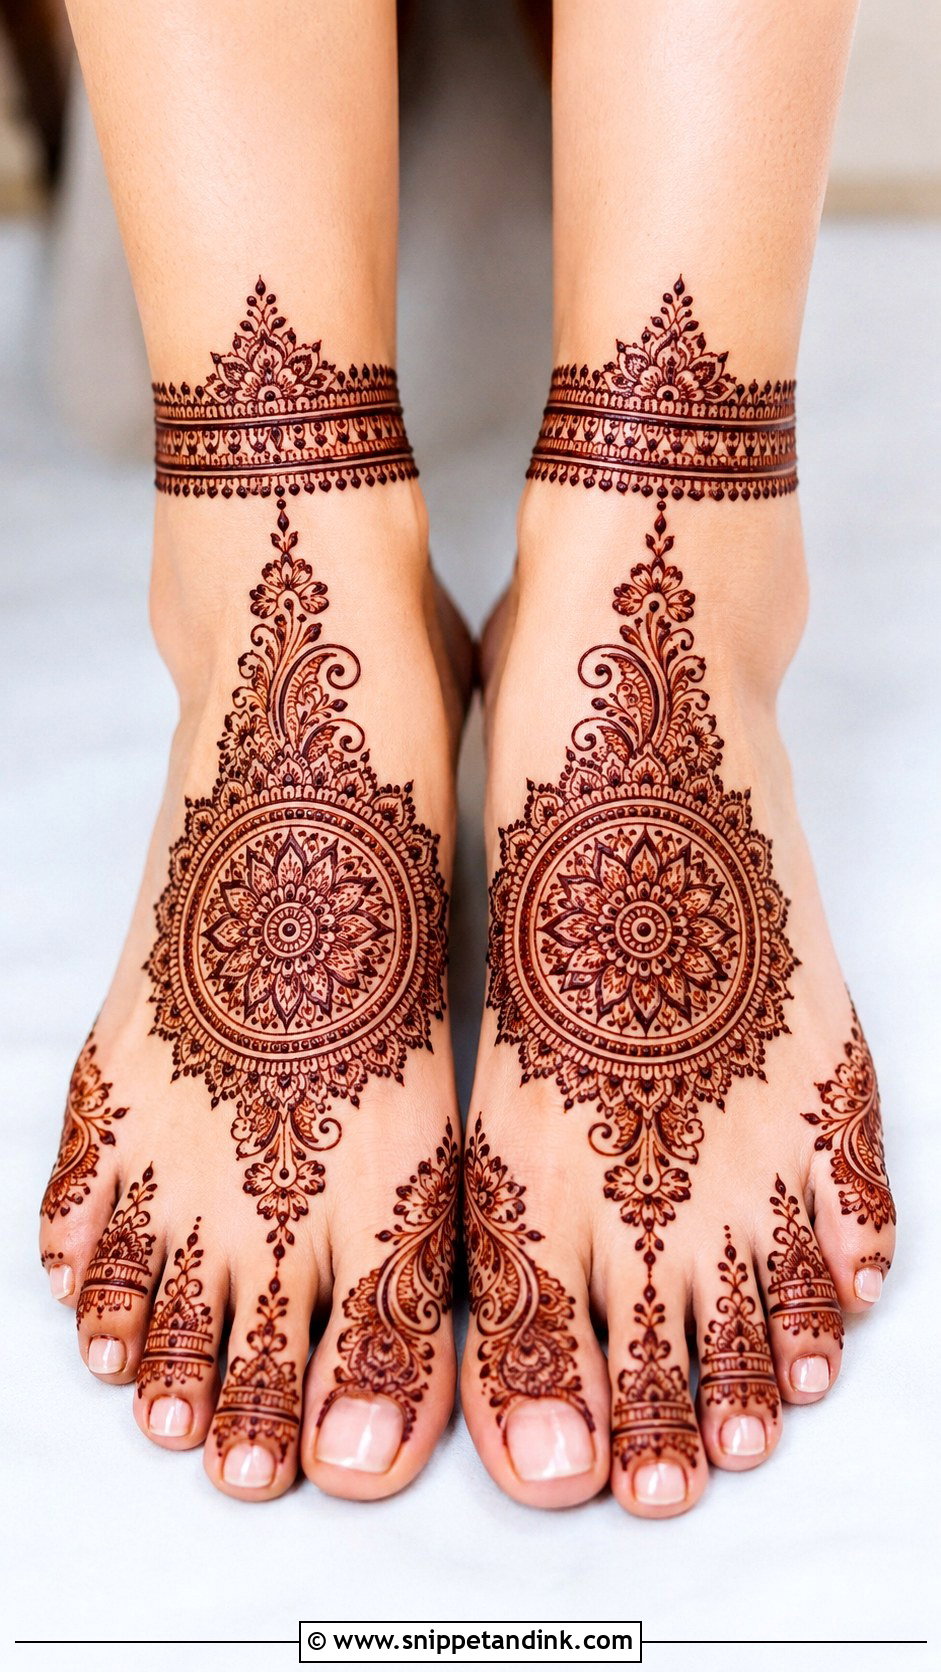
The top of the foot is what the camera catches in seated and getting-ready shots, so this design concentrates everything there: toes, instep and up toward the ankle, finished with a floral trail, a central mandala or a bracelet-style ankle band. The top of the foot is flatter than the toes, which lets me run finer lines here than anywhere else. I always join the toe work to the main pattern. Isolated toe motifs look like an afterthought in photos.
6. Front Feet Mehndi Design
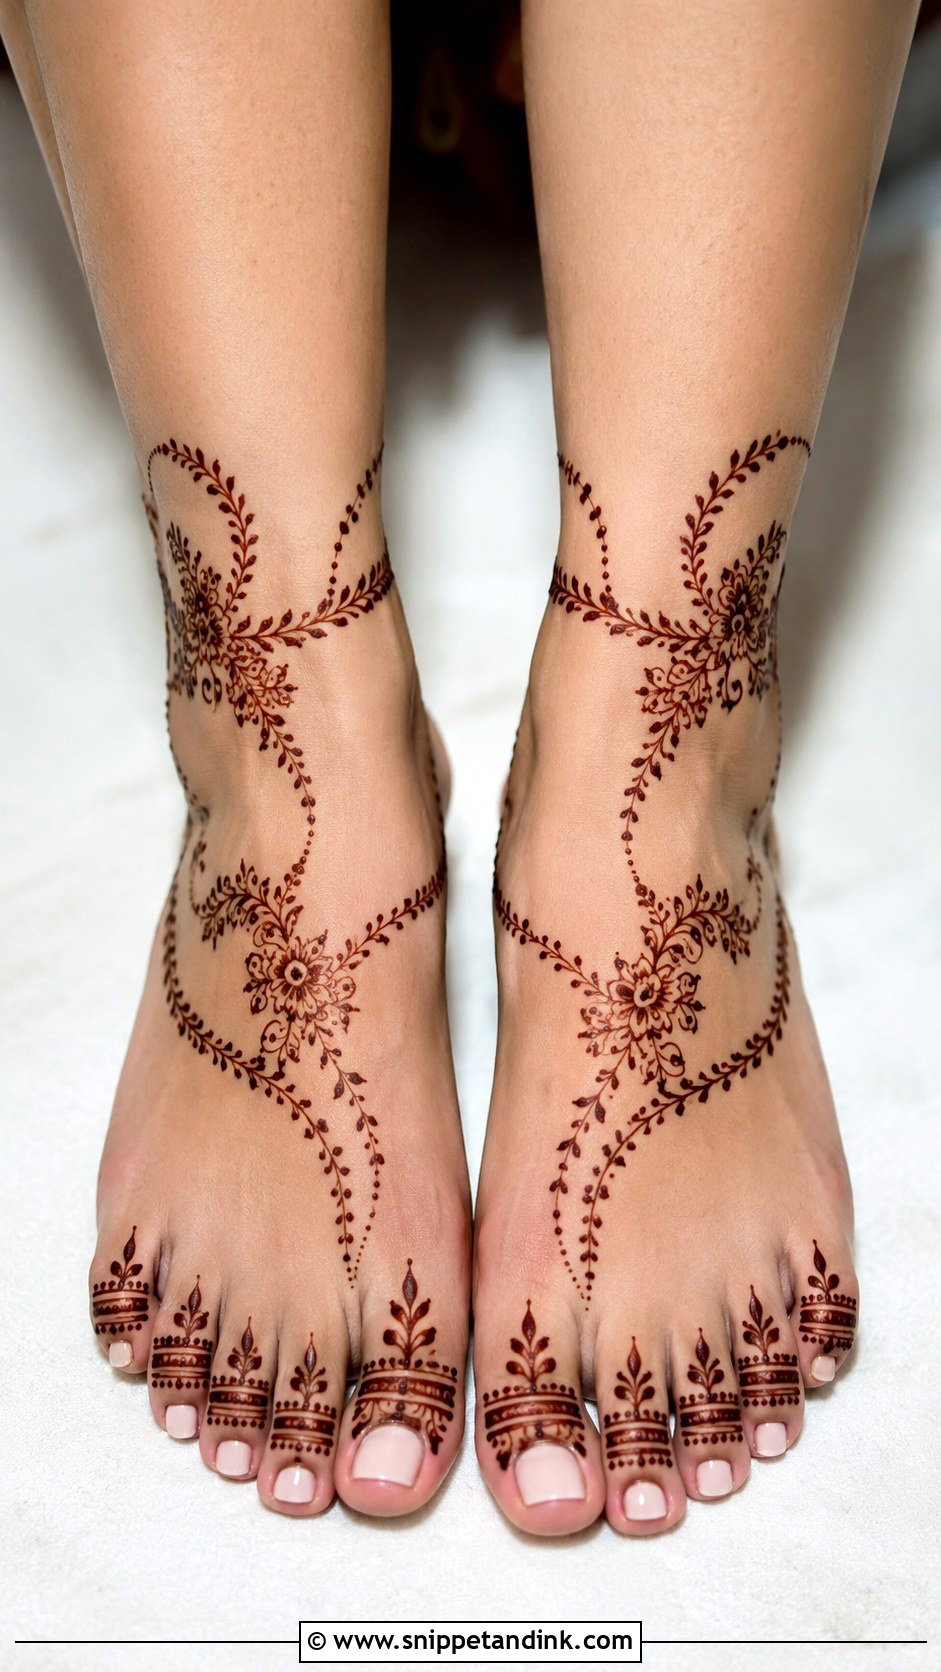
This one decorates the toes, upper foot and front of the ankle so it shows with juttis, sandals or open heels, using henna toe rings, leafy chains and small mandalas. I keep the toes lighter than the instep for a practical reason: toes twitch while paste dries, and dense detail there is always what smudges first. Let the heaviest part sit on the top of the foot, where you can actually hold still.
7. Leg Feet Mehndi Design
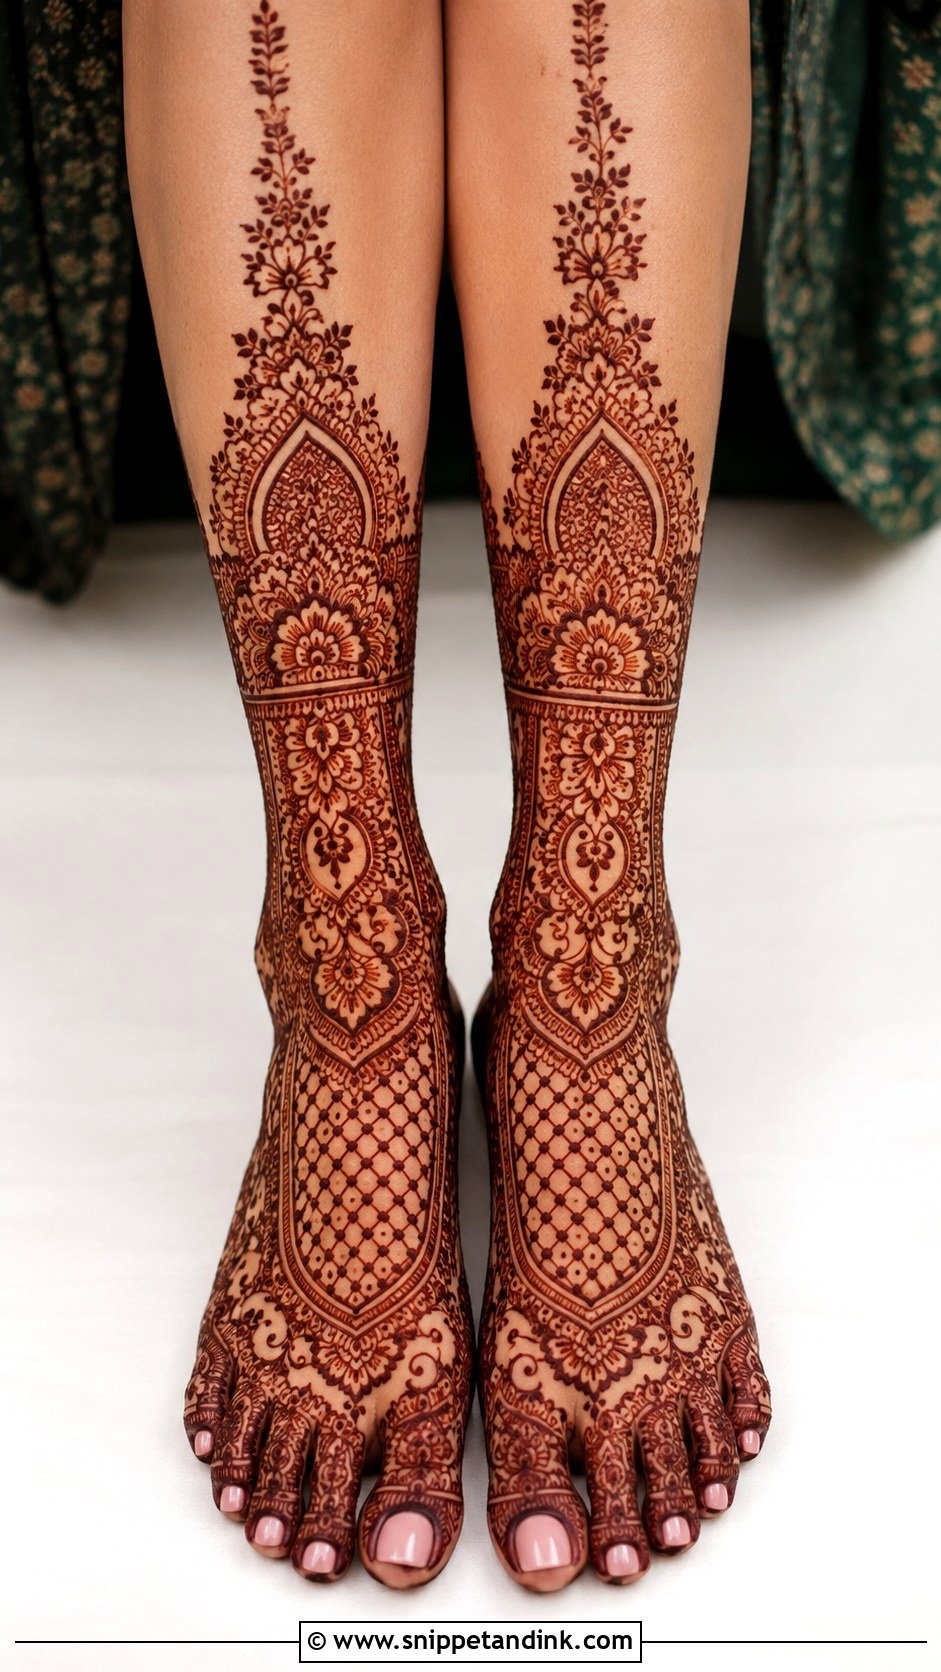
Extending past the ankle gives the drama heavy bridal outfits ask for, with florals, jaali or paisley vines climbing from the toes up the shin. The risk is a leg section that looks pasted on above a separate foot design. I plan the vertical line first so one vine or border visibly travels from the foot into the leg, and that continuity is also what lengthens the look of the feet and legs. Shin skin stains paler than the foot, so an airier leg section usually photographs more evenly than trying to match the density below it.
8. Dulhan Feet Mehndi Design
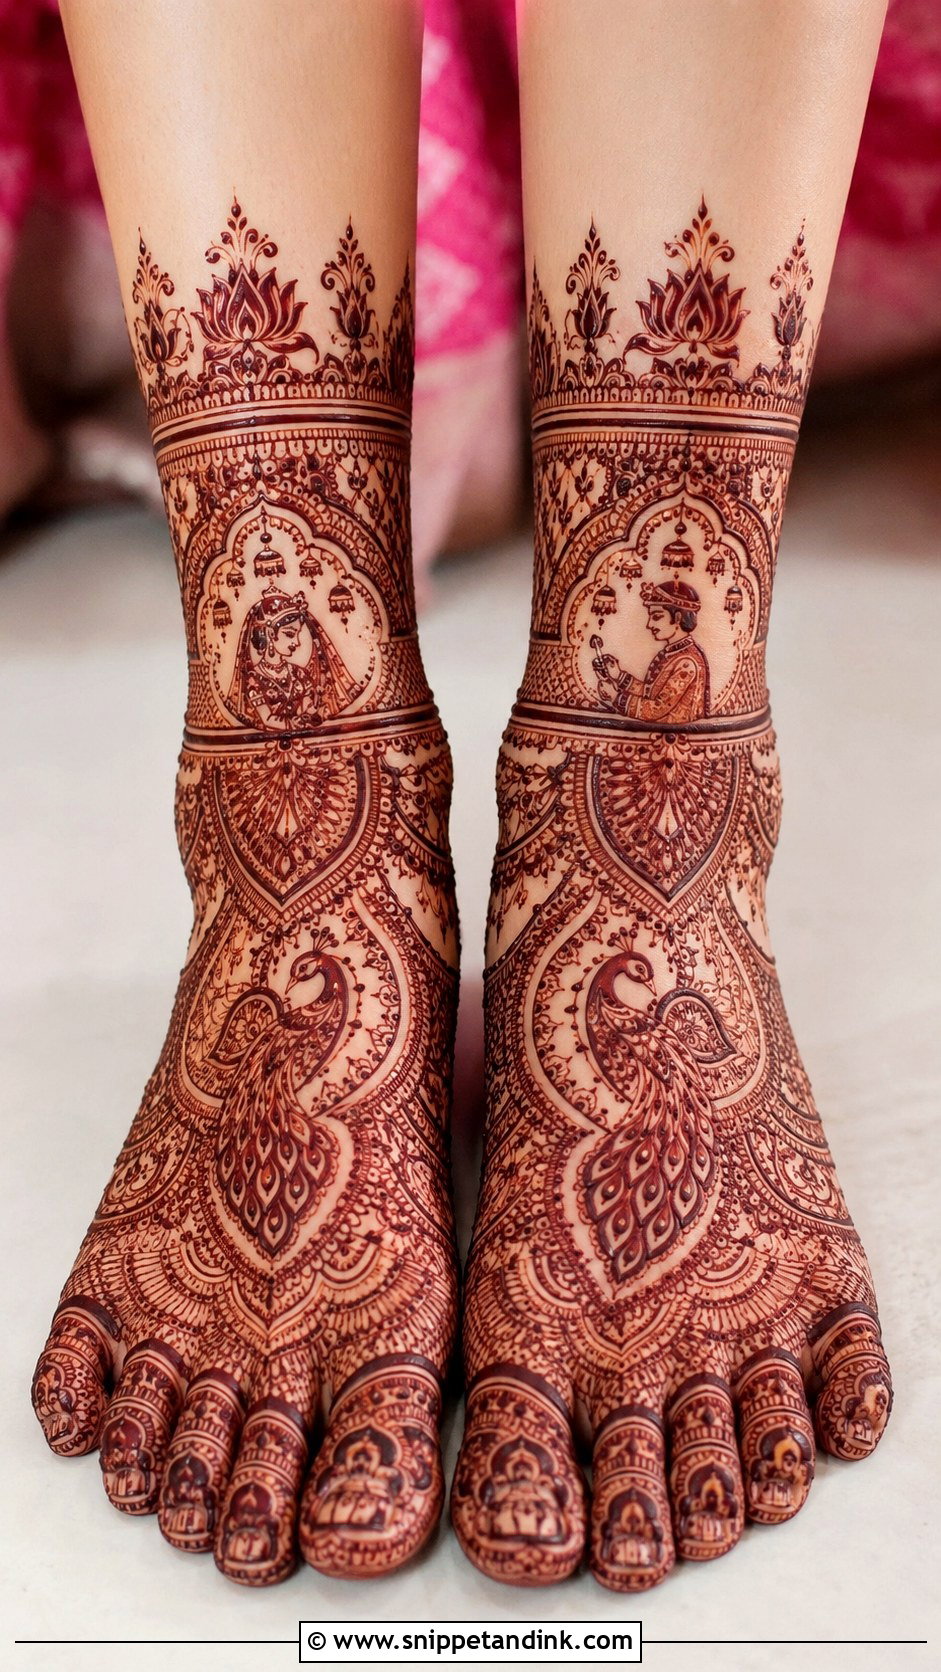
Dulhan feet are the full traditional set: dense Indian motifs mirrored on both feet, with lotus, peacock, kalash or bride-groom artwork worked into the layout from toes to lower leg. I will still talk a bride out of filling every gap, because the shape of the foot should read through the pattern. Clear borders and a repeating motif keep it refined against red, maroon, gold or ivory.
9. Indian Feet Mehndi Design
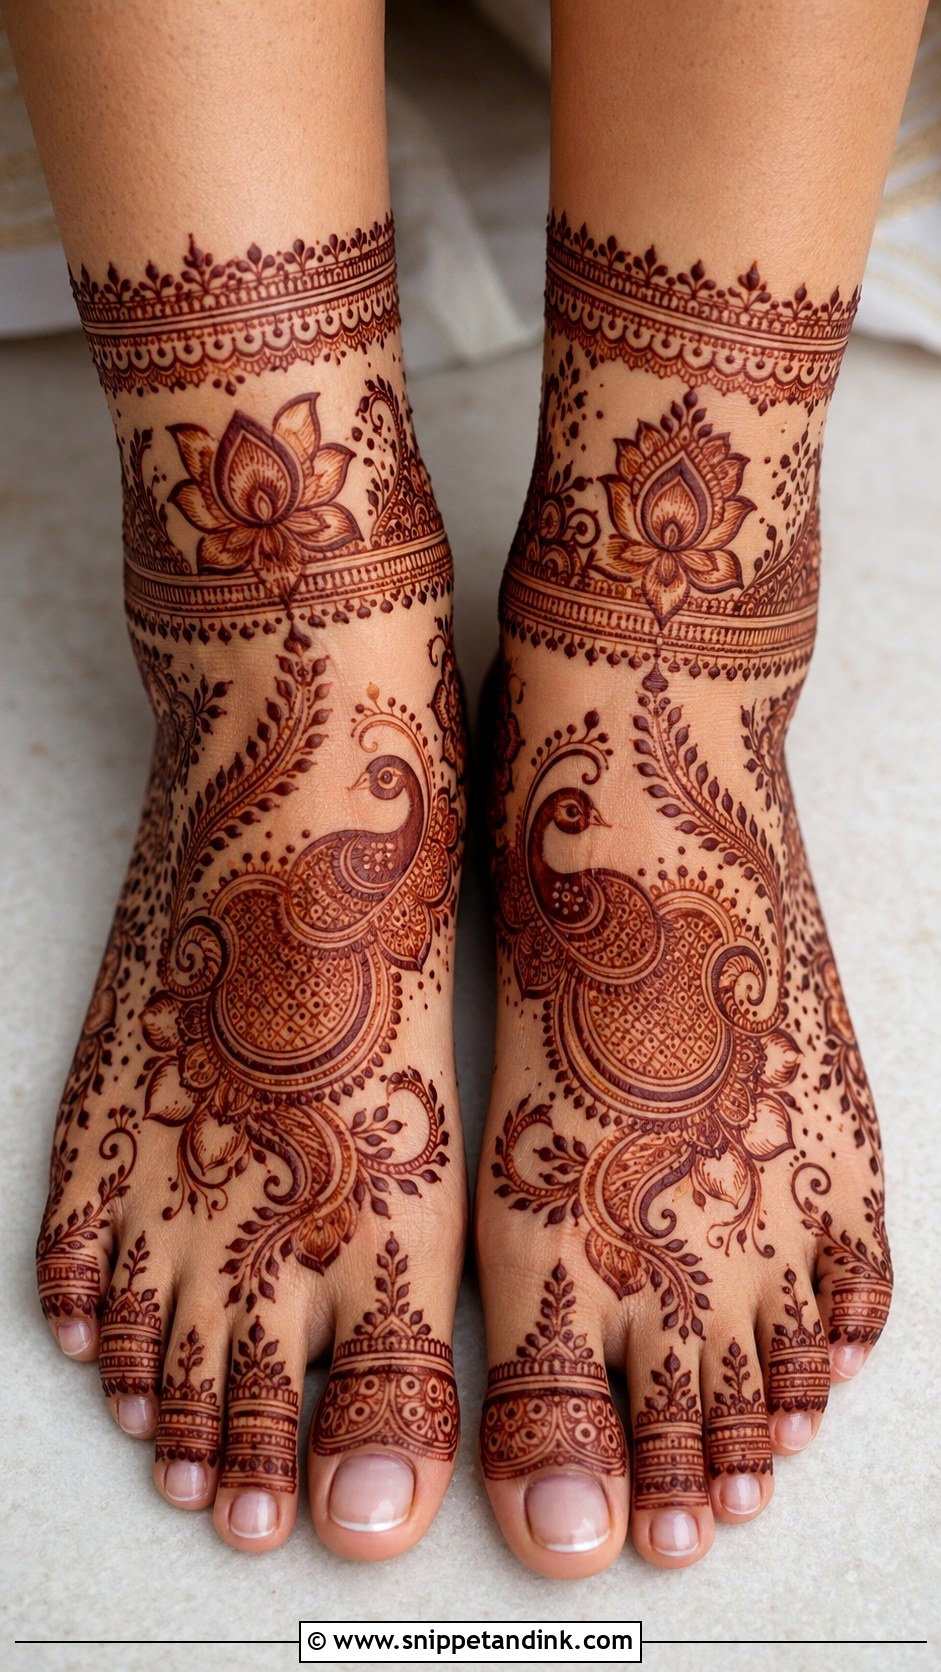
Indian foot mehndi covers more ground than Arabic, with paisleys, peacocks, lotus, dots and curling leaf lines in mirrored symmetry. It belongs at weddings, Karwa Chauth, Teej and Diwali. I divide the foot into panels and give each one its own filler, which is how a dense design stays legible. Consistency inside each panel matters more than variety between them: if one row of dots is bigger than the next, the eye goes straight to it.
10. Pakistani Feet Mehndi Design
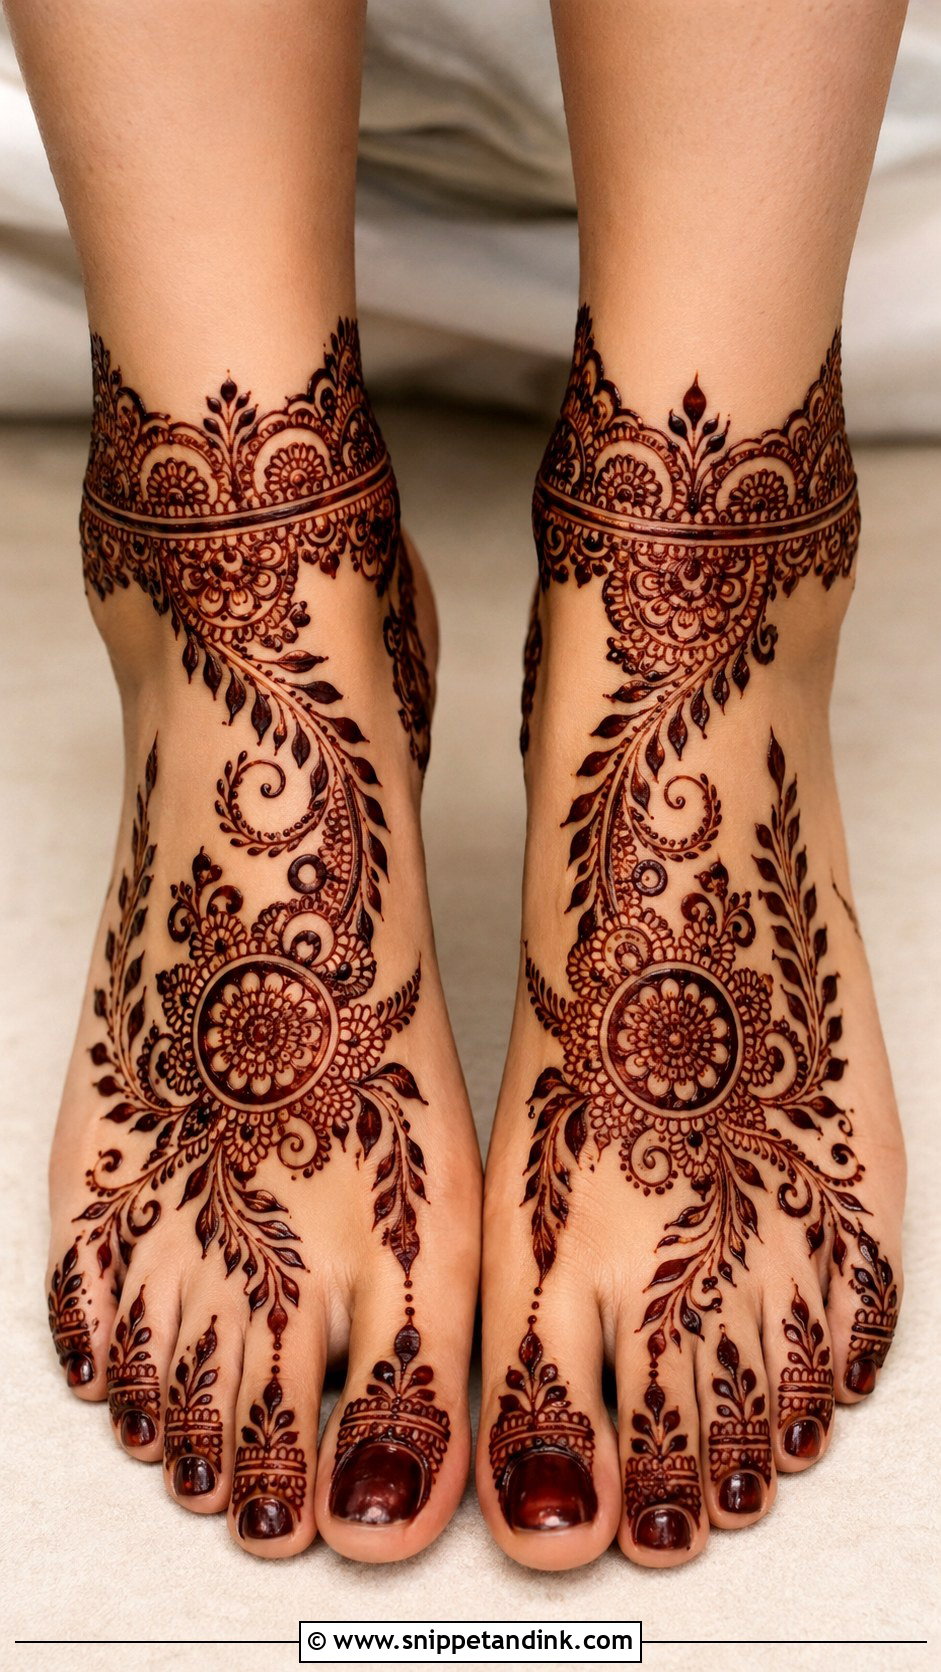
Pakistani styles marry the open flow of Arabic work with Indian-style filling inside the shapes: wide floral vines, shaded leaves, round medallions, paisley borders and a detailed ankle. You’ll see it at nikkah ceremonies, mehndi nights and Eid. I anchor it with one strong motif near the center of the foot and keep everything around it finer. When the vine curves with the foot instead of sitting flat across it, the design looks like it grew there.
11. Rajasthani Feet Mehndi Design
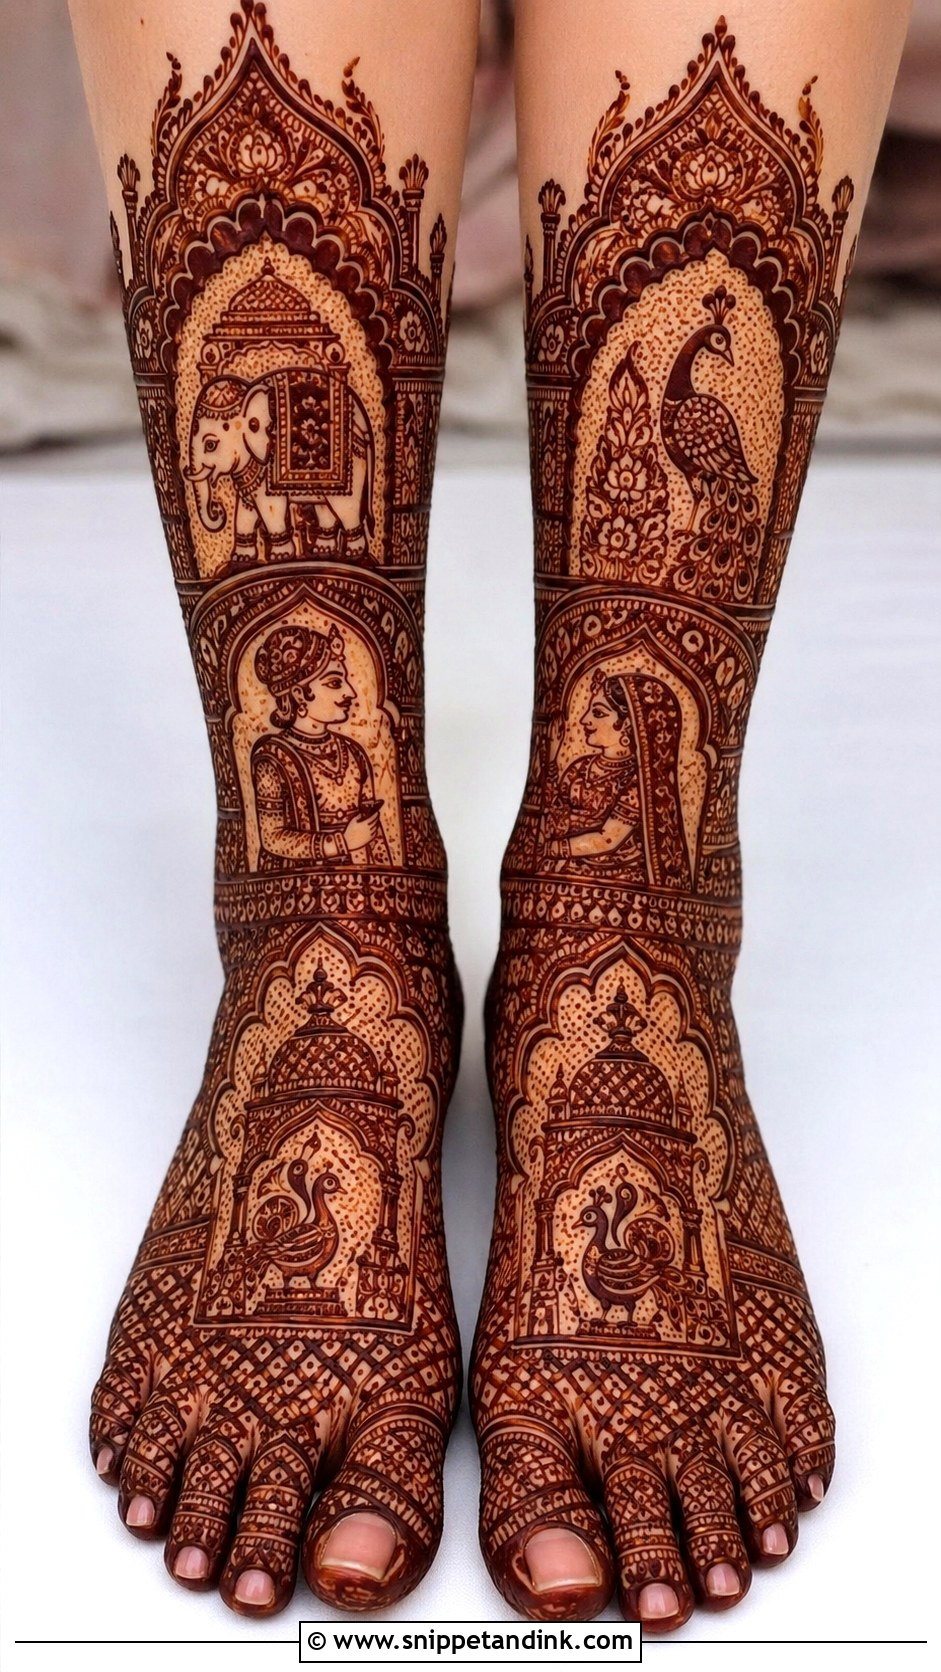
Rajasthani mehndi tells a story. Bride and groom figures, elephants, peacocks, palace arches and tiny filler work cover the whole foot and often the lower leg. It is the slowest design here to apply, and I’d only book it with an artist whose portfolio shows faces and figures done in henna, because a wobbly figure is far more noticeable than a wobbly leaf. Plan for a long sitting with your feet propped up. Next to a heavily embroidered lehenga and kundan jewelry, all that detail holds its own.
12. Marwari Feet Mehndi Design
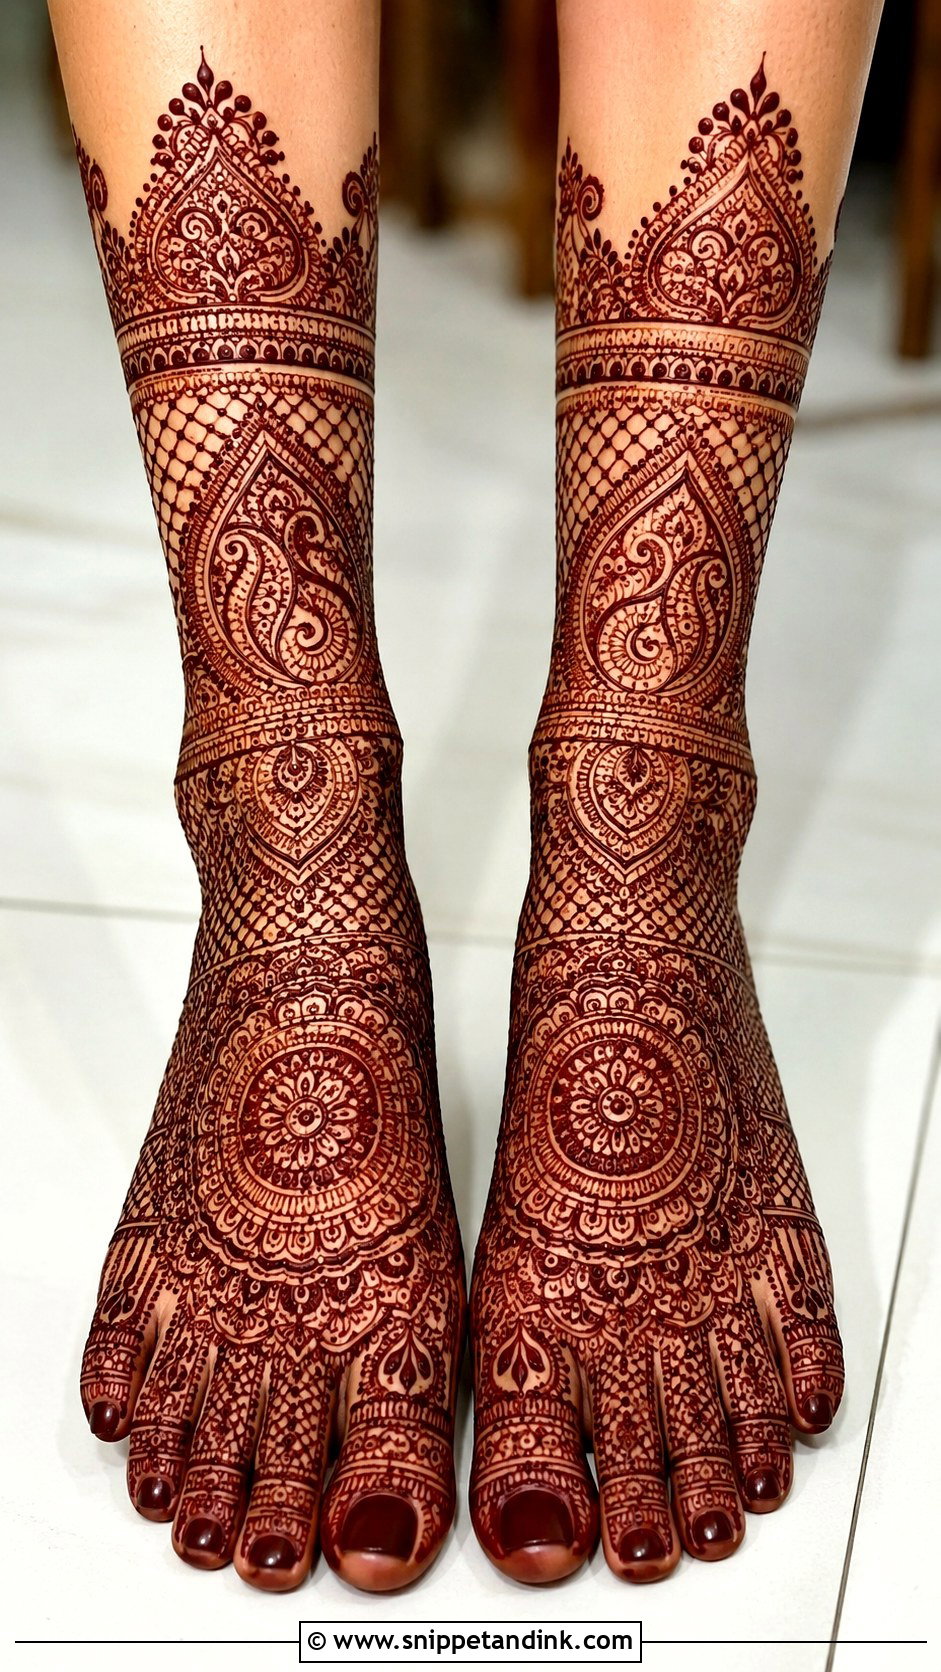
Marwari work is dense and fine: thin lines, paisleys, mandalas, little floral fillers and netted sections laid out symmetrically from toes to ankles. Many families add auspicious motifs from their own tradition, so ask an elder before the appointment. What keeps it wearable is breathing room. I leave slim gaps of bare skin between heavy sections, since fine lines sitting too close tend to bleed together as the stain darkens over the next two days.
13. Indo Arabic Feet Mehndi Design
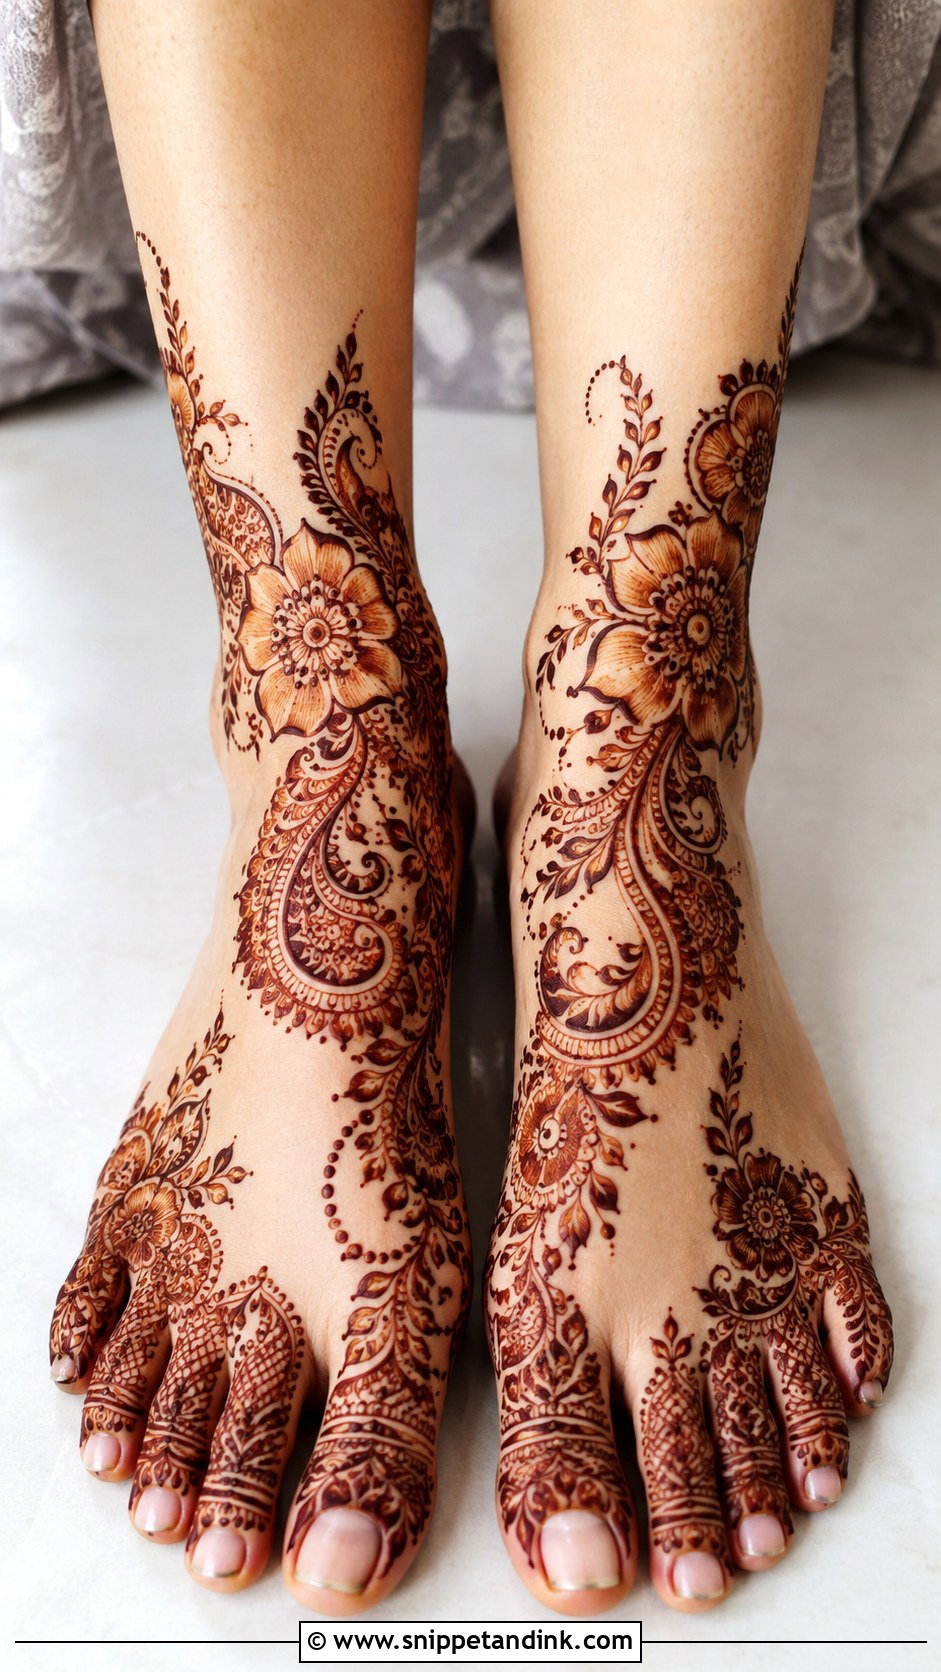
Indo-Arabic takes the sweeping placement of Arabic henna, fills its flowers and paisleys with Indian detail, then leaves open skin around them so the foot never looks overloaded. It’s my usual suggestion for bridesmaids, engagement ceremonies and a bride who wants something traditional but lighter. Placement decides it. I run it diagonally along the curve of the foot, which reads slimmer than a band straight across.
14. Moroccan Feet Mehndi Design
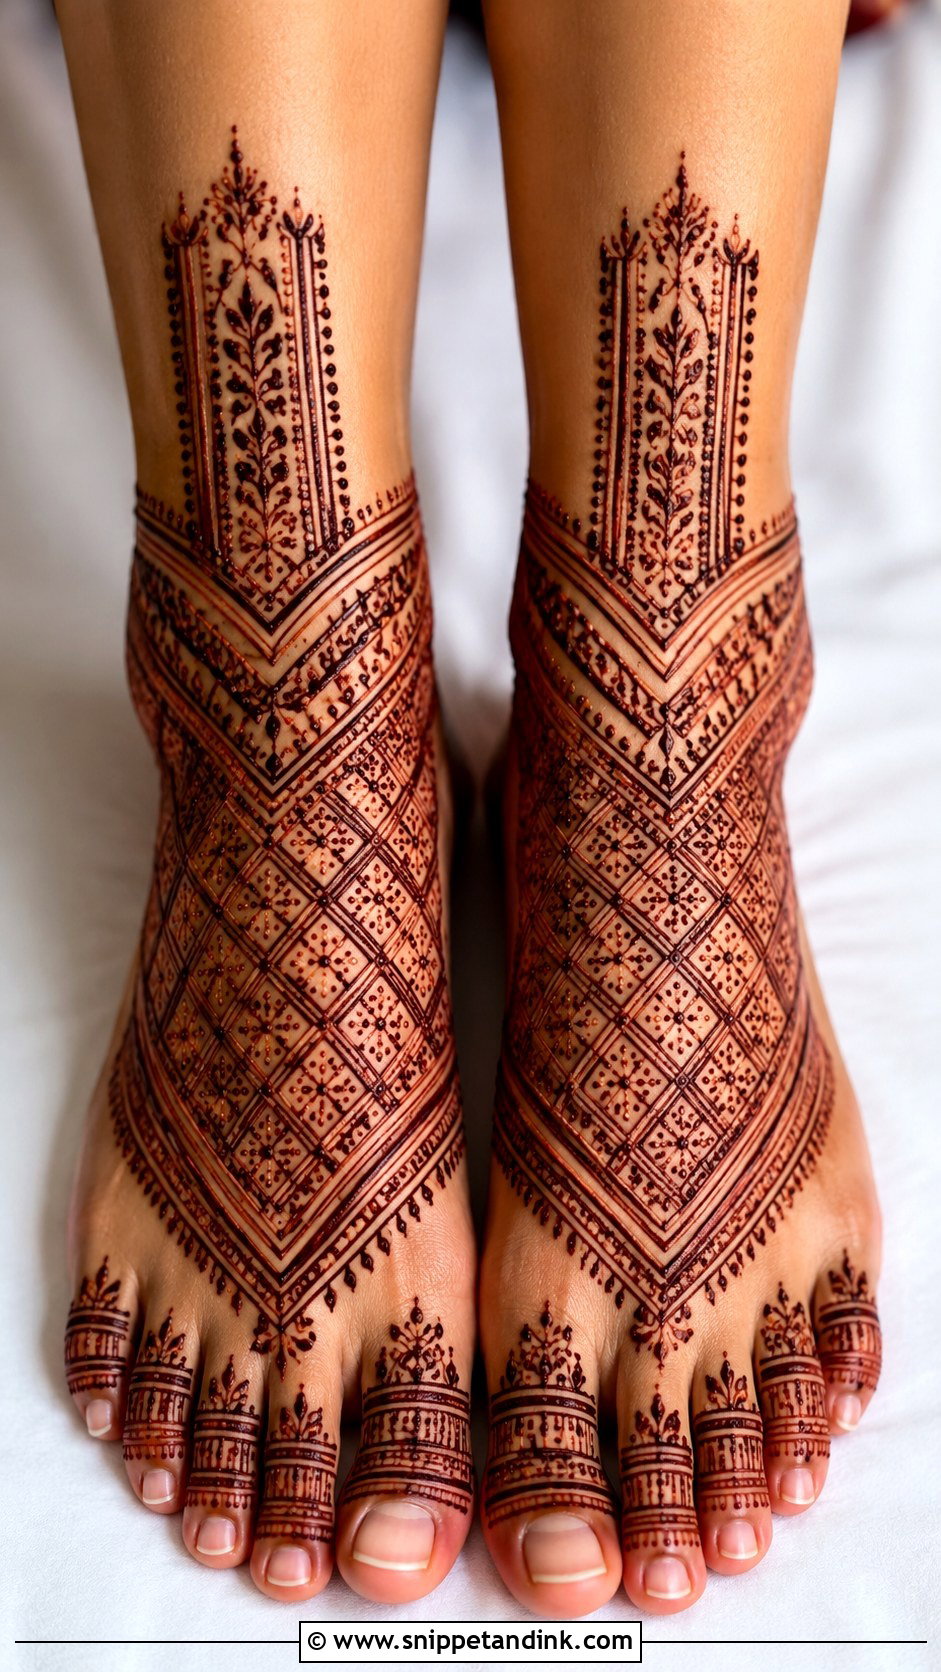
Geometry replaces florals here: diamonds, triangles, grids, dot rows and tribal-inspired shapes arranged around a central panel, with toe bands and an anklet-style border. Moroccan mehndi sits well with plain or minimal outfits because the pattern carries the look by itself. It is unforgiving, though. Every line has to be straight and evenly spaced, and on a curved foot that means I mark small guide dots first. If your artist mostly works freehand florals, ask to see geometric pieces before you book.
15. Gulf Feet Mehndi Design
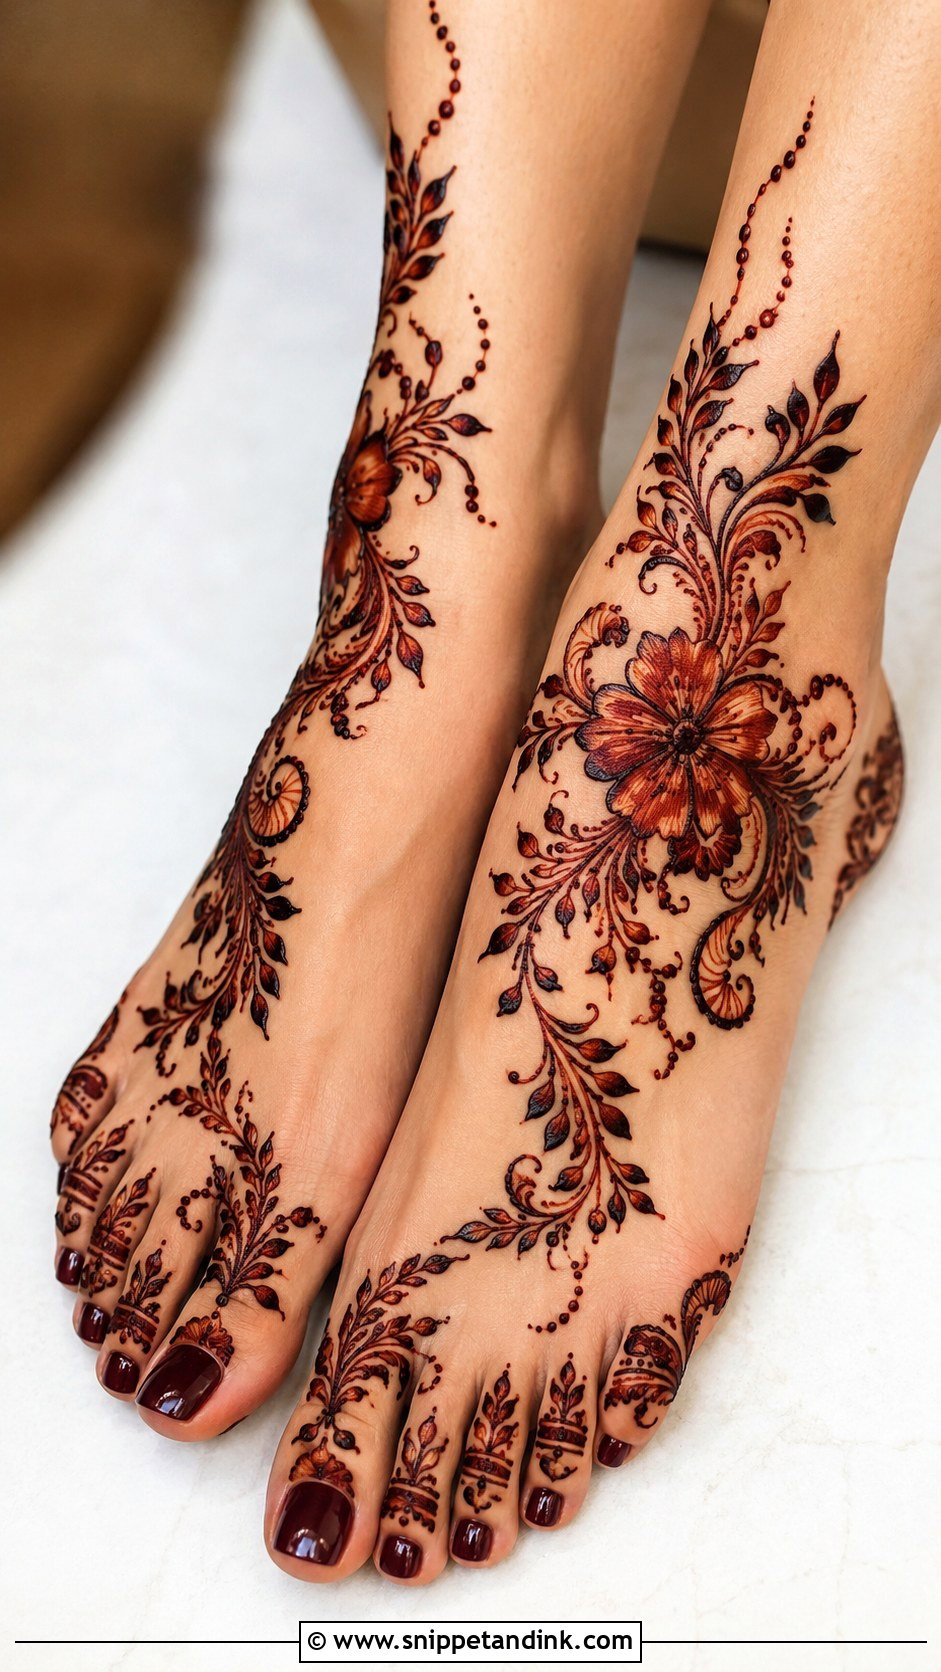
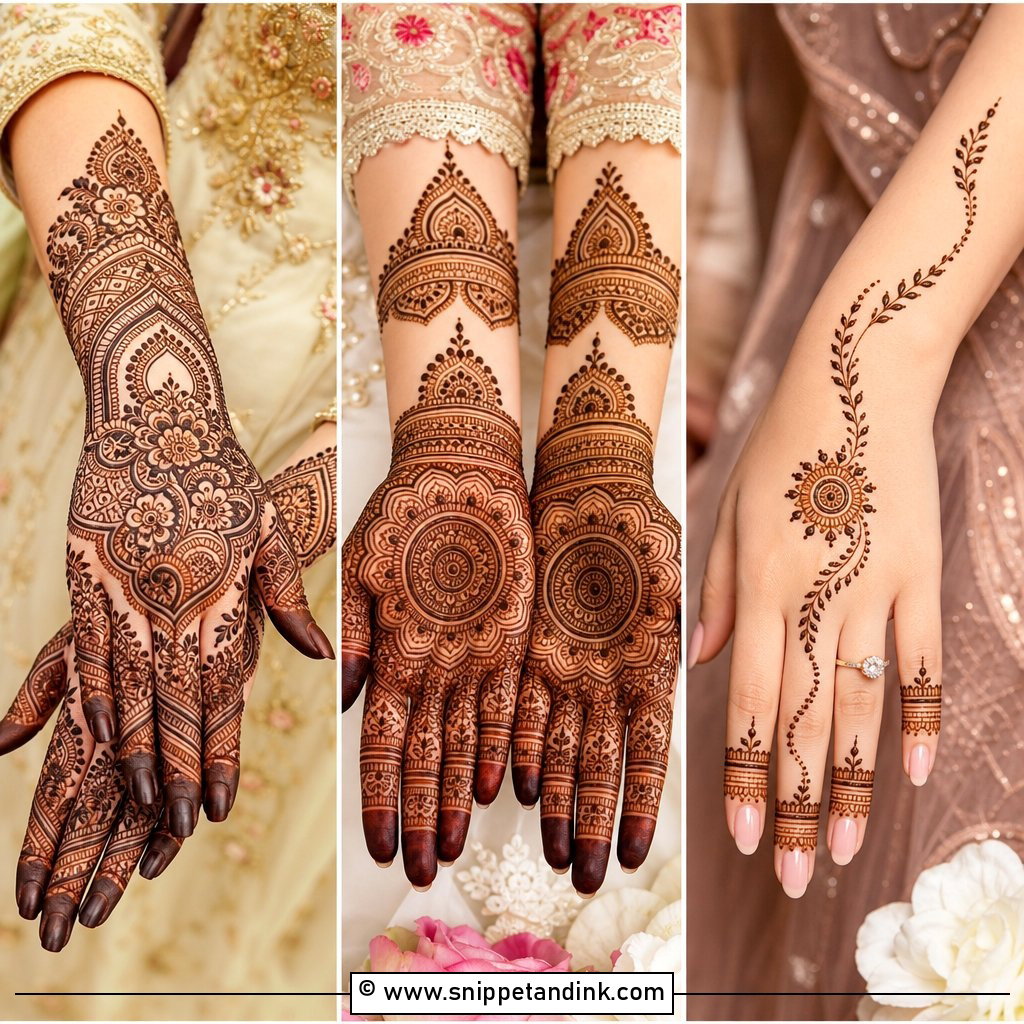
Khaleeji or Gulf-style henna uses big flowers, leafy vines and shaded petals with a lot of open skin, flowing from the toes toward one side of the ankle. It gives a rich look without the hours full Indian coverage takes. The signature is a thick outline with soft shading inside, which I build by spreading a thinner film of paste toward the center of each petal. Done well, that shading stains as a gradient rather than a solid block.
16. Mandala Feet Mehndi Design
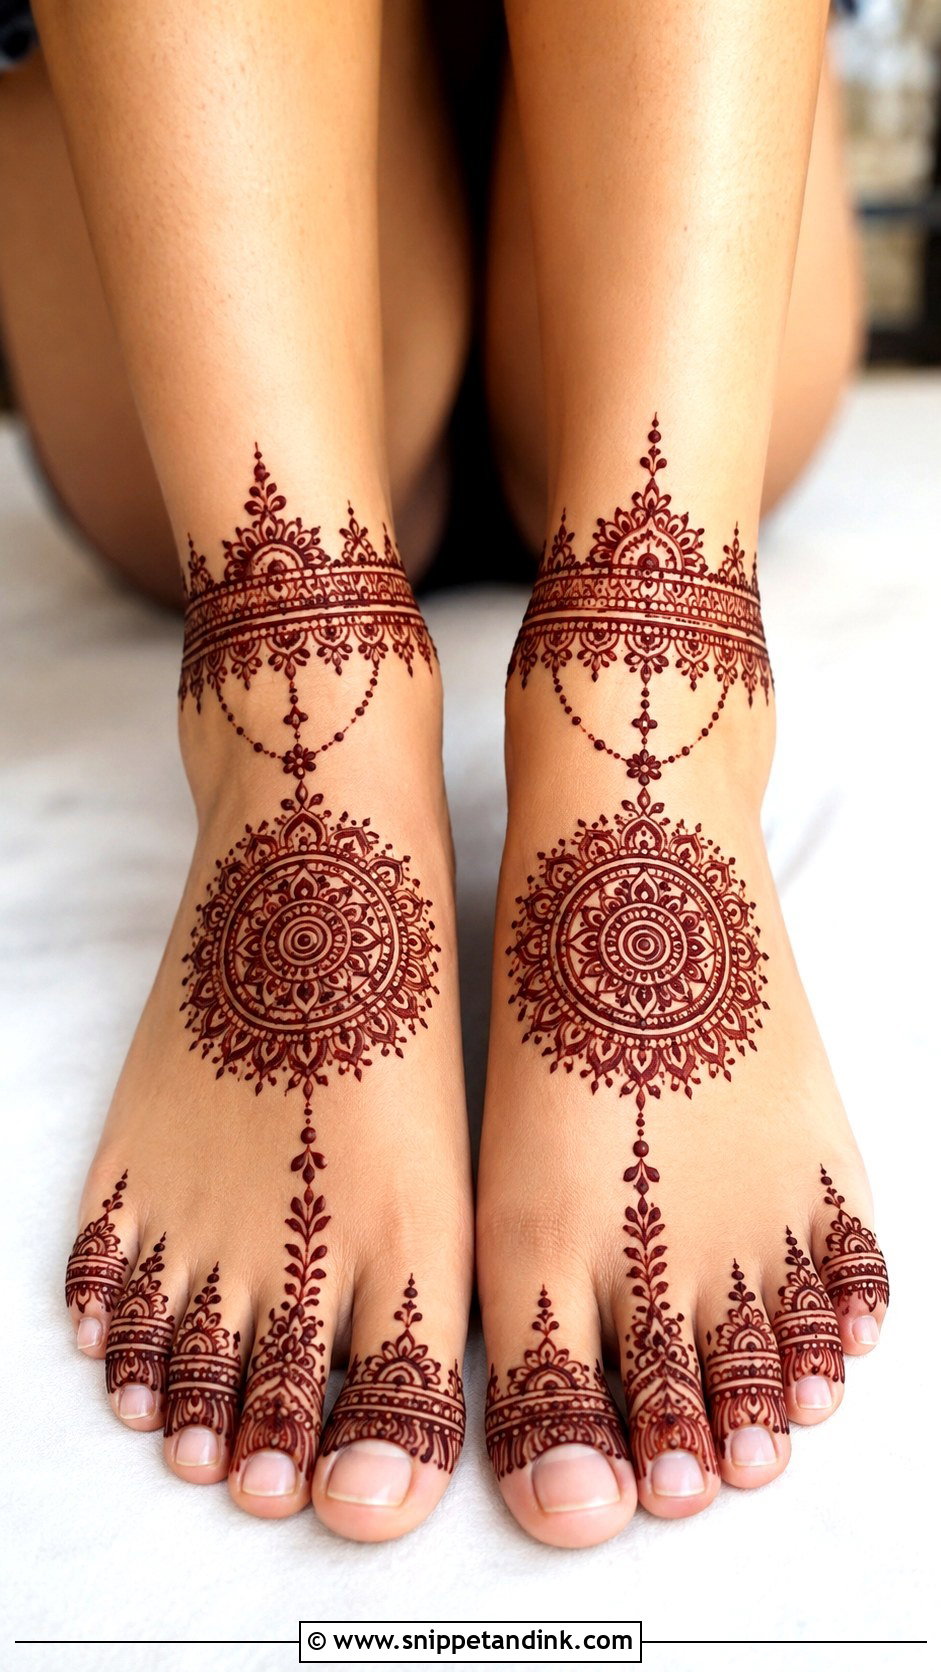
One circle does all the work: a mandala on top of the foot or near the ankle, with small dots, leaves or chains on the toes. Size sets the mood. A large mandala reads festive and a small one reads minimal, which is why I can use the same idea for a bride and her guests in one session. Getting a true circle on a sloping foot is harder than it looks, so I check it from where you’ll see it, standing up, not from my side of the chair.
17. Floral Feet Mehndi Design
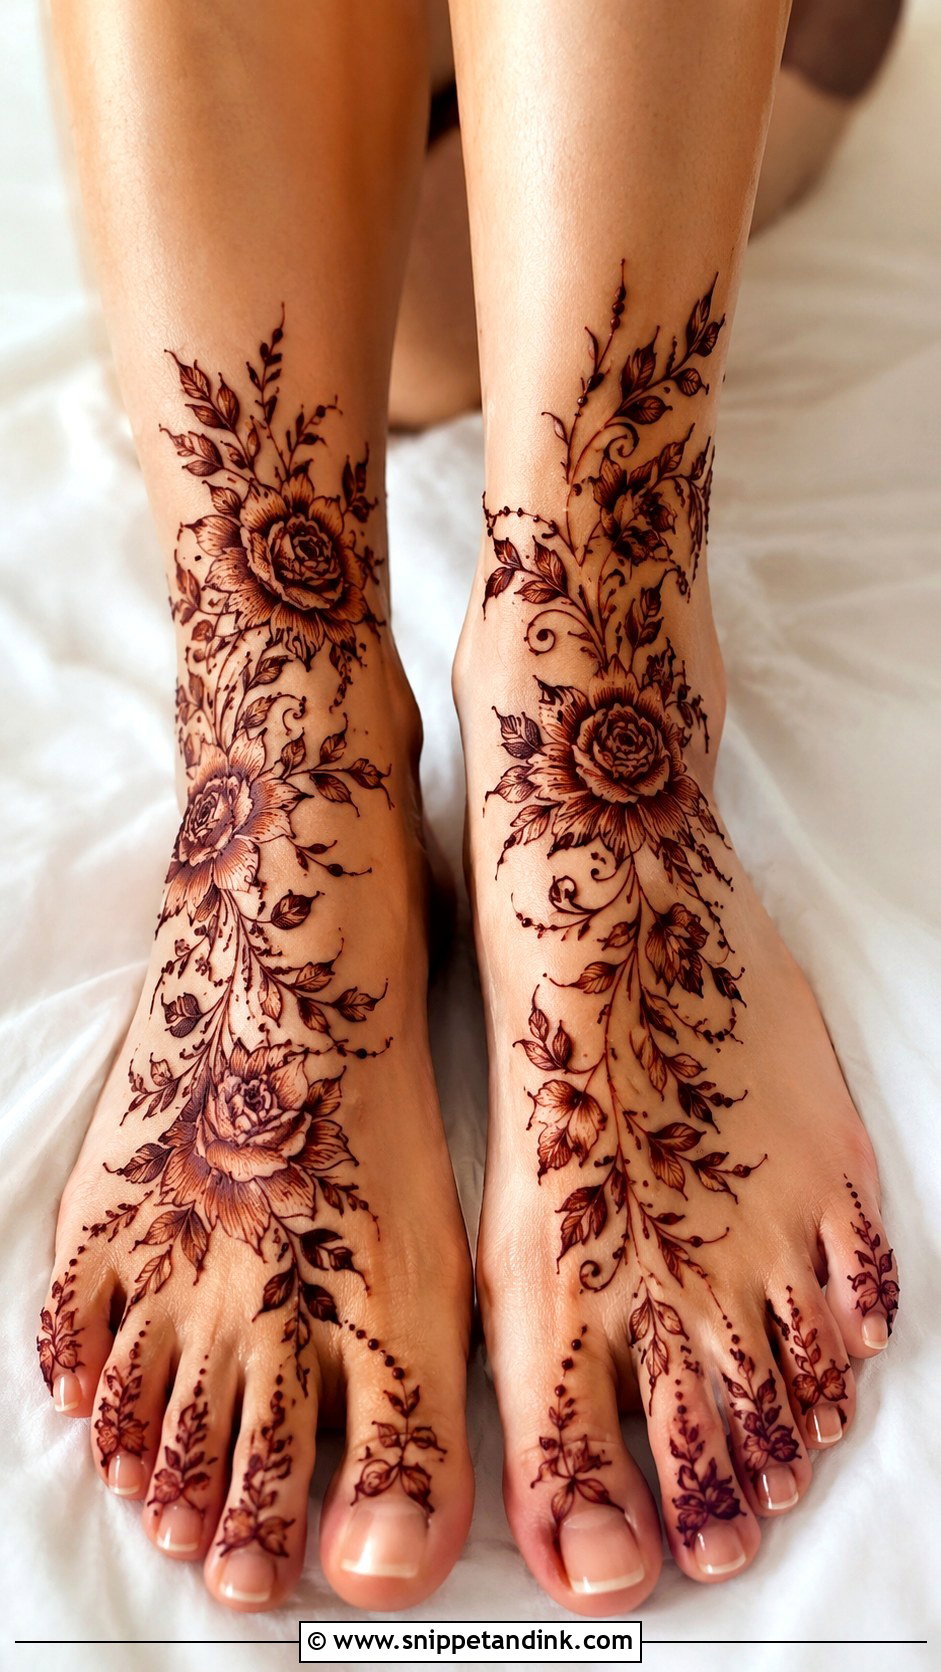
Roses, lotus, small blossoms, vines and shaded petals suit nearly any outfit, so florals are my safest suggestion for a baby shower, a festival or a wedding guest. The design can cover the whole foot or flow down one side. Large flowers with tiny dotted trails and open skin keep it modern, while paisleys and an ankle border push it toward bridal. Florals show off a good stain more than most motifs: petals that develop to deep maroon look rich, and ones that stay orange look unfinished, so give it the full 48 hours.
18. Paisley Feet Mehndi Design
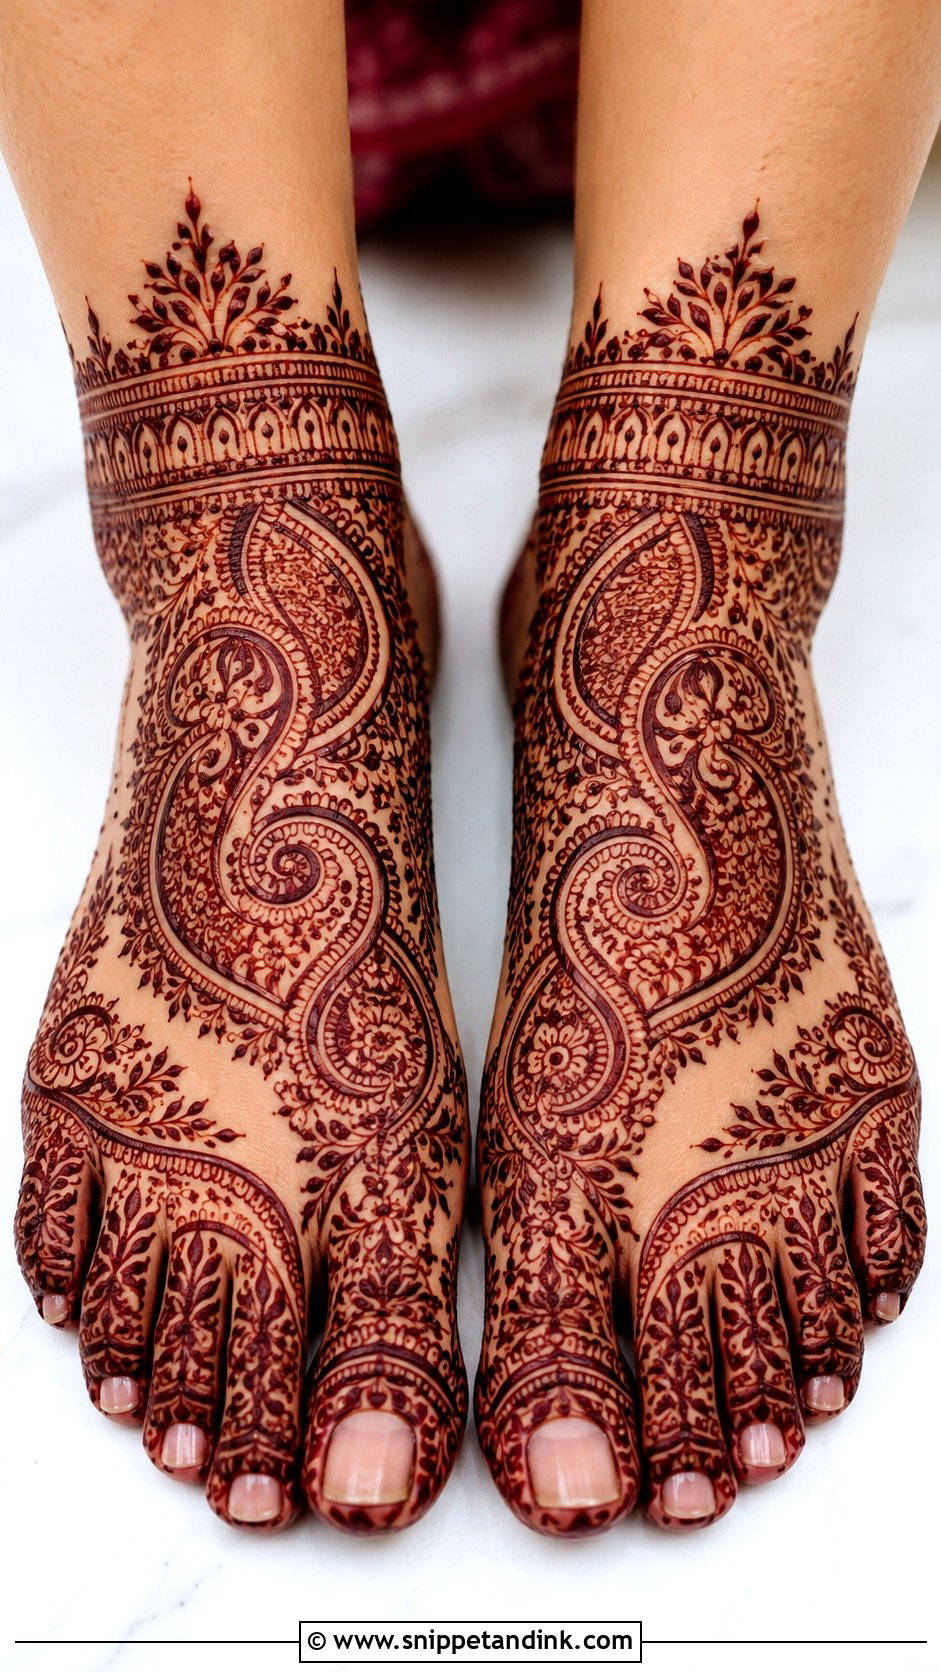
Paisleys bend the way a foot does, which is why they sit so naturally along the outer edge, across the instep or around the ankle. I fill each one differently, with lines, dots, leaves or a tiny flower, so a row of them never looks stamped. Keep the outlines bold and the vines around them light; two heavy elements side by side is what makes a foot look crowded.
19. Peacock Feet Mehndi Design
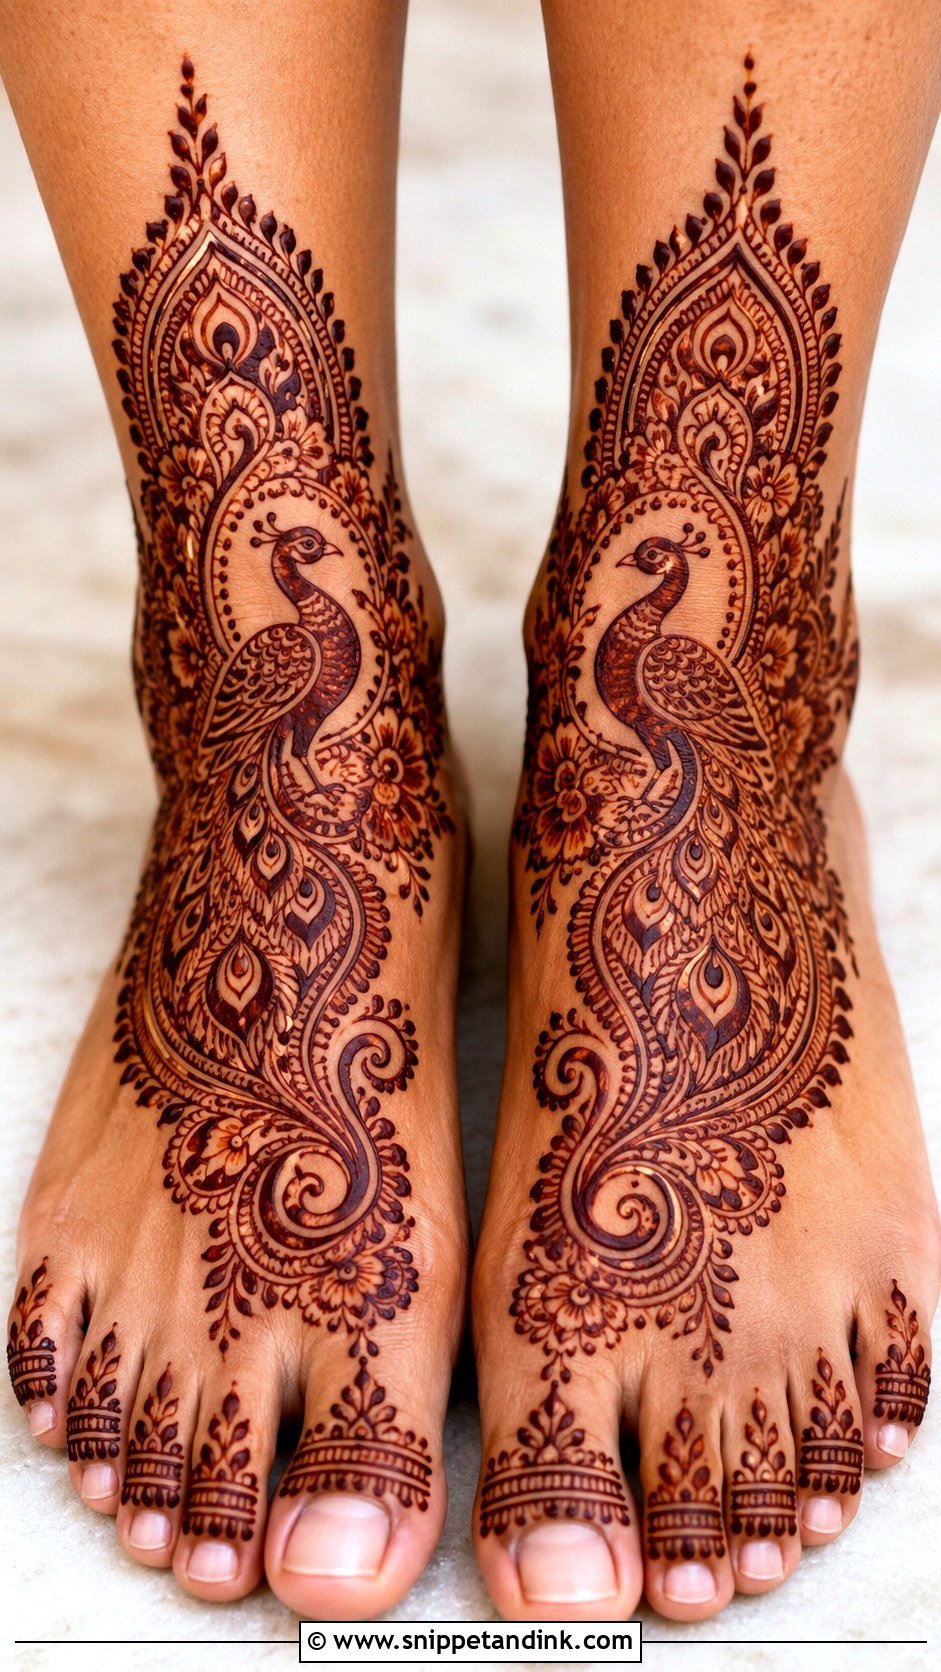
A peacock gives me room to show fine work in the tail feathers, and it reads instantly as festive and bridal. It can sit at the ankle, in the center of the foot or along the side as part of a trail. My advice is one per foot, facing inward so the pair mirrors each other. Two or three on the same foot fight for attention, and the feather detail starts to blur together once it stains.
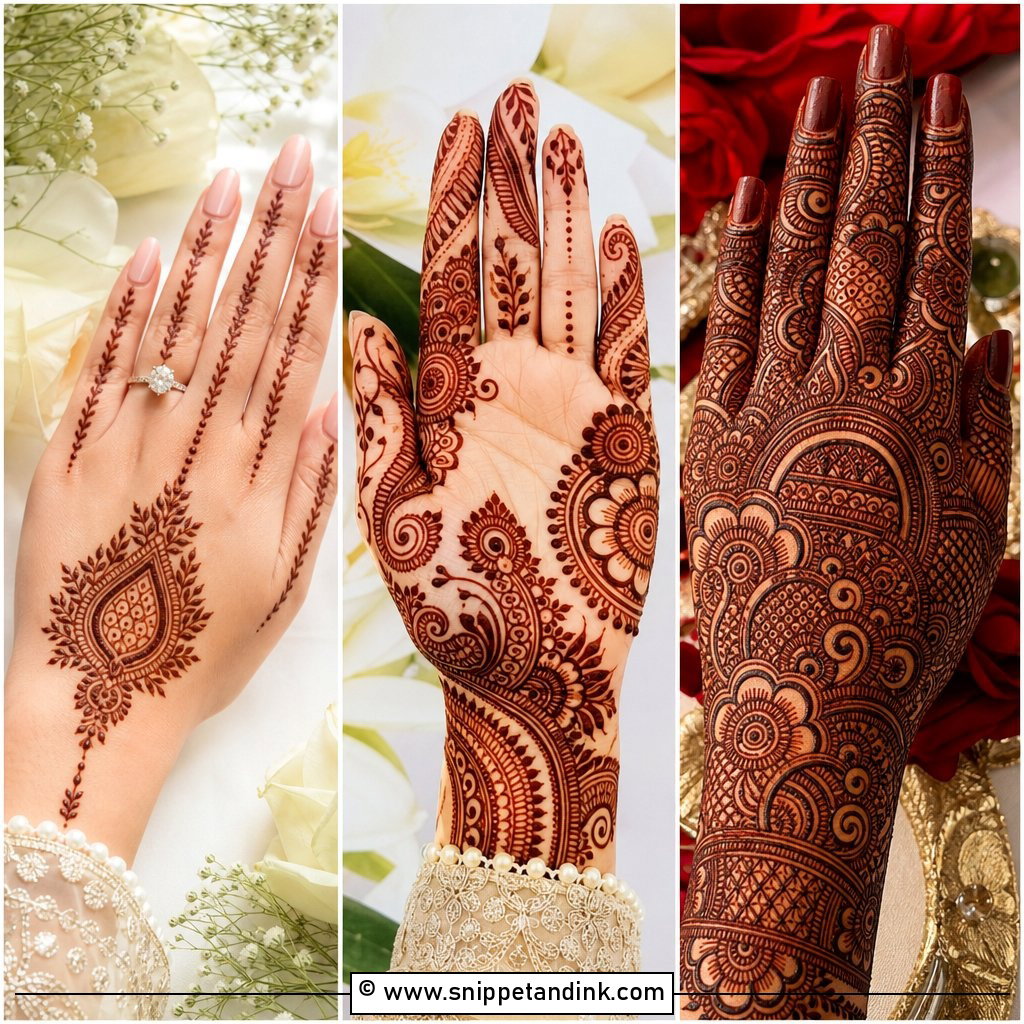
20. Jaali Feet Mehndi Design
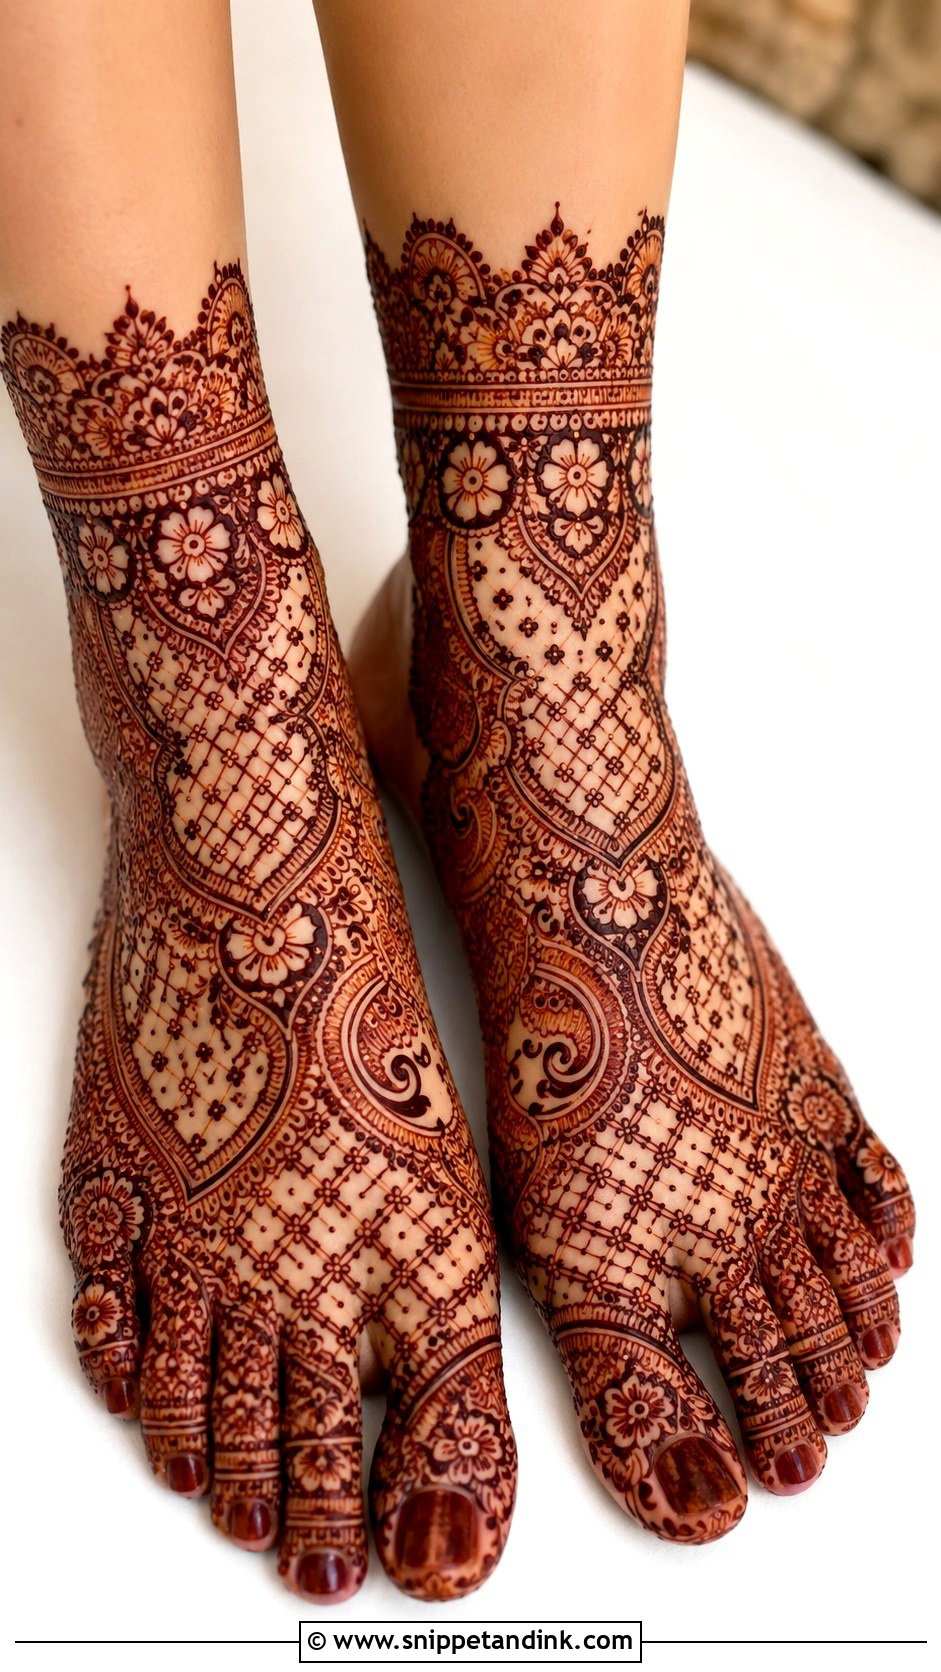
Jaali is henna lace: mesh lines, tiny dots and neat panels that resemble ornamental fabric or fine jewelry, either across the whole top of the foot or as a side panel beside flowers and paisleys. The grid is where artists come unstuck. Henna lines spread slightly as they settle, so a mesh drawn too tight closes up into a solid patch, and I space it wider than looks necessary while wet. A bold border around the jaali stops it fading into the background.
21. Anklet Feet Mehndi Design
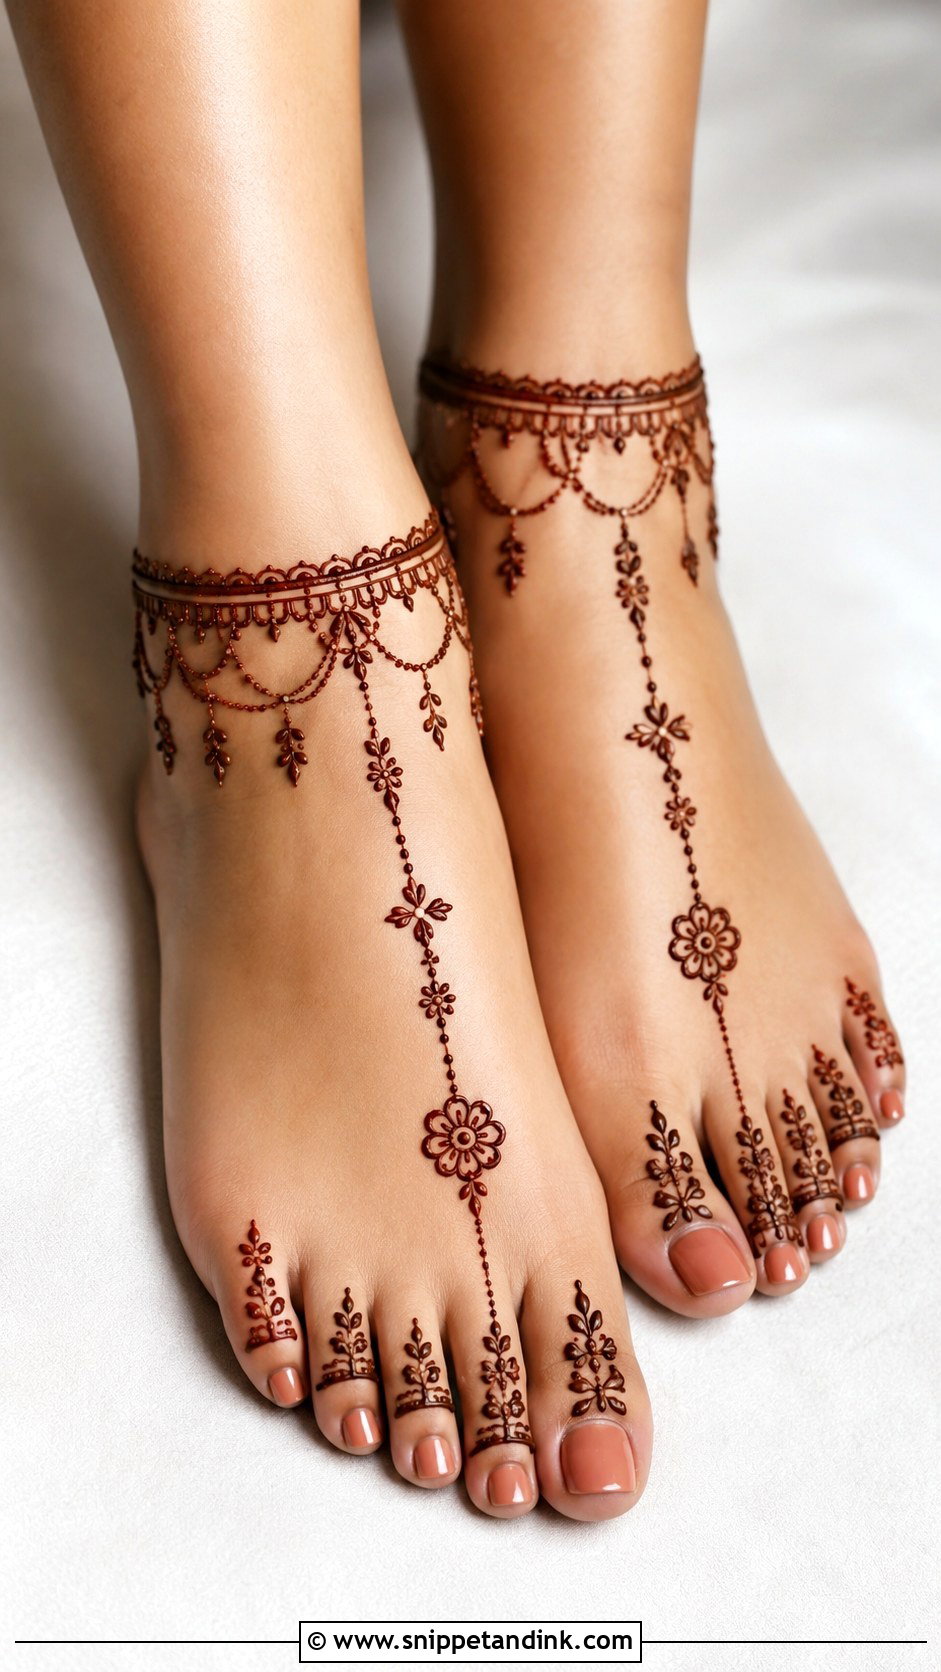
An anklet design wraps the ankle like a payal and runs chains, dots or small florals down to the toes, so you look adorned without wearing anything extra. The band can be a single line or heavily worked. For a convincing jewelry effect I add small hanging drops along the lower edge and keep the chains hairline thin. It shows best with open sandals, and it’s one of the few designs that looks just as finished on a bridesmaid as on the bride.
22. Toe Ring Feet Mehndi Design
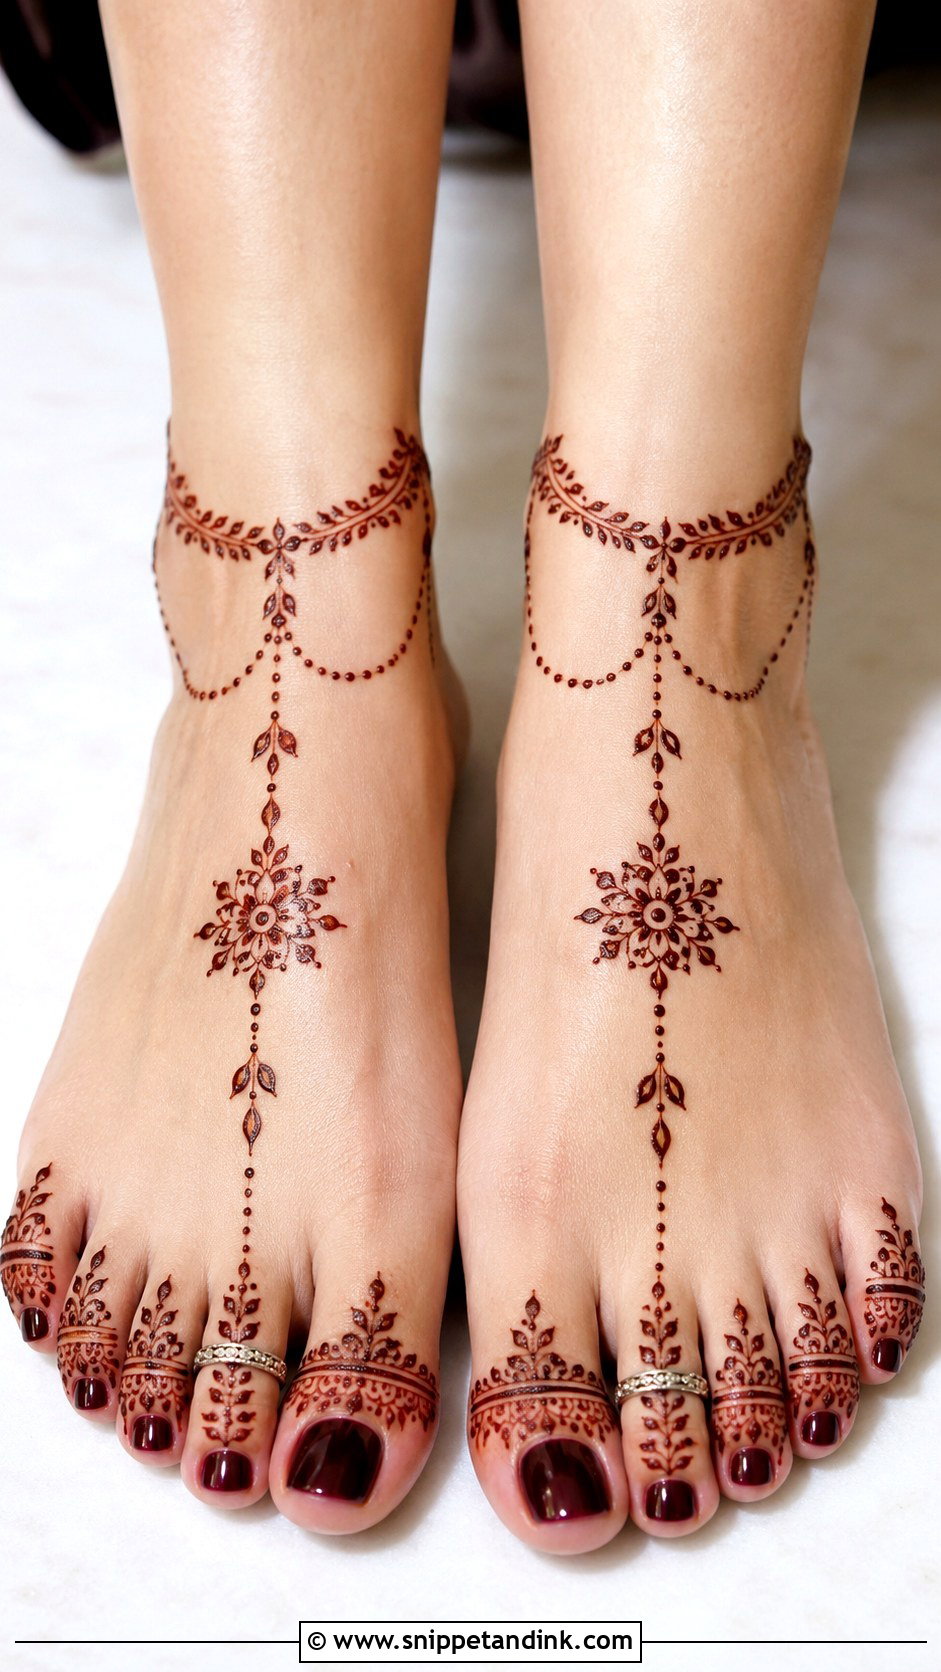
Here the toes carry the design, each with a ring band, tiny dots and leafy chains leading to a small motif on the upper foot. It’s quick, which suits a guest or a bride adding feet at the last minute. It layers well with real toe rings and anklets as long as the henna bands don’t sit exactly where the metal will rub. I keep the lines very thin on toes; thick paste there looks clumsy and smudges with the smallest wiggle.
23. Minimal Feet Mehndi Design
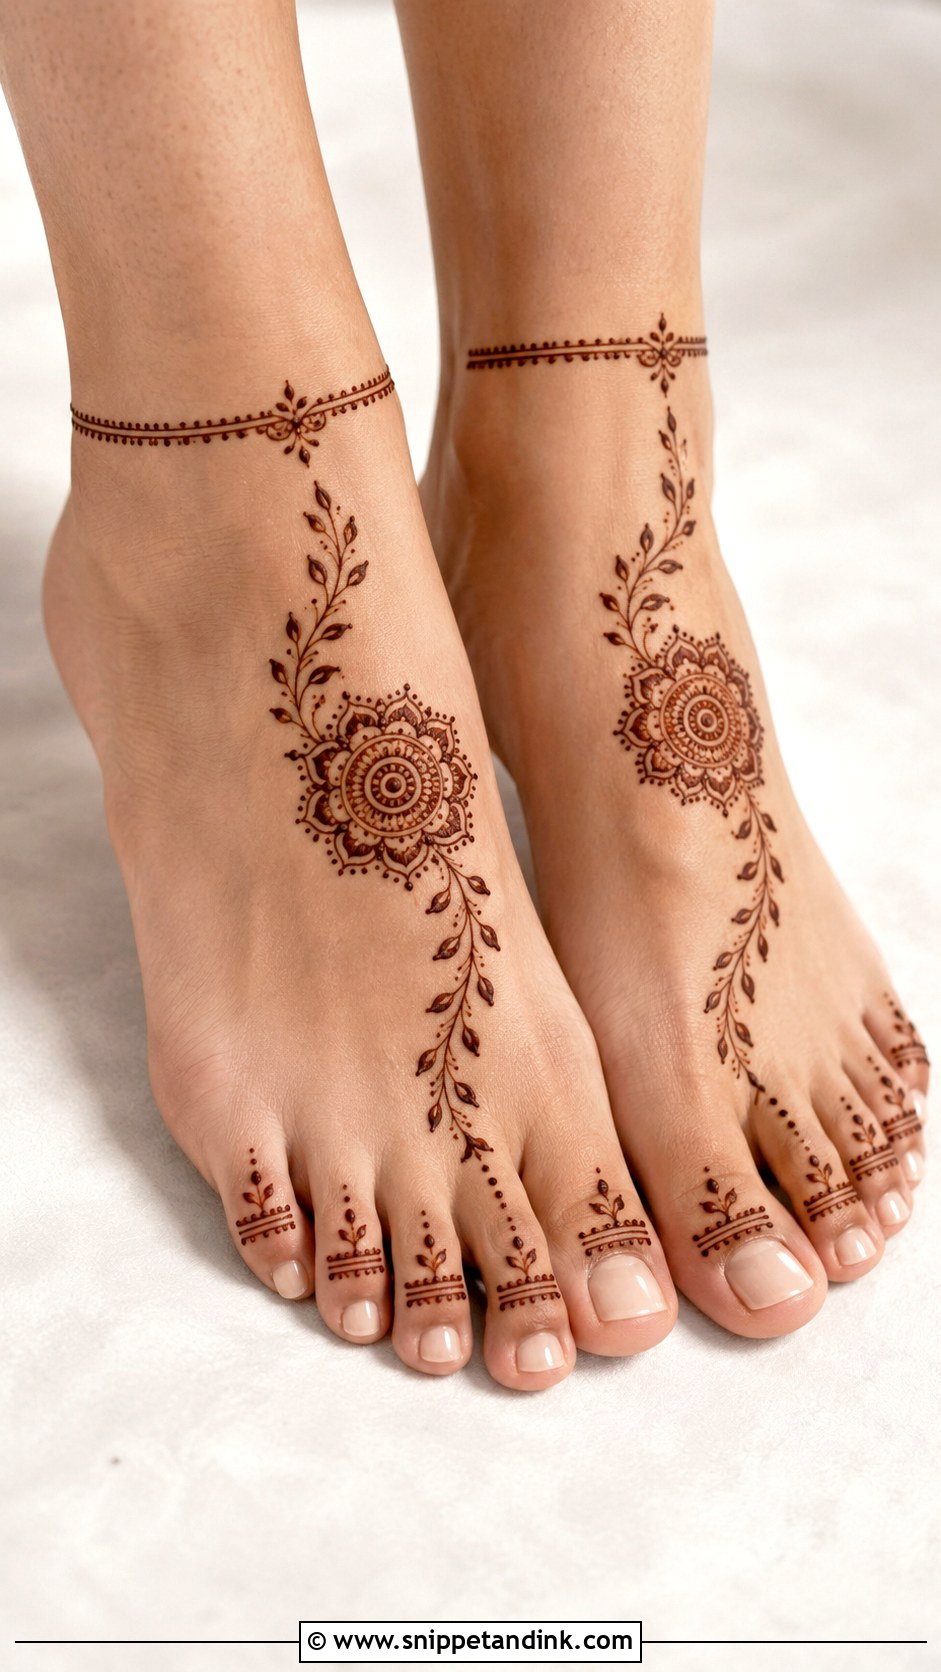
One or two elements, maybe a small mandala, a thin vine, an ankle band or delicate toe work, with the bare skin treated as part of the pattern. That restraint suits small events, fusion outfits and anyone who dislikes heavy mehndi. There’s no filler to hide a mistake, so I’d rather spend extra minutes on spacing than add another motif.
24. Easy Feet Mehndi Design
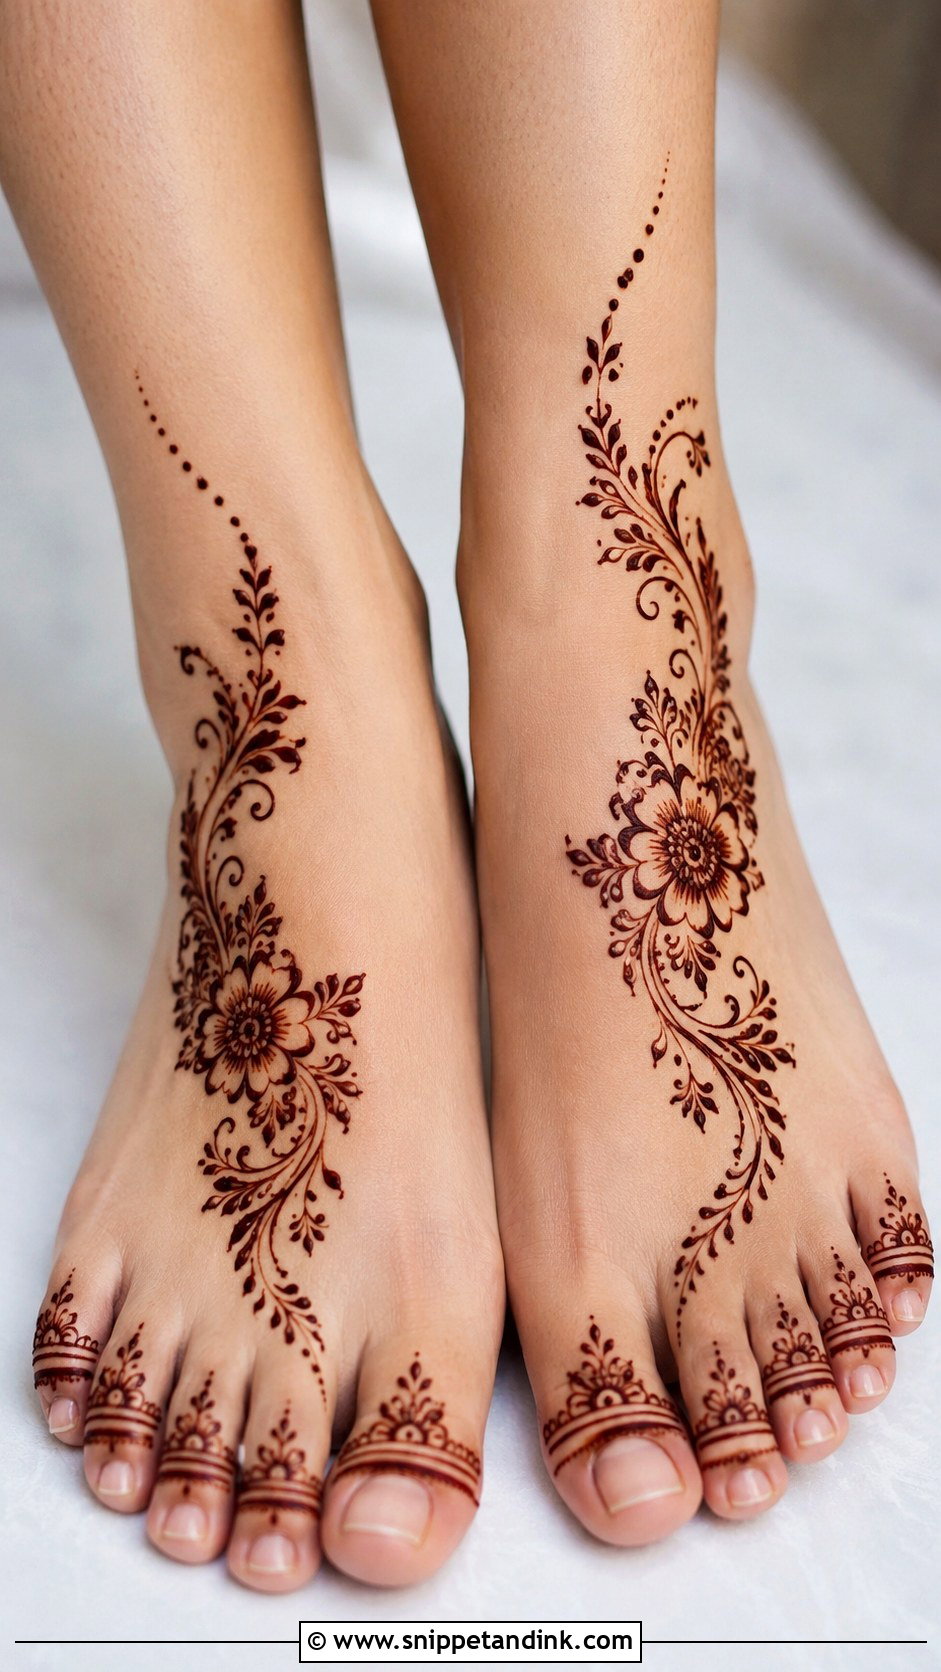
Simple flowers, curved vines, dots, small leaves and basic toe bands, usually trailing from the toes upward: this is what I’d teach a sister or cousin who wants to do the family’s feet before a festival. The trick to making it look polished is repetition. The same leaf used five times looks intentional, while five different leaves look hesitant. Mirror the layout on the second foot and even a beginner’s work looks considered.
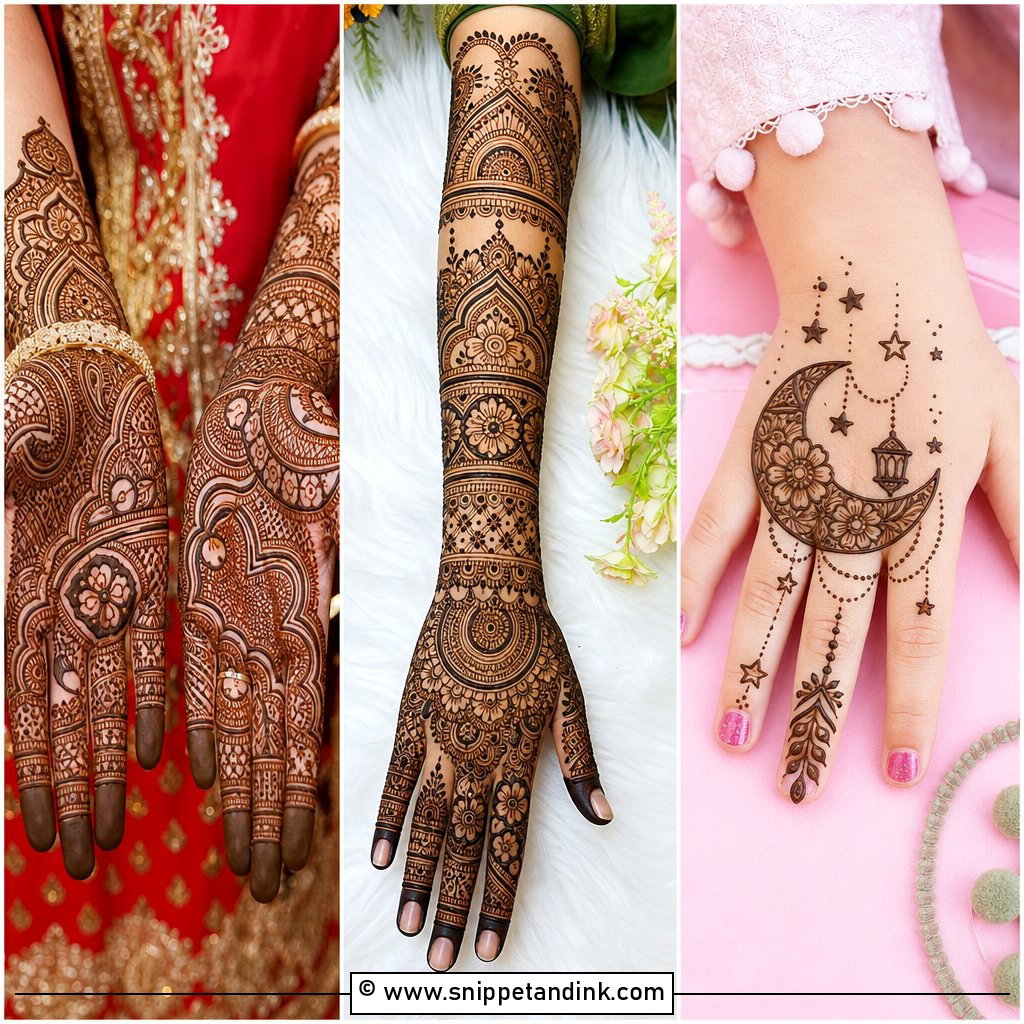
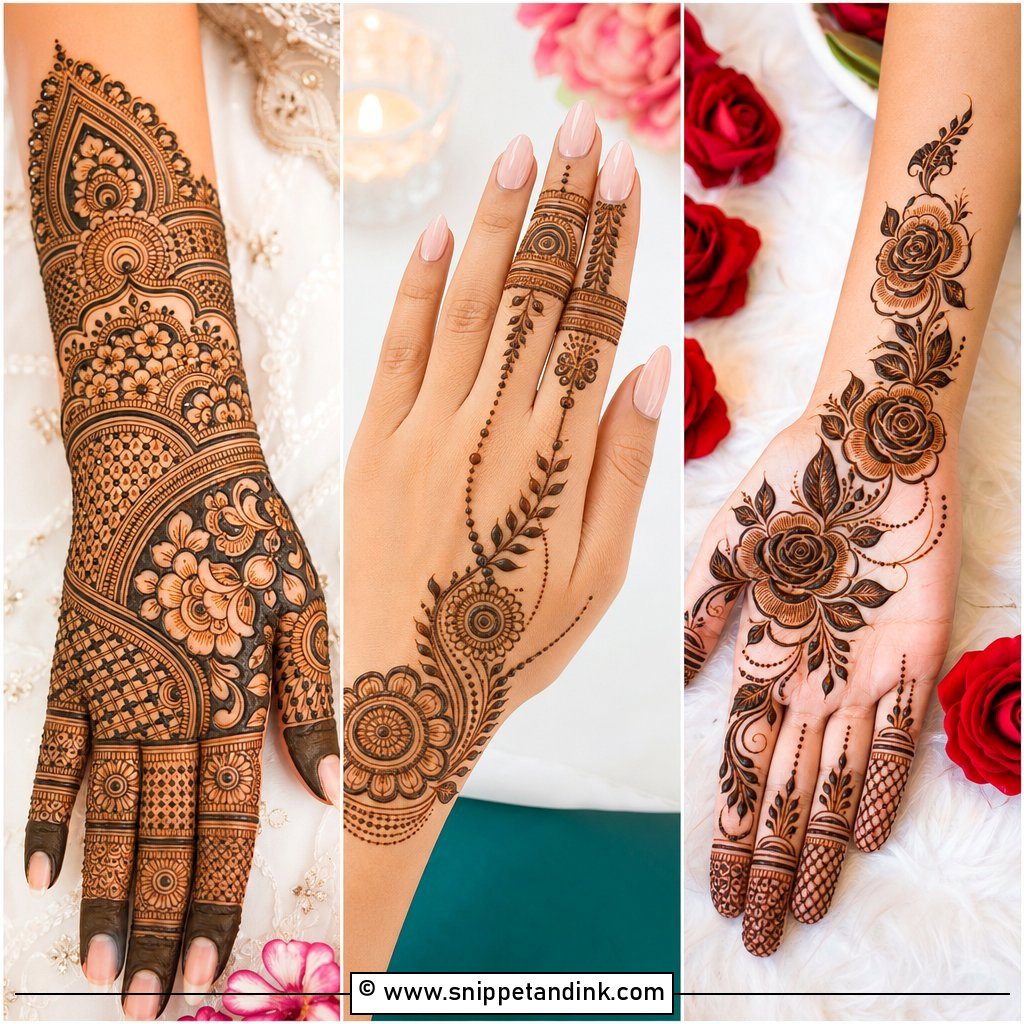
25. Modern Feet Mehndi Design
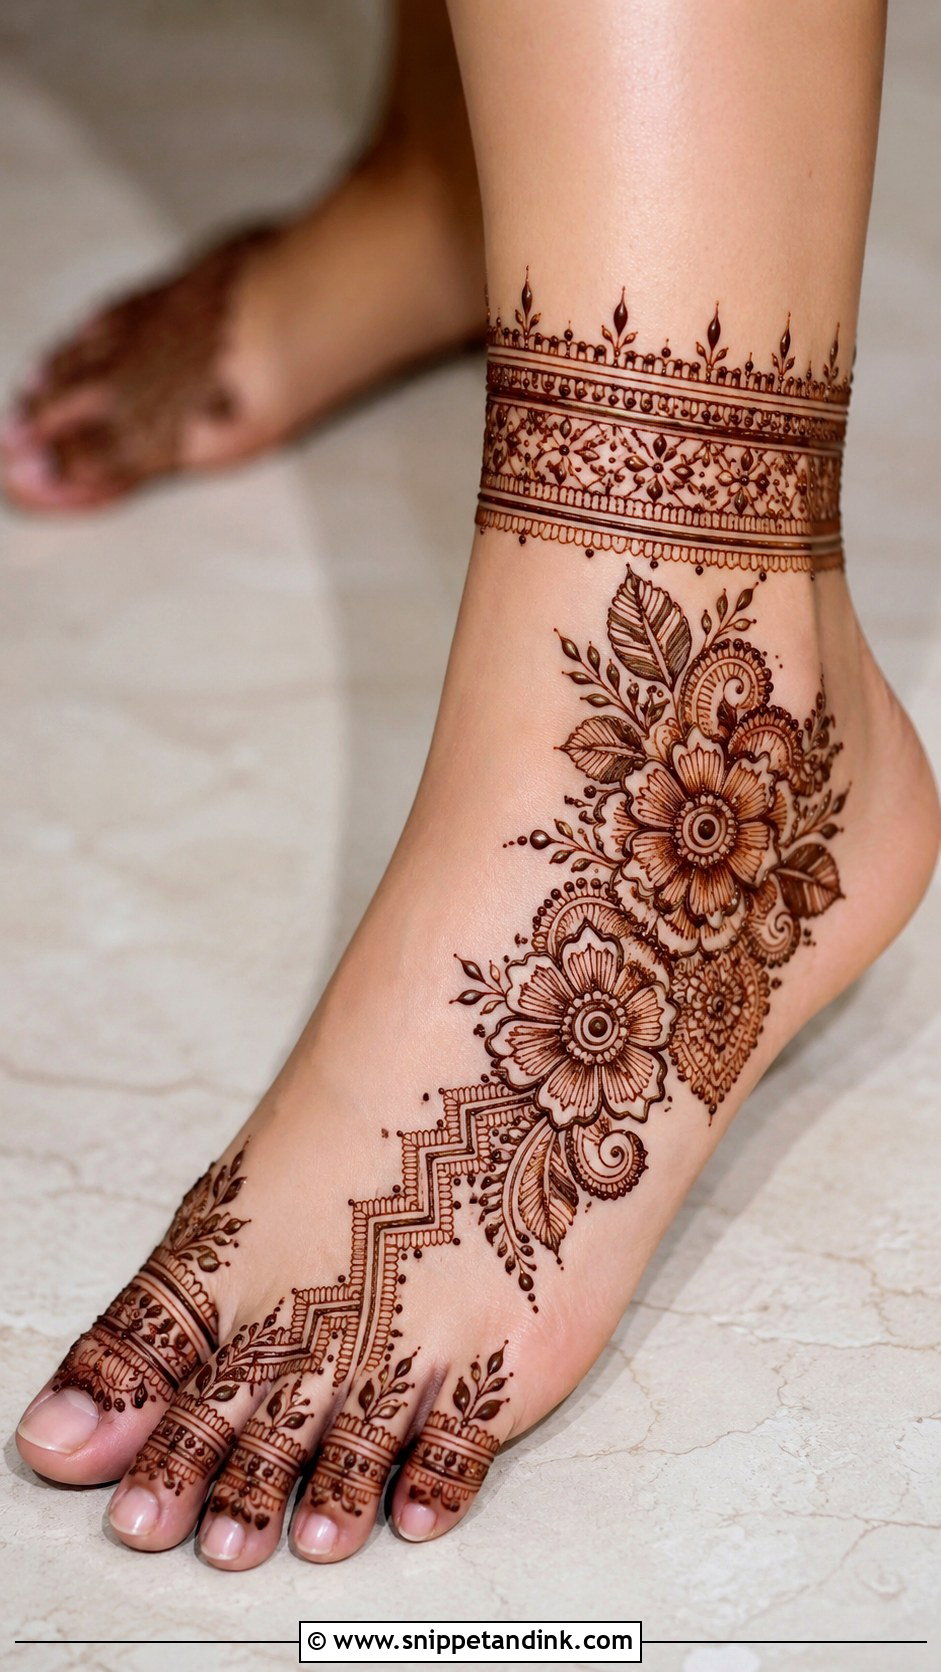
Modern foot mehndi relies on negative space, bracelet bands, side trails, geometric accents and a mix of florals with fine lines. Brides lean toward it for receptions, engagements and fusion outfits when full traditional coverage feels like too much. Modern doesn’t have to mean plain. A bold floral on one side with delicate toe work is one of my favorite compositions, but I keep at least one traditional element, a paisley or a classic border, so it still reads as mehndi.
26. Stylish Feet Mehndi Design
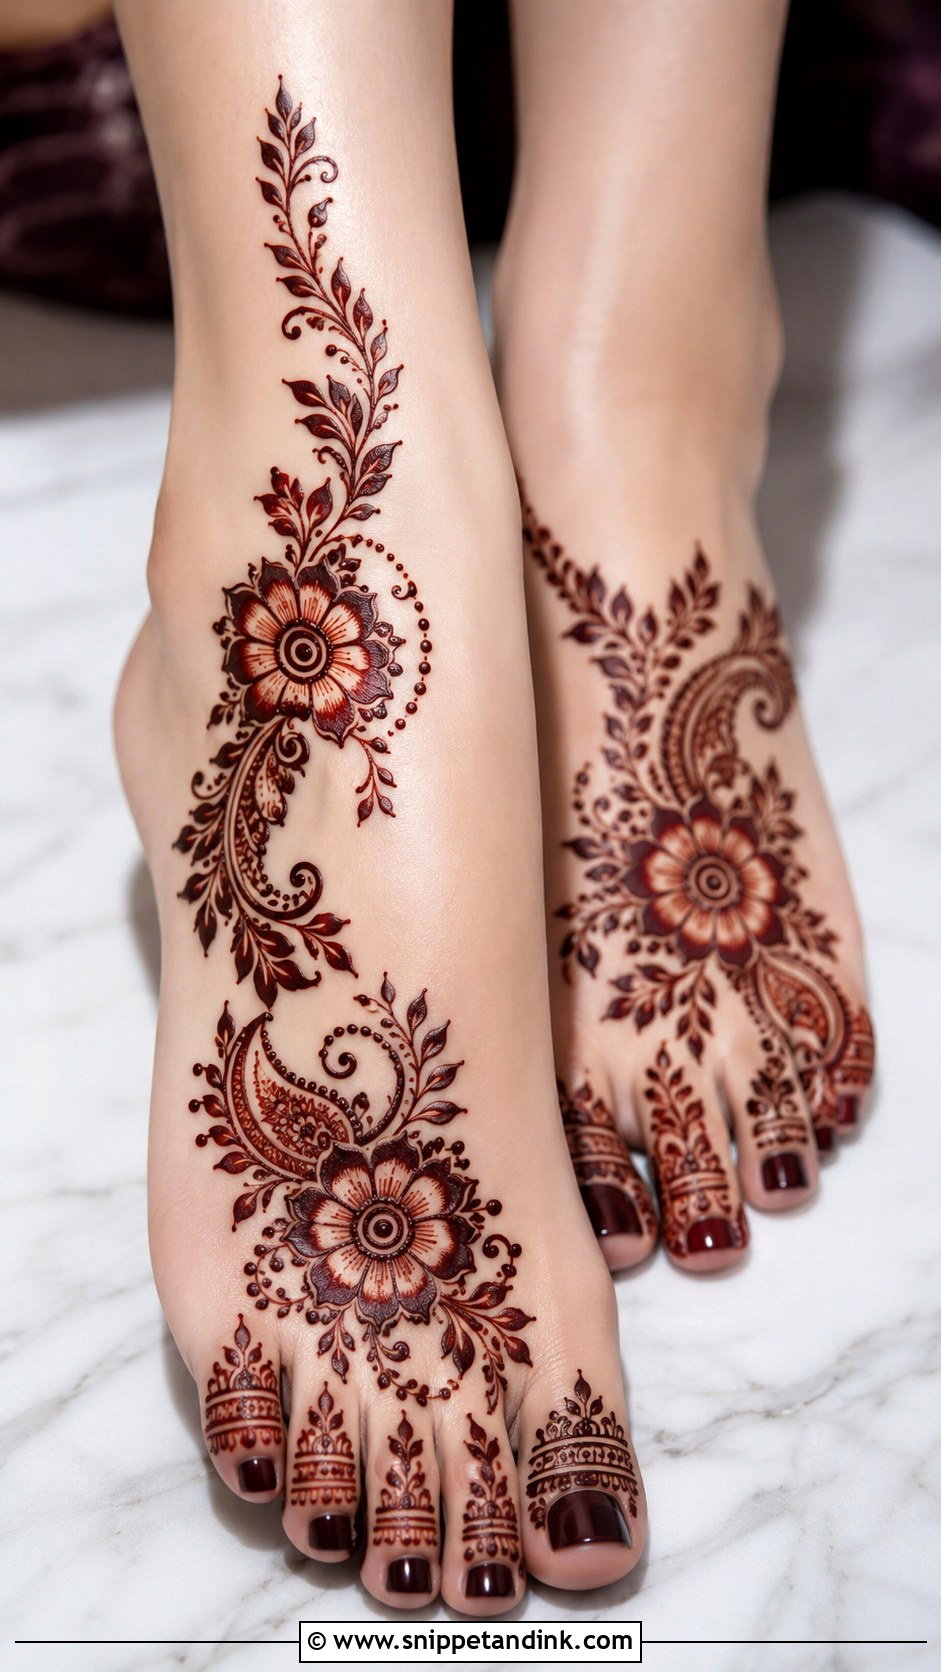
Stylish is less a motif than a finish: bold shapes, generous empty space, sharp outlines, even dots and smooth curves, in Arabic, Indo-Arabic, floral or jewelry-inspired layouts. I always ask clients to bring the shoes they’ll wear, because straps cut straight through a design and the best part can end up hidden. Place the henna where the footwear leaves skin showing. Clean execution separates a professional result from an amateur one far more than the choice of pattern.
27. Rose Feet Mehndi Design
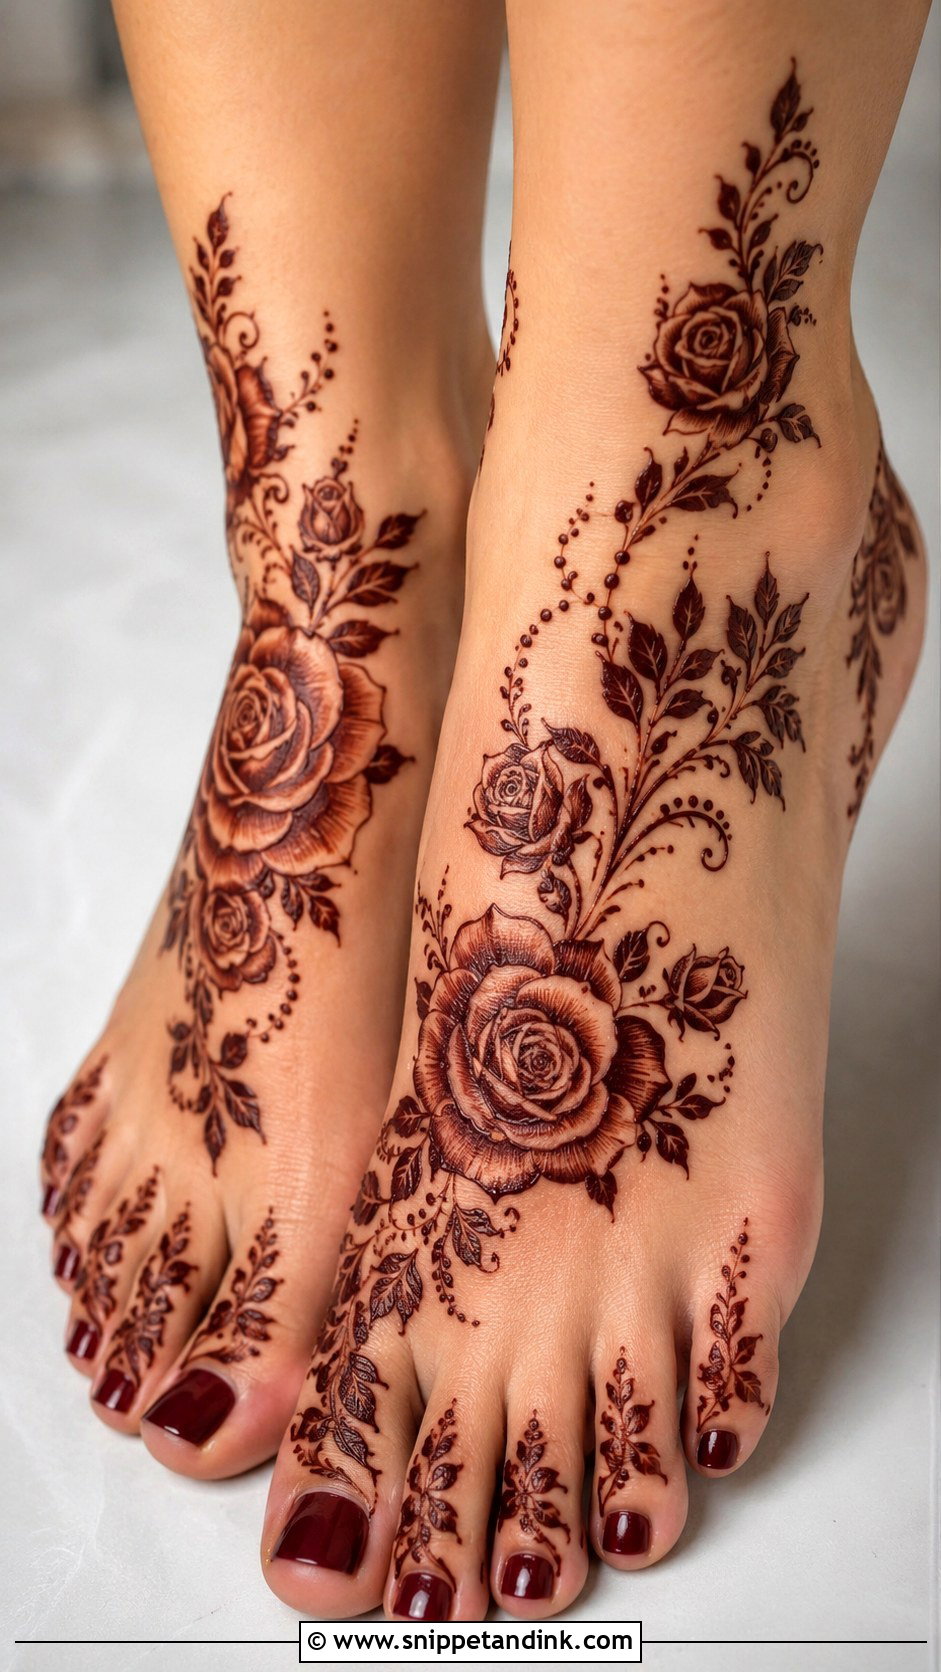
Roses feel romantic without needing a heavy layout: one large bloom on top of the foot, with buds and leaves trailing to the toes or ankle. I shade the petals from the outer edge inward so they look full and keep a fine outline so they stay crisp. One rose per foot is plenty for engagement ceremonies, bridal showers and guests, especially against pastels and floral embroidery. Add vines and ankle borders only if you want it fuller.
28. Lotus Feet Mehndi Design
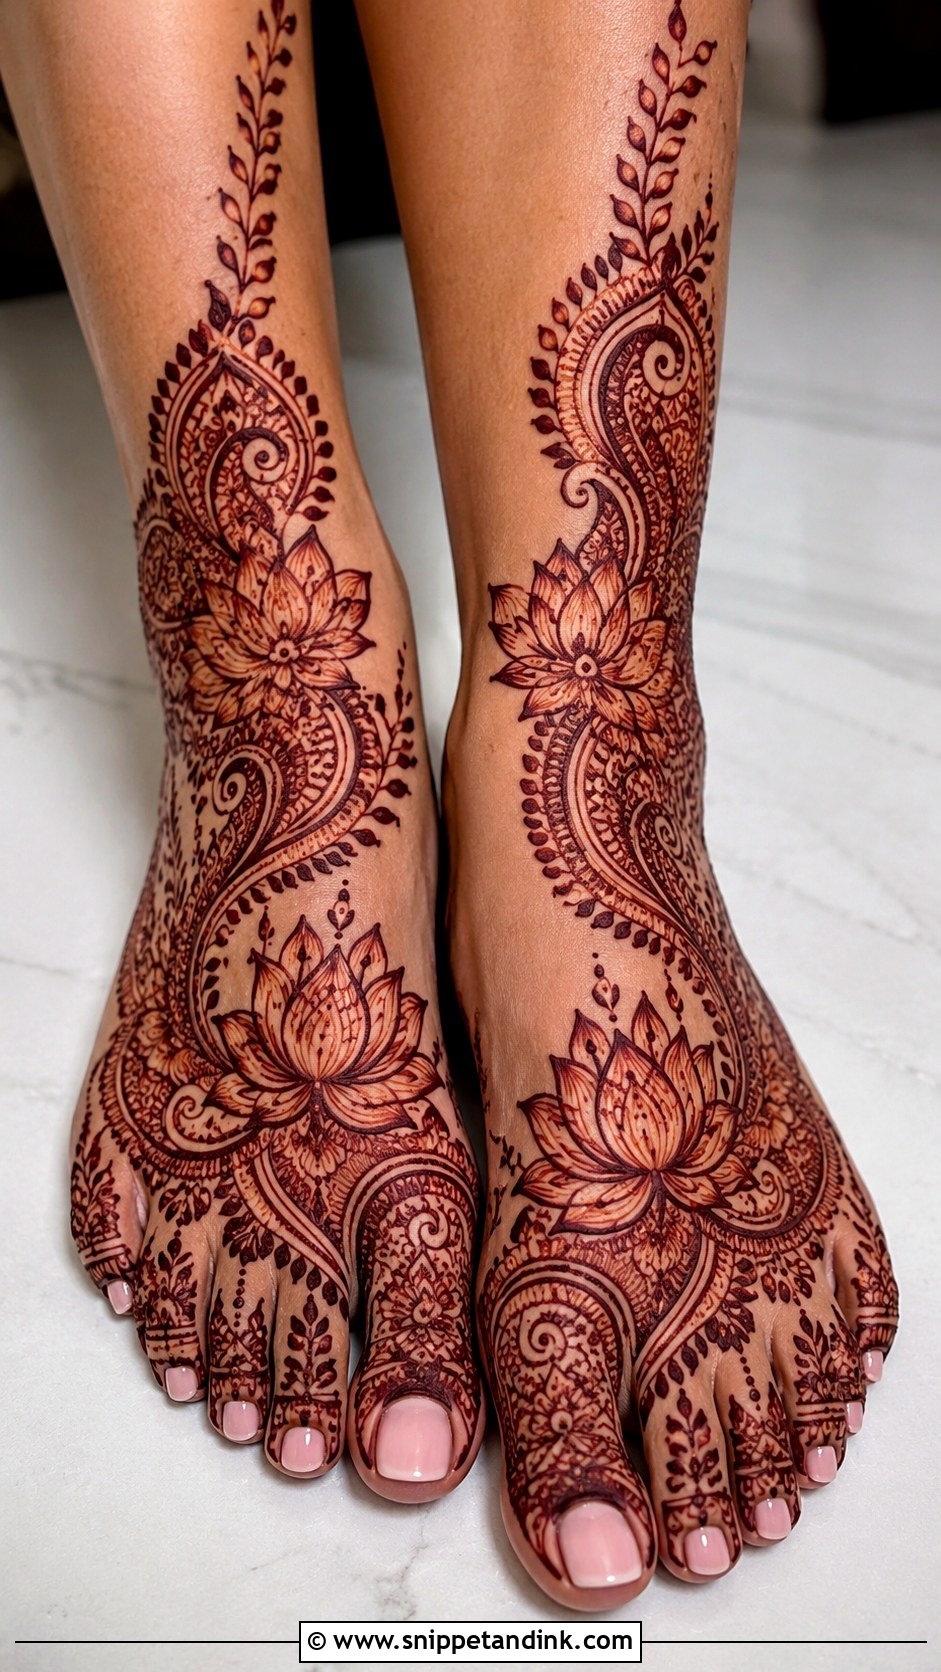
In many South Asian families the lotus is auspicious, which is why it gets requested for weddings and religious occasions. It can sit near the ankle, at the center or along the side of a larger bridal pattern. Its layered petals let me build depth petal by petal with fine lines and shading. Pair it with paisleys, dots and vines for a bridal set, or keep one large lotus surrounded by open skin for a cleaner version.
29. Belt Feet Mehndi Design
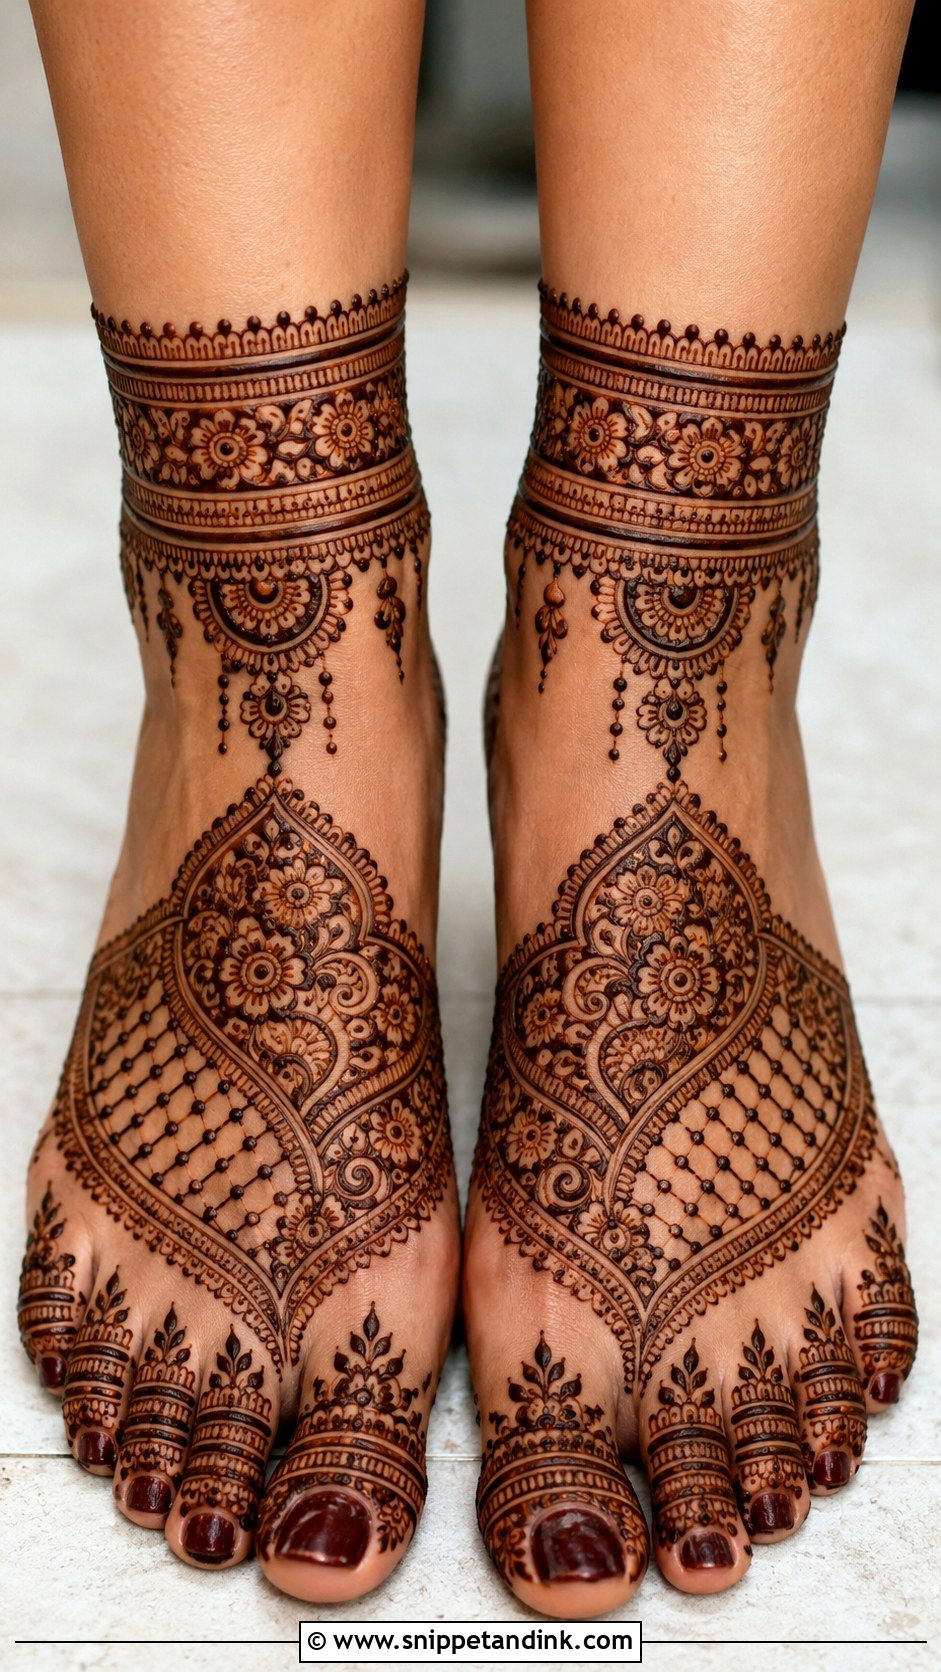
Belt designs lay structured bands across the toes, the mid-foot and the ankle, each filled with florals, dots, mesh or small paisleys. They follow the line of most sandal straps, so less of the work disappears behind your footwear than you’d expect. The danger is stiffness. I break up the bands with a few curved vines or hanging details between them, and the whole foot softens.
30. Side Feet Mehndi Design
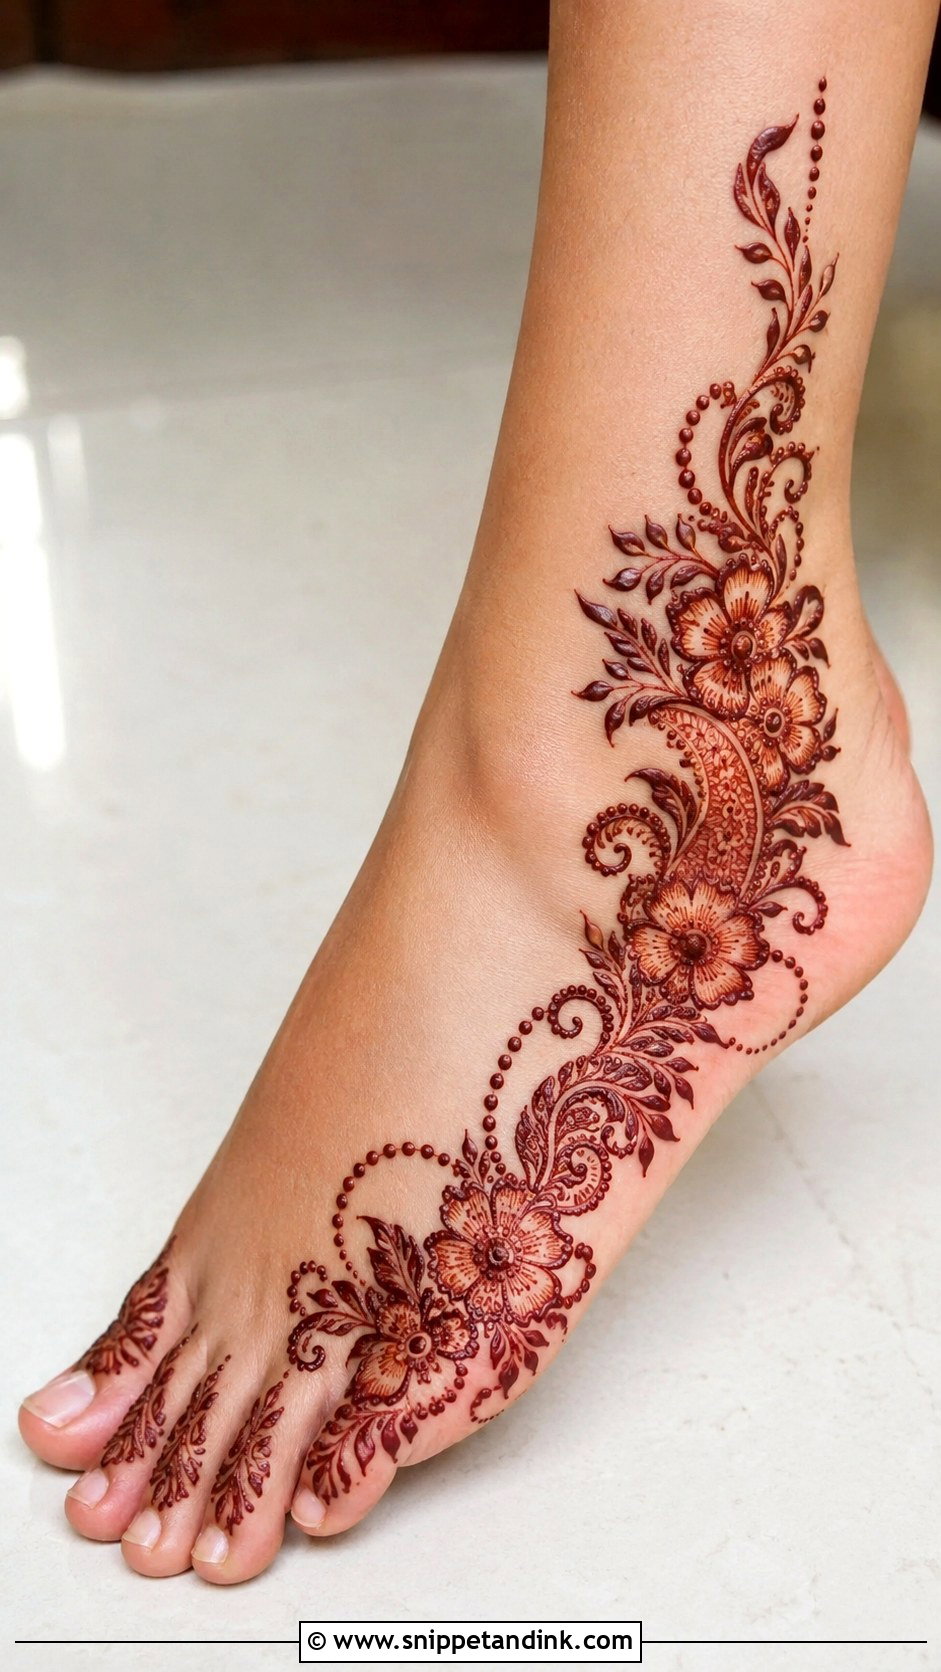
A side design runs along one edge of the foot, usually from the little toe to the ankle, leaving the center bare. Arabic flowers, vines, paisleys and dotted chains all suit the placement. It’s practical as well: less paste means it dries faster, so you’re walking again sooner than with a dense pattern. I follow the outer curve of the foot rather than drawing a straight line, and that curve is what makes it look slim.
31. Finger Feet Mehndi Design
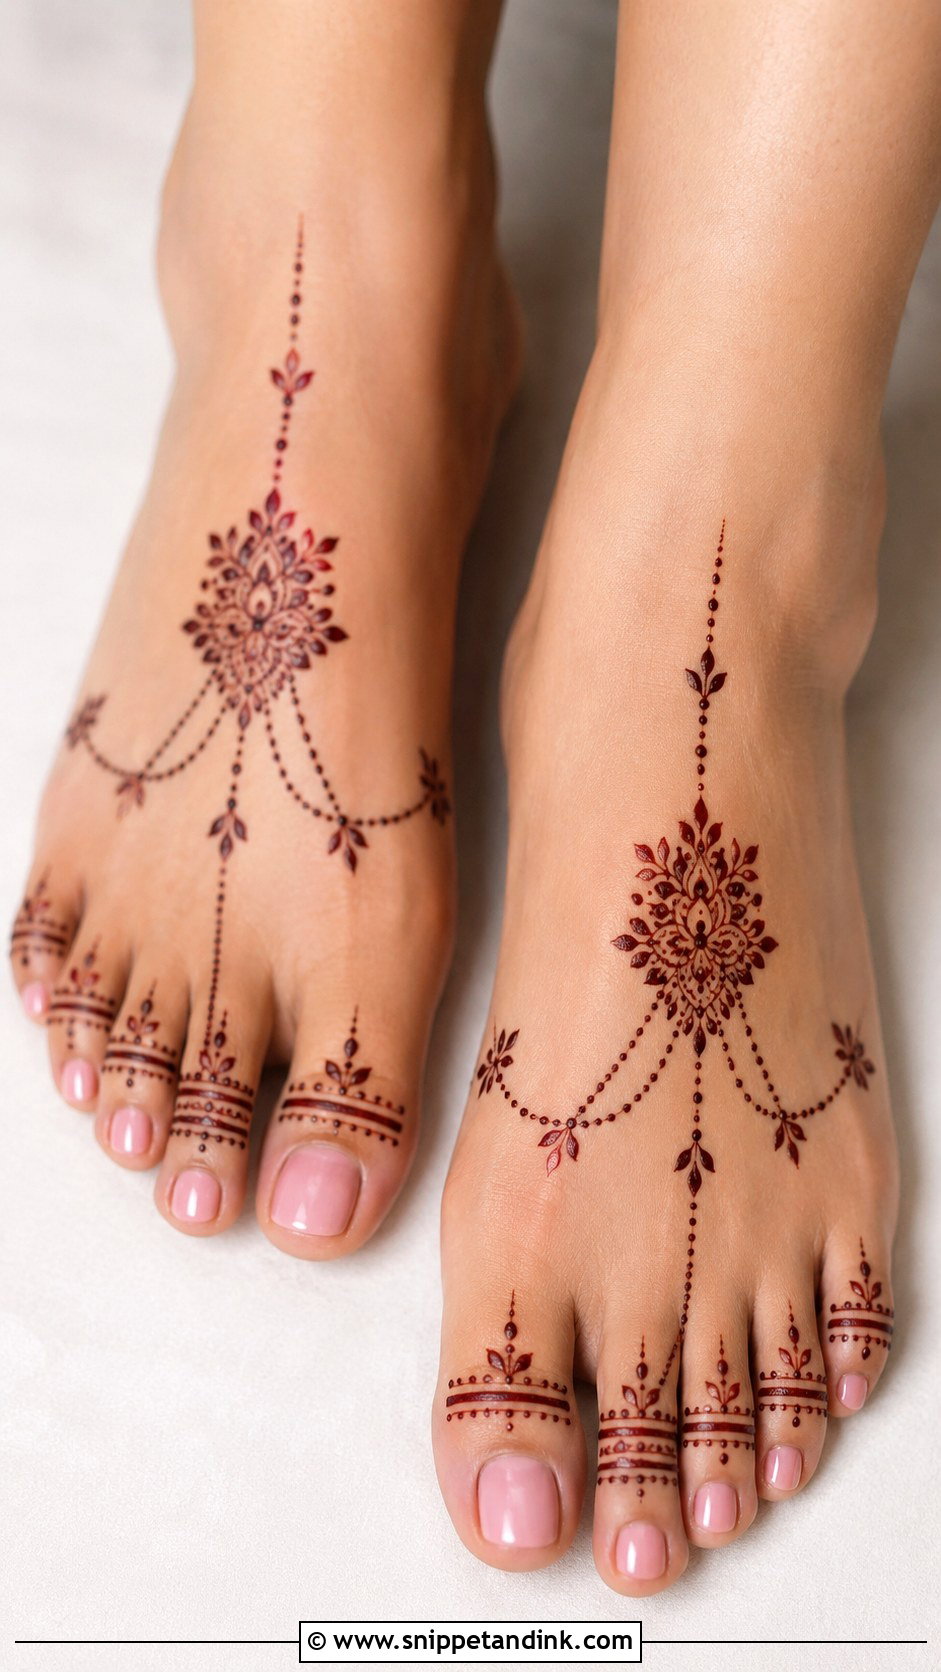
Think of this as finger mehndi for the toes: rings, dots, tiny leaves or small floral bands on each toe, joined by a chain toward the foot. It’s casual and quick, good for festive mornings or anyone who wants very little coverage. Decorating five small toes without crowding them is the real challenge, so I keep each toe’s motif tiny and identical across both feet. A small central motif on the upper foot helps if the toes alone feel unfinished.
32. Round Feet Mehndi Design
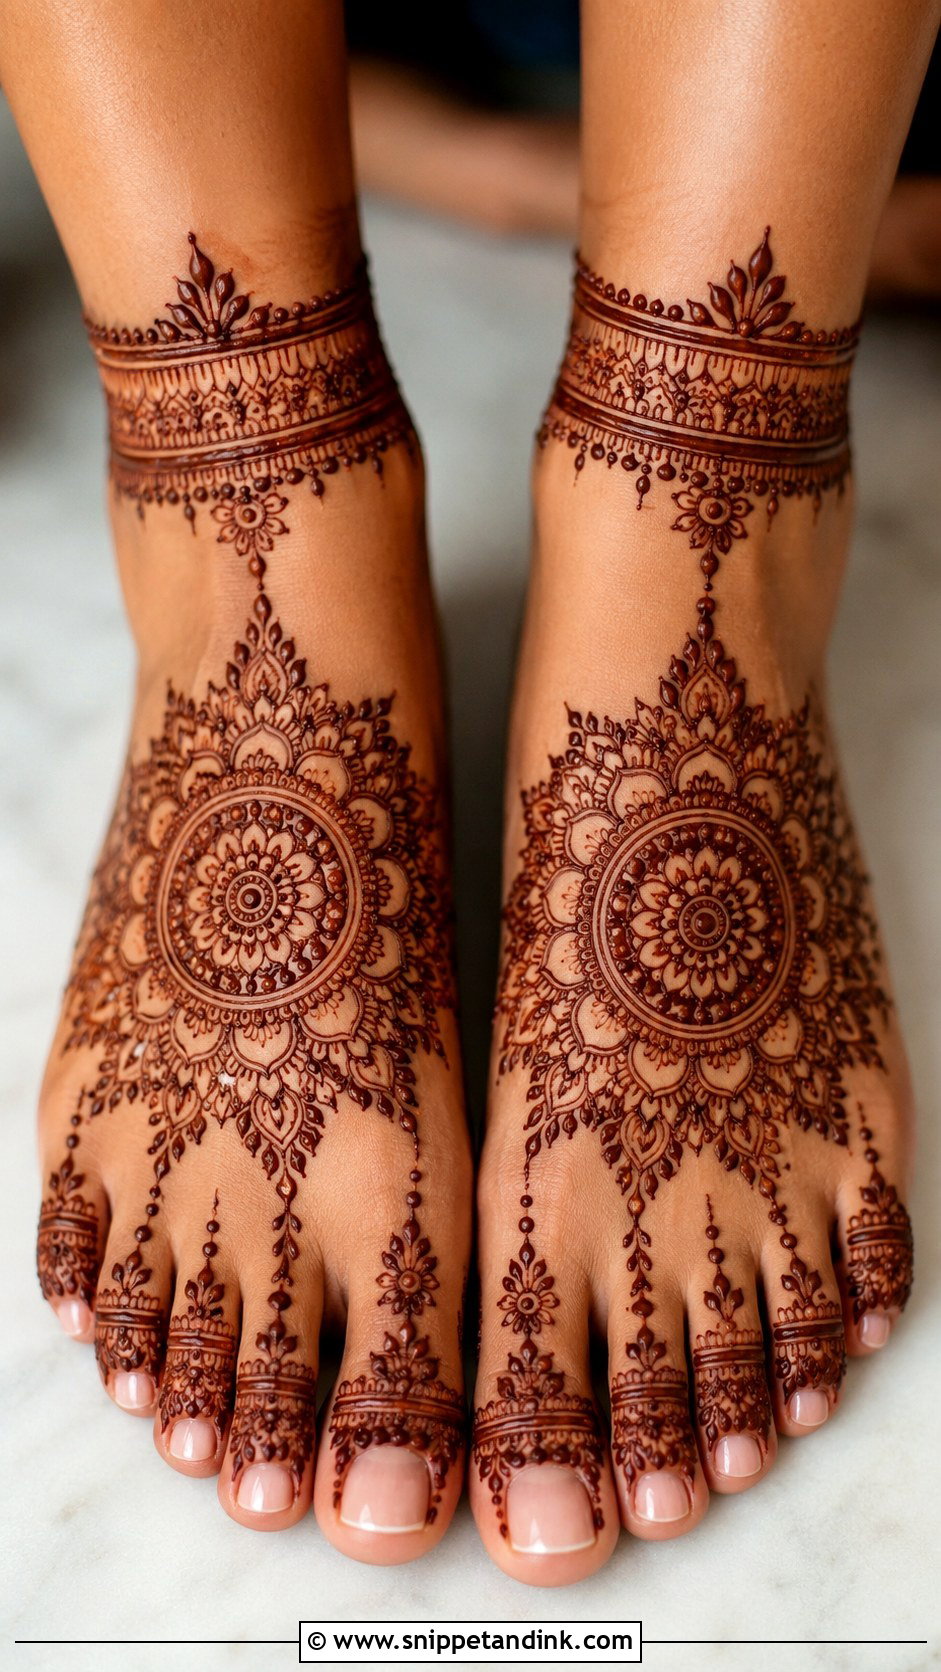
A large circle, mandala or tikki sits on top of each foot, echoed by smaller circles near the toes or ankle. The round shape draws the eye on its own, so it suits Eid, Diwali and pre-wedding functions without much else. Leave the circle bold and empty, or fill it with petals, dots and fine lines. I connect it to the toes with delicate chains, because a floating circle with nothing around it can look like a stamp.
33. Heavy Feet Mehndi Design
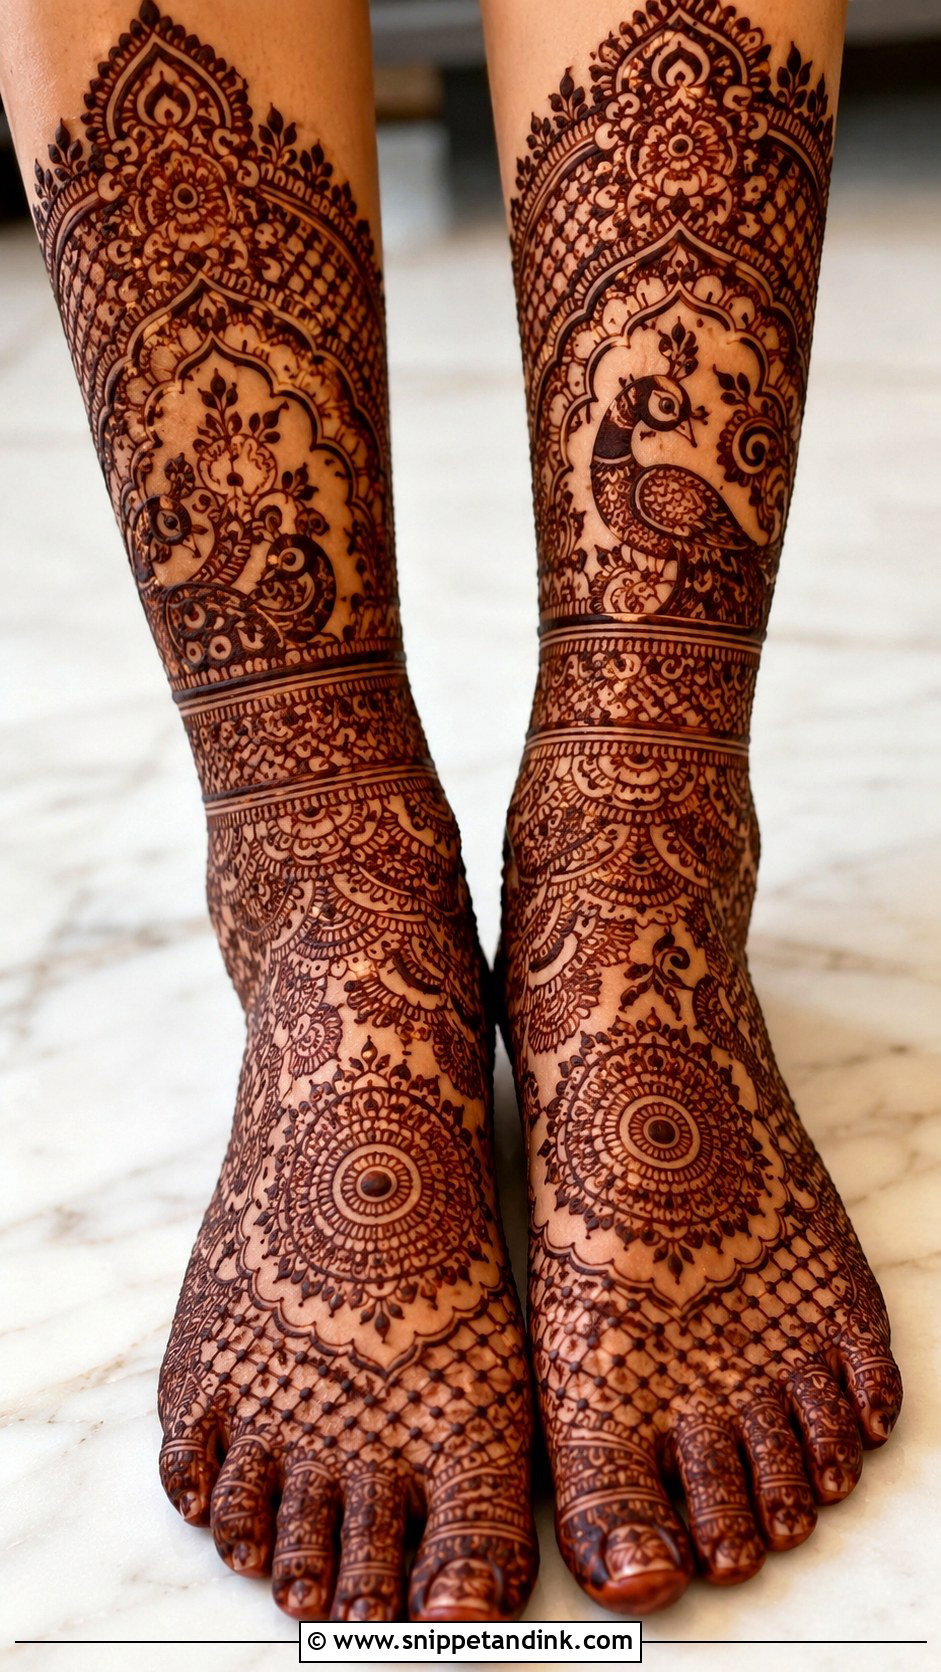
Heavy designs cover toes, feet, ankles and often the lower legs with paisleys, mandalas, florals, jaali, peacocks and dense filler, and they’re meant for brides and major traditional celebrations. Comfort becomes the real issue, since you’ll be sitting with your feet up for a long stretch while it’s applied and dries. I work in clear sections so the result never looks like one solid block. Afterward, stay out of tight or closed shoes; they rub the paste away and leave patchy color.
34. Shaded Feet Mehndi Design
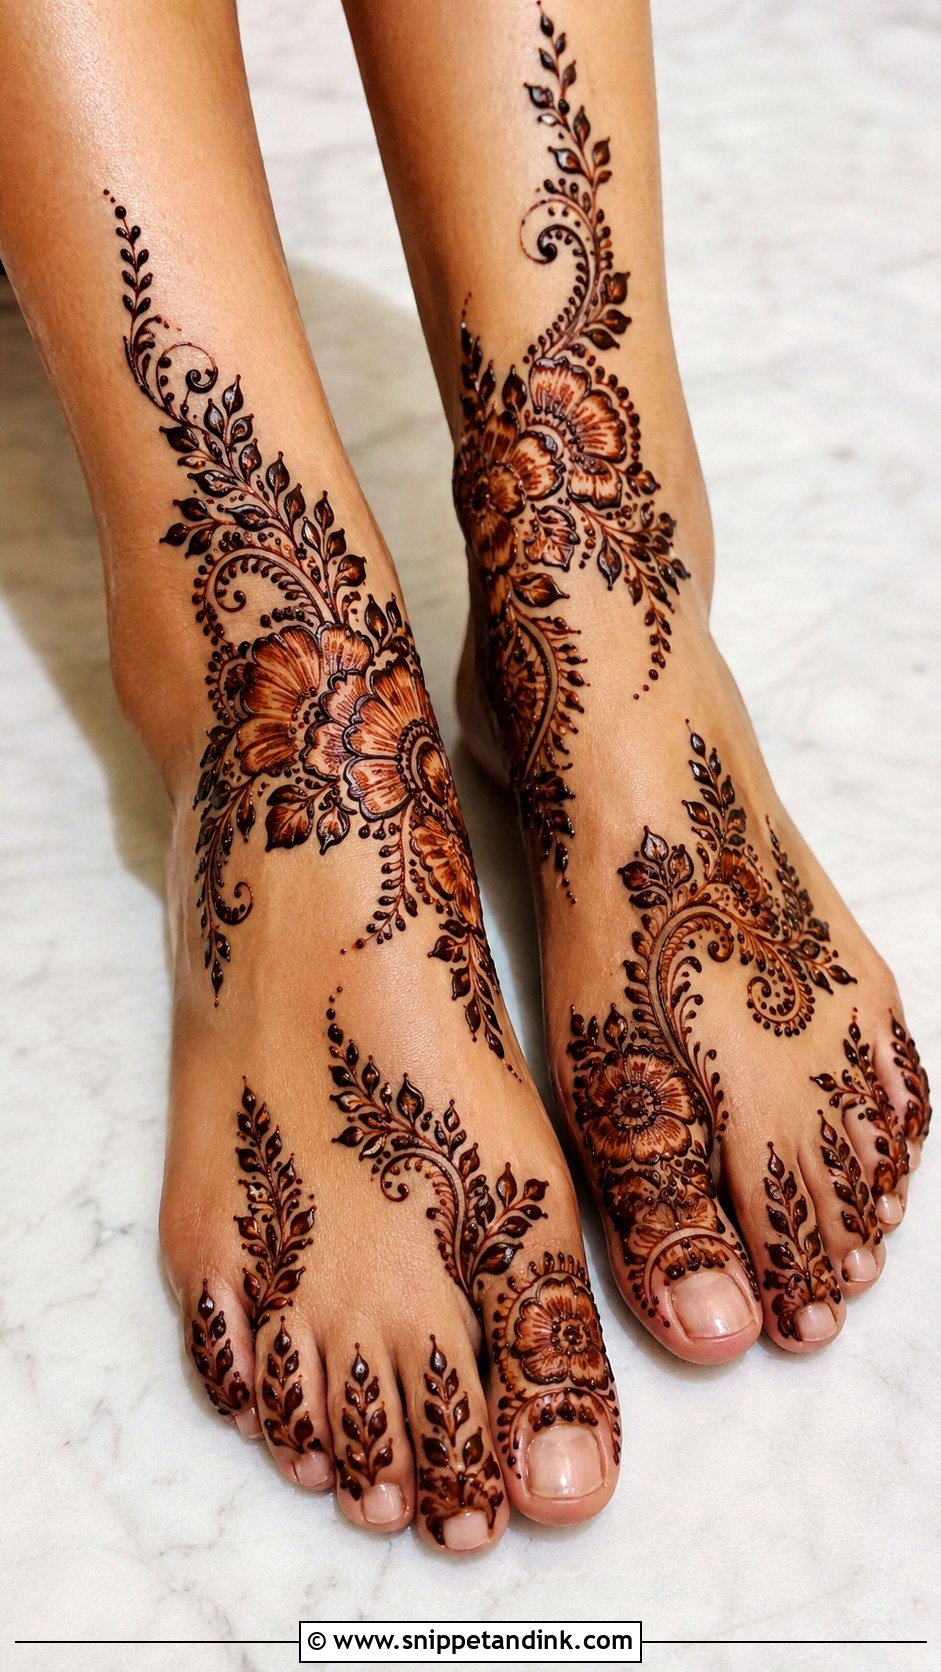
Shading means filling flowers, leaves and paisleys with a thin, soft layer of paste so they look three-dimensional, a technique common in Arabic and Gulf work. It gives large motifs fullness without covering the whole foot, which suits bridesmaids and guests. Overdo it and the foot looks heavy, so I pair shaded motifs with clean outlines, dots and plenty of open skin. Even application matters, since patchy shading stains patchy.
35. Glitter Feet Mehndi Design
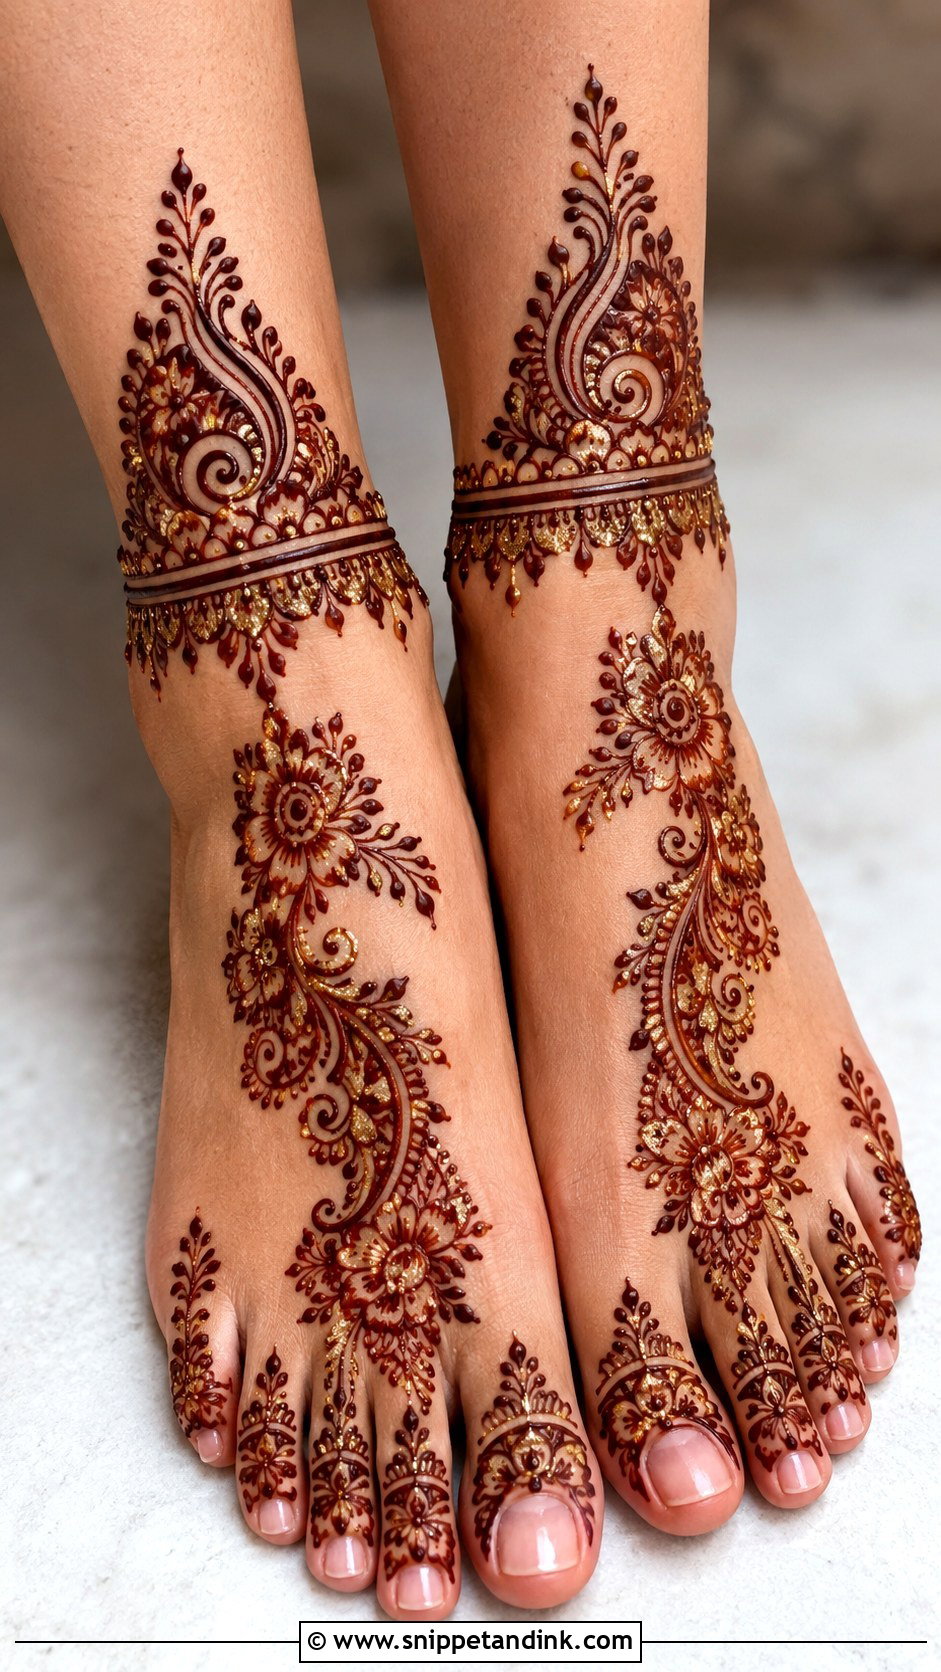
Glitter goes on top of a henna pattern for parties and sangeet nights, either pressed into the wet paste or applied with cosmetic adhesive once it dries. It’s purely decorative. Glitter doesn’t stain, and it leaves when the paste does. I keep it to borders, petal tips or small highlights in gold, bronze or maroon, because glitter everywhere looks messy within an hour. Use skin-safe cosmetic glitter only, never craft glitter.
From Wet Paste to Deep Maroon in Forty-Eight Hours
Henna comes off the skin bright orange and darkens over the next two days as the dye oxidizes. That’s why I book bridal feet one to two days before the wedding, never the morning of. Here is the aftercare I give every client:
- Keep the paste on for six to eight hours, or overnight if you can sleep with your feet wrapped in tissue and loosely taped.
- Dab a little lemon and sugar mix over the paste once it’s dry to the touch. It helps the paste cling; dab, don’t soak.
- Scrape the dried paste off instead of washing it, and keep water away for as long as you can, ideally until the next morning.
- Stay warm. Socks over the wrapped feet and a warm room do more for the color than any trick.
- Skip pedicure scrubs, chlorine pools and waxing on the feet until after the wedding, since exfoliation takes the stain with it.
If one patch comes up lighter, don’t repaint it with fresh henna the night before. It won’t catch up in time, and you’ll end up with two shades side by side.
Black Henna Is the One Shortcut I Refuse
A paste that promises a black stain within an hour almost always contains PPD, a hair-dye chemical that can blister skin and leave scarring or a lasting sensitivity. Natural henna paste is green to brown, smells earthy or of essential oils, and stains orange first. If an artist can’t tell you what is in the cone, ask to see the ingredients, or book someone else.
Let Your Shoes and Your Schedule Settle the Coverage
Your event, your outfit and how long you can sit still should decide the coverage more than any trend. Brides tend toward heavy Indian, Rajasthani or dulhan patterns, while guests often prefer Arabic, floral, minimal or anklet-style designs. Open layouts with vines, toe rings or a single mandala are quick; paisleys, peacocks, jaali and leg extensions take longer and give more drama. The best foot mehndi I see is cleanly spaced and planned around the shape of the foot and the shoes it will be worn with.
You'll Like These Ideas:


Leave a Reply