
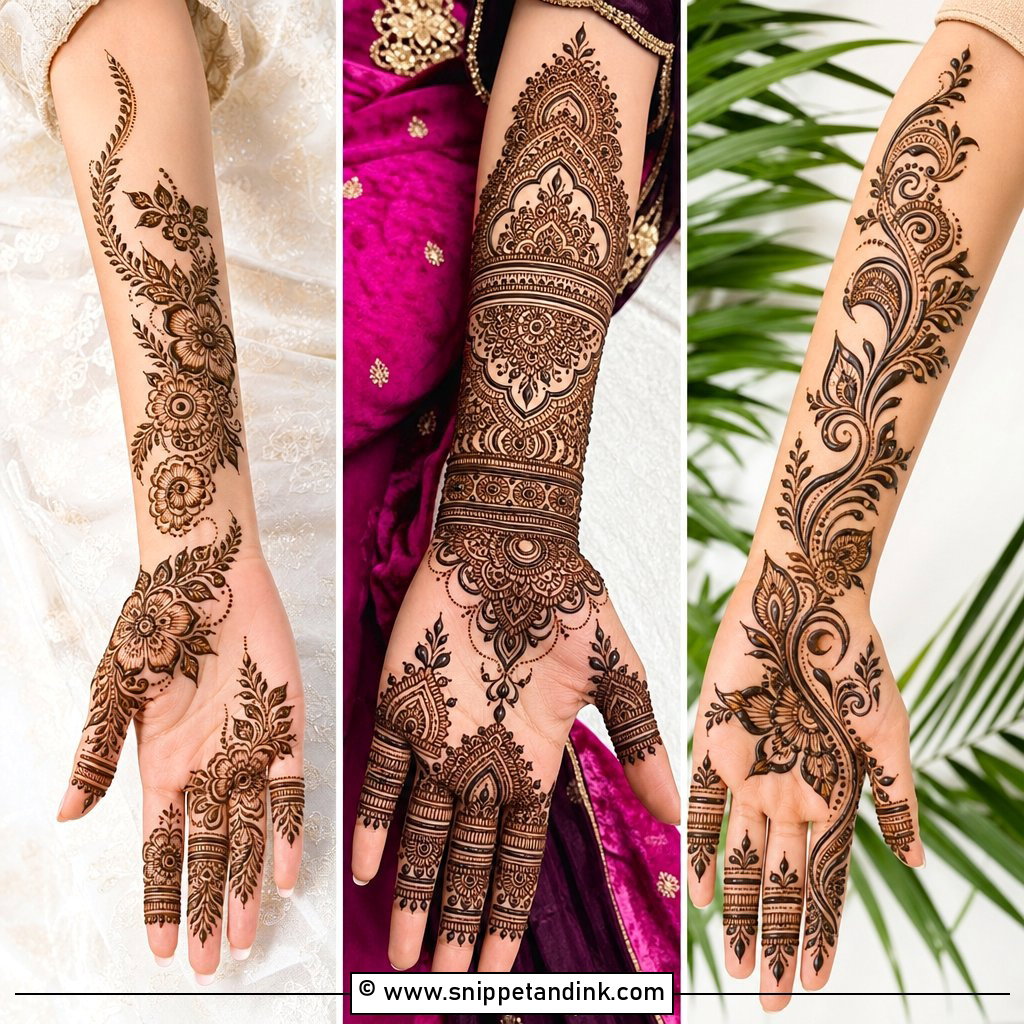
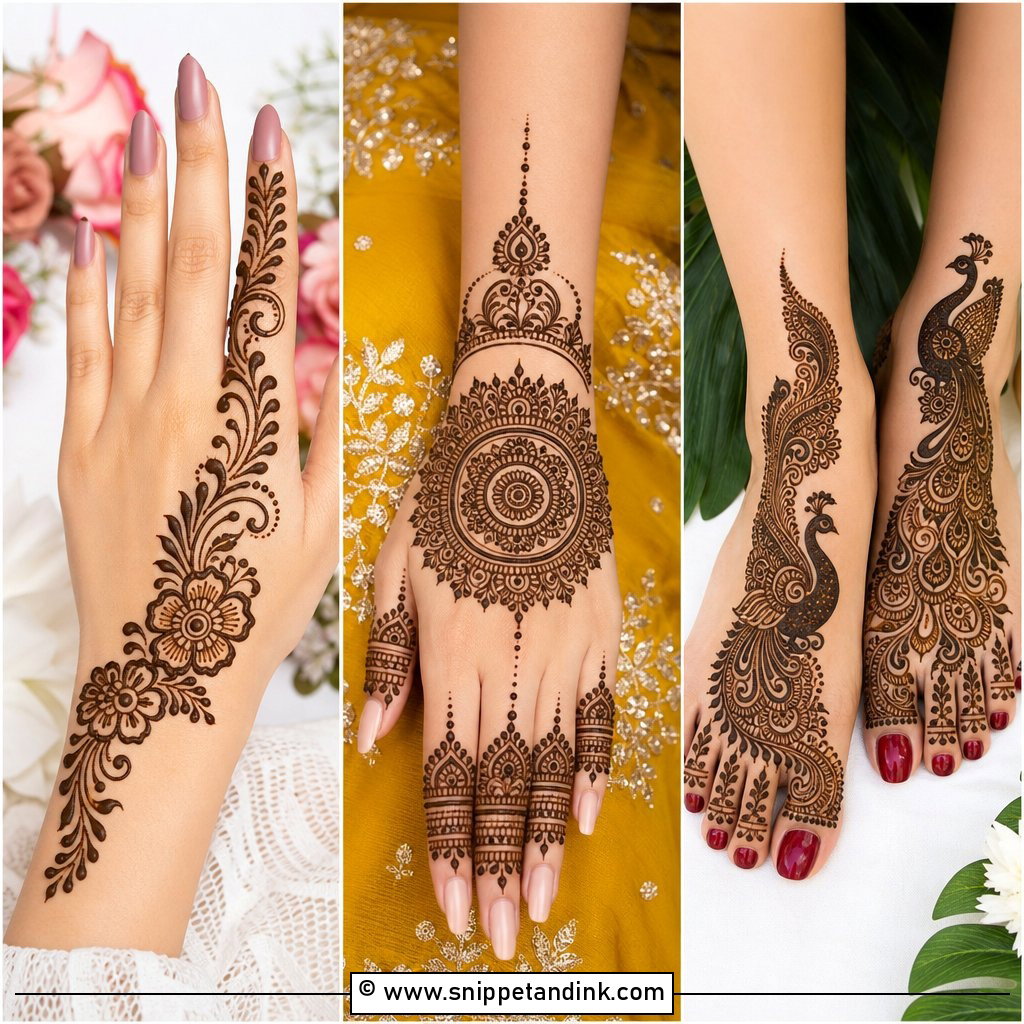
A bel is a vine, and it’s the most forgiving layout I draw. One curving path runs from the wrist toward the fingers, carrying leaves, flowers, paisleys and dots, and the skin around it stays open. That open skin is what makes a vine look graceful instead of crowded. It can be simple for beginners, bold in the Arabic way, dense like Indian work or clean and modern. It suits the front of the hand, the back, the fingers and the wrist, and it scales up to bridal. Below are thirty vine layouts, with the details that make each one work once the stain develops.
Mapping the Vine So It Lengthens the Hand
Before I draw a single leaf, I look at the hand. Where the vine starts and which finger it ends on changes how long and slim the hand looks, and that’s the decision that makes or breaks a bel design.
- Short fingers or a broad hand: I run the vine diagonally and finish on the middle finger, which draws the eye upward.
- Long, slim fingers: the vine can end on the index finger, or split between two fingers.
- Small hands: one fine vine with small motifs, since large flowers swallow the space.
- Both hands: I usually mirror the vine so the hands look like a pair when held together for photos.
I draw the main stem first in one confident stroke, then build leaves and flowers onto it. If the stem is shaky, nothing added later will hide it. I also keep the vine away from deep creases at the wrist and knuckles, because skin folds there and a line drawn across a crease looks broken once the hand relaxes.
1. Simple Bel Mehndi Design
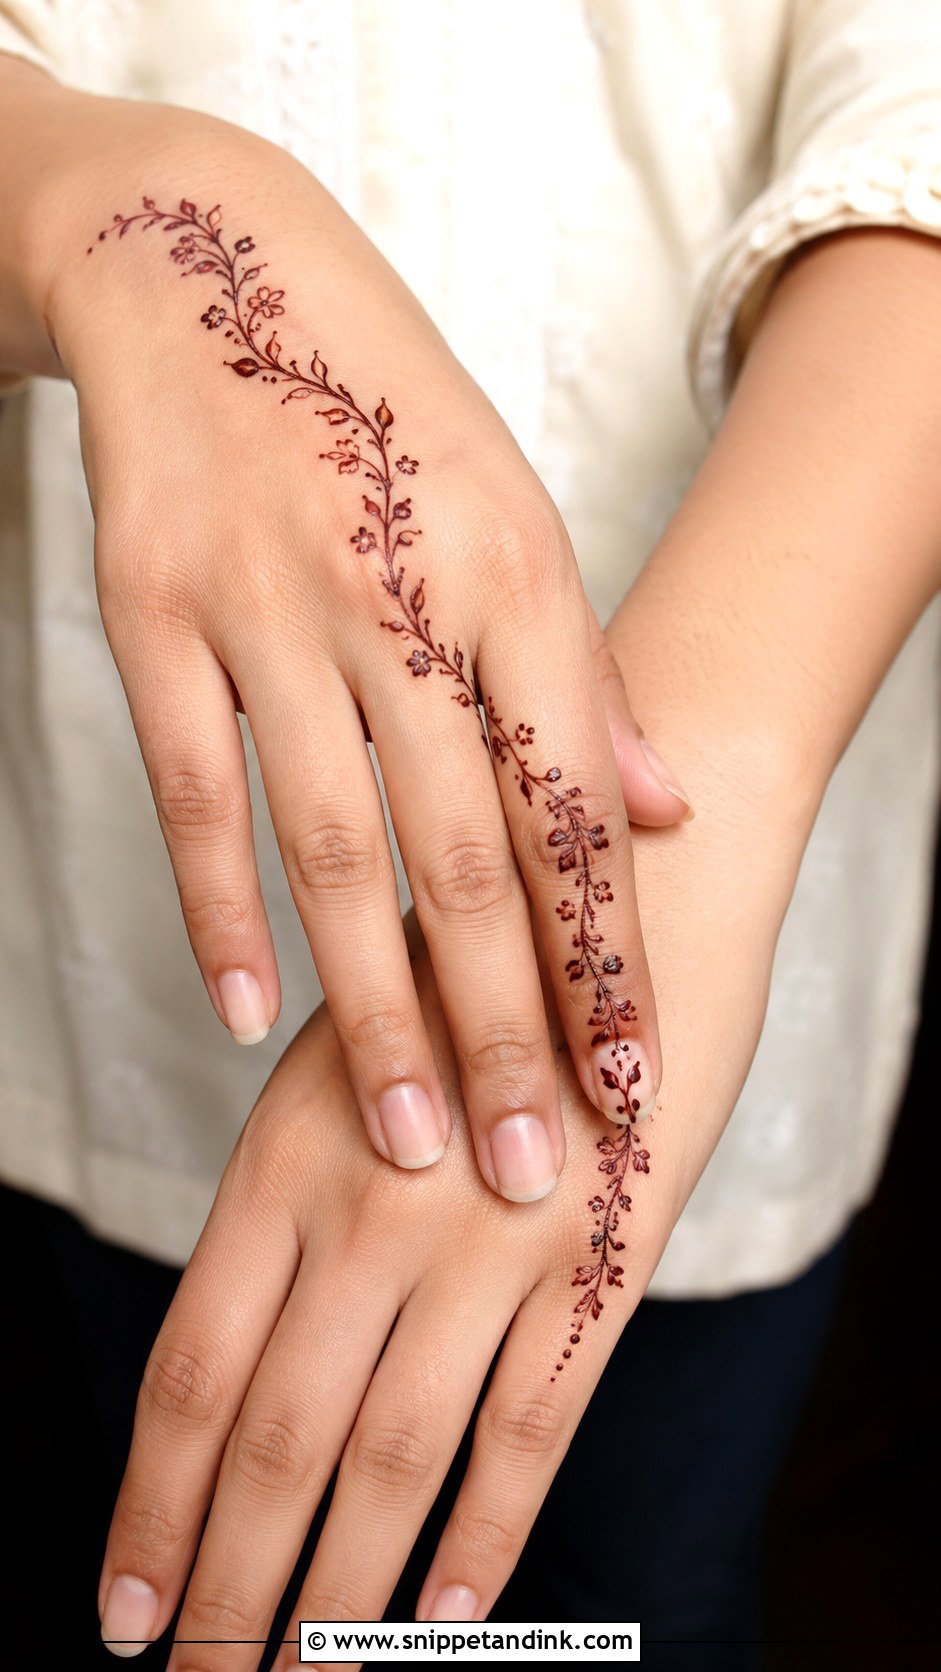
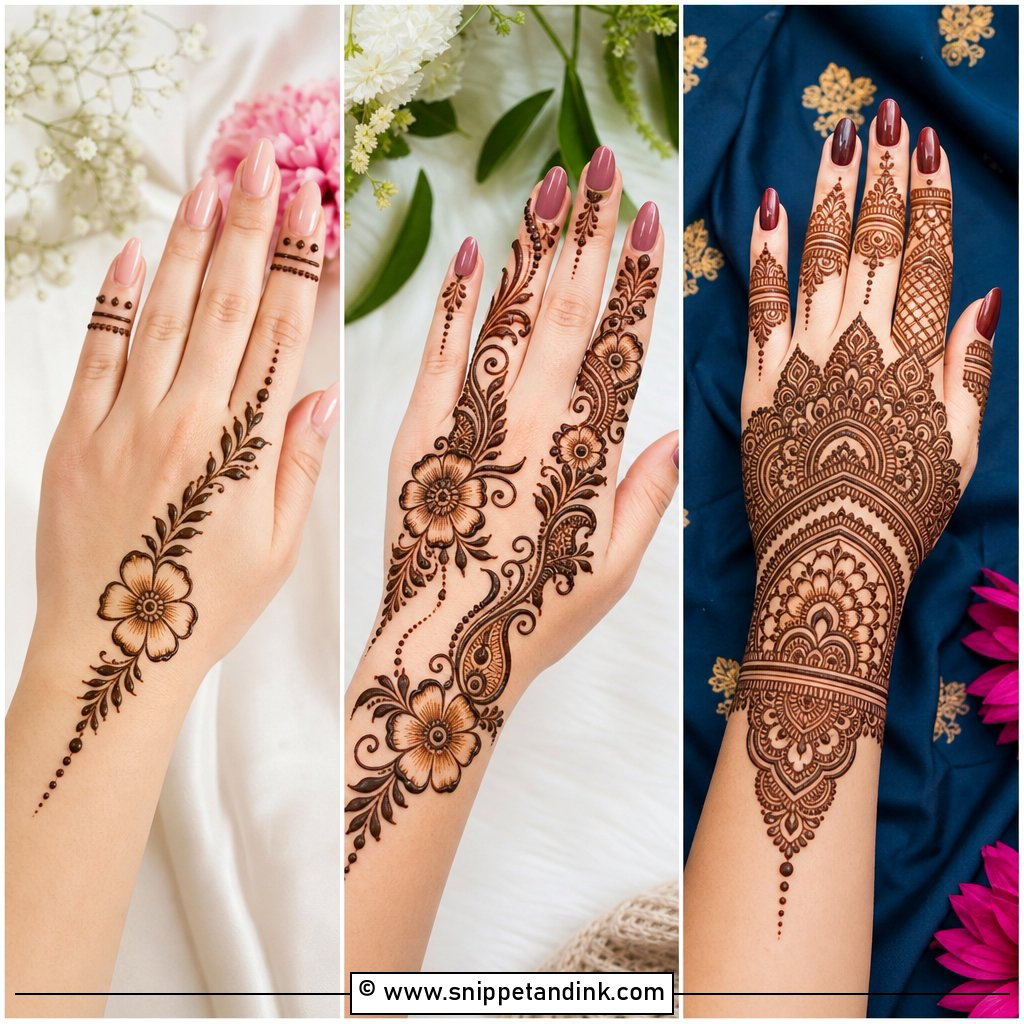
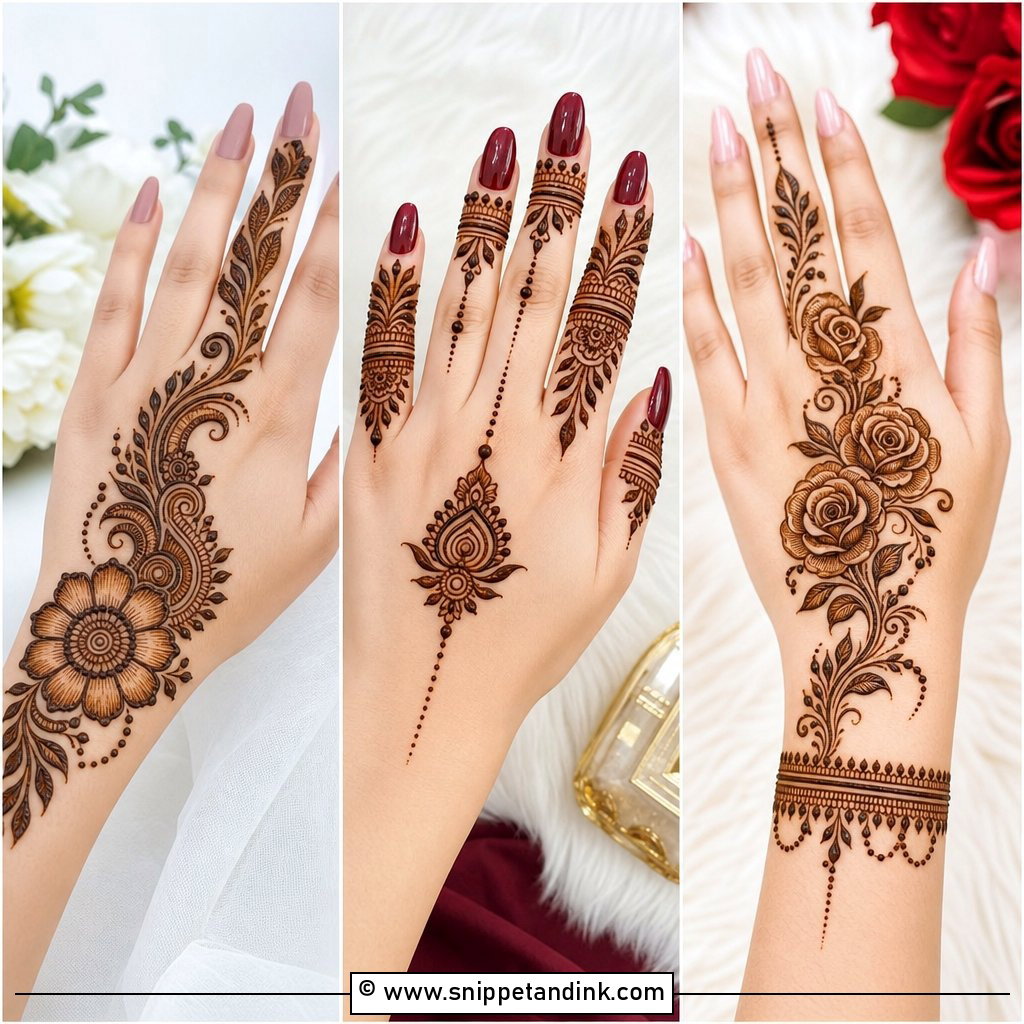
Start at the wrist and travel diagonally to one finger, leaving plenty of bare skin on both sides. That’s the whole idea of a simple vine, and on the back of the hand it makes the fingers look longer. I draw the main stem first in one smooth stroke, then add small leaves and tiny flowers along it at even intervals. No heavy filling or shading is needed, so it’s a good place for beginners to start. Quick enough for a school function or a casual festive day.
2. Arabic Bel Mehndi Design
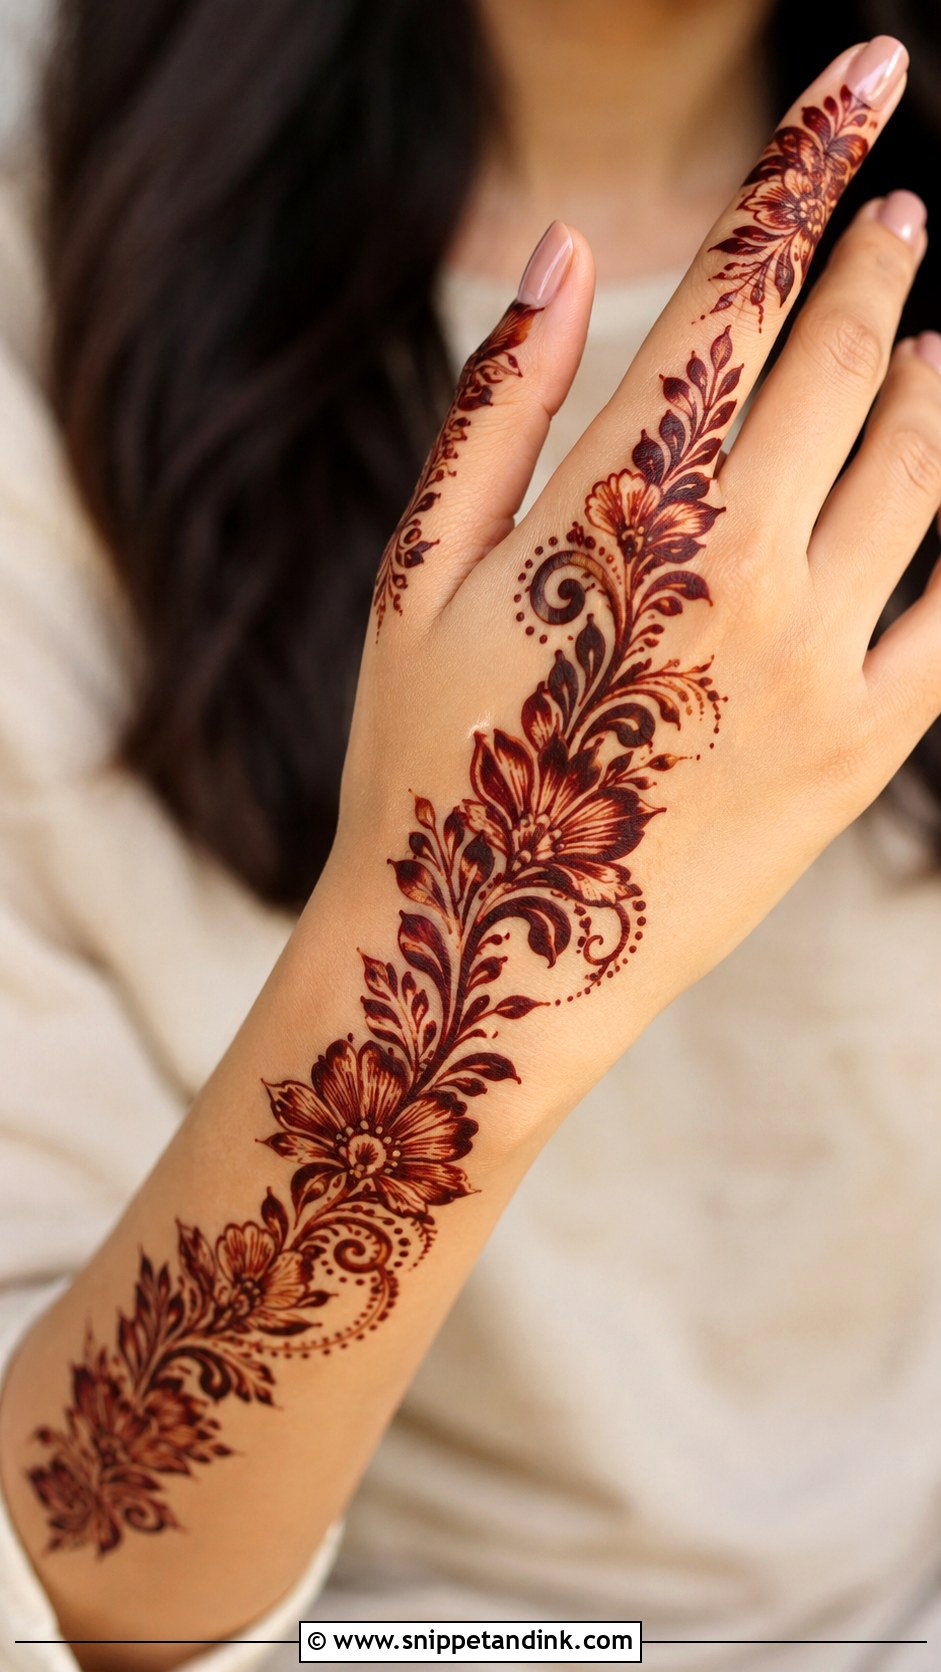
Arabic vines run in a clear curved path from the wrist to the index or middle finger, with big flowers and generous empty skin around them. I use a thicker outline here and soft shading inside the petals, which gives depth without dense fill. The open spaces make the deep reddish-brown stain look sharp. It flatters slim and broad hands alike and it’s quick to apply, which is why so many wedding guests and Eid clients choose it.
3. Back Hand Bel Mehndi Design
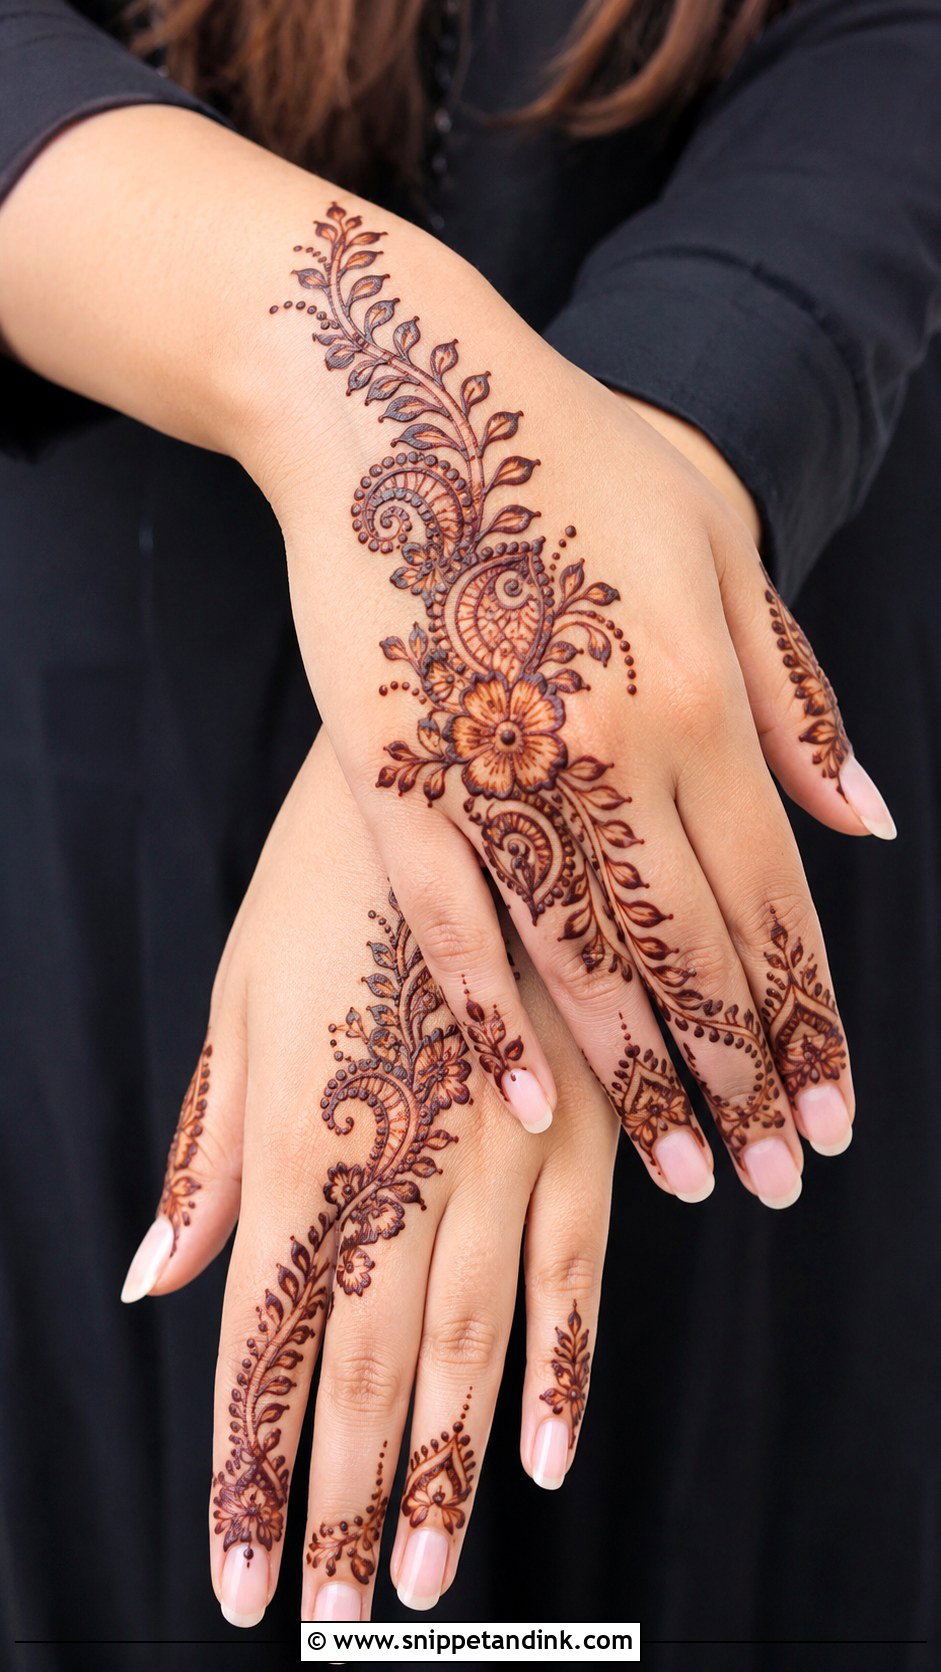
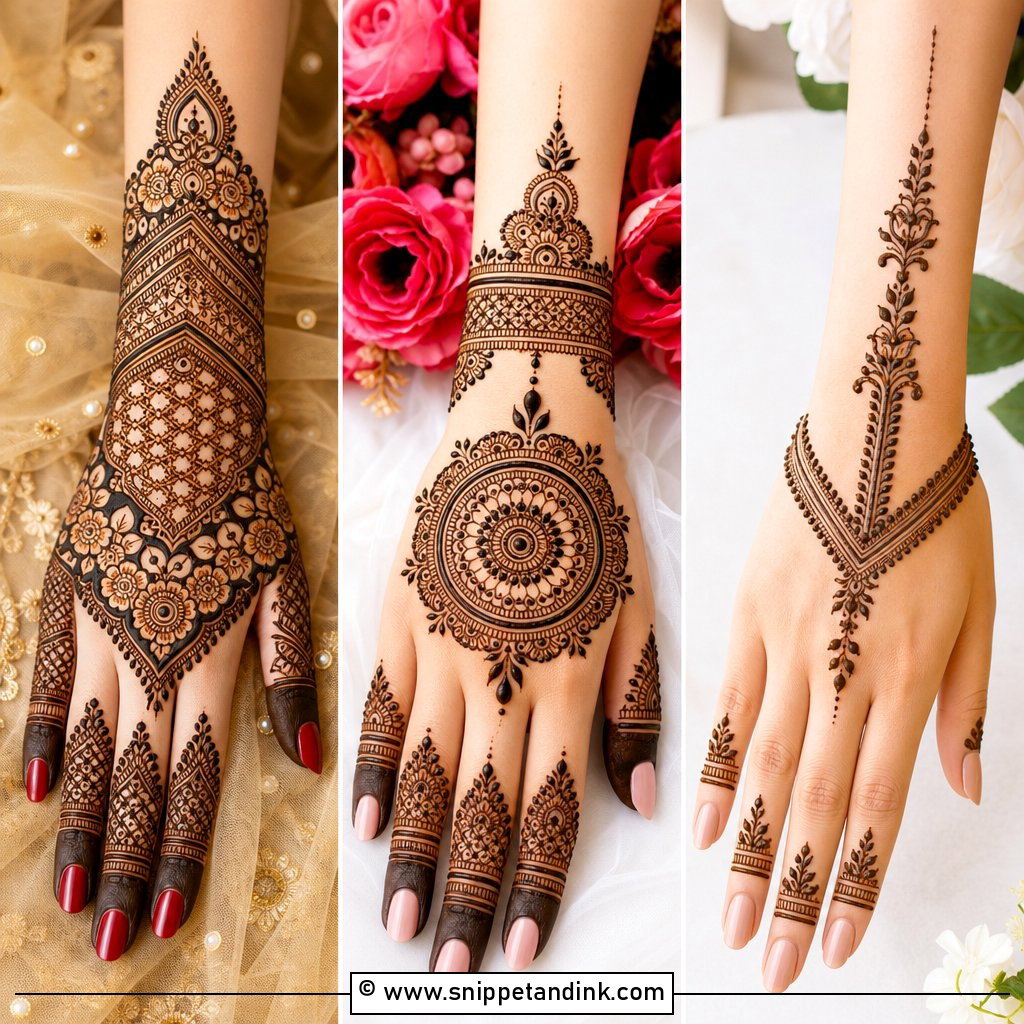
The back of the hand is where a vine gets seen most: holding a clutch, a phone or a gift. I start near the wrist, put one flower, paisley or small mandala as the focus, then run thin leafy trails toward the fingers. Knuckles crease and stretch, which distorts lines drawn across them, so I route the vine between knuckles rather than over them. The back stains lighter than the palm, so slightly bolder lines help. Keep the sides open for a fresh look.
4. Front Hand Bel Mehndi Design
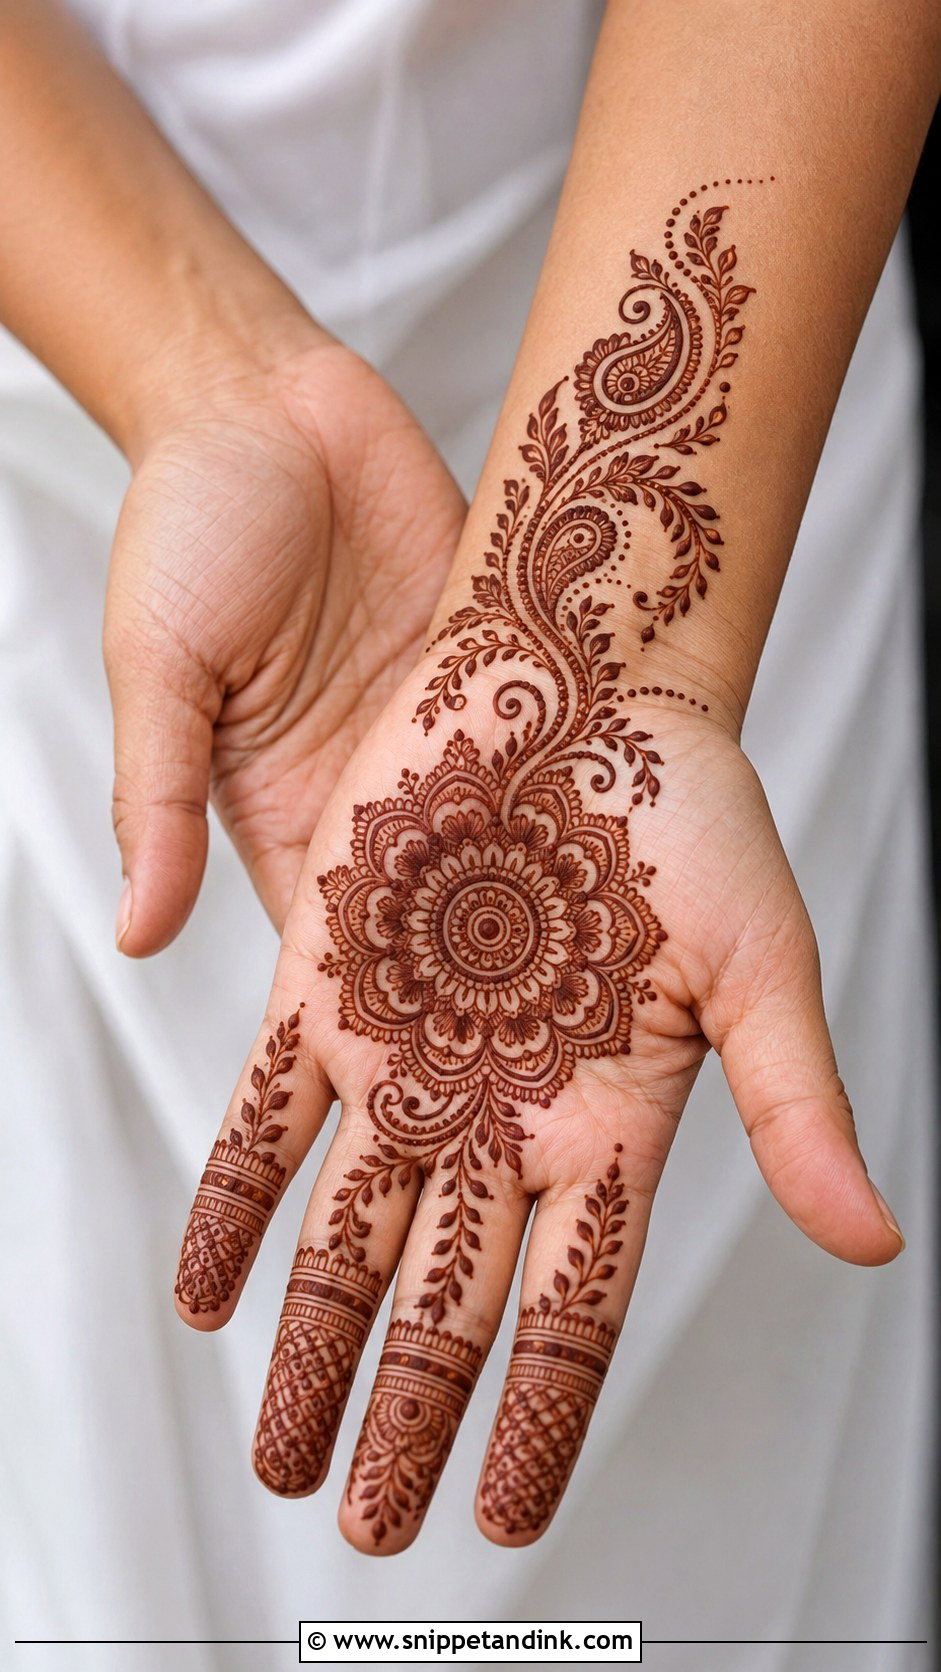
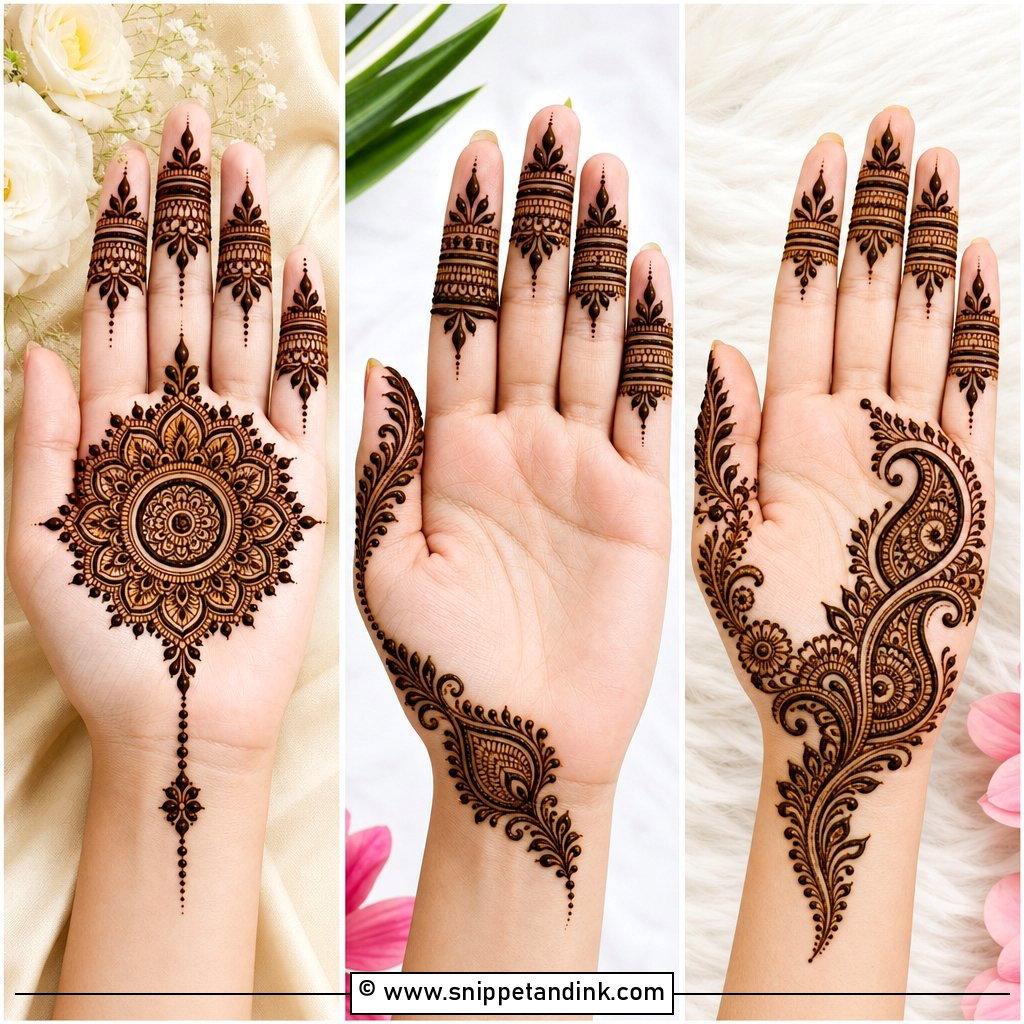
On the palm, even a simple vine stains rich, because palm skin takes henna more deeply than anywhere else. Front hand bel mehndi design often puts a round flower or small mandala in the center, then links it to a leafy vine running to the wrist and fingers. Fine dots and slim paisleys finish it. Because the palm isn’t fully covered, it stays comfortable for everyday use. I suggest it for Diwali, Raksha Bandhan and small family functions.
5. Floral Bel Mehndi Design
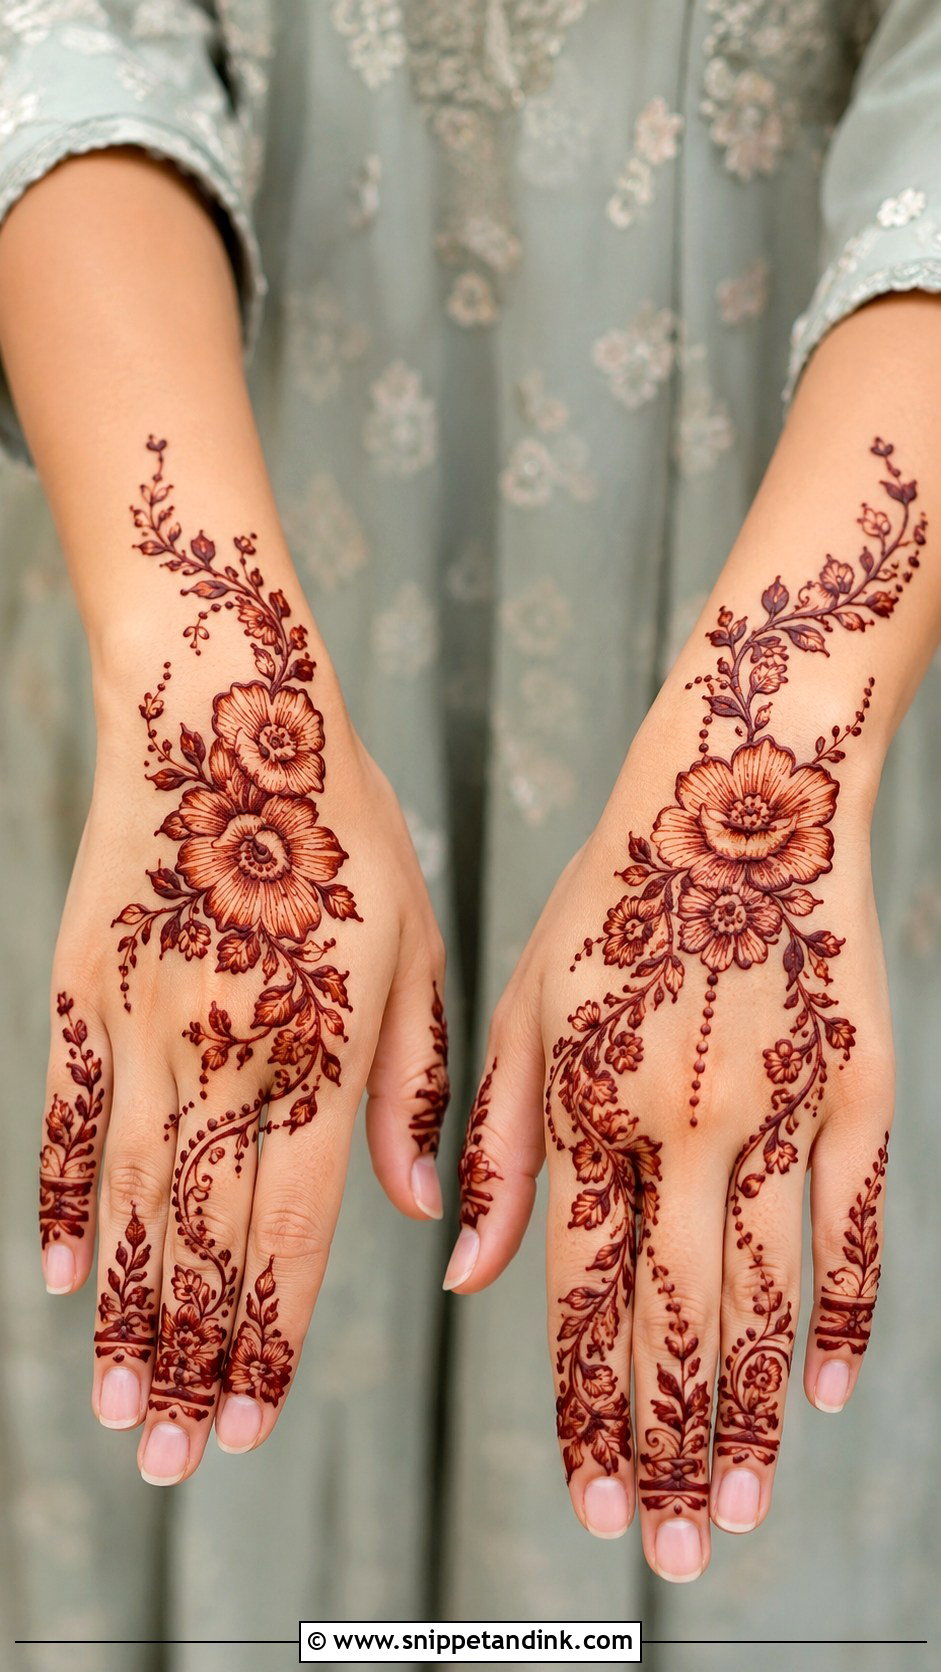
Here the vine is built around blooming flowers spaced from the wrist to the fingers. The leaves have to follow the curve of the stem, or the flowers look pasted on rather than grown. I give each bloom bold outlines and a few fine inner lines. The fingers carry buds, half flowers and dotted stems that echo the main pattern. Florals read clearly on the open skin of the back hand, and it suits bridesmaids and guests who want a pretty, unfussy look.
6. Paisley Bel Mehndi Design
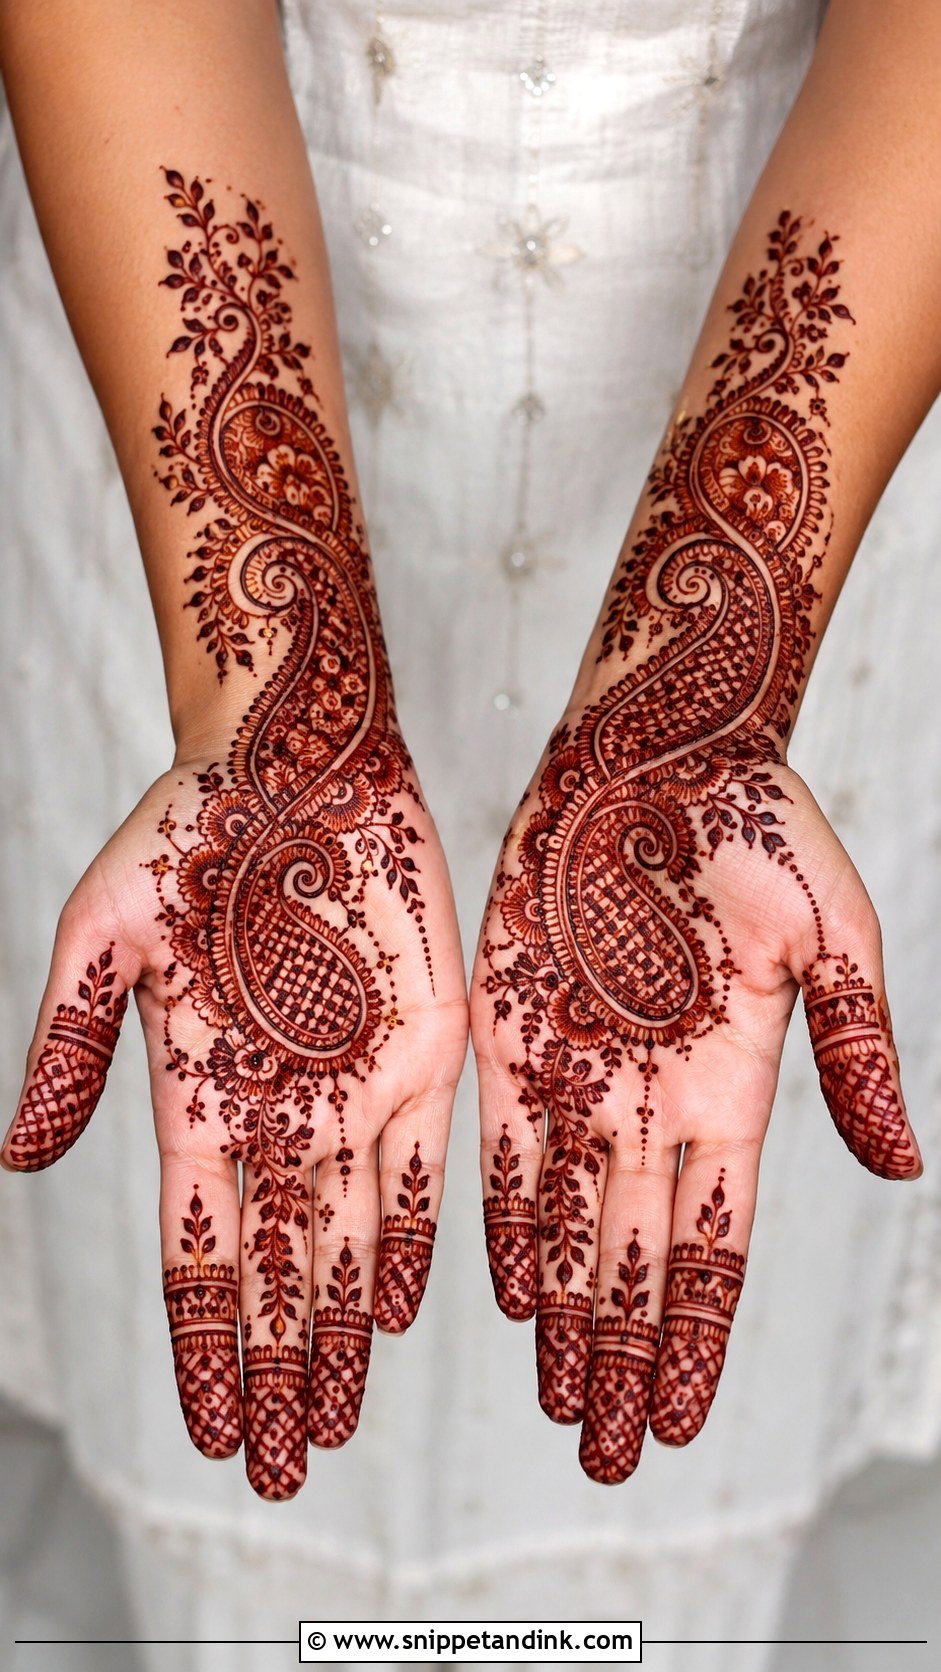
Paisleys already have a curve, so they join a vine naturally. I place one large paisley near the wrist or center of the hand and let a leafy vine run on toward the fingers. Inside, small checks, petals or fine lines give texture. The surrounding skin stays lighter so the paisley remains the focal point. If fill lines inside a paisley are drawn too close together, they merge as the stain darkens, so I space them a little wider than looks necessary.
7. Mandala Bel Mehndi Design
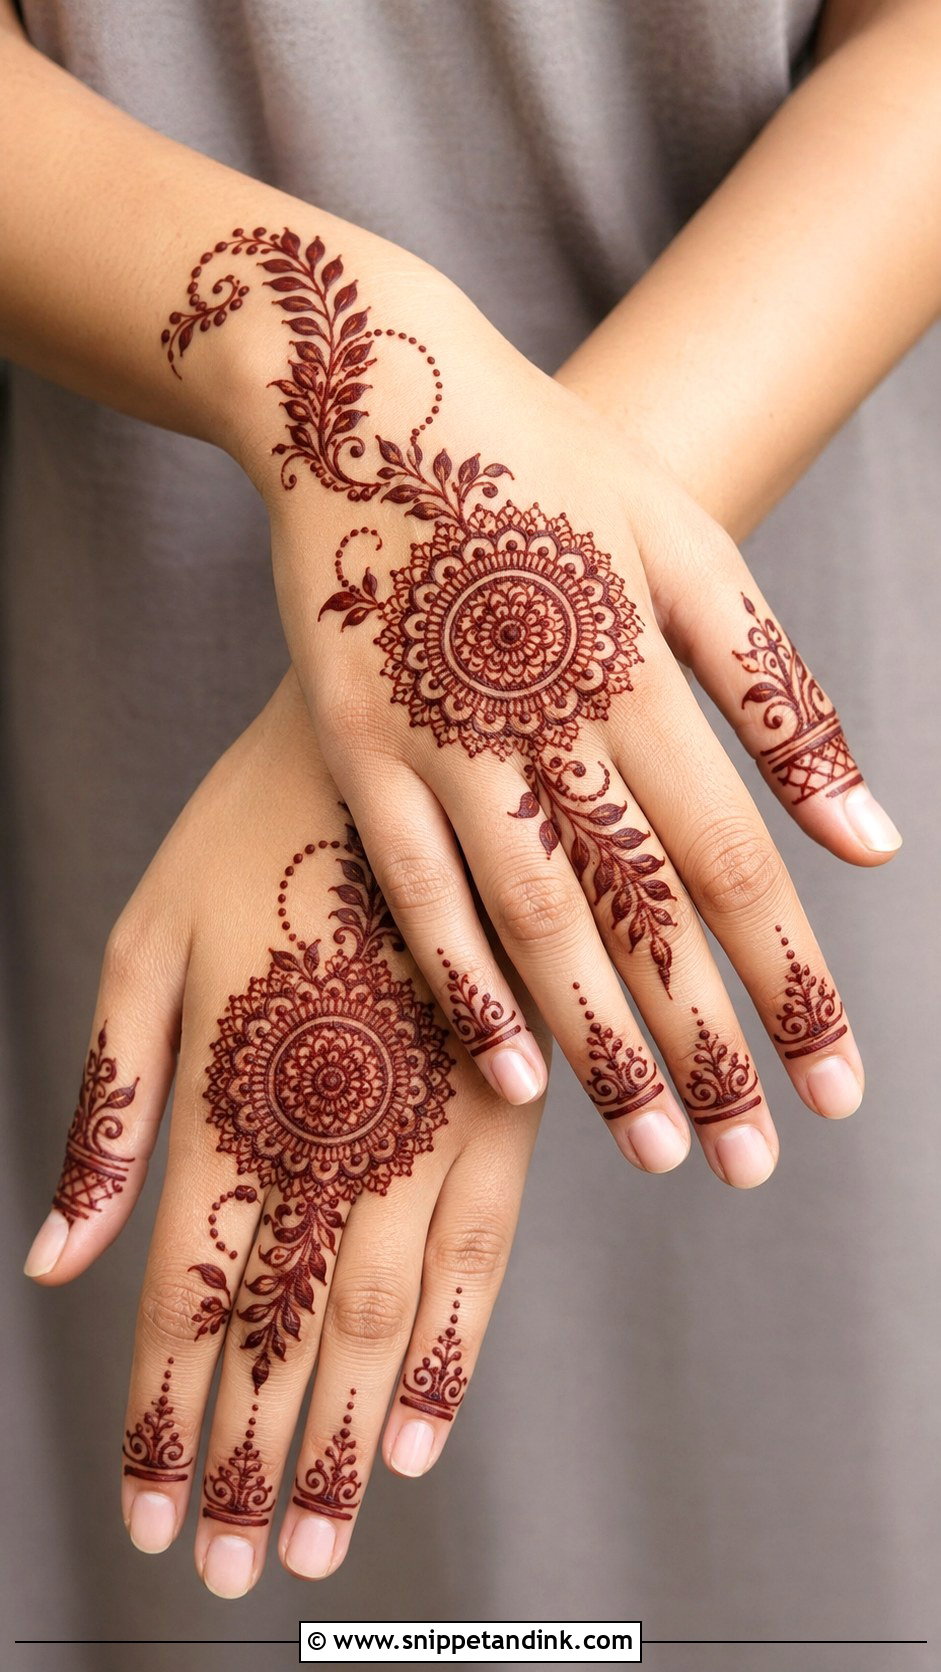
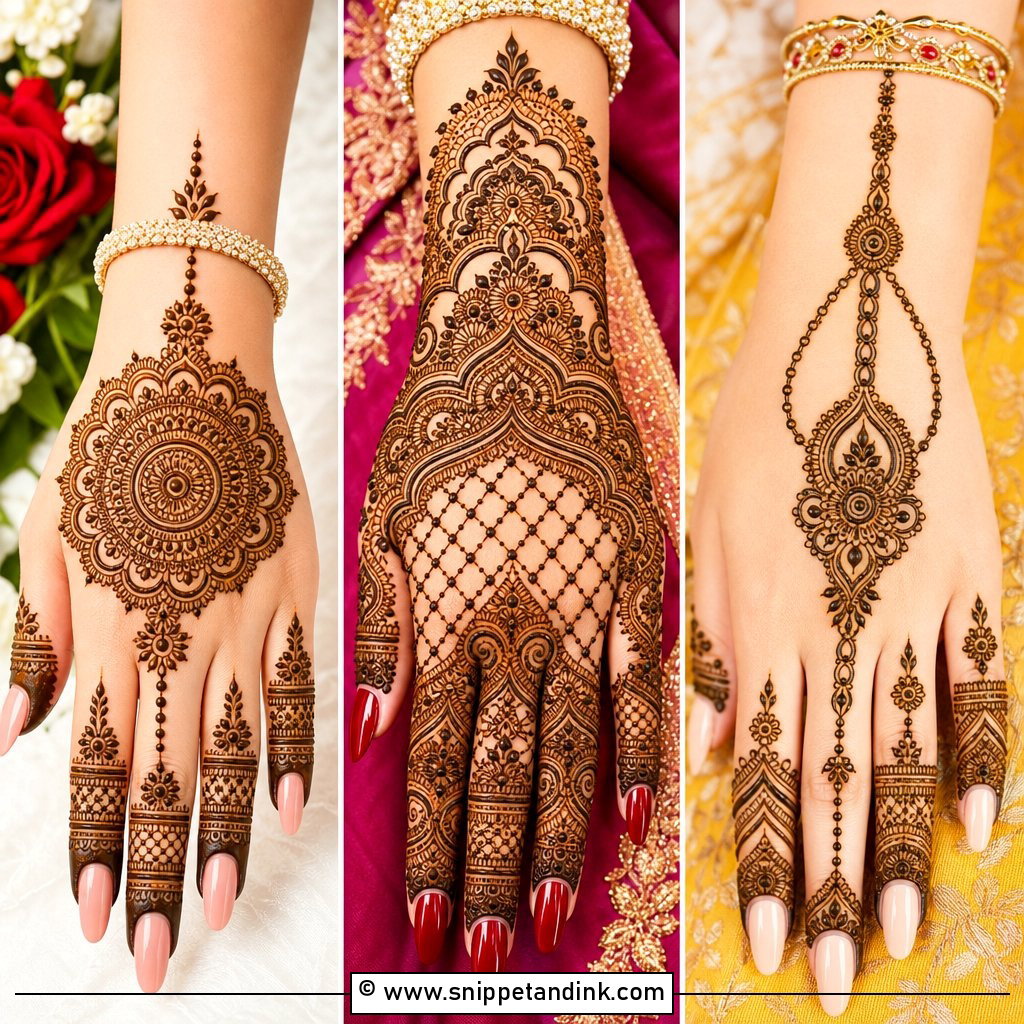
A round mandala gives a vine something to anchor to. I place it in the middle of the palm or back hand and let the bel flow out toward the wrist and fingers, linked with small leaves and petal chains. The round shape gives structure and the vine adds movement. Matching mini vines or ring-like bands on the fingers finish it. It’s a good middle ground for pujas and engagement functions, traditional in feel but with open spacing.
8. Bridal Bel Mehndi Design
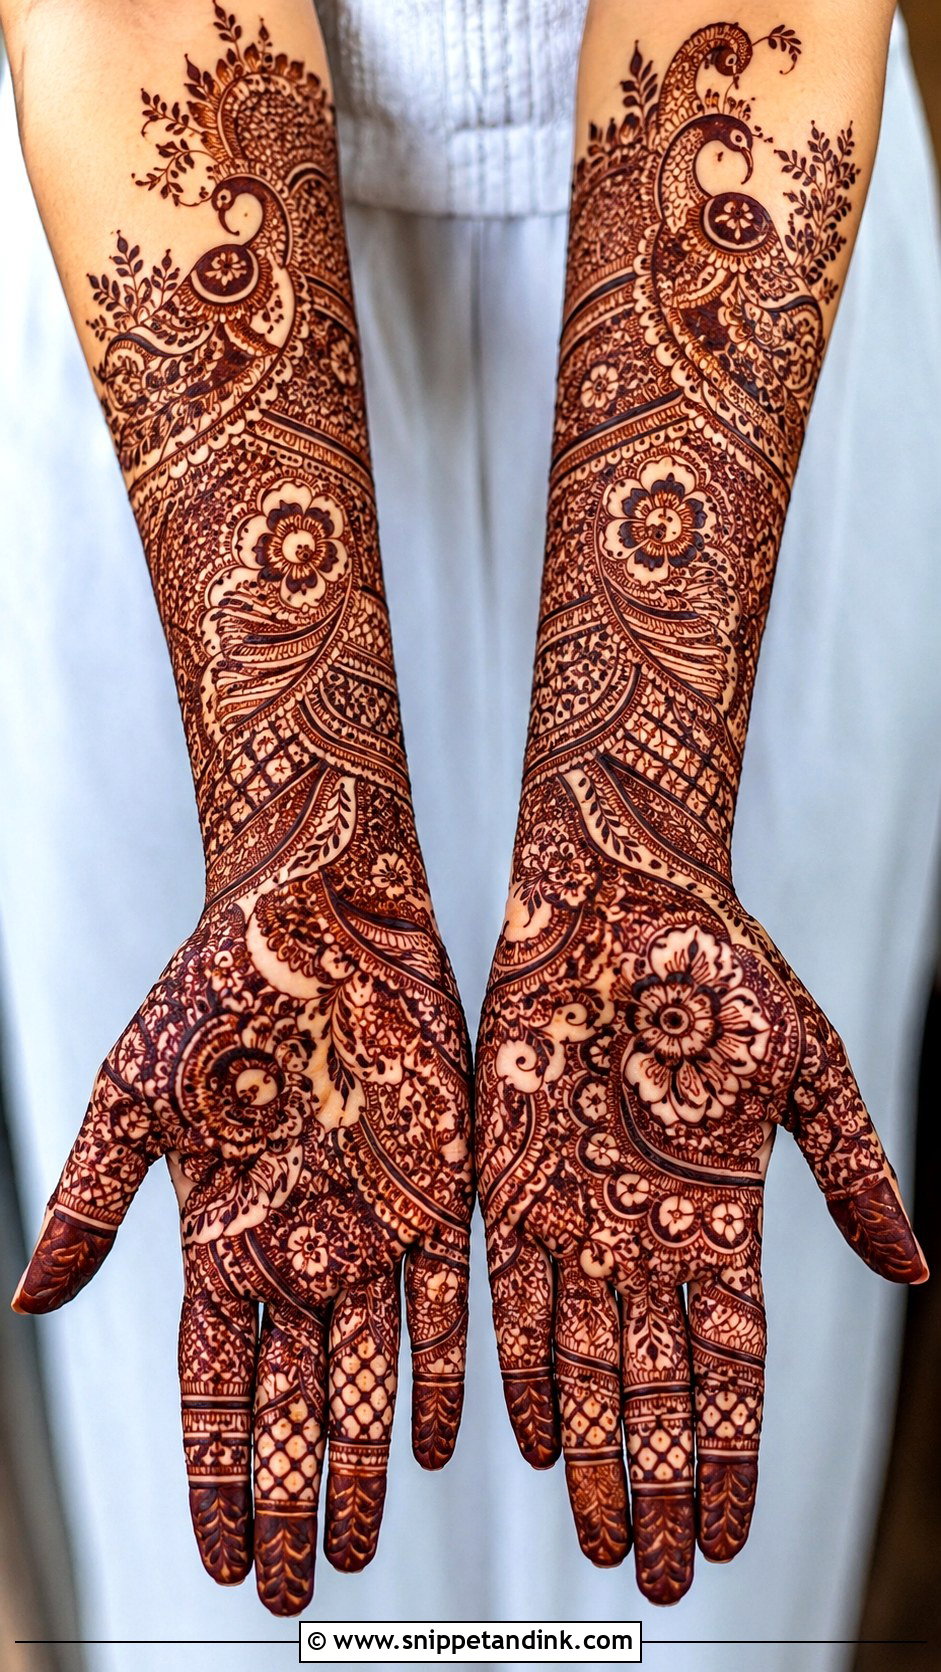
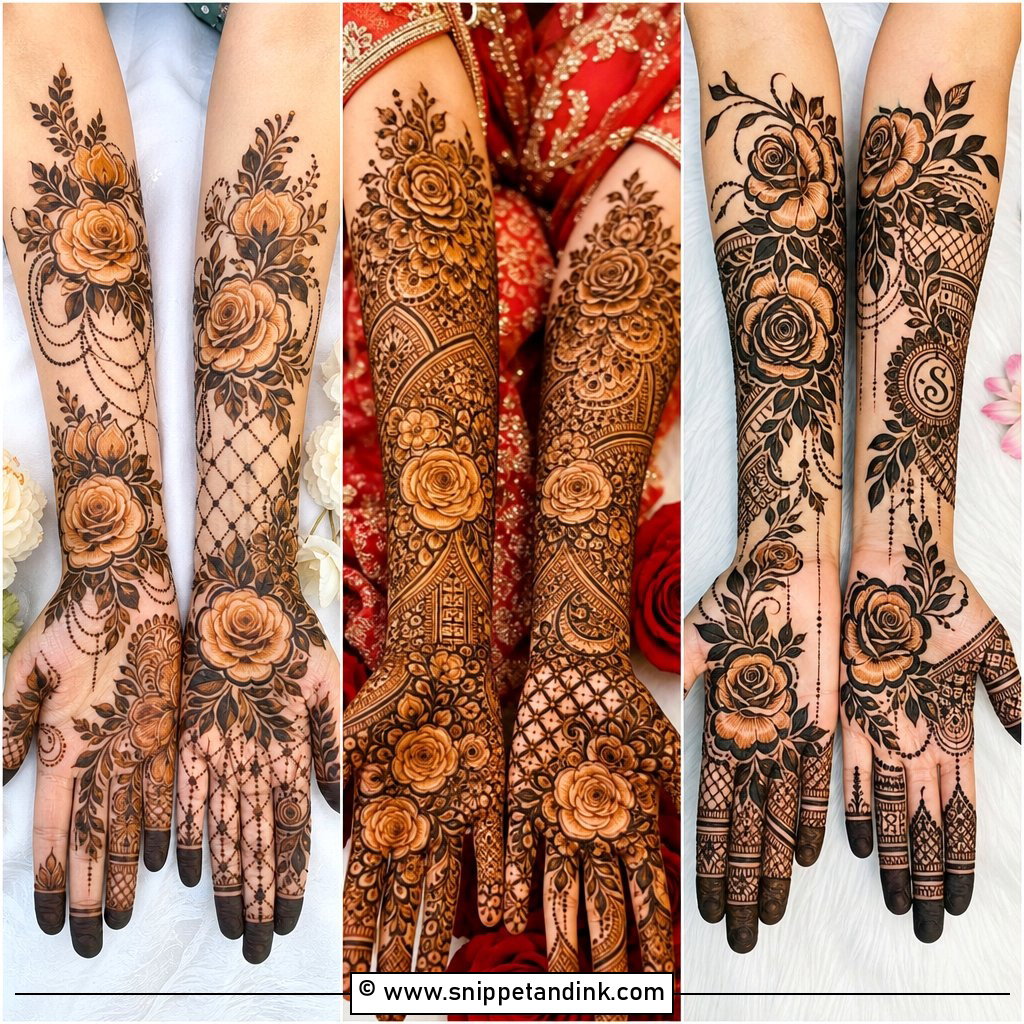
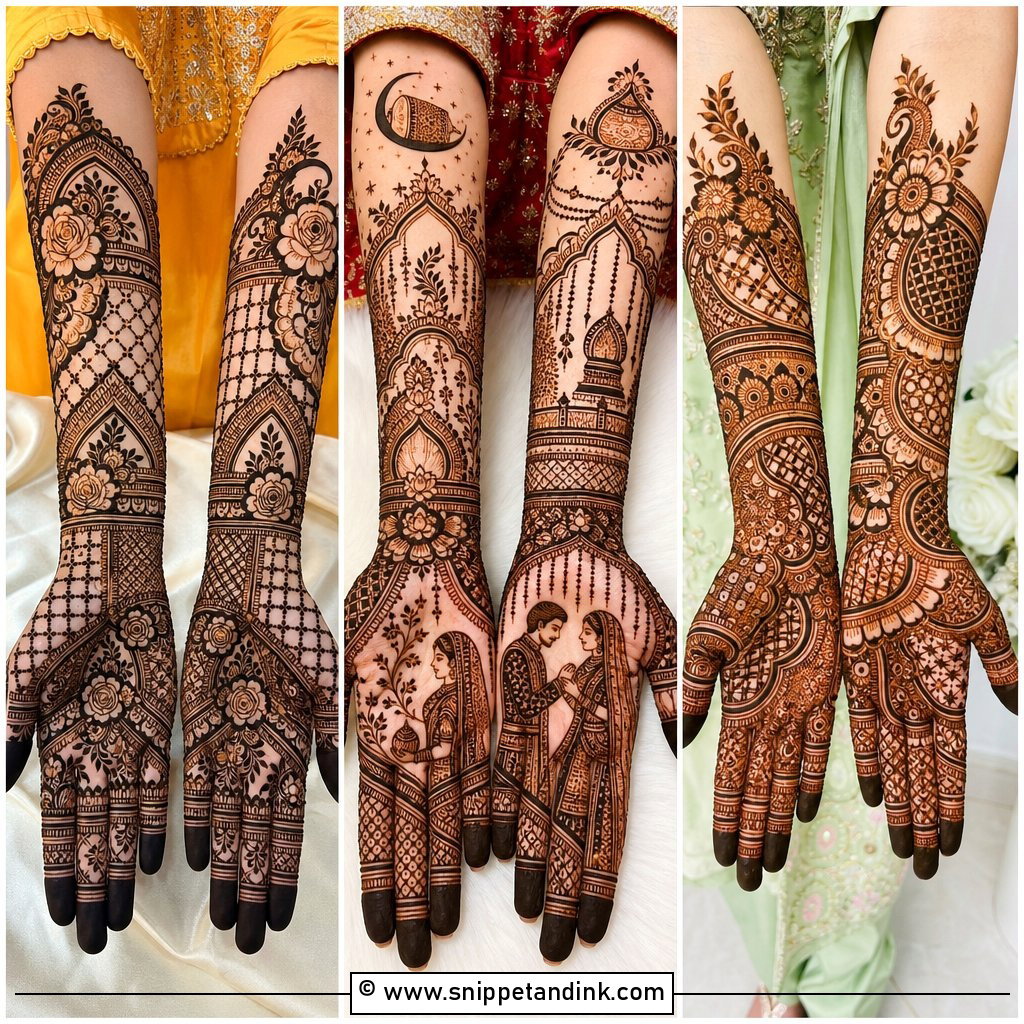
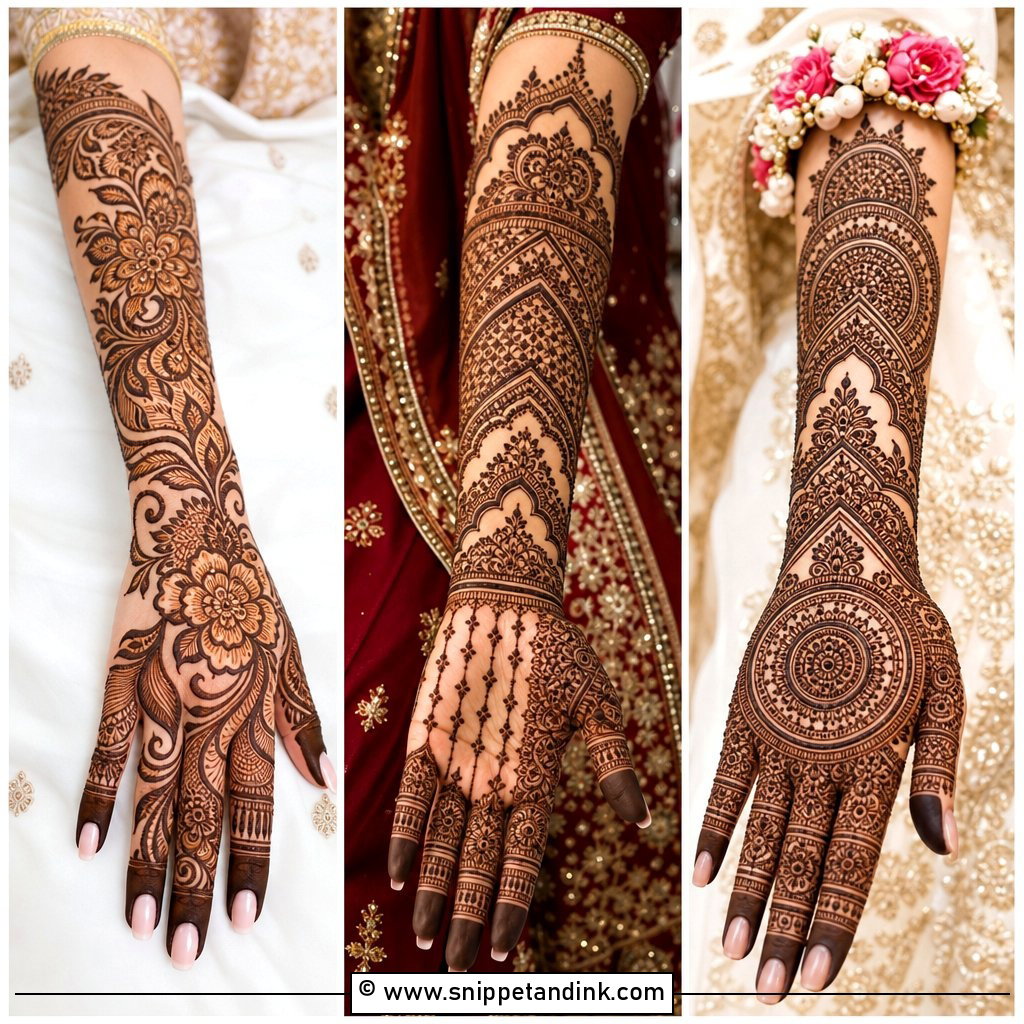
Bridal vines run from the fingertips to the forearm and carry far more: layered flowers, paisleys, jaali sections, peacock details and fine filler work. Some brides add initials or small symbols inside the larger motifs. What keeps it from looking messy is rhythm, so I repeat motifs at steady intervals along the path. Bridal application takes hours, so I ask brides to eat, rest their back and keep their hands still for long stretches. It suits a bride who prefers movement over solid blocks.
9. Full Hand Bel Mehndi Design
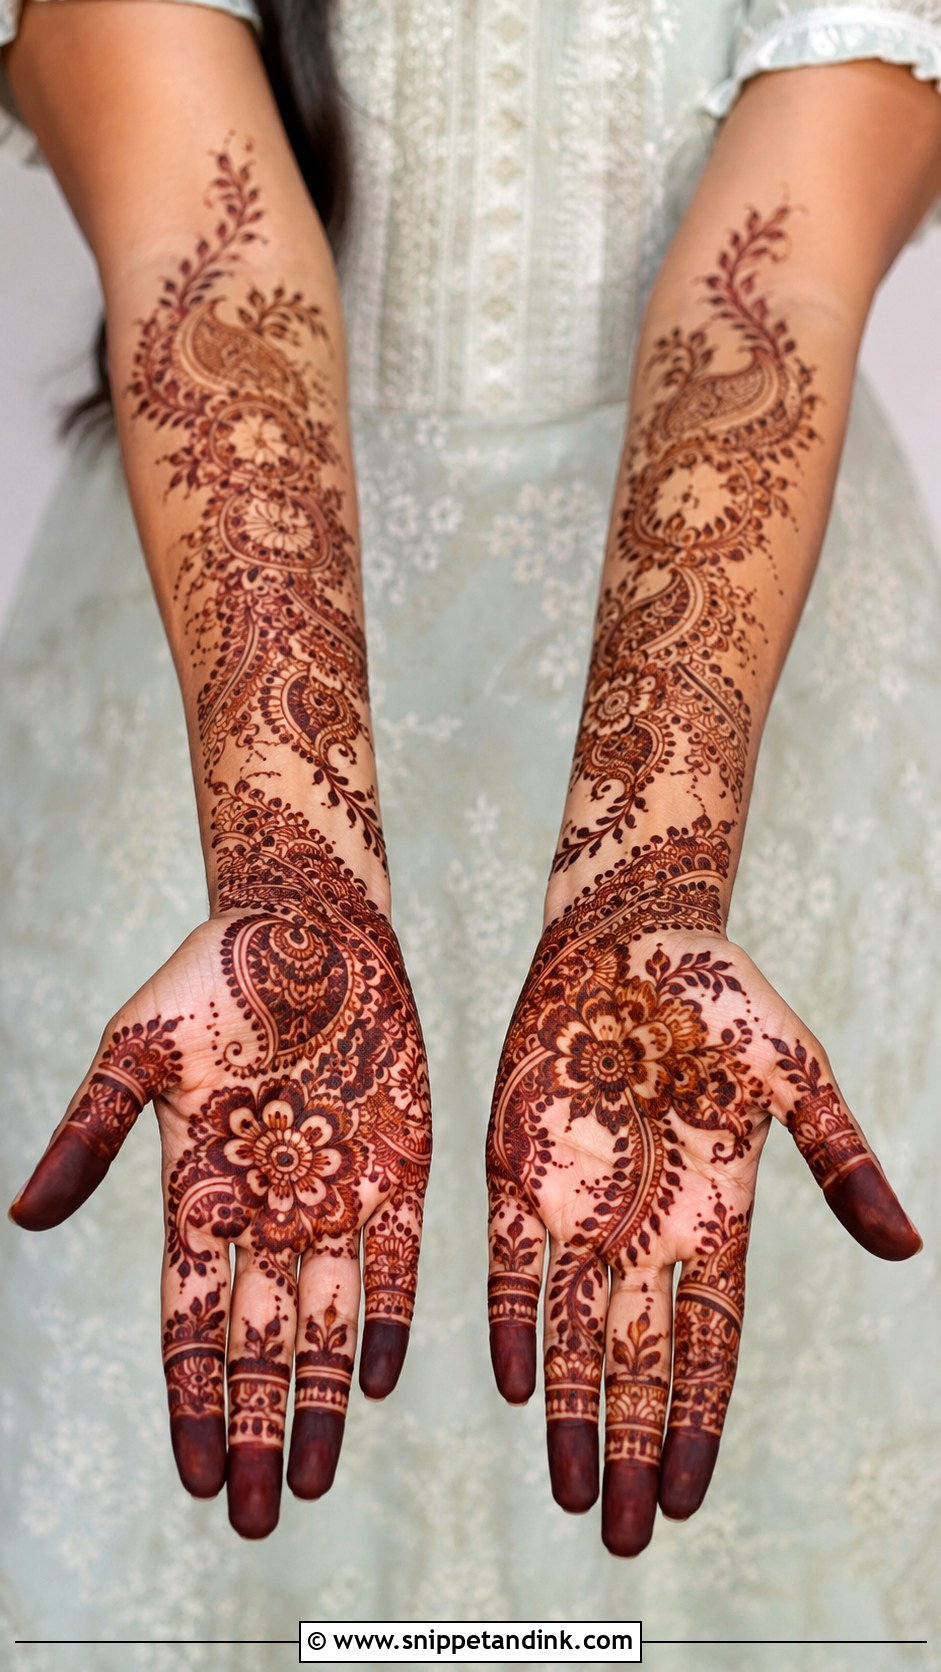
Full-hand vines cover fingers, palm or back, wrist and forearm, but the vine is still the path the eye follows from the fingertips down the arm. I put the heavier clusters near the wrist and lighten the spacing toward the fingers, which keeps the hand looking graceful rather than gloved. Floral clusters, paisley chains and small mandala breaks fill it in. Plan for the time this takes, and for the paste staying on long enough to stain through. Best for weddings and major festivals.
10. Half Hand Bel Mehndi Design
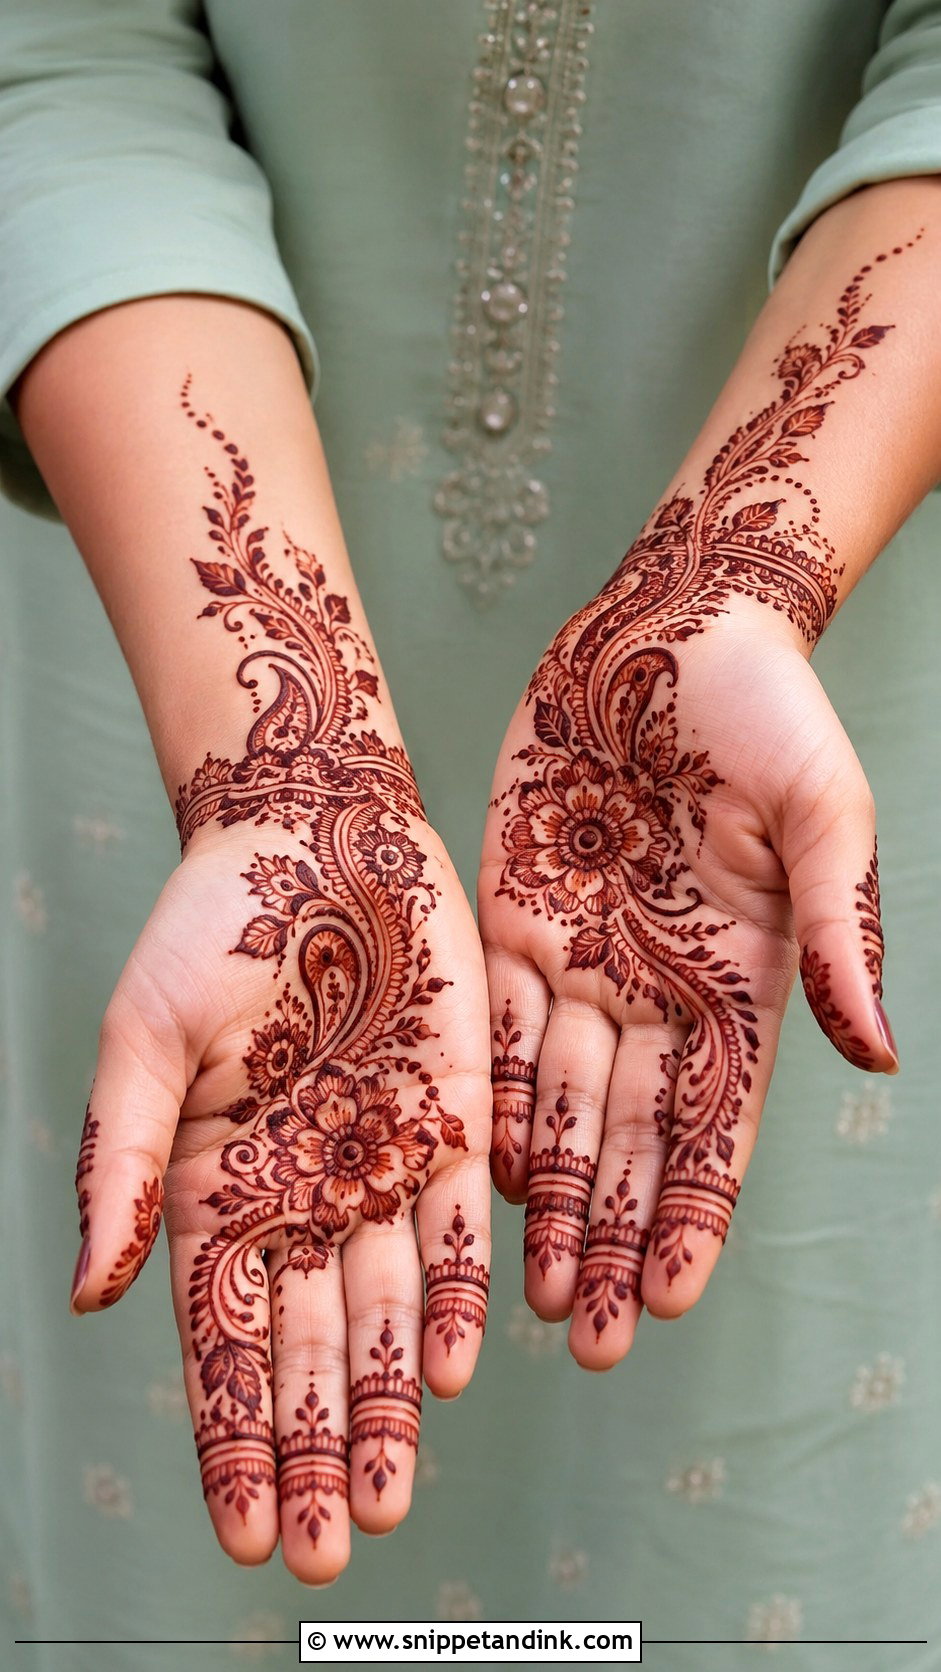
Half-hand vines are more visible than finger mehndi but lighter than a full hand, covering the fingers, the center of the hand and the wrist without going far up the arm. A diagonal layout feels Arabic; a vertical one feels more Indian. Flowers, leaves and dots finish it while leaving comfortable open skin. It dries faster than heavy work, which I appreciate when a client has an office function the next day.
11. Finger Bel Mehndi Design
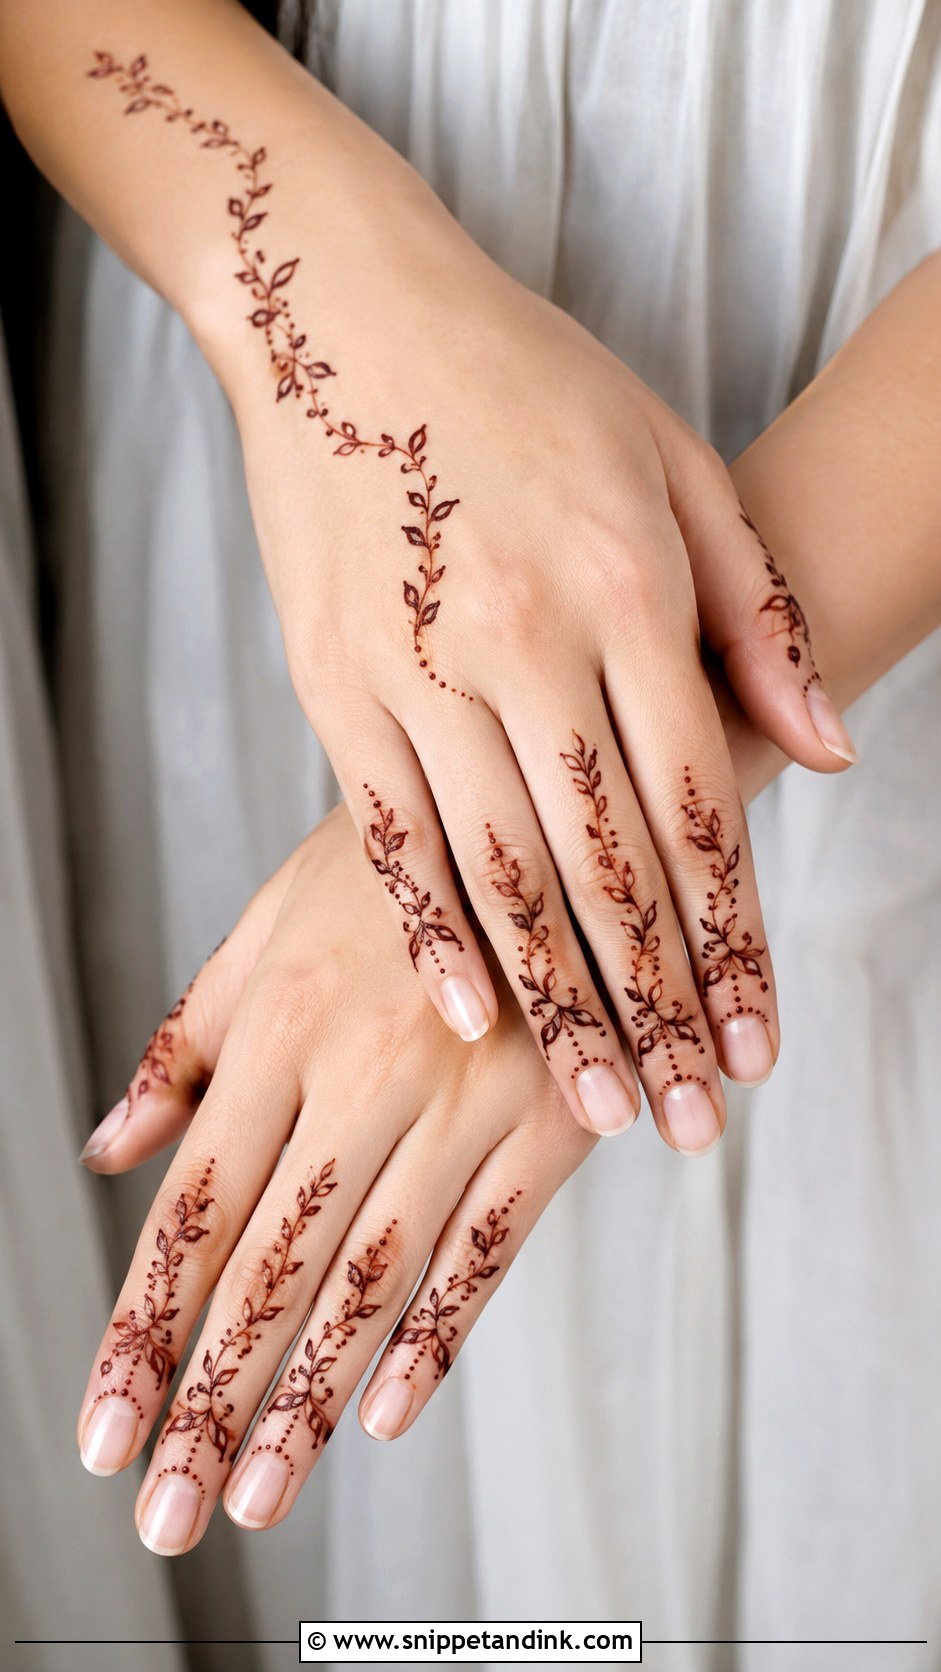
Fingers get the attention here. The vine can climb from the wrist or the side of the hand toward one or more fingers, or each finger gets its own small leafy vine linked by a light trail across the back of the hand. I finish with tiny dots near the cuticles and slim leaf pairs along each finger. Finger skin flexes constantly, so the paste can crack off early; a light sealant helps. Neat and modern, it suits college events and minimal festive dressing.
12. Wrist Bel Mehndi Design
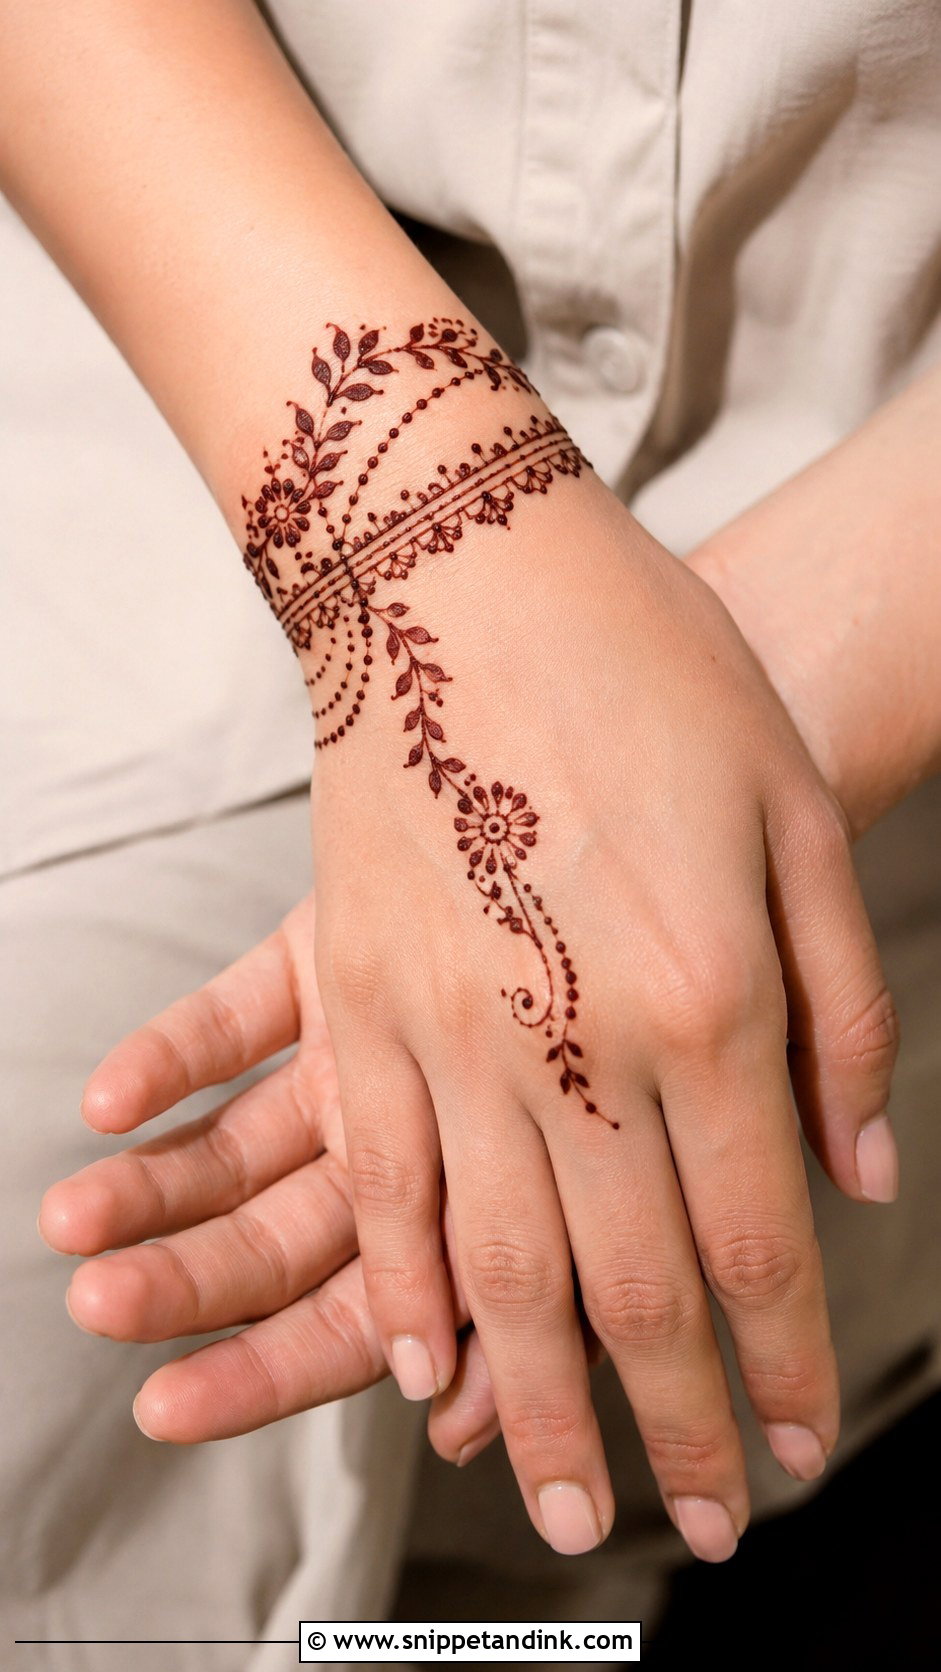
A vine that wraps around the wrist and then extends a little onto the hand or forearm reads as a henna bracelet. I build it from small flowers, leafy branches, dotted chains and curved bands, and I make sure it connects as one piece rather than a separate motif sitting on the wrist. The wrist bends a lot, so I draw it with the client’s hand relaxed, not flexed. Pair it with simple finger patterns for a quick, light look on festive mornings.
13. Bracelet Bel Mehndi Design
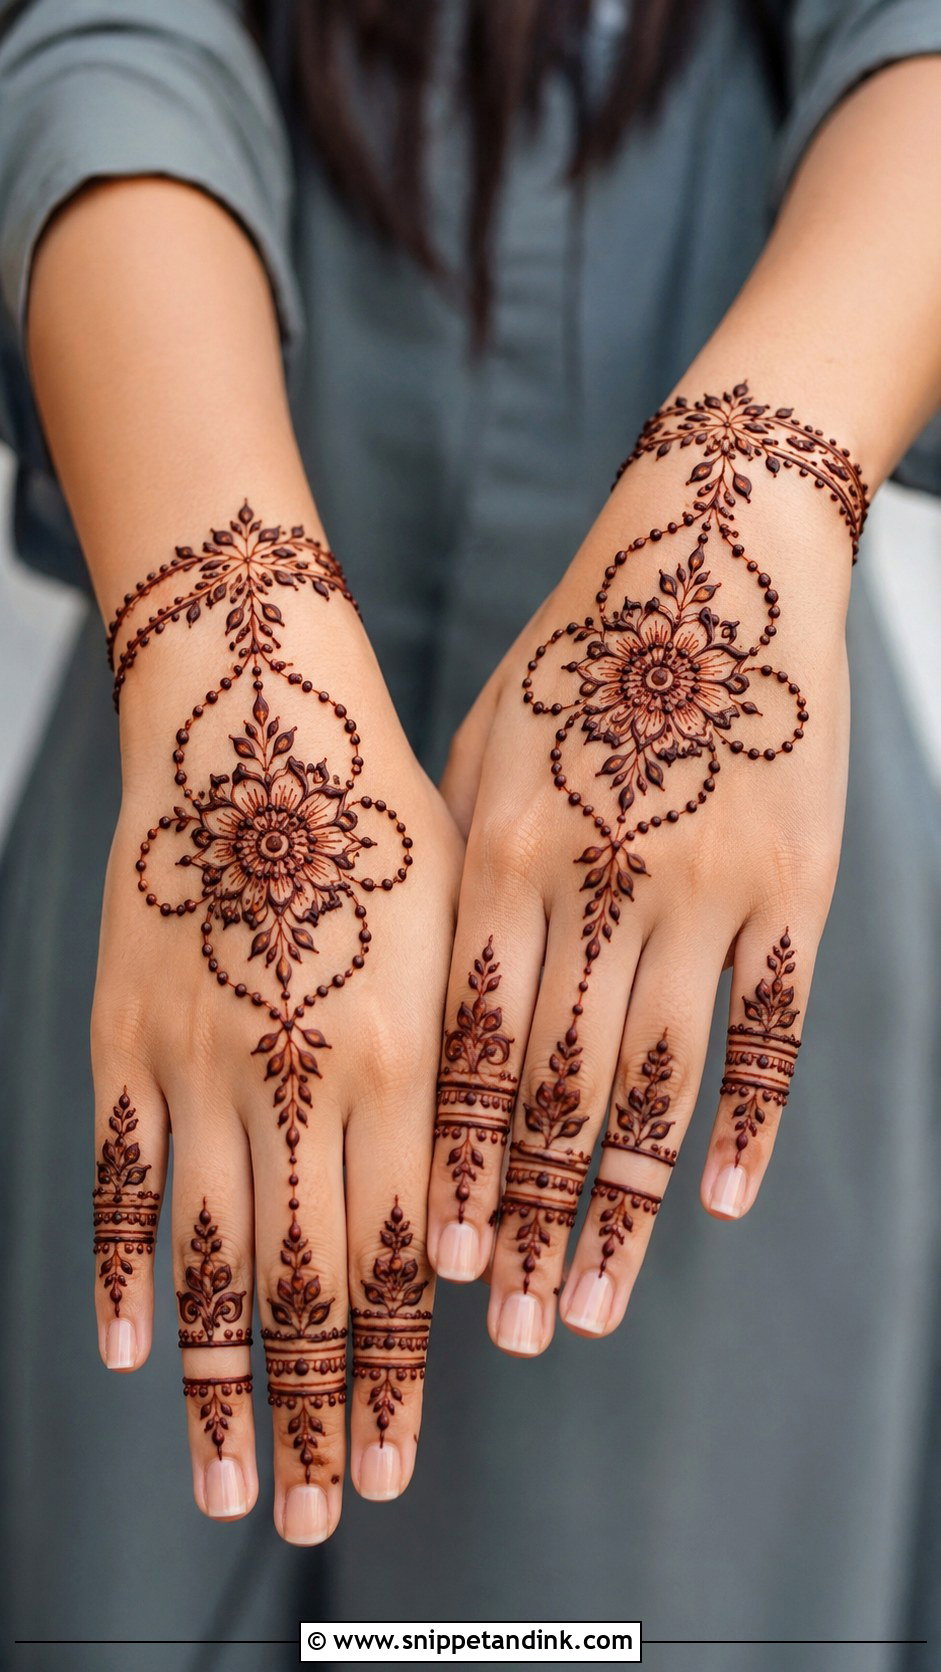
Henna jewelry is the effect: a band around the wrist linked to the fingers by a delicate chain, floral trail or leafy curve. A small mandala or flower at the center of the hand creates a ring-and-bracelet look. Clean lines and even spacing matter most here, since the pattern imitates metalwork. I’d steer heavy bangle wearers to keep the band slightly above where bangles sit, so the paste isn’t rubbed off. Good for engagement guests and bridesmaids.
14. Modern Bel Mehndi Design
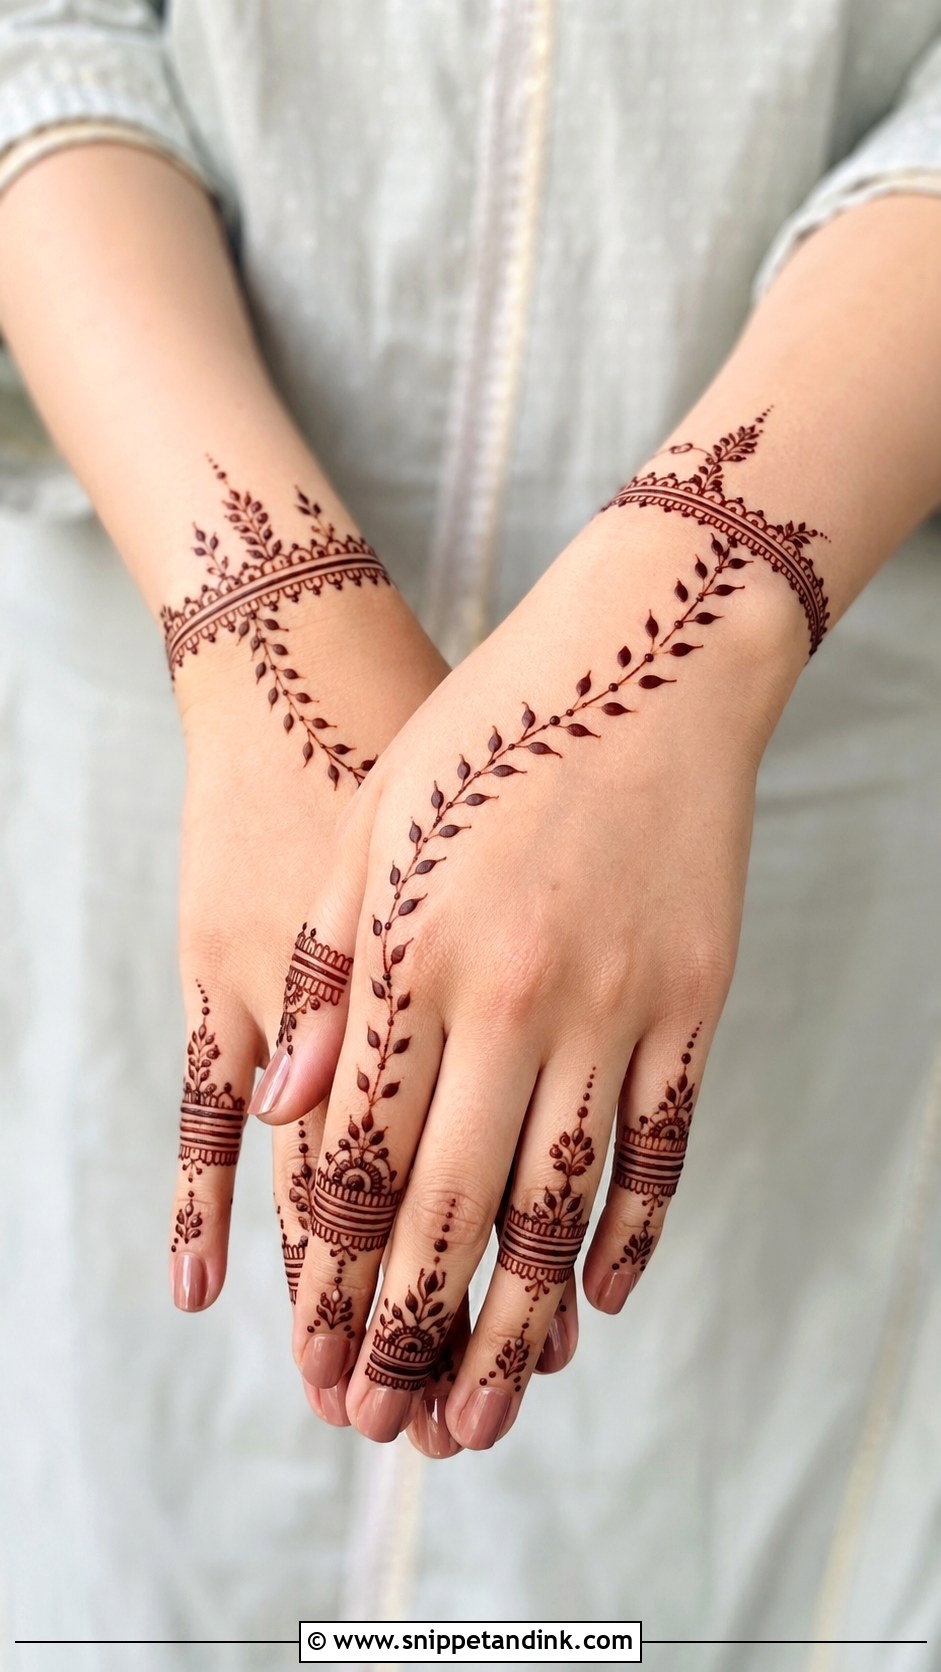
Modern vines use slim lines, controlled motifs and plenty of empty skin. Leafy stems sit next to geometric bands, tiny florals and dots, and the vine runs diagonally across the back of the hand or curves softly around the palm. My rule is one main feature, say a flower cluster or a long leaf trail, with very few fillers. It works with Western and fusion outfits, and with clients who like henna but not heavy traditional coverage.
15. Minimal Bel Mehndi Design
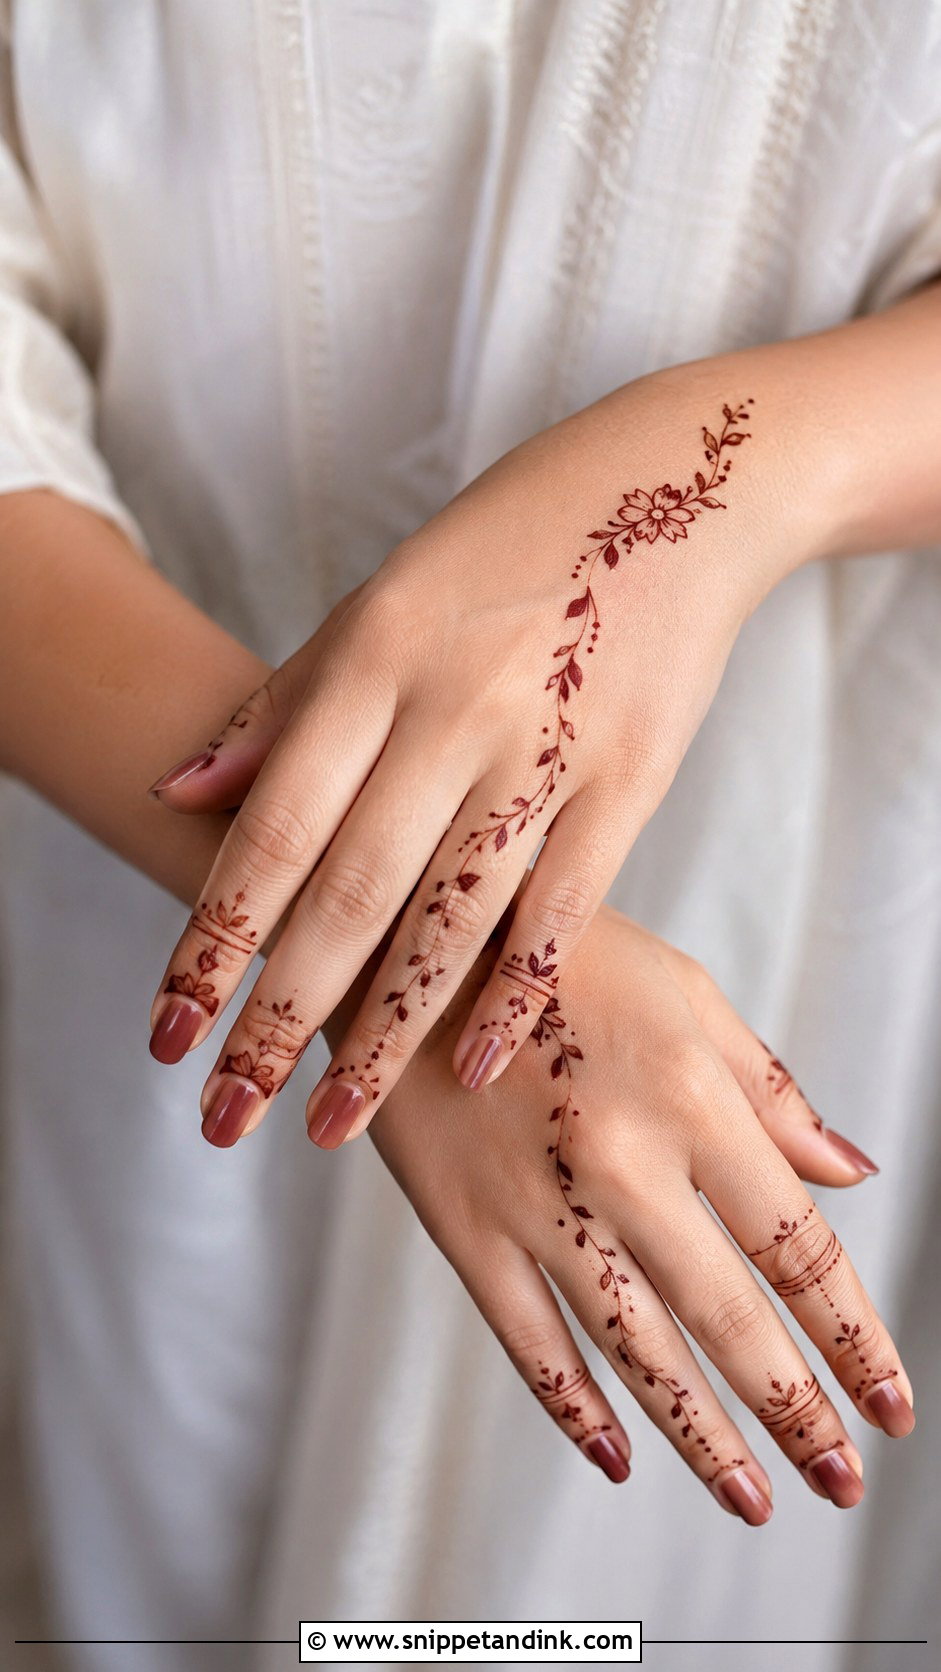
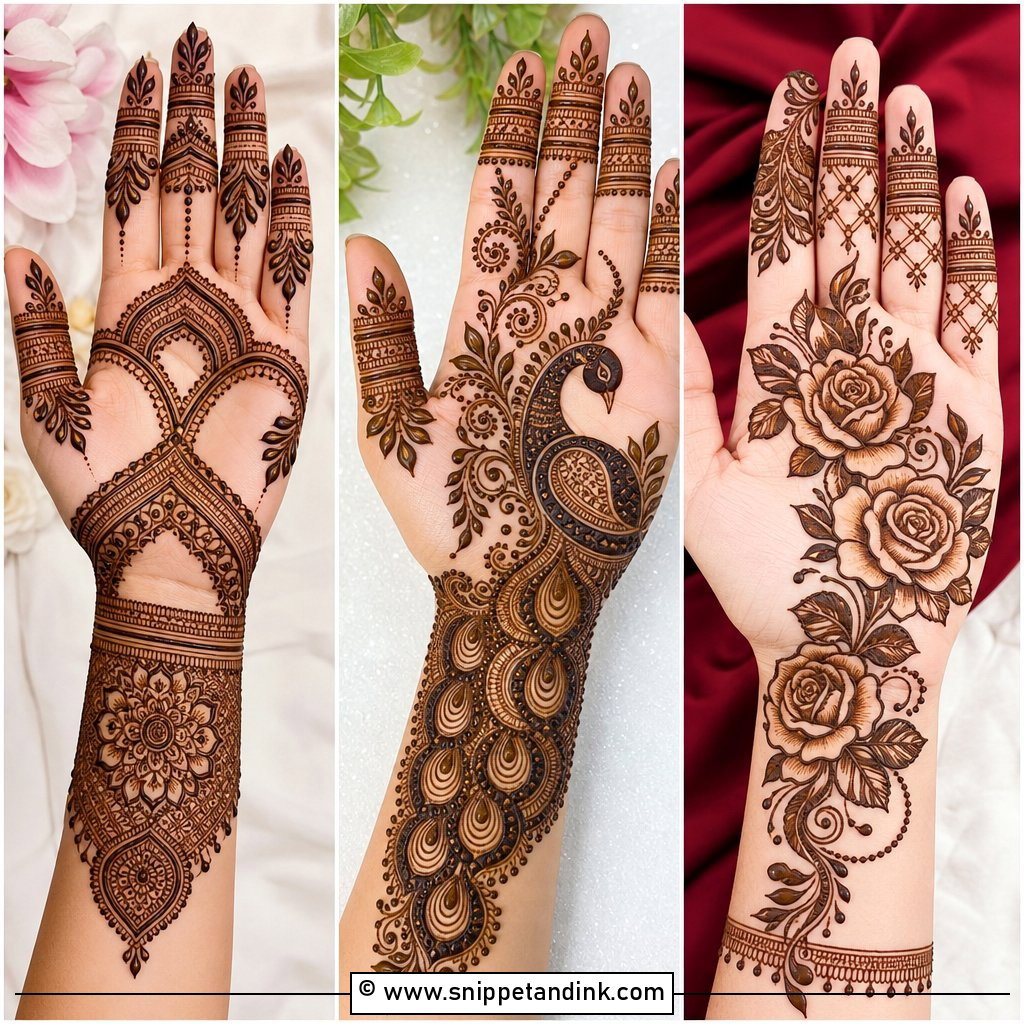
A minimal vine is thin, airy and kept to one side of the hand, with small leaves and dots for detail. It might cover only the back of the hand and one finger. I treat the empty skin as part of the design, so I give the vine a soft curve and resist adding more. Large flowers and heavy shading break the effect. Lines that aren’t crowded stain neatly, which is why it’s such a good fit for beginners, teenagers and office-friendly events.
16. Indo Arabic Bel Mehndi Design
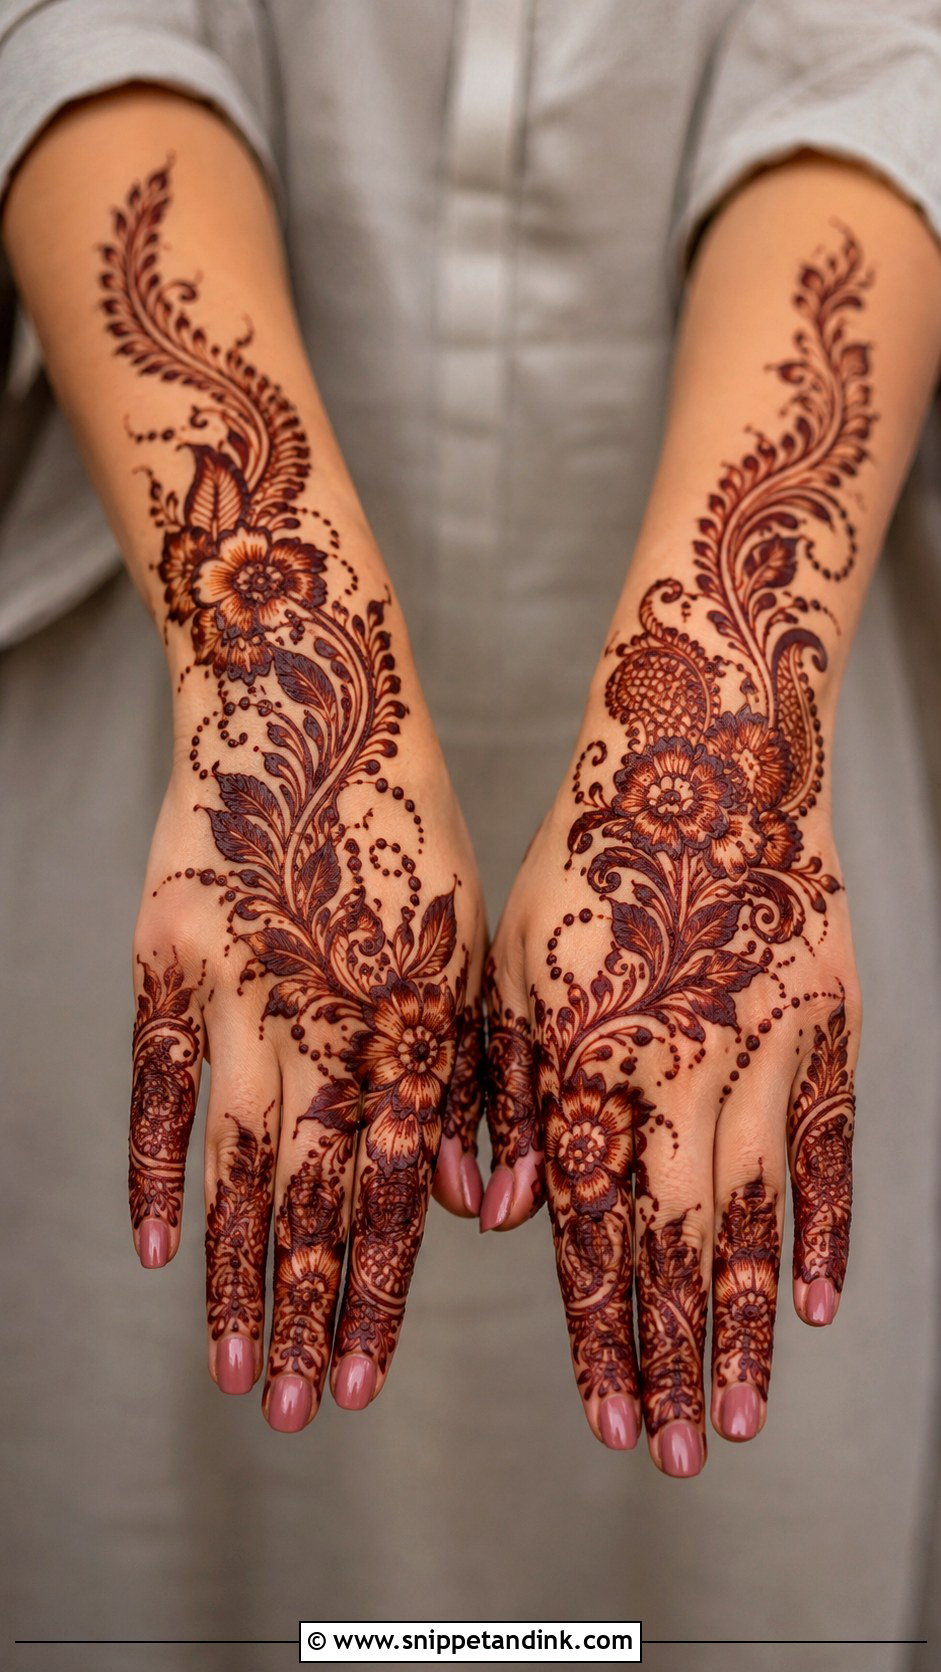
Indo-Arabic vines carry big Arabic flowers and paisleys, then fill their insides with tiny Indian-style lines, dots, checks and leaves. The result is rich without dense coverage across the whole hand. I draw the main curve first and keep it clear, then add detail around it. It works on front and back hands. It’s the layout I’d suggest for sisters of the bride and close family who want something special but lighter than bridal.
17. Indian Bel Mehndi Design
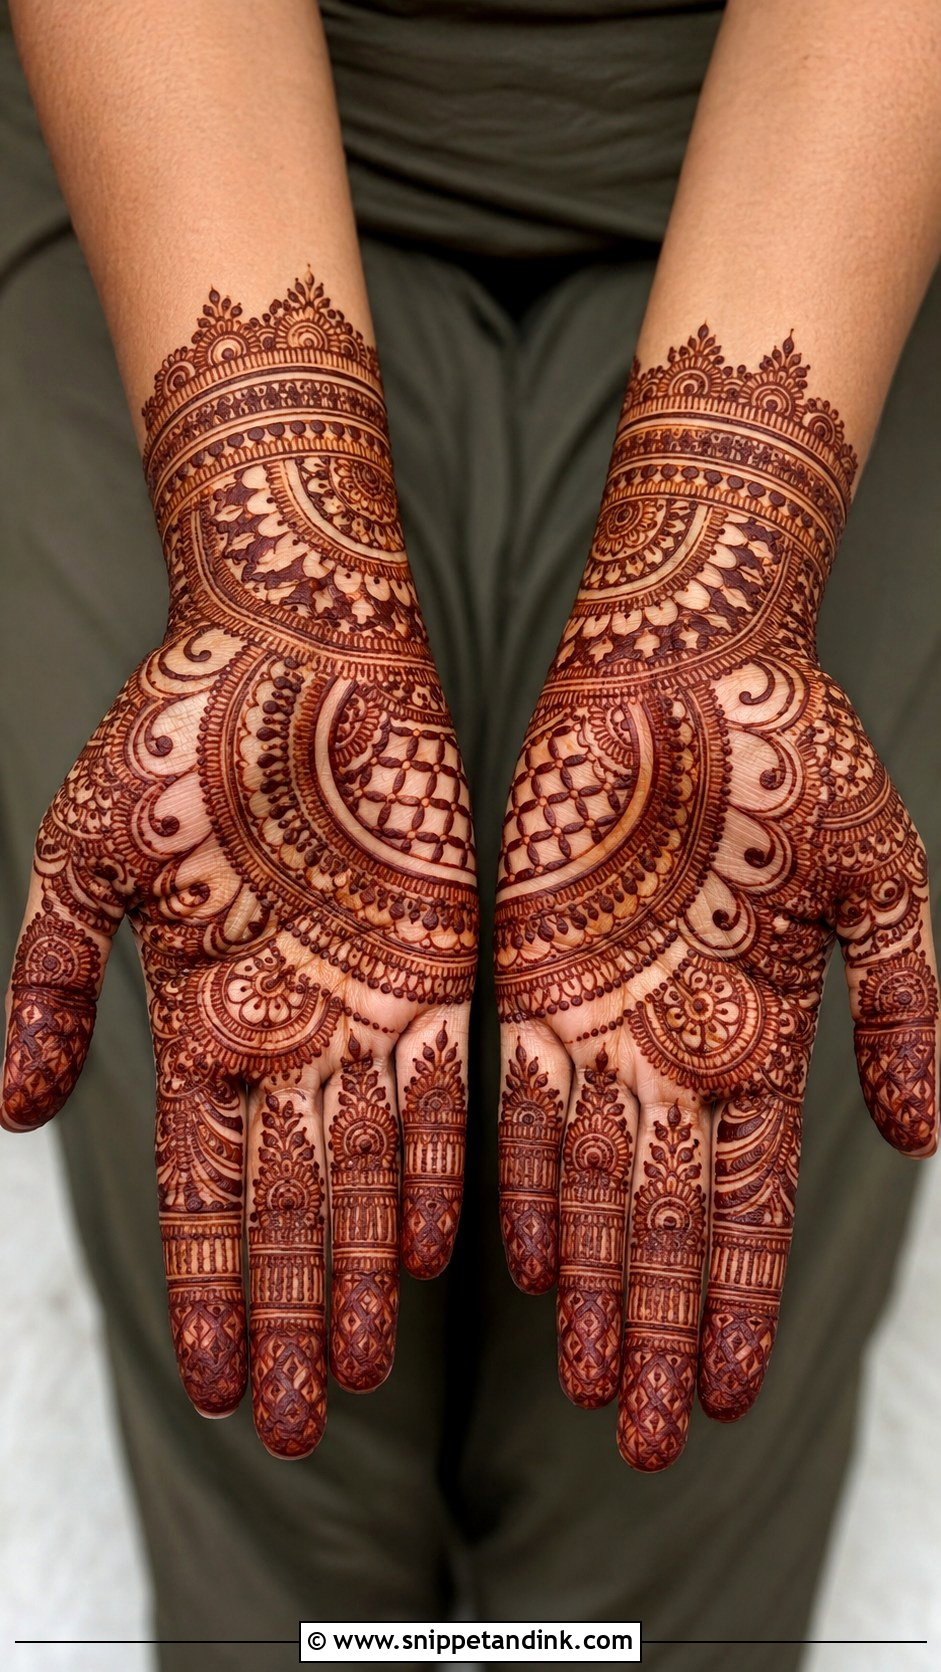
Indian bel mehndi design is the more traditional version: paisleys, flowers, mandalas, jaali and fine filling around a vine that runs through the center of the palm or back hand. It can be denser than Arabic work, but the bel shape should still be traceable. Fingers often get bands and leafy tips. Symmetrical details and shaded sections give the classic look. Common at weddings, pujas, Diwali, Teej and Karwa Chauth.
18. Gulf Bel Mehndi Design
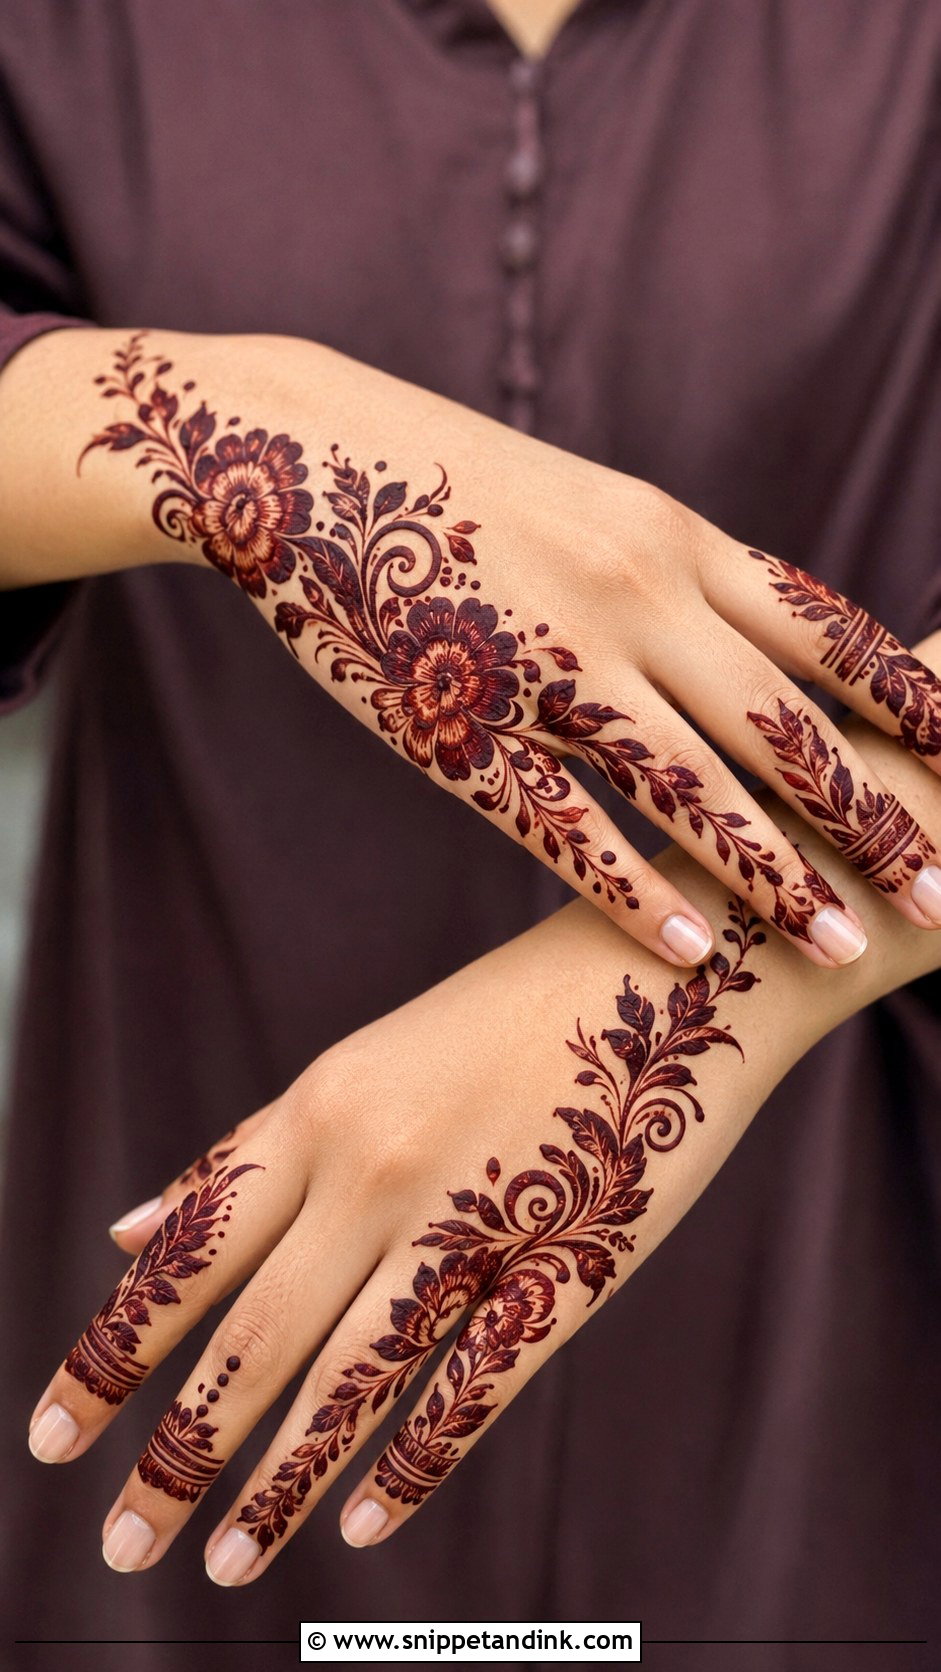
Gulf vines are bold and open: thick floral outlines, shaded petals, leafy curves and strong negative space. One dramatic diagonal trail runs from the wrist to a single finger, leaving most of the skin clean. That contrast suits a deep stain and photographs clearly. I use a slightly wider cone tip for the outlines and keep fingers simple with dots or tips. A favorite for Eid and evening functions.
19. Moroccan Bel Mehndi Design
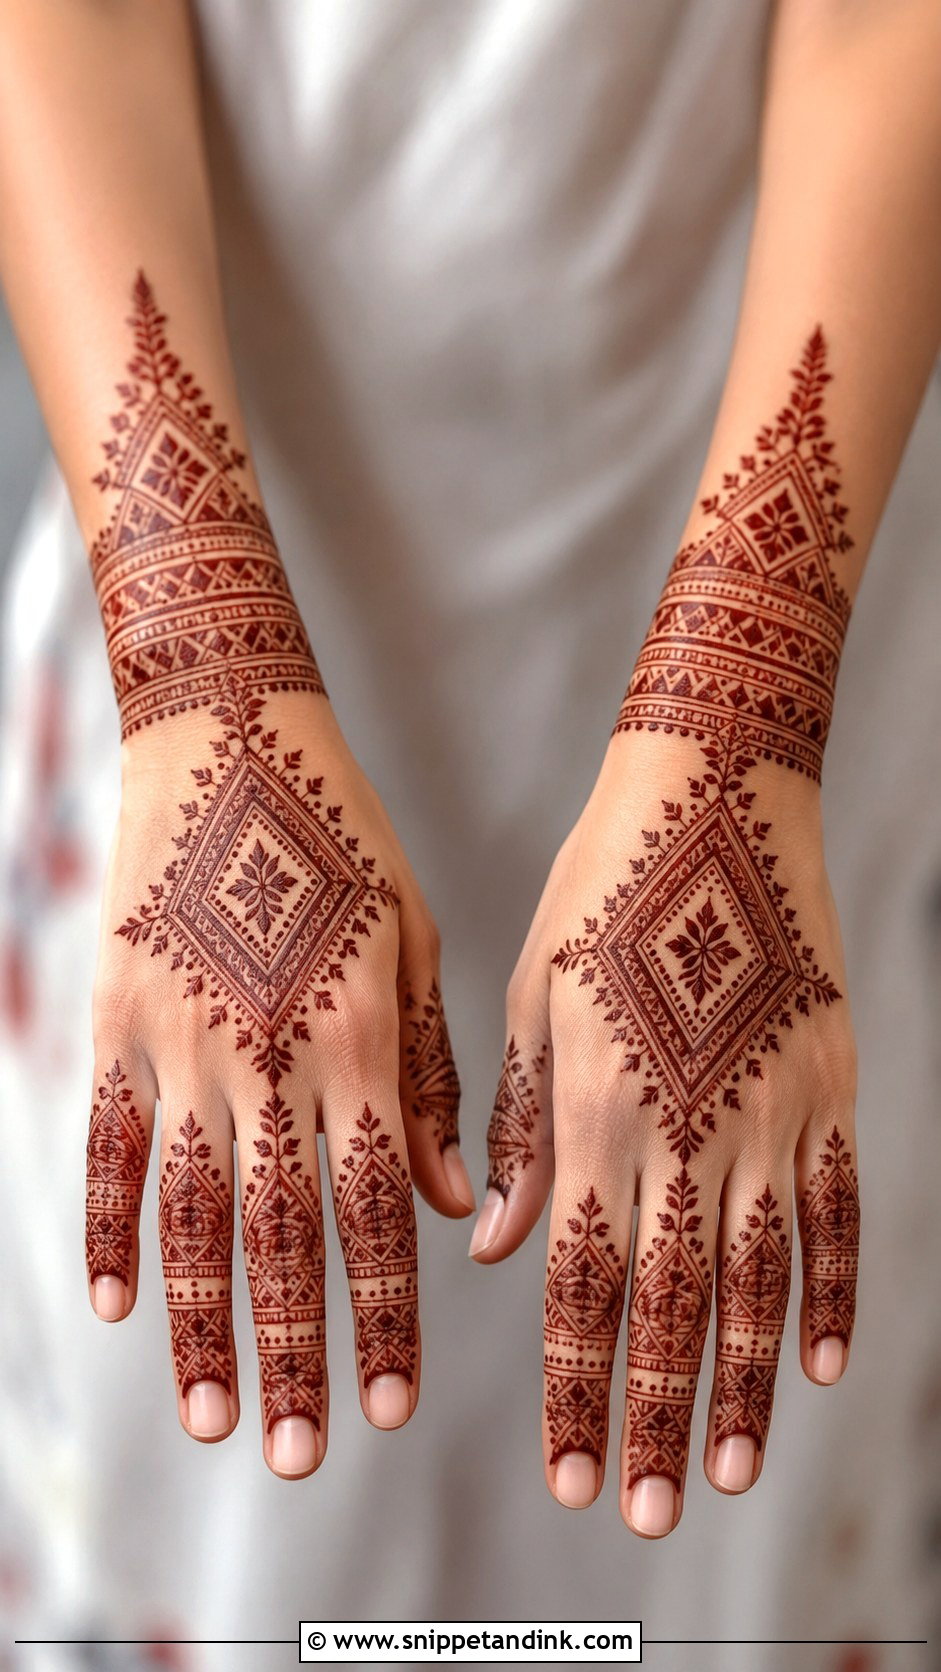
Moroccan influence brings geometry into the vine: diamonds, straight lines, triangles, grids and structured bands. The bel still travels across the hand, but the motifs feel architectural. Straight lines show every tremor, so I rest the side of my hand on the client’s and pull each line toward me in one stroke. A few small leaves soften it. It stands out on the back of the hand and wrist and pairs well with plain outfits.
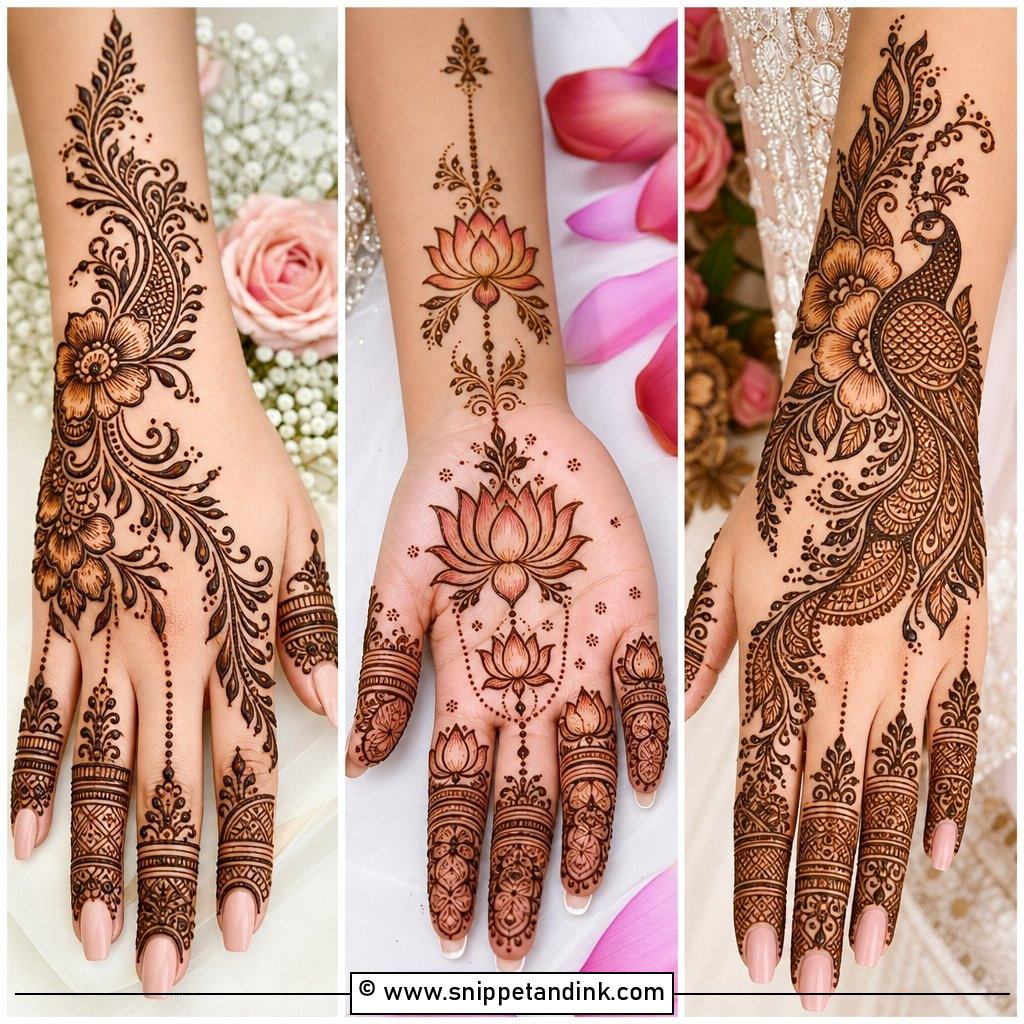
20. Peacock Bel Mehndi Design
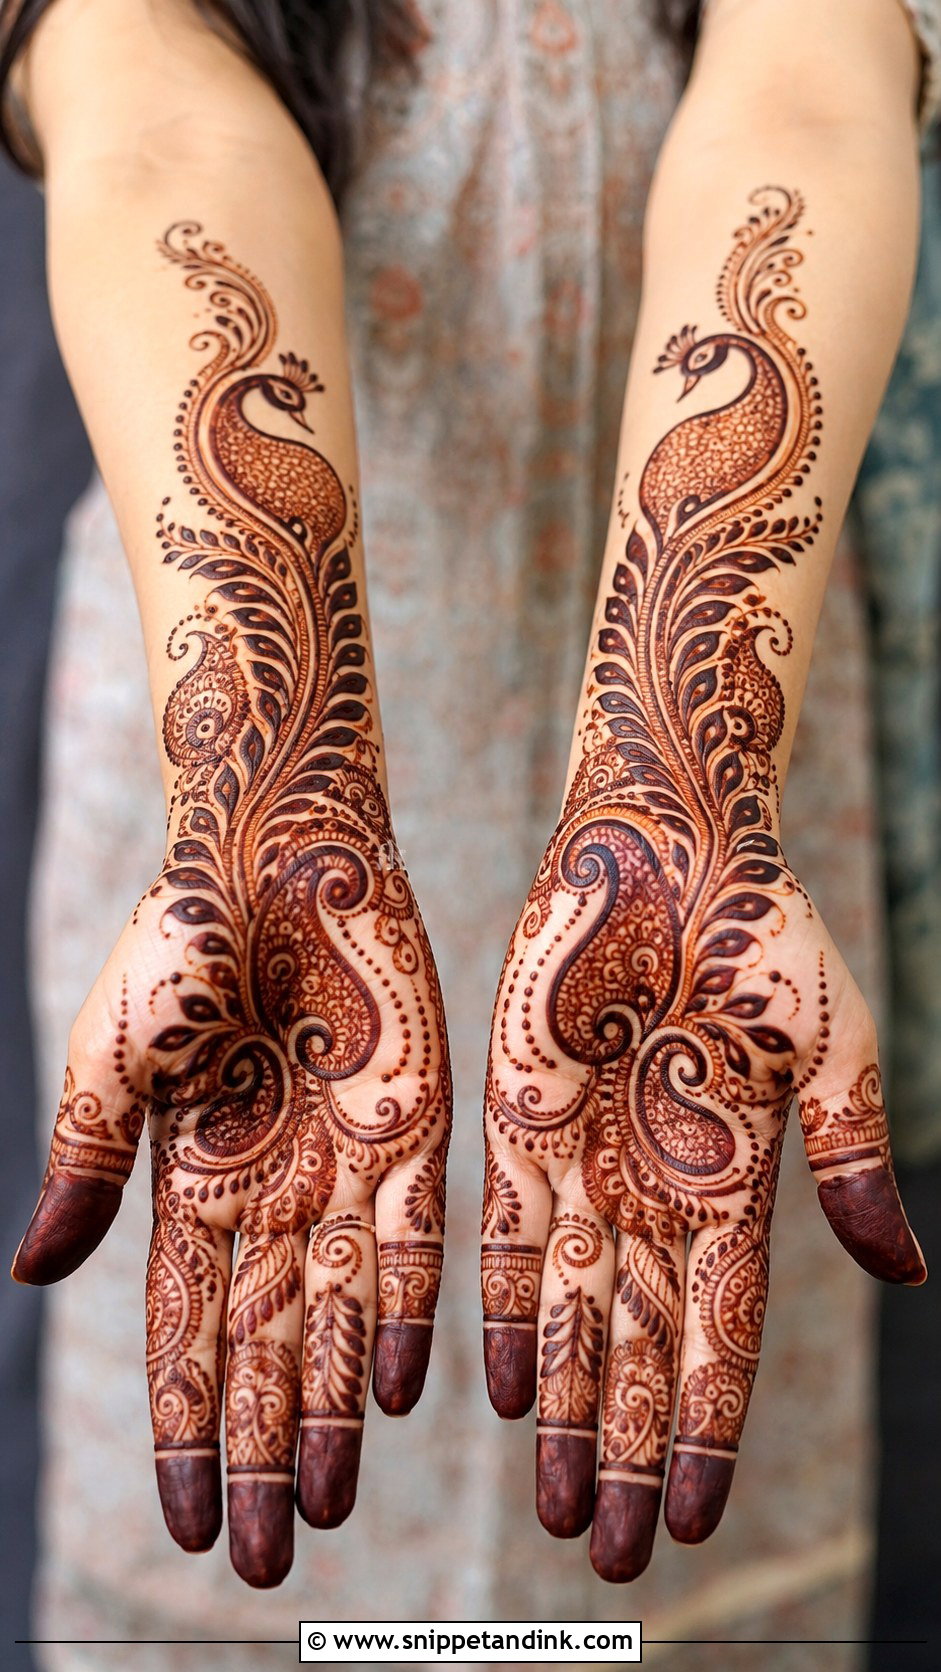
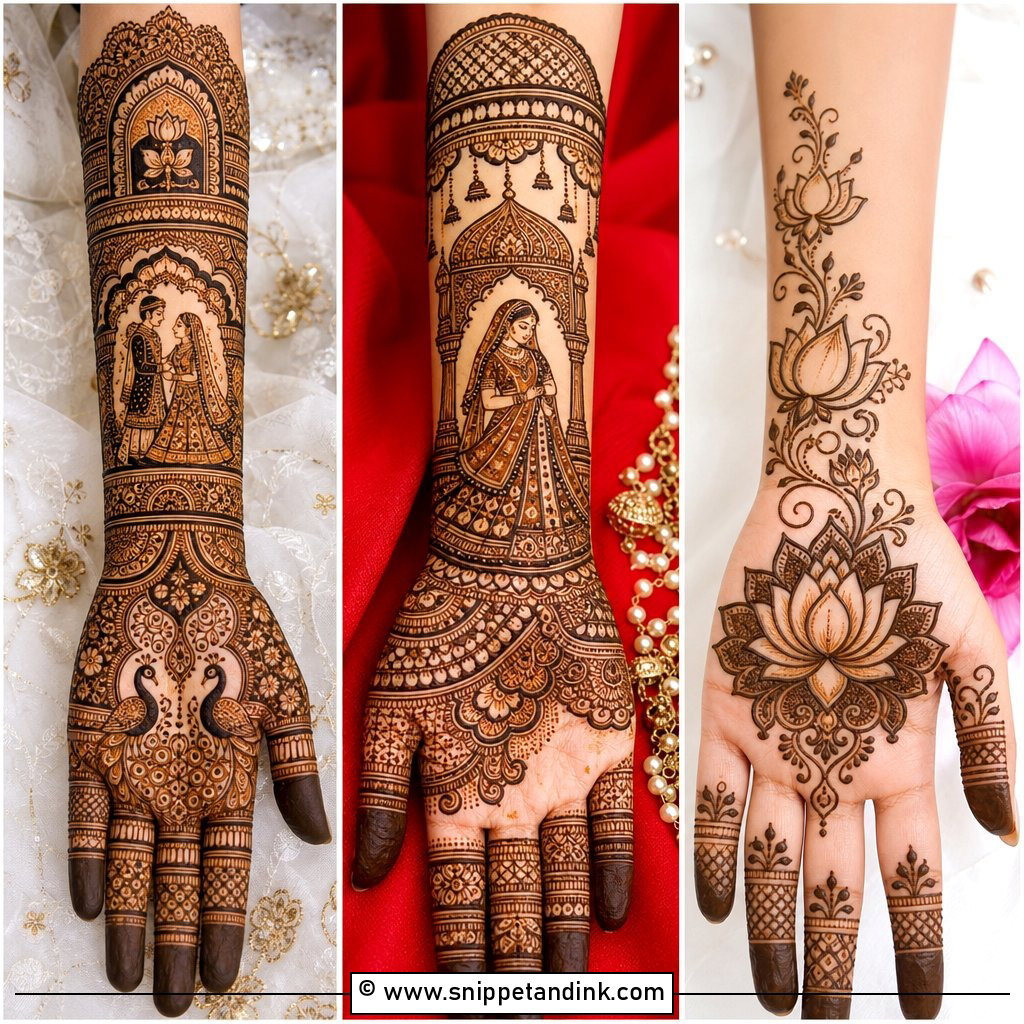
A peacock placed near the wrist, the palm center or the back hand, with the vine growing out of its feathers toward the fingers, makes a festive, traditional design. I keep the bird’s body simple and put the detail into the feathers, since a busy body fills in once the stain darkens. For weddings, shaded feather work and fine inner lines; for a lighter version, one peacock with a leafy trail. The palm gives the bird the most room.
21. Lotus Bel Mehndi Design
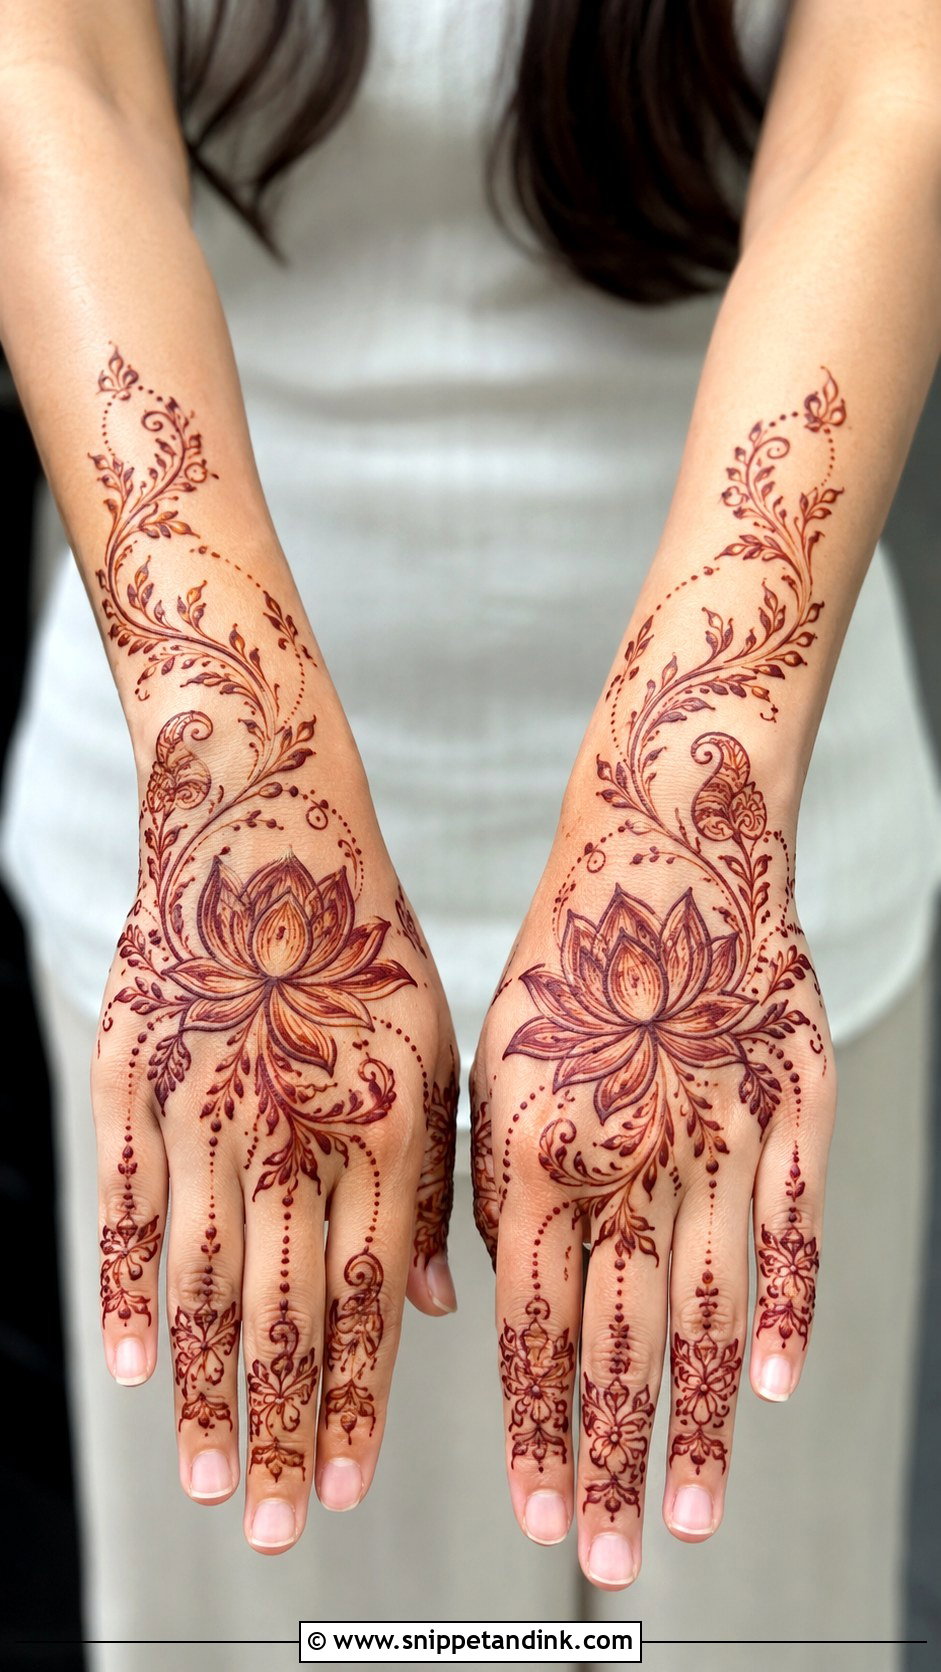
A lotus gives a vine a calm focal point. I draw it larger than the surrounding work and keep the bel around it light, with long petals, curved leaves and fine dotted stems. Even petal shapes matter most; an uneven lotus looks lopsided after staining. It can sit in the palm, near the wrist or on the back hand. Clients choose it for pujas, weddings, Diwali and engagements, and it goes with modern and traditional outfits.
22. Rose Bel Mehndi Design
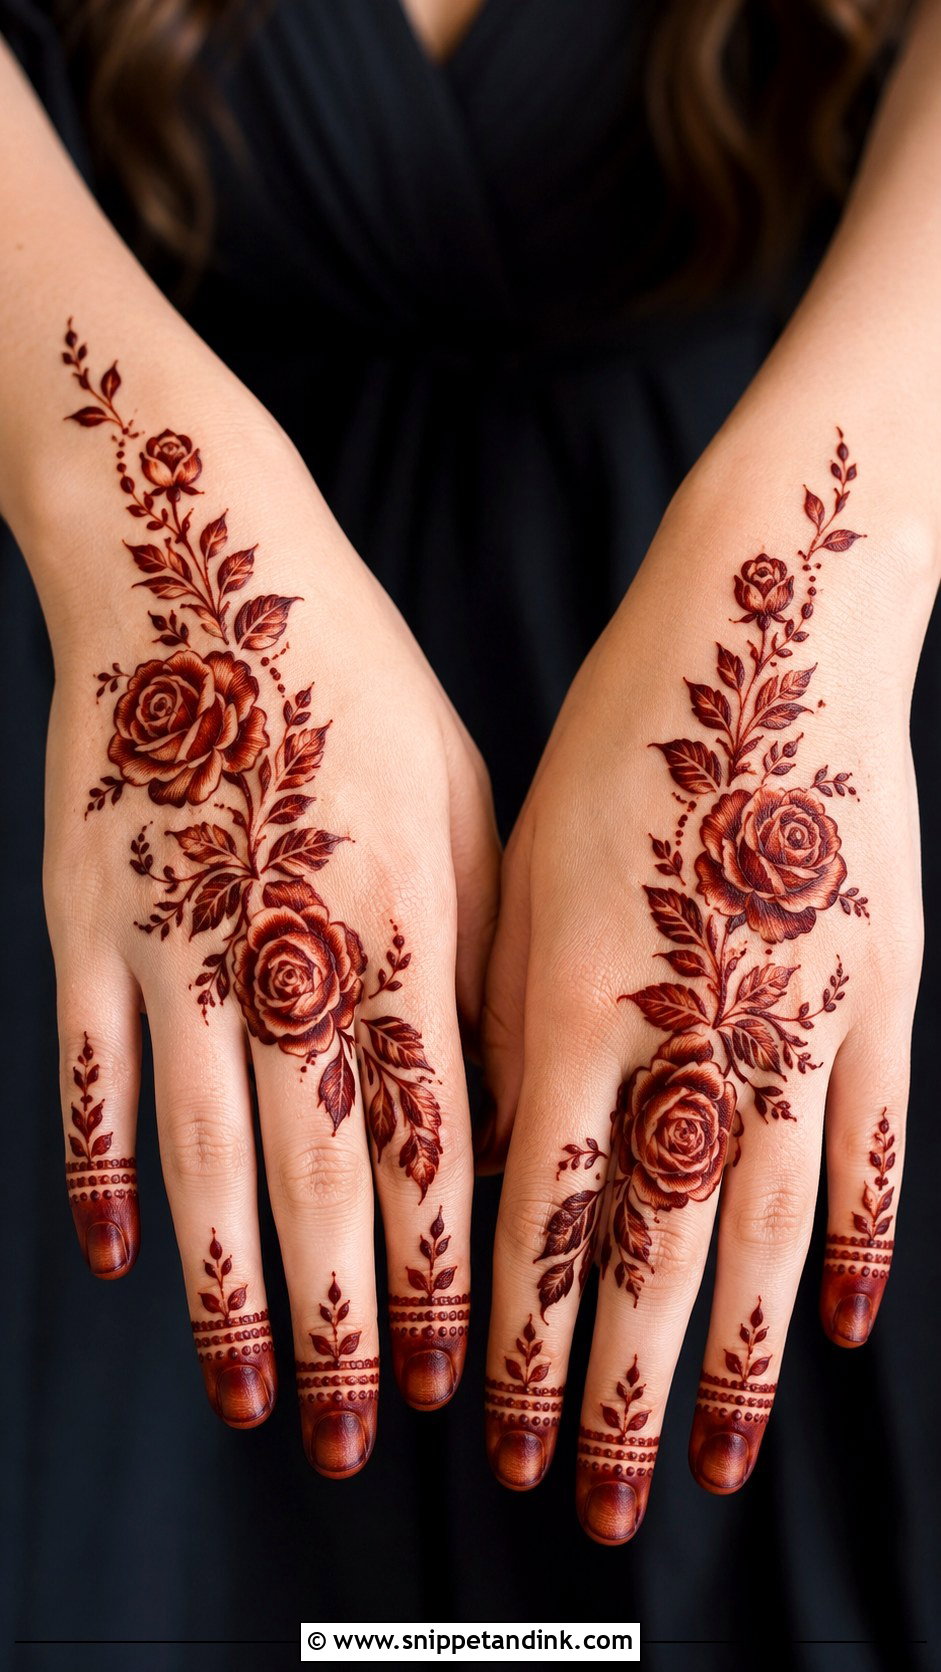
Roses spaced along a diagonal vine, with leaves and buds filling the gaps, give a romantic floral look. I shade the petals for fullness, keep the stems slim and draw the rose outlines boldly so they stay visible against the lighter detail around them. Rose clusters read well on the back hand. The fingers can take leafy tips or tiny rosebuds. It suits engagement ceremonies and wedding guests.
23. Leafy Bel Mehndi Design
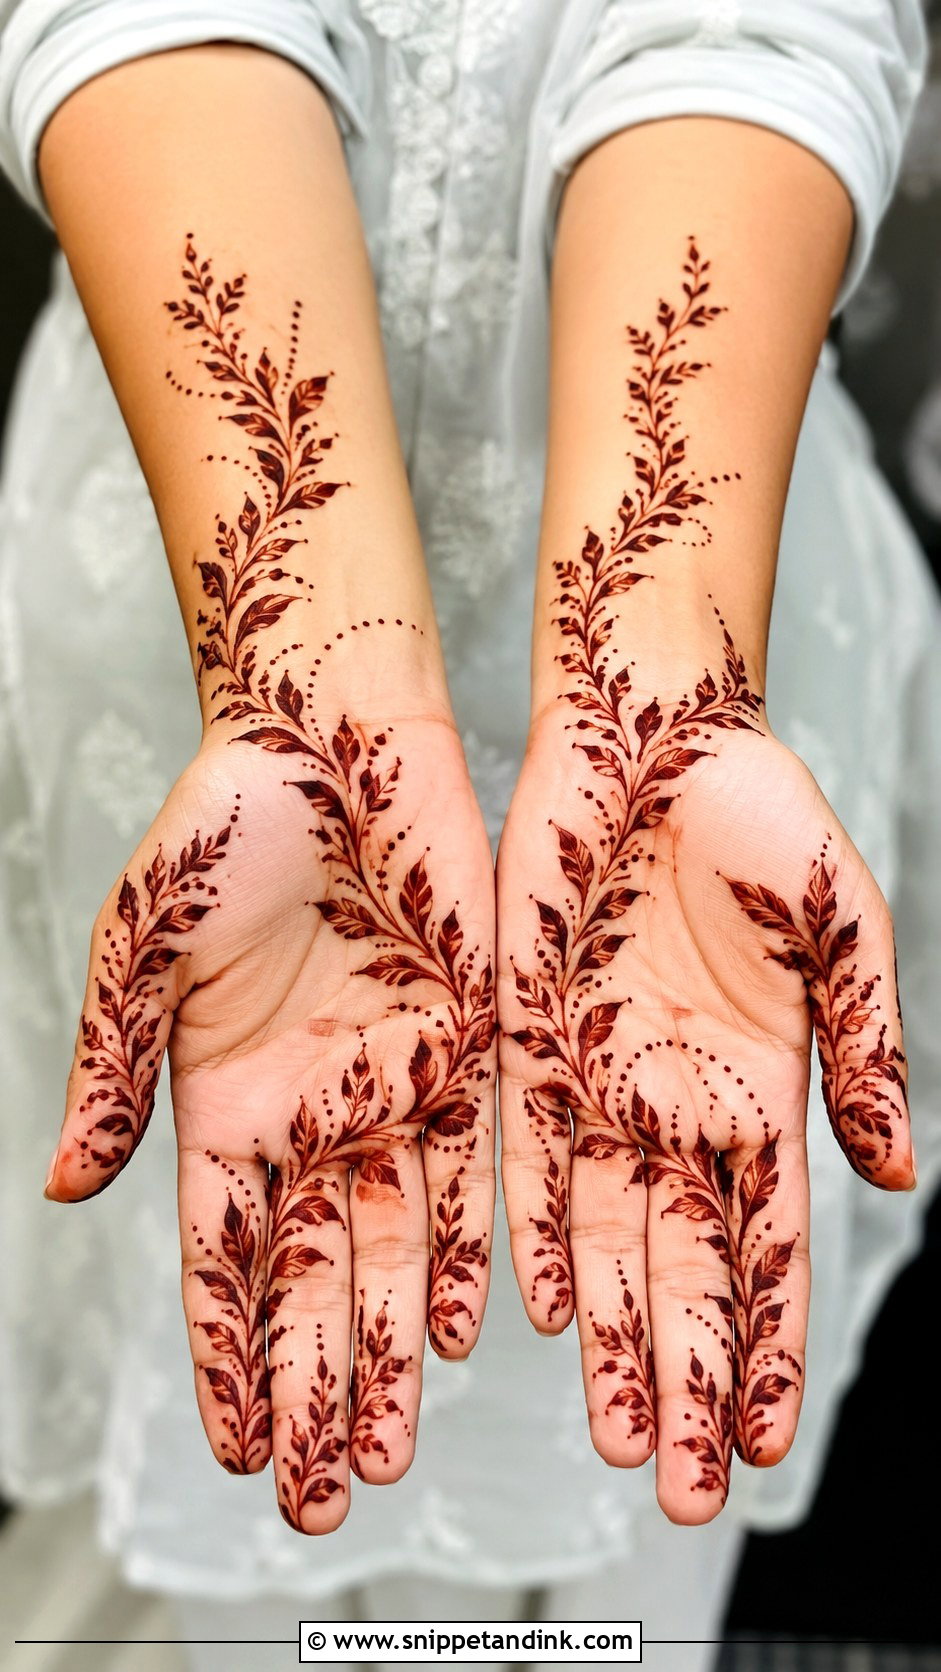
Leaves alone can carry a whole design. Repeating leaves, slim stems and small dotted trails move from the wrist to the fingers or curve across the palm. Leaves are easier to draw than complex flowers, so it’s where I start students. The trick to keeping it interesting is to vary the leaf sizes, larger near the base and smaller toward the tips, and add tiny dots between branches. Fresh and light for small festivals and family events.
24. Jaali Bel Mehndi Design
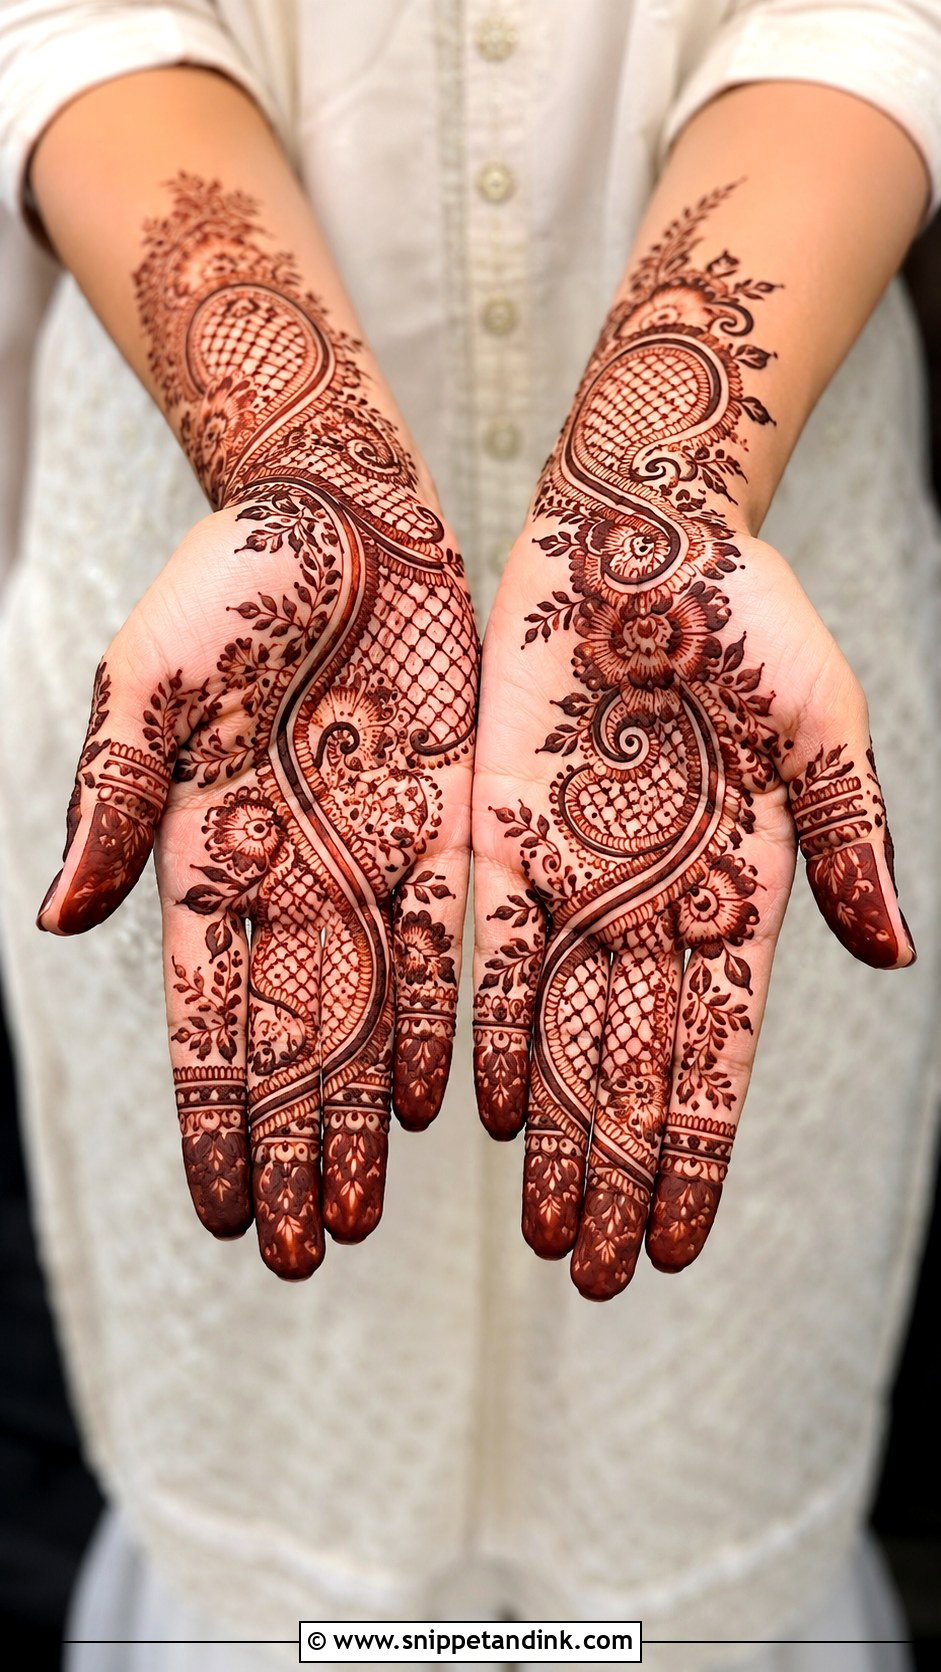
Mesh and vine together give contrast: a structured jaali section near the wrist, along one side of the palm or inside a large paisley, with the bel flowing around it in flowers, leaves and dots. Jaali lines must be evenly spaced, because one uneven grid throws off the whole design. I use the finest cone tip I have for it. It’s detailed without full coverage, and it suits wedding guests and brides who want a semi-heavy look.
25. Shaded Bel Mehndi Design
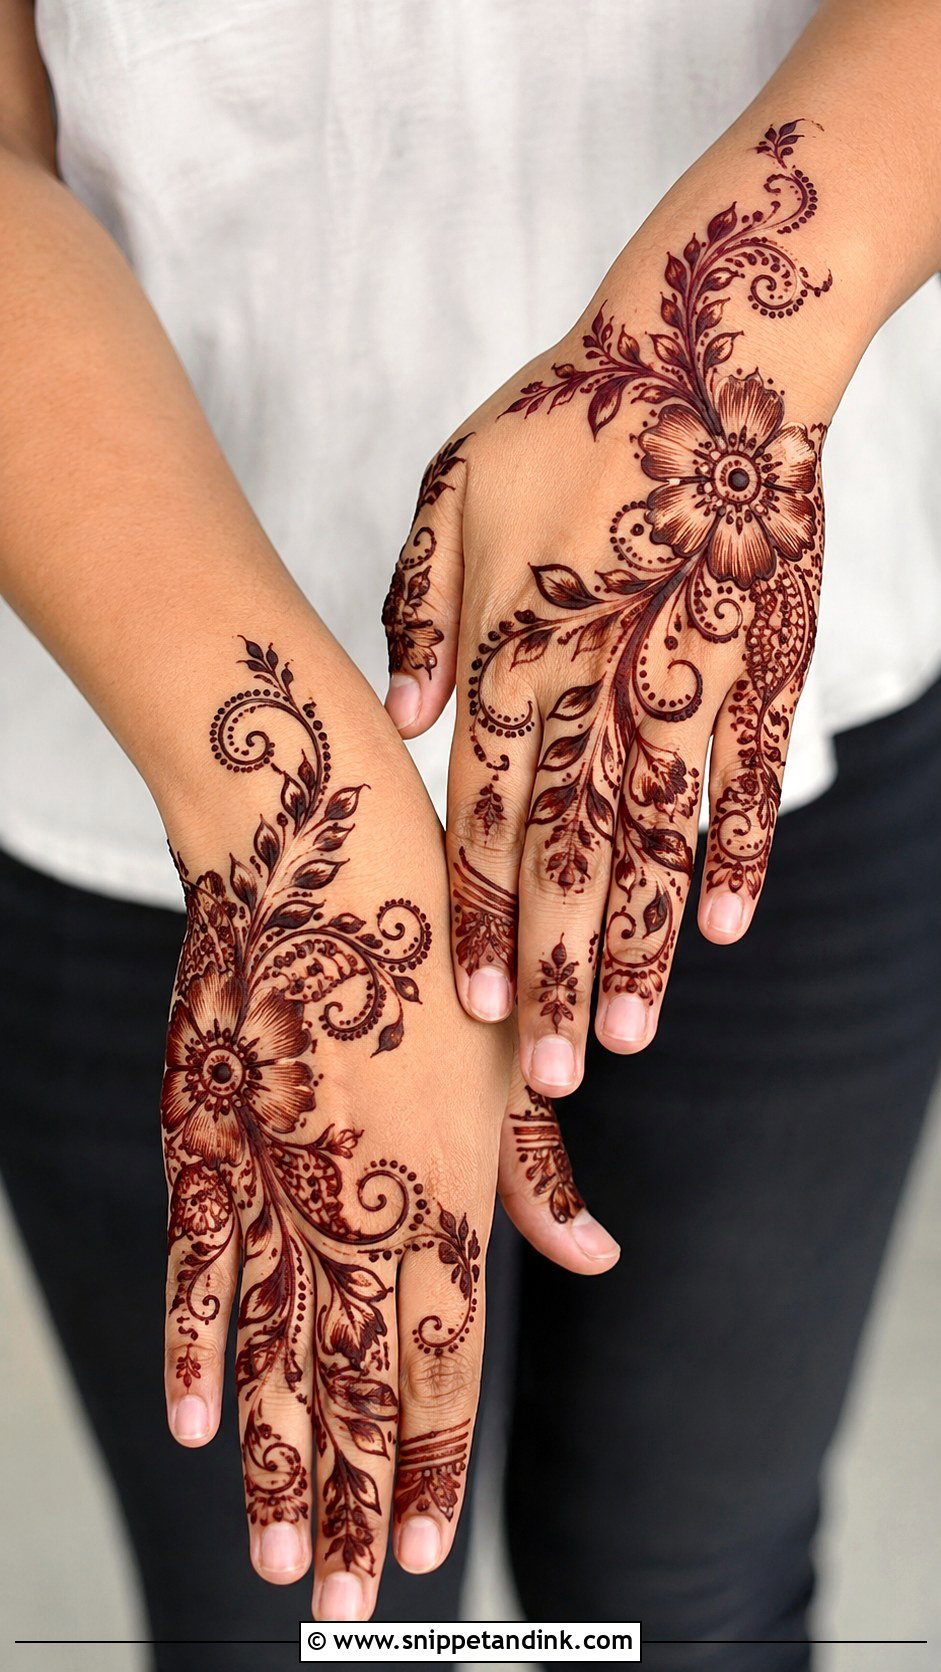
Shading adds depth to flowers, leaves and paisleys without solid blocks of paste. I draw thick outlines for the main motifs and pull lighter strokes inside them, all in one direction so the shading looks deliberate. Arabic and Indo-Arabic vines benefit most, because the open skin around them highlights the darker parts. Shaded areas stain in graded tones, which reads as layered detail. Dressy enough for Eid and wedding events.
26. Dotted Bel Mehndi Design
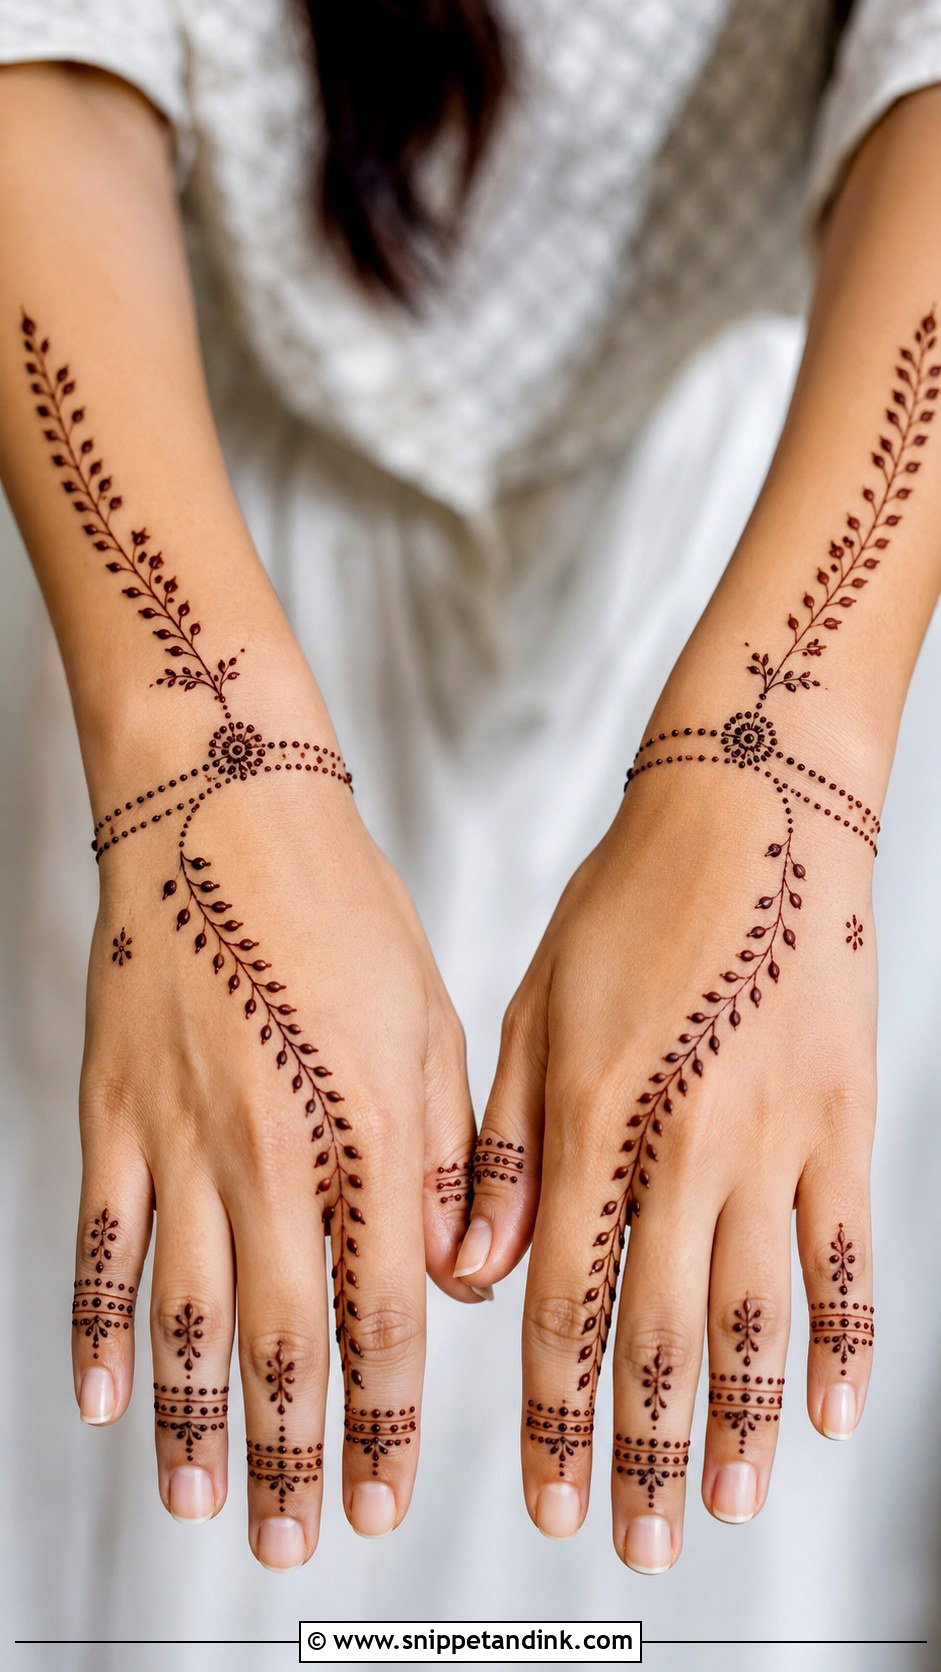
Dots are the most flexible tool I have. Along the vine, around flowers, near the fingers or beside leafy branches, they fill small gaps without adding weight. They also hide tiny spacing mistakes, which makes this a good design for beginners. A slim vine with small florals and dotted finger bands, plus a short wrist trail, looks complete. Dots that are too large can spread into each other, so a light squeeze on the cone is enough. Sweet and quick for younger wearers.
27. Side Bel Mehndi Design
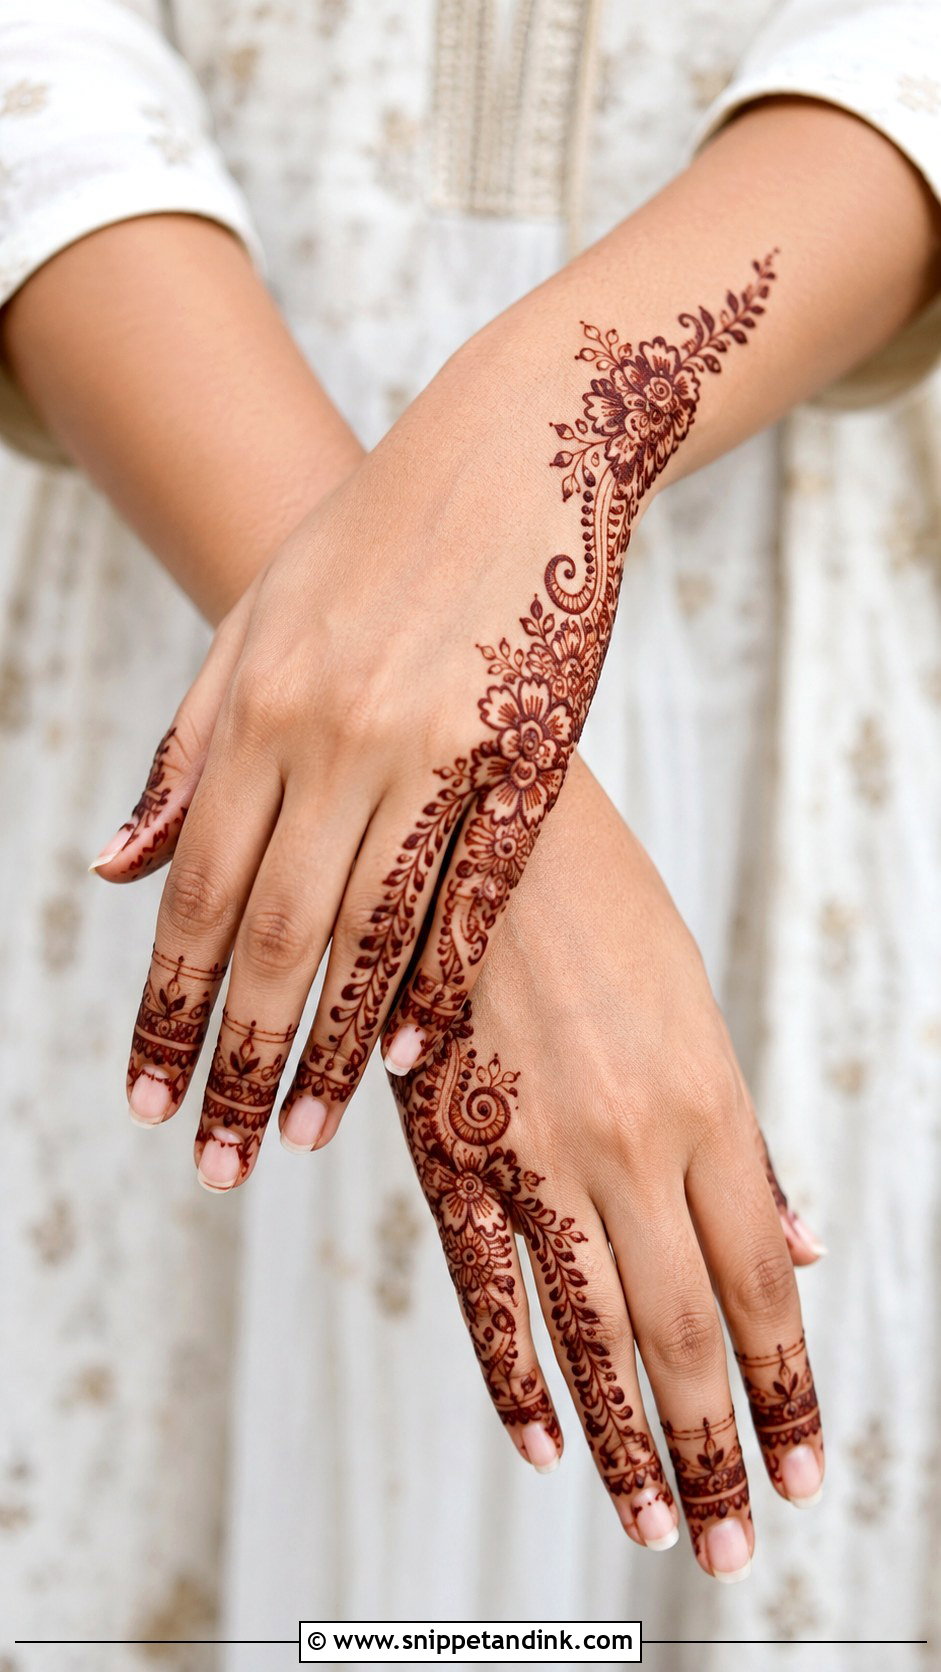
Running the vine along one edge of the hand instead of through the center gives a sleek, modern look. On the back of the hand it can follow the thumb side or the little-finger side; on the palm it frames the hand and leaves the middle open. I keep flowers, leaves and small paisleys along that edge and decorate the fingers lightly so it doesn’t look half-done. The side of the palm rubs on surfaces, so this placement fades a little faster. Great for minimalist bridesmaids.
28. Diagonal Bel Mehndi Design
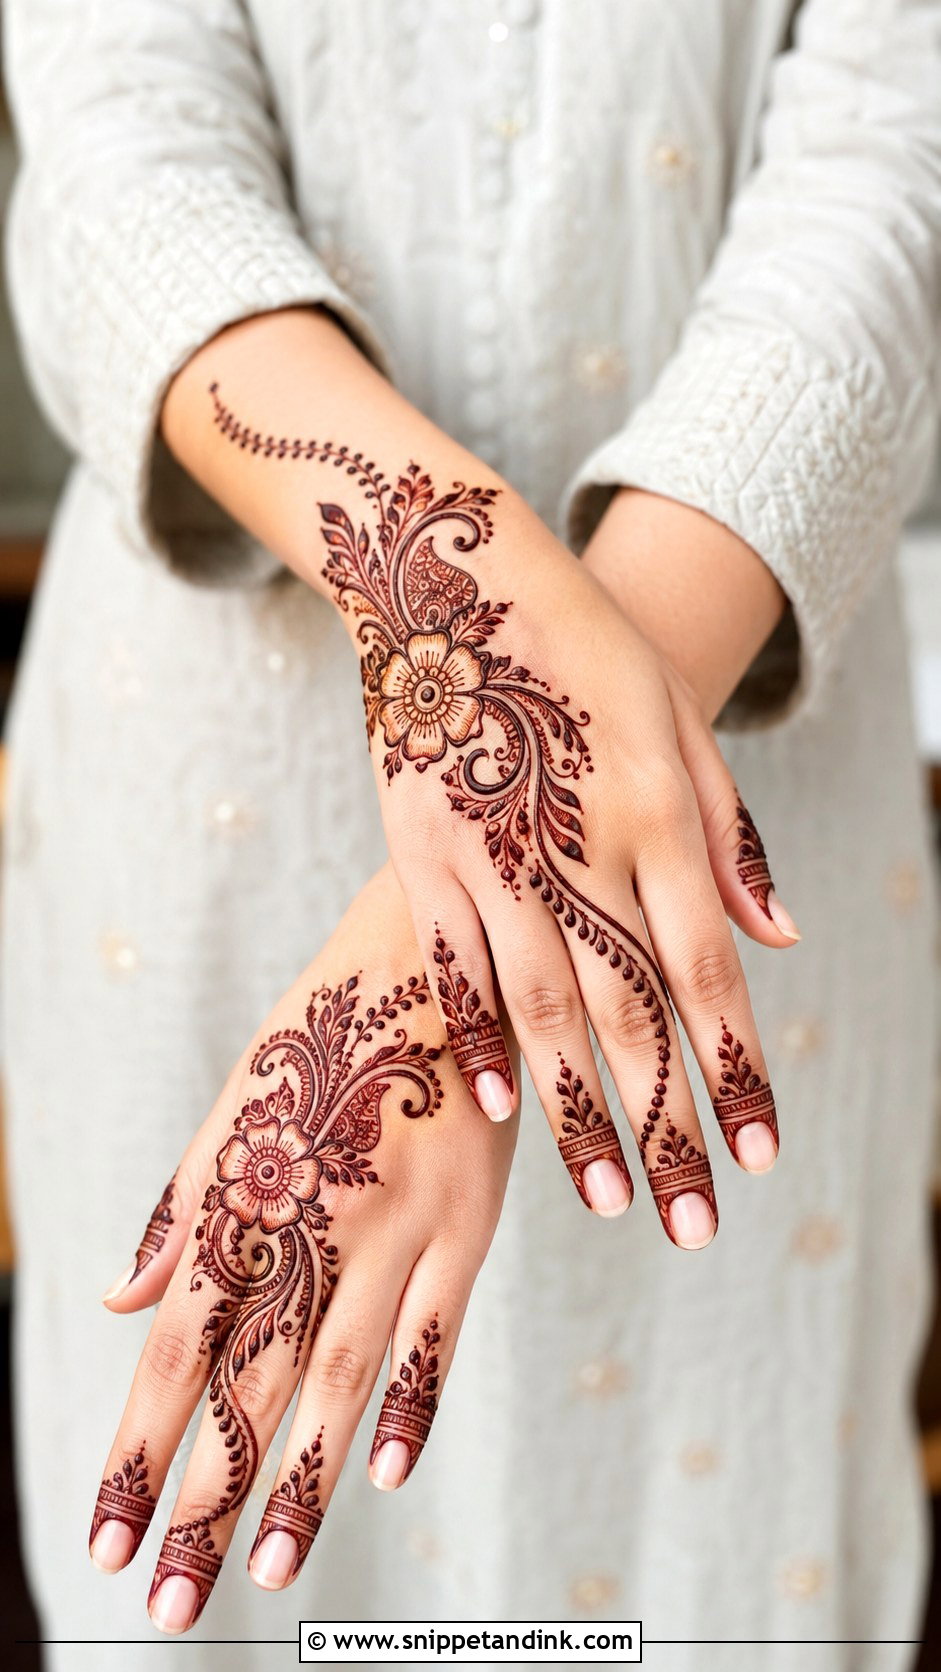
Diagonal is the most flattering vine path I know. It starts near one side of the wrist and crosses the hand to the opposite finger, which visually lengthens the hand. I keep the largest motif near the center and taper smaller details toward the fingers. There’s room for bold flowers, paisleys and dotted curves without full coverage, which is why Arabic work uses it so often. Easy to adapt from simple leaves to detailed floral clusters.
29. Heavy Bel Mehndi Design
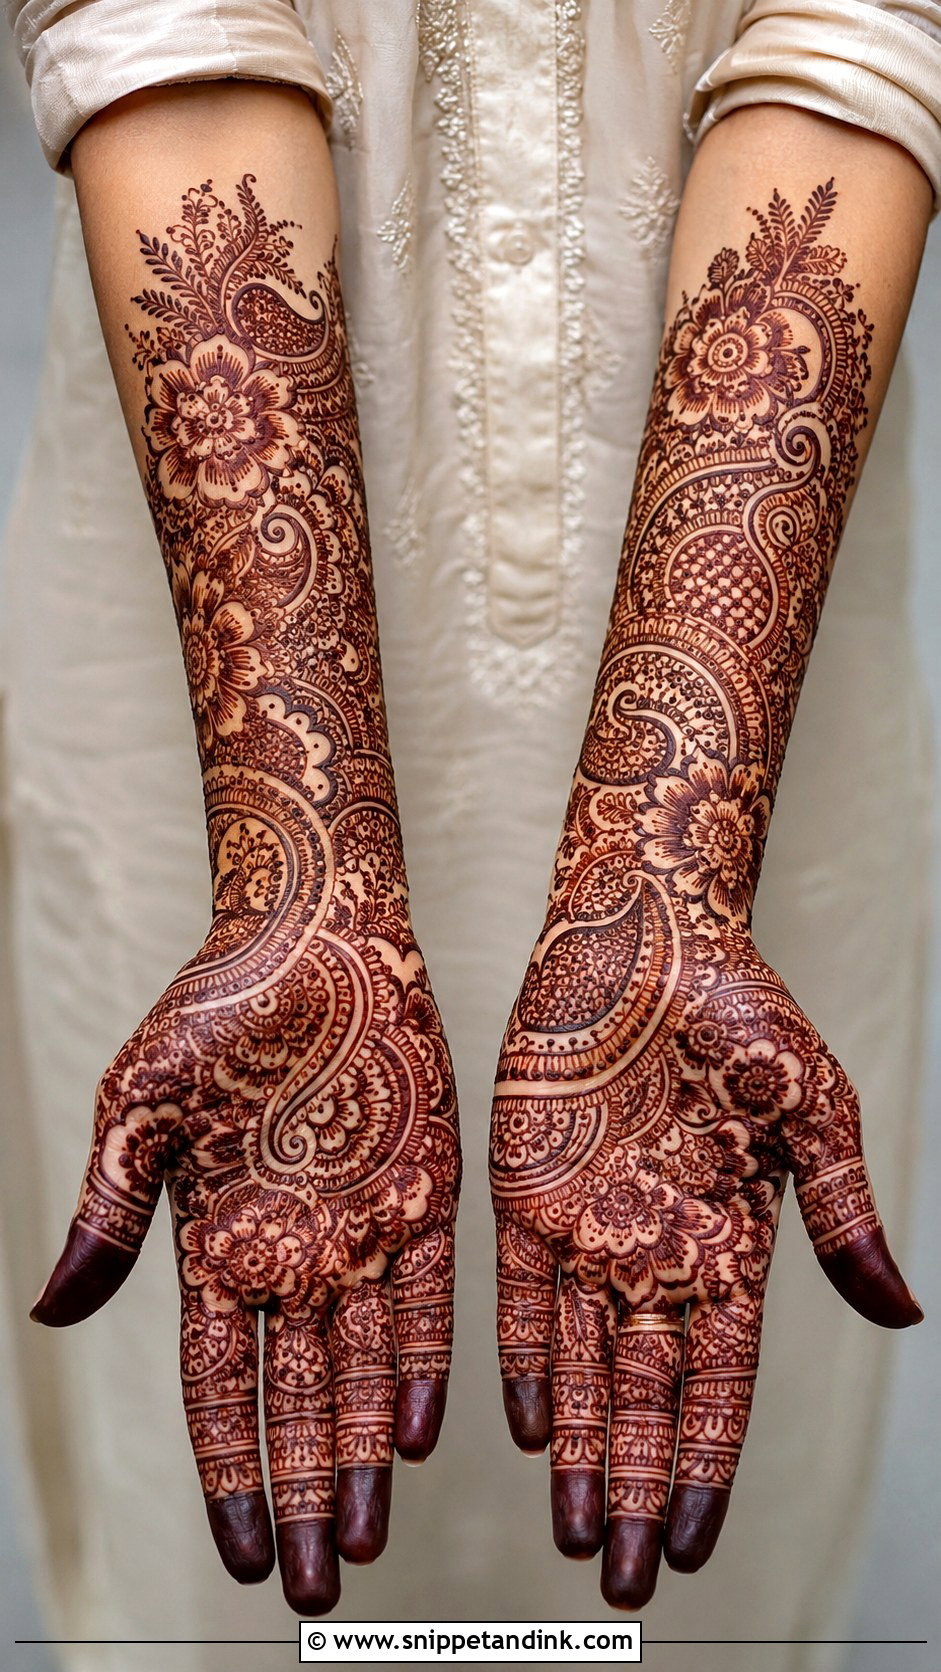
Heavy vines still use the bel as their spine, but the surrounding areas fill with dense work: shaded flowers, paisleys, jaali, mandalas and finger bands, covering the full palm, back hand, and wrist. I map it in sections before starting, so every zone has a job rather than filling at random. Contrast matters, with bold areas beside fine detail. It’s for brides, close family and the biggest celebrations.
30. Easy Bel Mehndi Design For Beginners
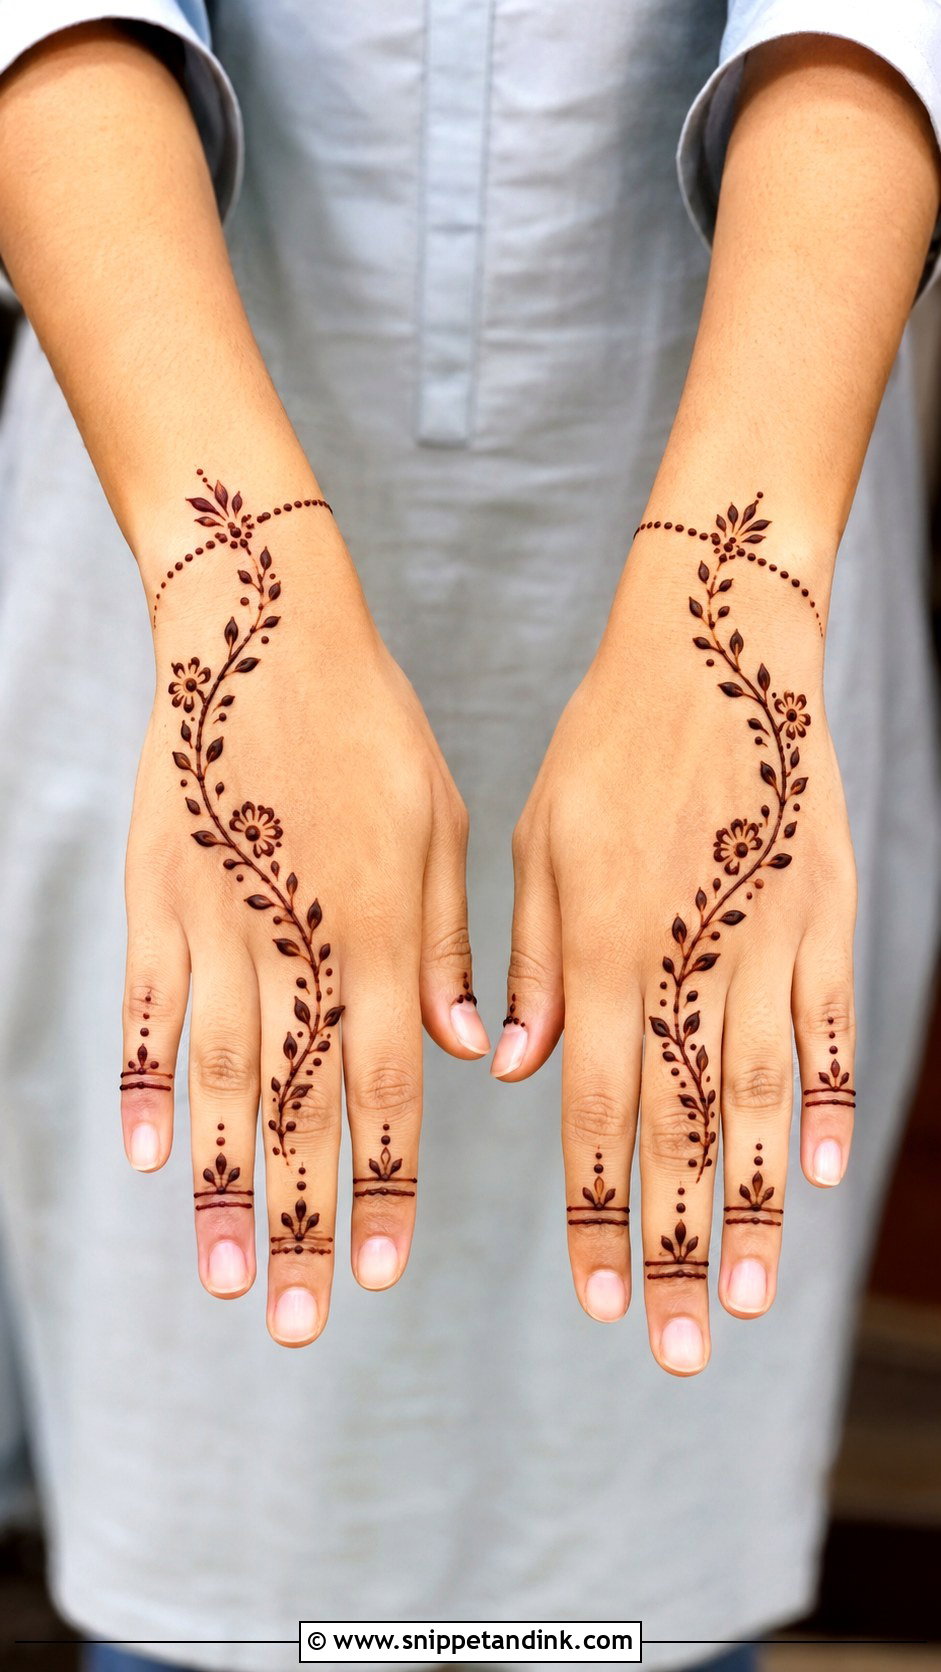
If you’re new to henna, start with one smooth curved line from the wrist to a finger. Add small leaves on both sides, then a few flowers or dots along the curve, and keep the fingers light with tiny vines or fingertip details. Practice the curve on paper first; it’s the part that shows wobble. Steady spacing and clean leaf shapes matter more than adding motifs. Once you’re confident, the same layout grows into Arabic or floral versions.
Mixing Your Own Cone for a Vine That Doesn’t Break
Many bel designs here are simple enough to try at home, but the paste matters more than the pattern. Long, thin vine lines break if the paste is lumpy, too stiff or too runny.
How I prepare natural henna paste
- Use fresh, finely sifted body-art henna powder. Old powder gives weak color.
- Mix with lemon juice or water and a little sugar until it is smooth, about the thickness of toothpaste.
- A small amount of a skin-safe essential oil such as eucalyptus or lavender can help the color develop; I leave it out for children and anyone with sensitive skin.
- Cover and rest the paste in a warm place until dye releases, often several hours or overnight depending on room temperature.
- Stir again, check it flows smoothly, then fill cones and practice a few lines on paper first.
If you smudge a line while it’s wet, wipe it right away with a damp cotton bud. A dried mistake can’t be removed and will stain, so it’s better to turn it into a leaf or a dot. Leftover paste keeps in the freezer for later use.
A Vine Reads Best When You Can Trace Its Path
Whatever its weight, a bel works because the eye can follow one path across the hand. A light back-hand vine for everyday events, a floral Arabic trail for Eid, a paisley palm for festivals or a heavy full hand for a wedding all rely on that clear line. Build the leaves, flowers, dots, mandalas, jaali or peacocks around it with balance, and leave enough skin open for the stain to read. Beginners and seasoned mehndi lovers can both start from the same curve.
You'll Like These Ideas:


Leave a Reply