
Not every occasion needs four hours of bridal work. Most of the hands I decorate for Eid, Diwali, a cousin’s wedding or a family dinner take twenty to forty minutes, and they still look finished because the layout is planned from fingertip to wrist. The designs below are built from shapes almost anyone can pipe: dots, vines, open florals, small mandalas, paisleys and bracelet bands. Some are light enough for a work day, others carry enough filling for a festival. If you’re new to the cone, start with the larger, open designs and work toward the denser ones as your lines steady.
Getting the Cone Ready Before You Draw a Petal
Most beginner mistakes come from the cone, not the hand. Paste should be smooth and about as thick as toothpaste: too runny and lines blob and spread, too stiff and they break off. If a ready-made cone is lumpy, I squeeze a little onto a tile first and pipe a few practice lines until it flows evenly.
- Hold the cone like a pen, slightly above the skin, and let the line fall onto it rather than dragging the tip.
- Keep pressure light and constant; I steady my piping hand by resting its wrist on the other hand.
- Practice the core shapes on paper first: dots, a leaf, a petal, a curved vine, a paisley.
- Snip the cone tip very small; you can always cut it wider, but never smaller.
- Keep a cotton bud nearby to lift mistakes within a few seconds, before the paste stains.
Clean, dry skin takes stain best. I ask people not to apply lotion or oil before a session, since it creates a barrier the dye can’t pass through.
1. Simple Front Hand Mehndi Design
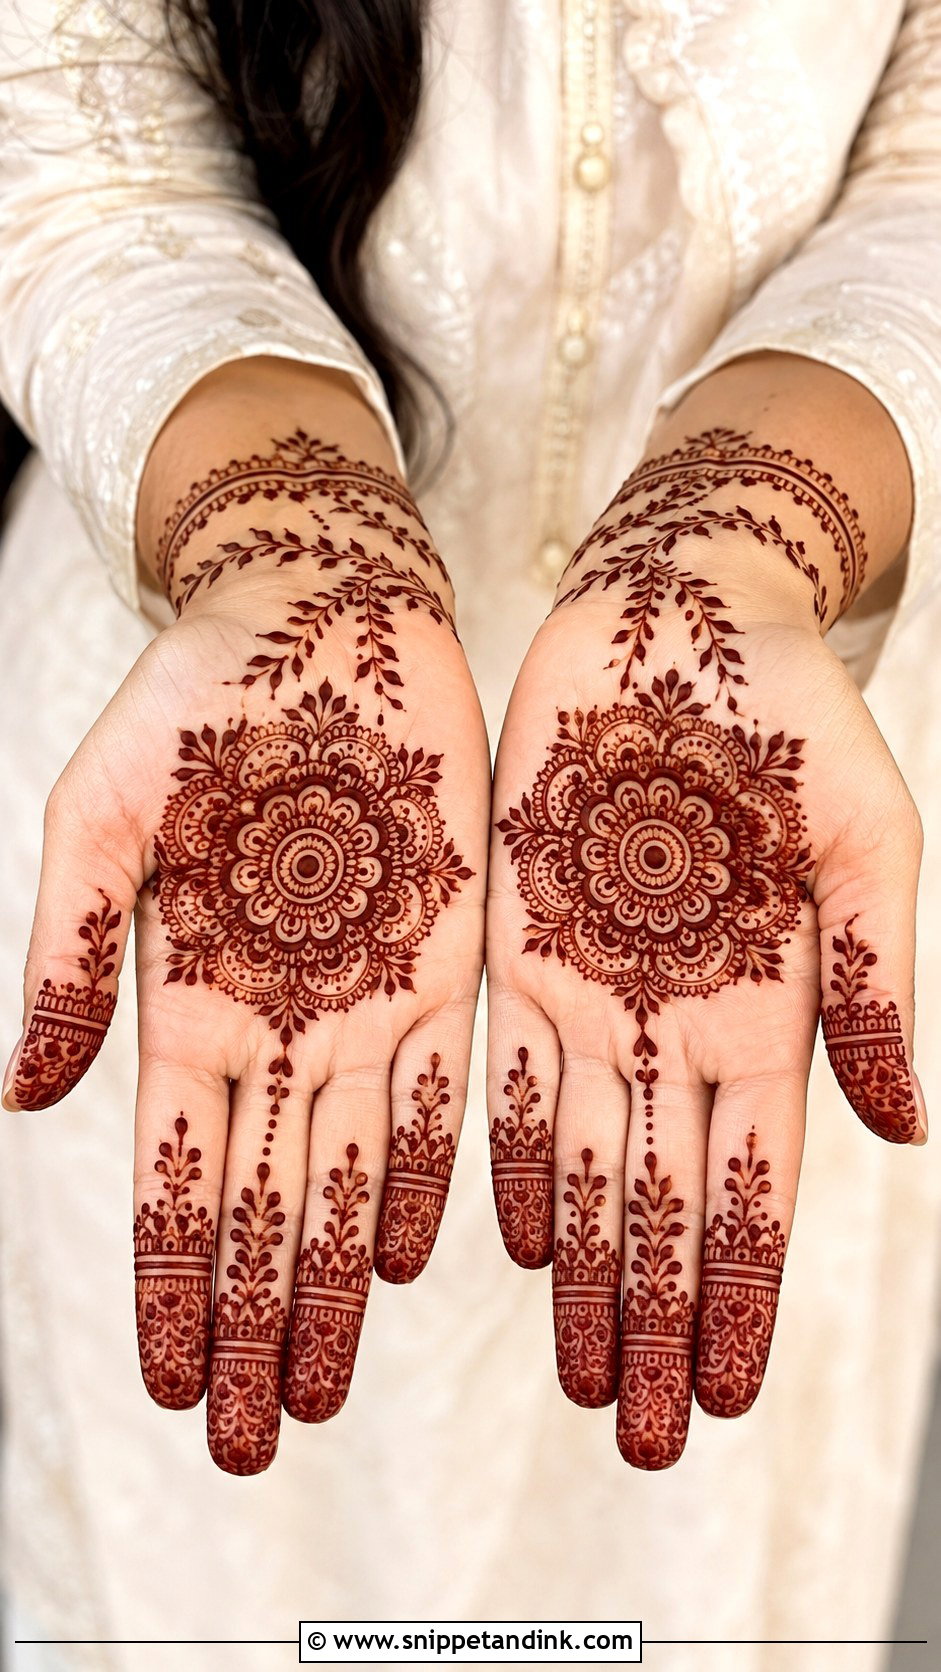
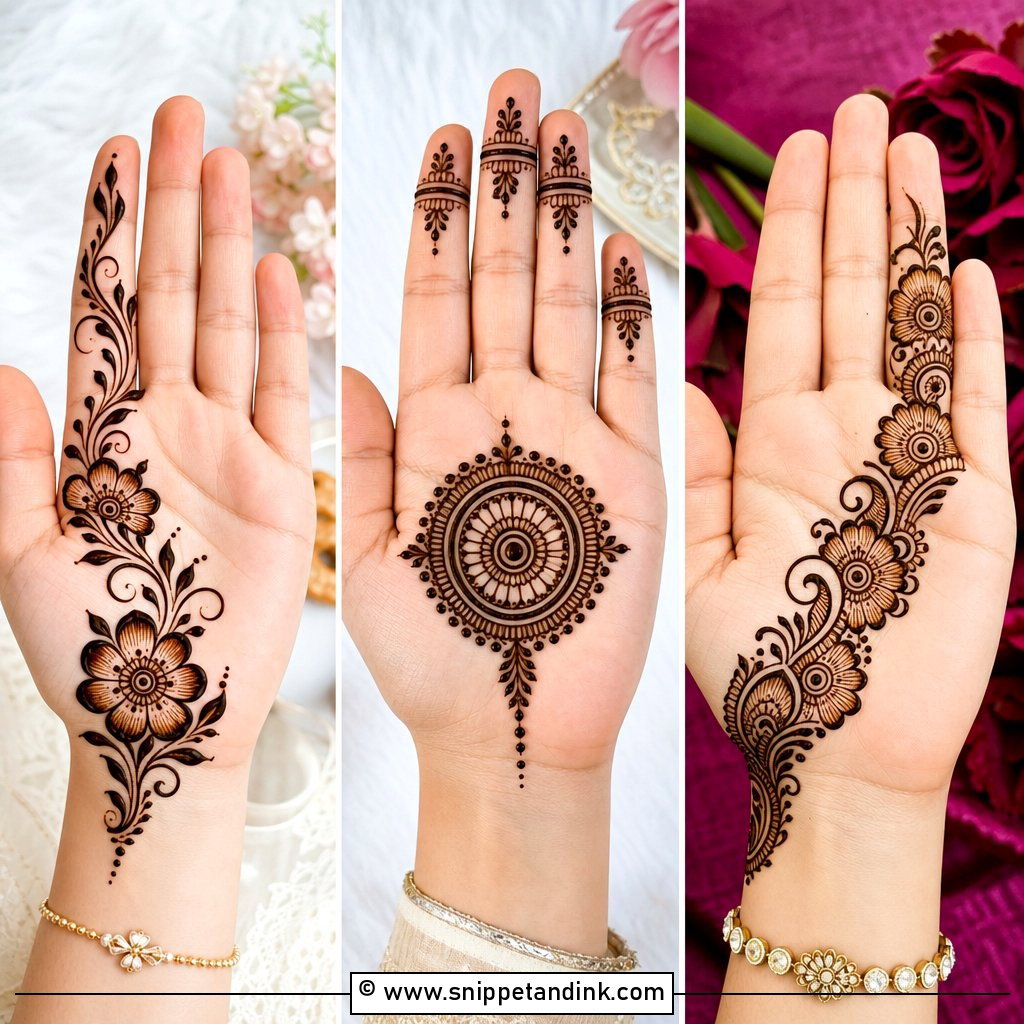
The palm is the easiest canvas you have: flat, wide and slow to move while you work. I start with a small mandala in the center, add rounded petals and dots around it, then run short leafy vines up toward the fingers. Fingertips get a light cap of tiny lines or half flowers, and a thin wrist border closes it off. Keep the shapes generous if your pressure is still uneven; a wobble in a big petal disappears, while the same wobble in fine filler looks like a mistake.
2. Simple Back Hand Mehndi Design
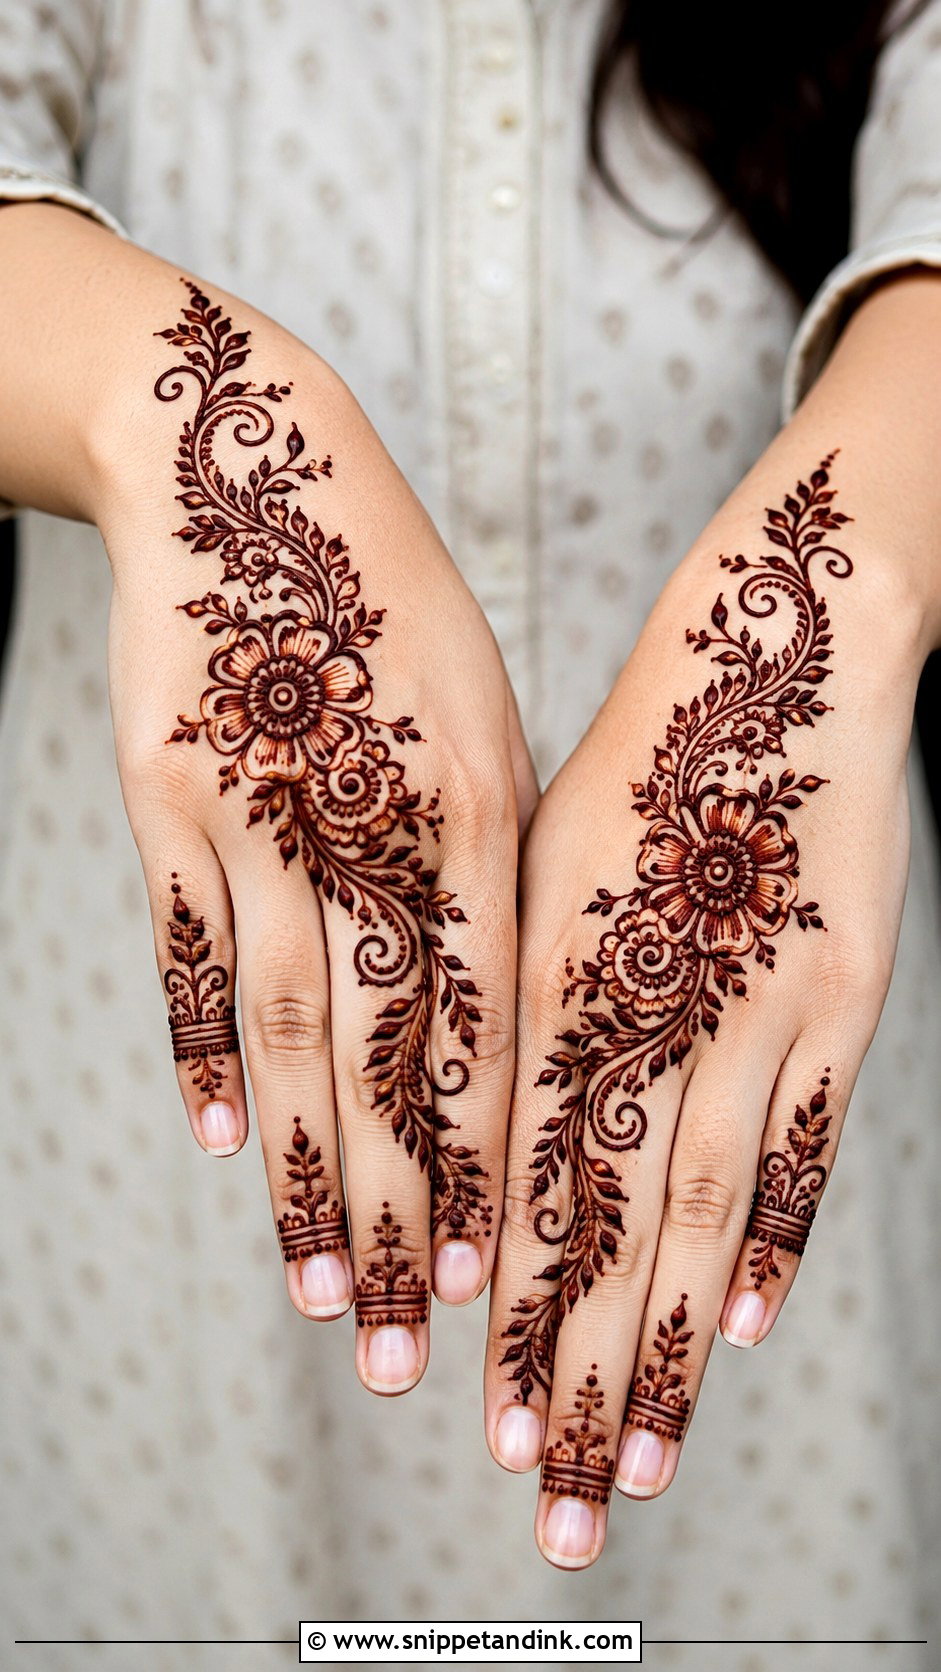
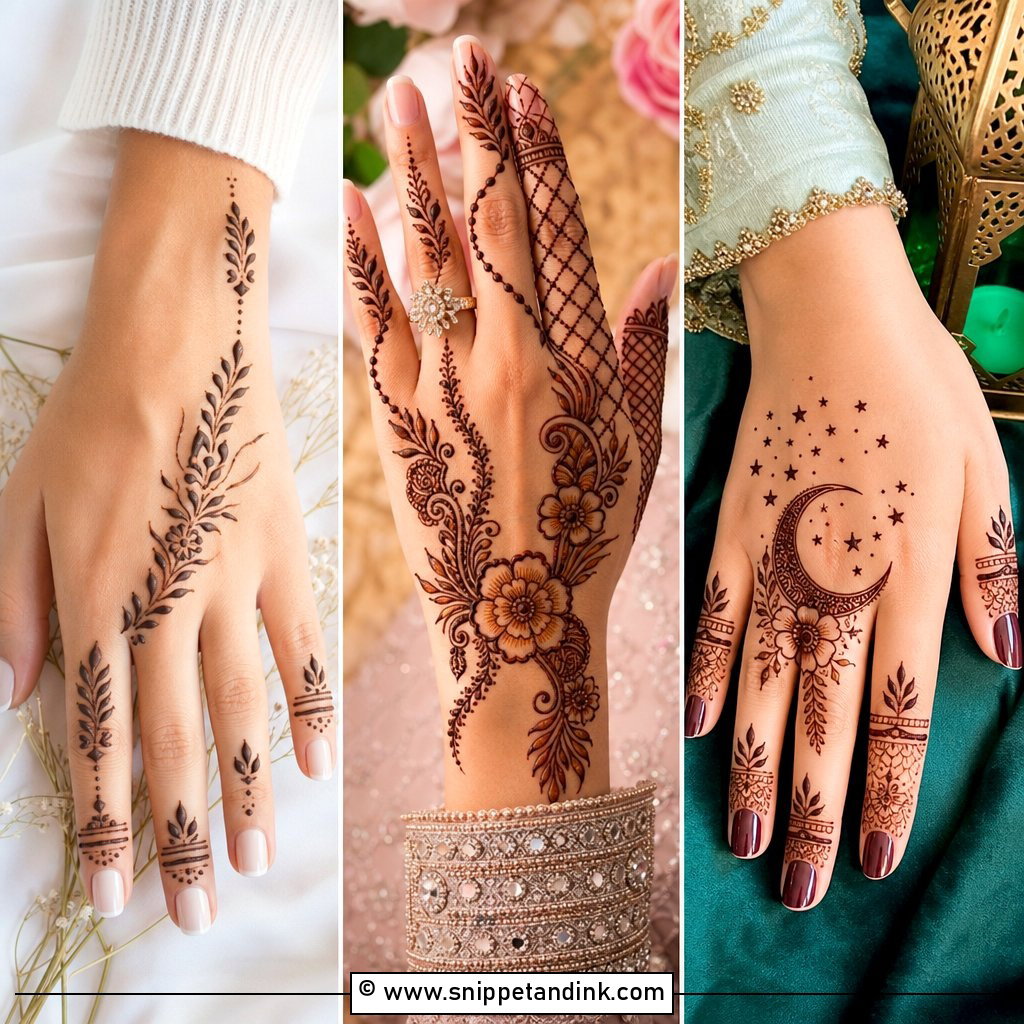
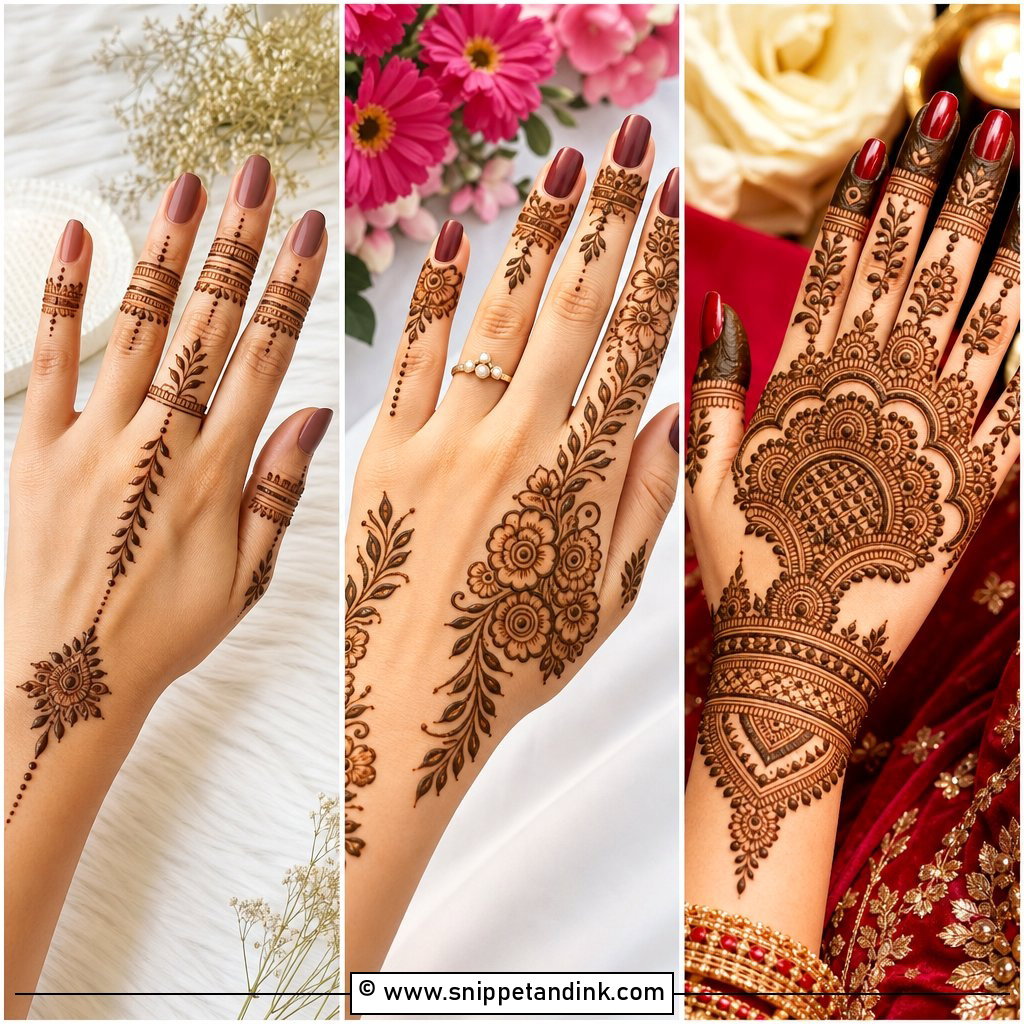
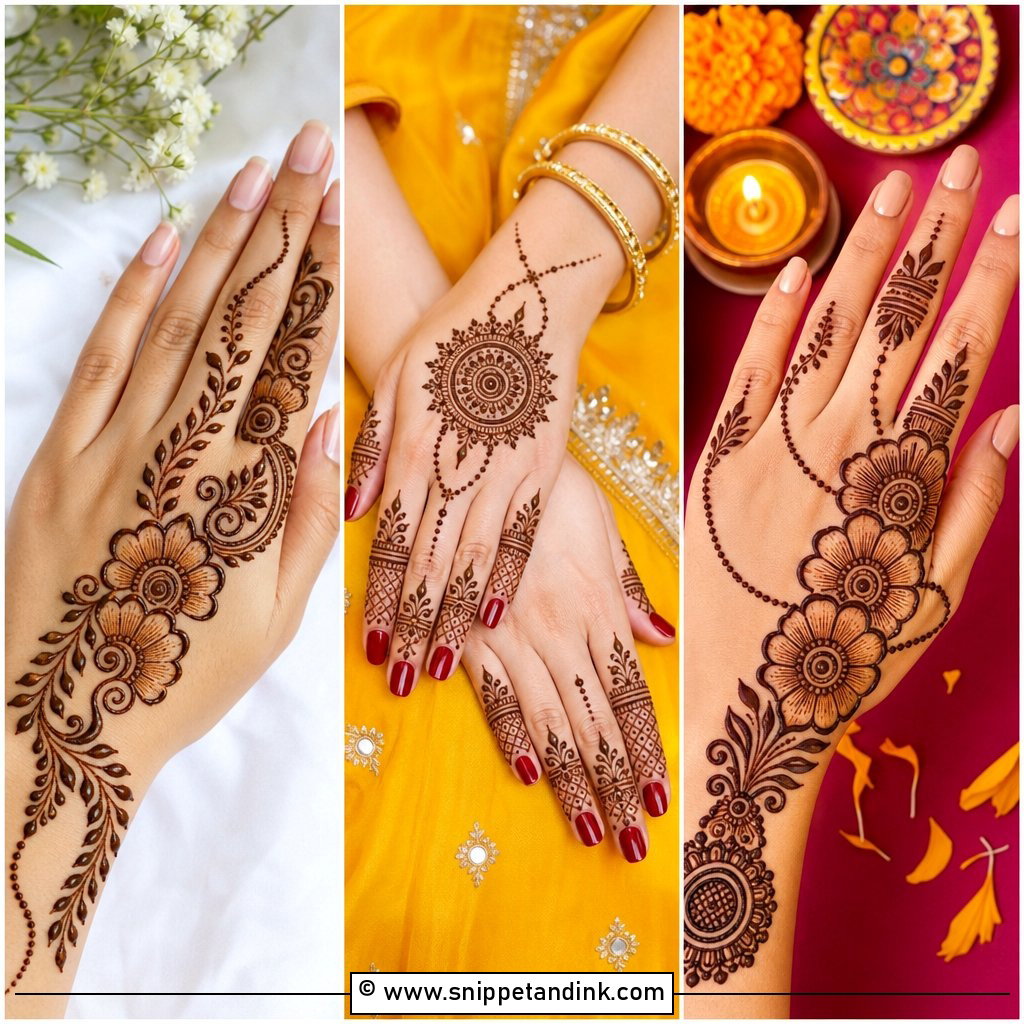
The back of the hand needs far less henna to look dressed, so this is the design I suggest when time is short. Place a small floral cluster near the center, then send one vine toward the index finger and another toward the wrist. Dots along the empty spaces tie the pieces together. Keep the fingers to simple leaf chains or thin bands. Stains here come out lighter than on the palm, because the skin there is thinner and holds less dye, so I make the outlines slightly bolder to compensate.
3. Easy Arabic Mehndi Design
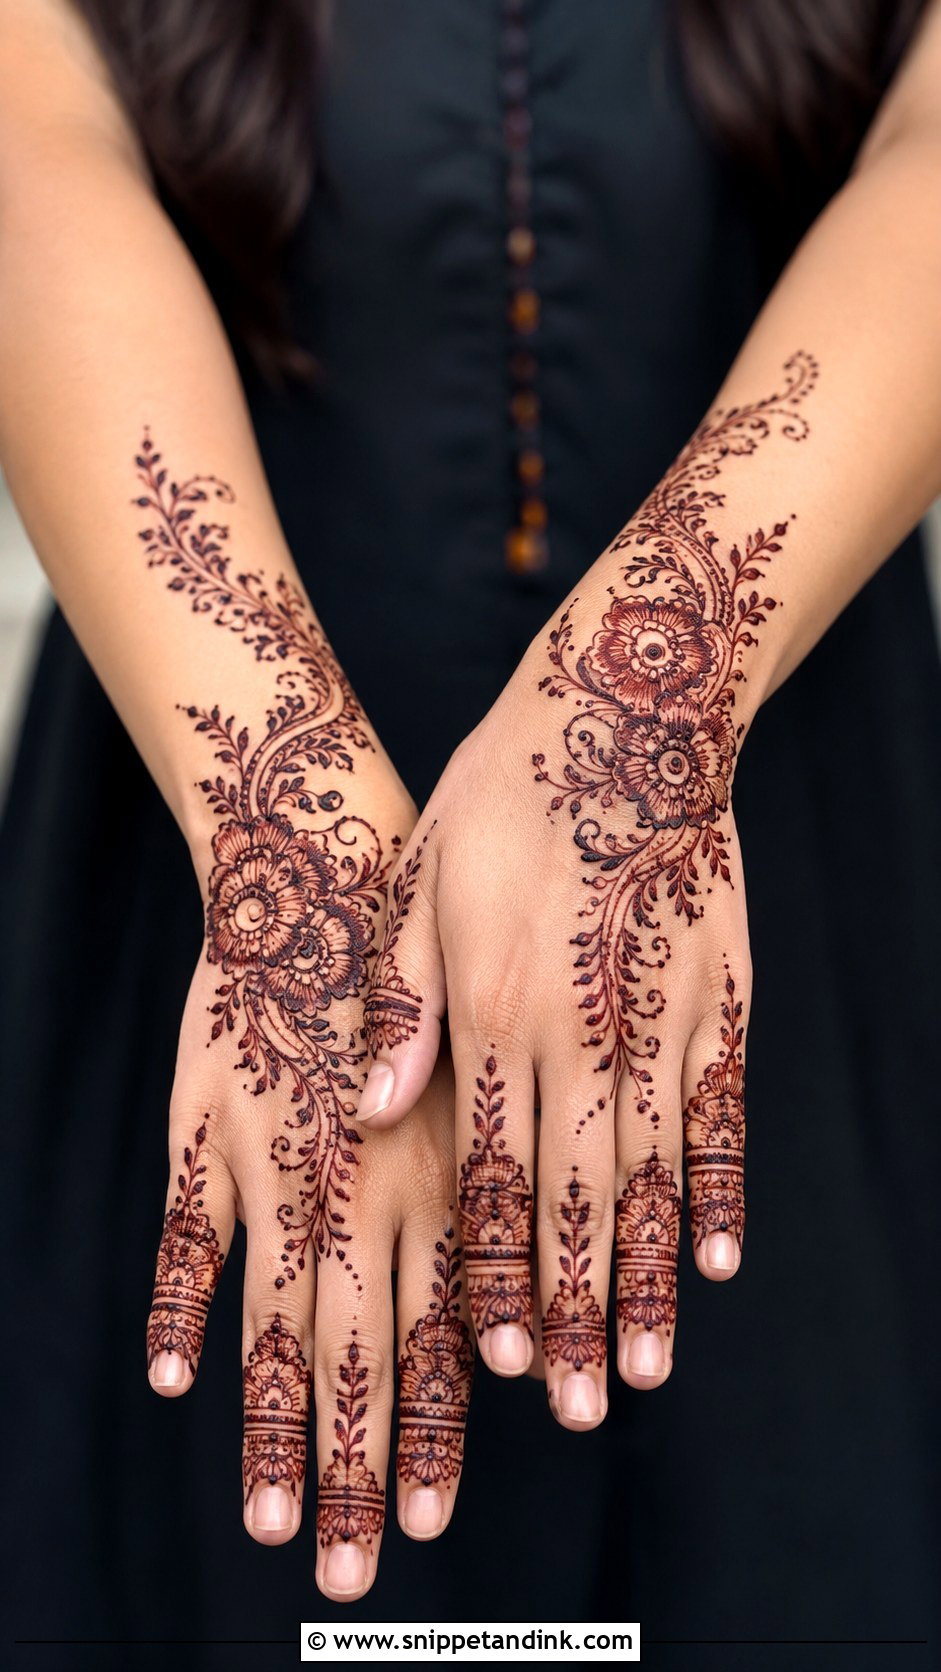
Arabic layouts are built on one diagonal trail running from the wrist to the index or middle finger, with bold flowers placed along it and leaves, dots and small curls filling the gaps. One side of the hand stays almost bare, which is what makes the design read as modern. I outline the flowers with a thicker line and fill them more lightly inside; that contrast gives the trail its strength. Because nothing has to mirror anything else, it forgives a beginner’s uneven hand better than almost any other style.
4. Easy Mandala Mehndi Design
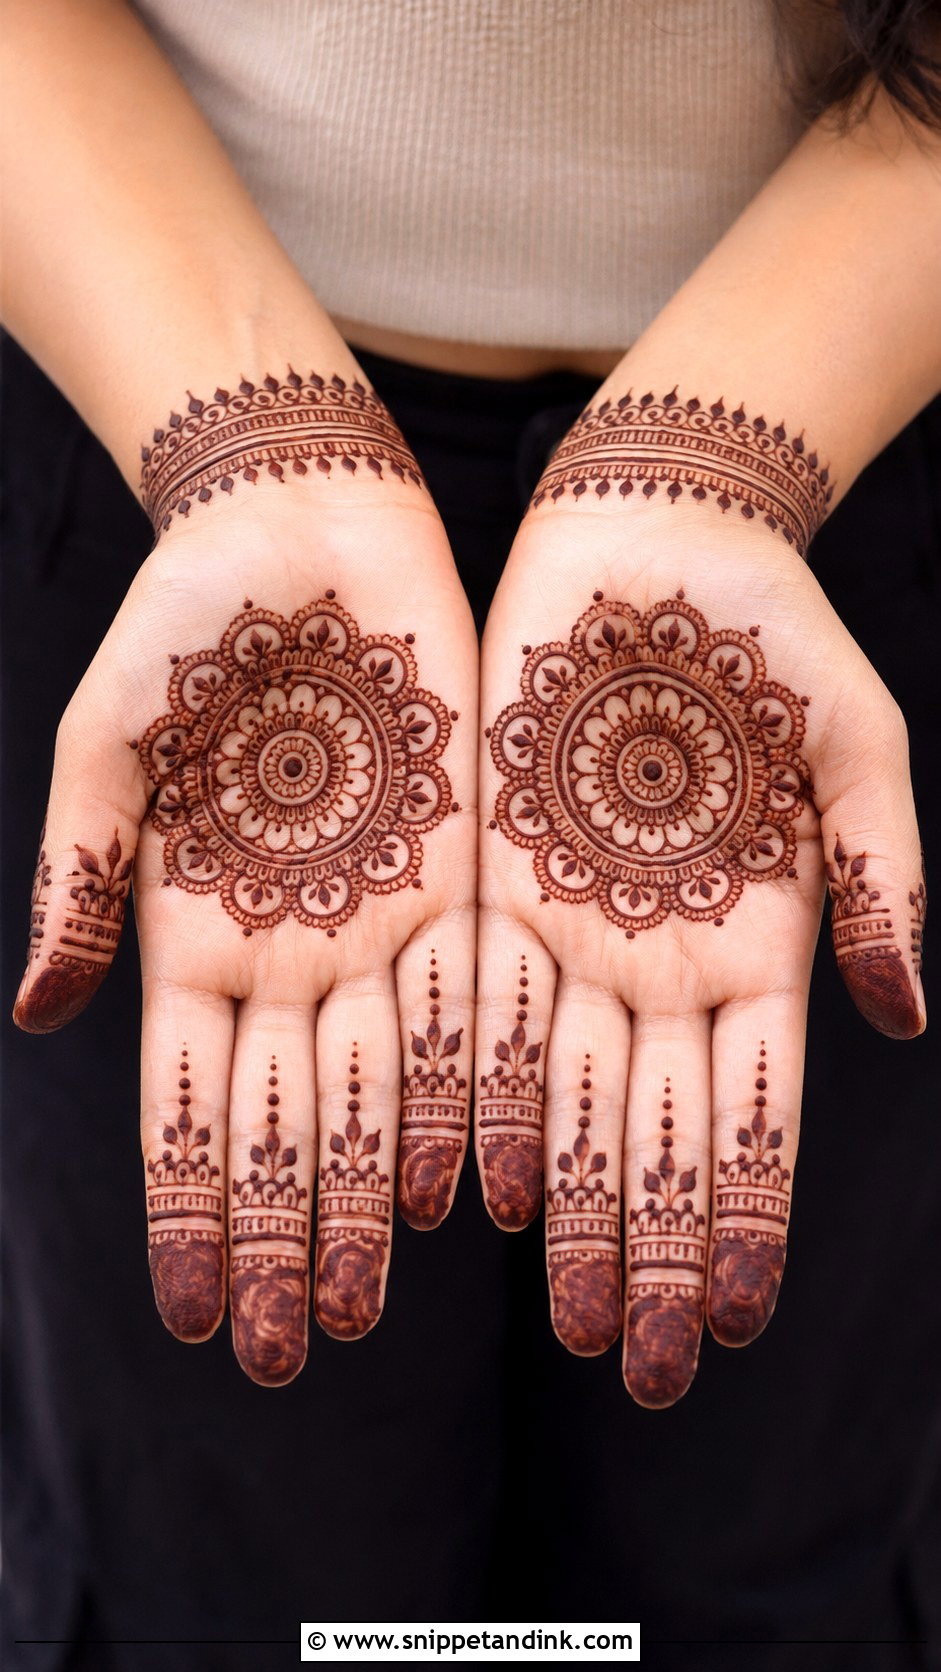
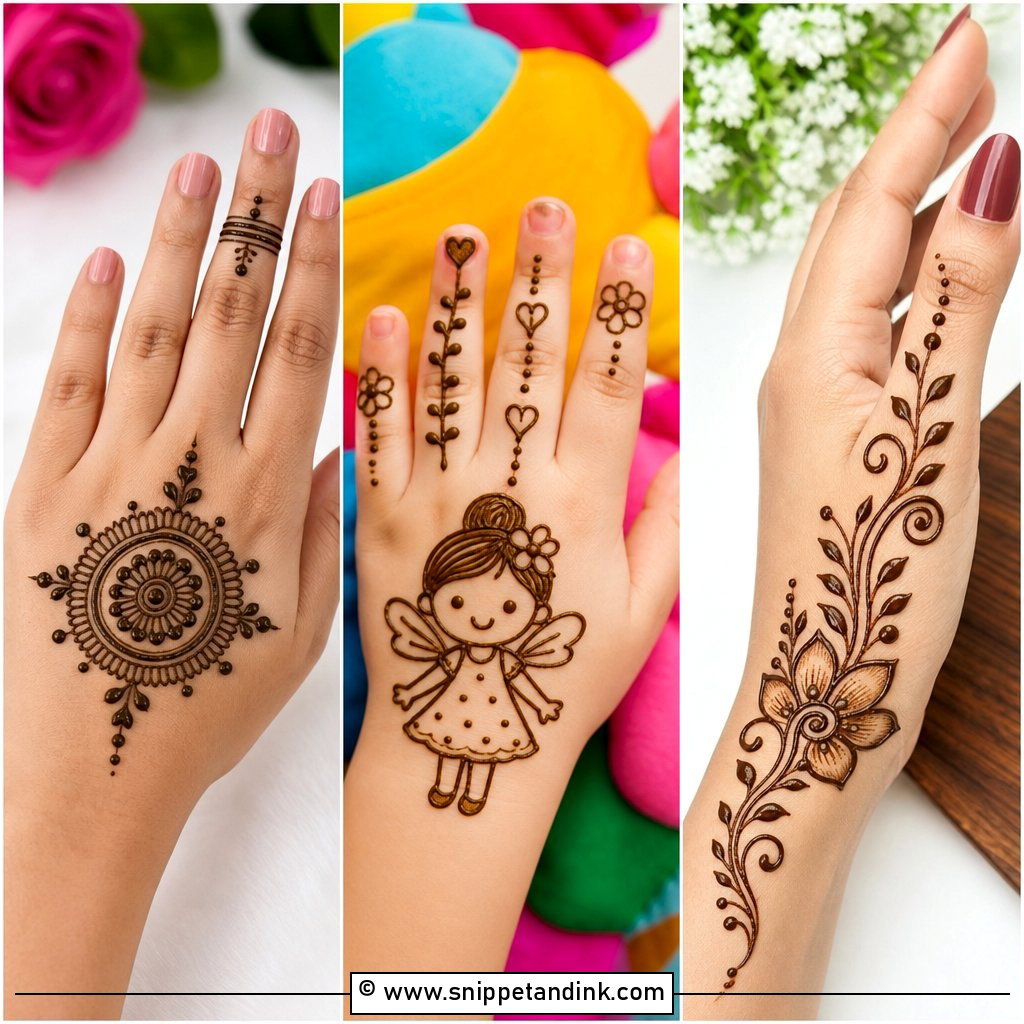
A mandala feels intricate but is just a series of rings around a center point. I place a dot in the middle of the palm, then work outward: a circle, a row of petals, a scalloped edge, a ring of dots. Straight lines, small leaves or tiny ring bands carry it up the fingers, and the wrist can stay bare or take a thin bracelet. The round shape guides your hand, so even slightly uneven circles still look balanced from a distance. It suits poojas and quiet family functions especially well.
5. Easy Floral Mehndi Design
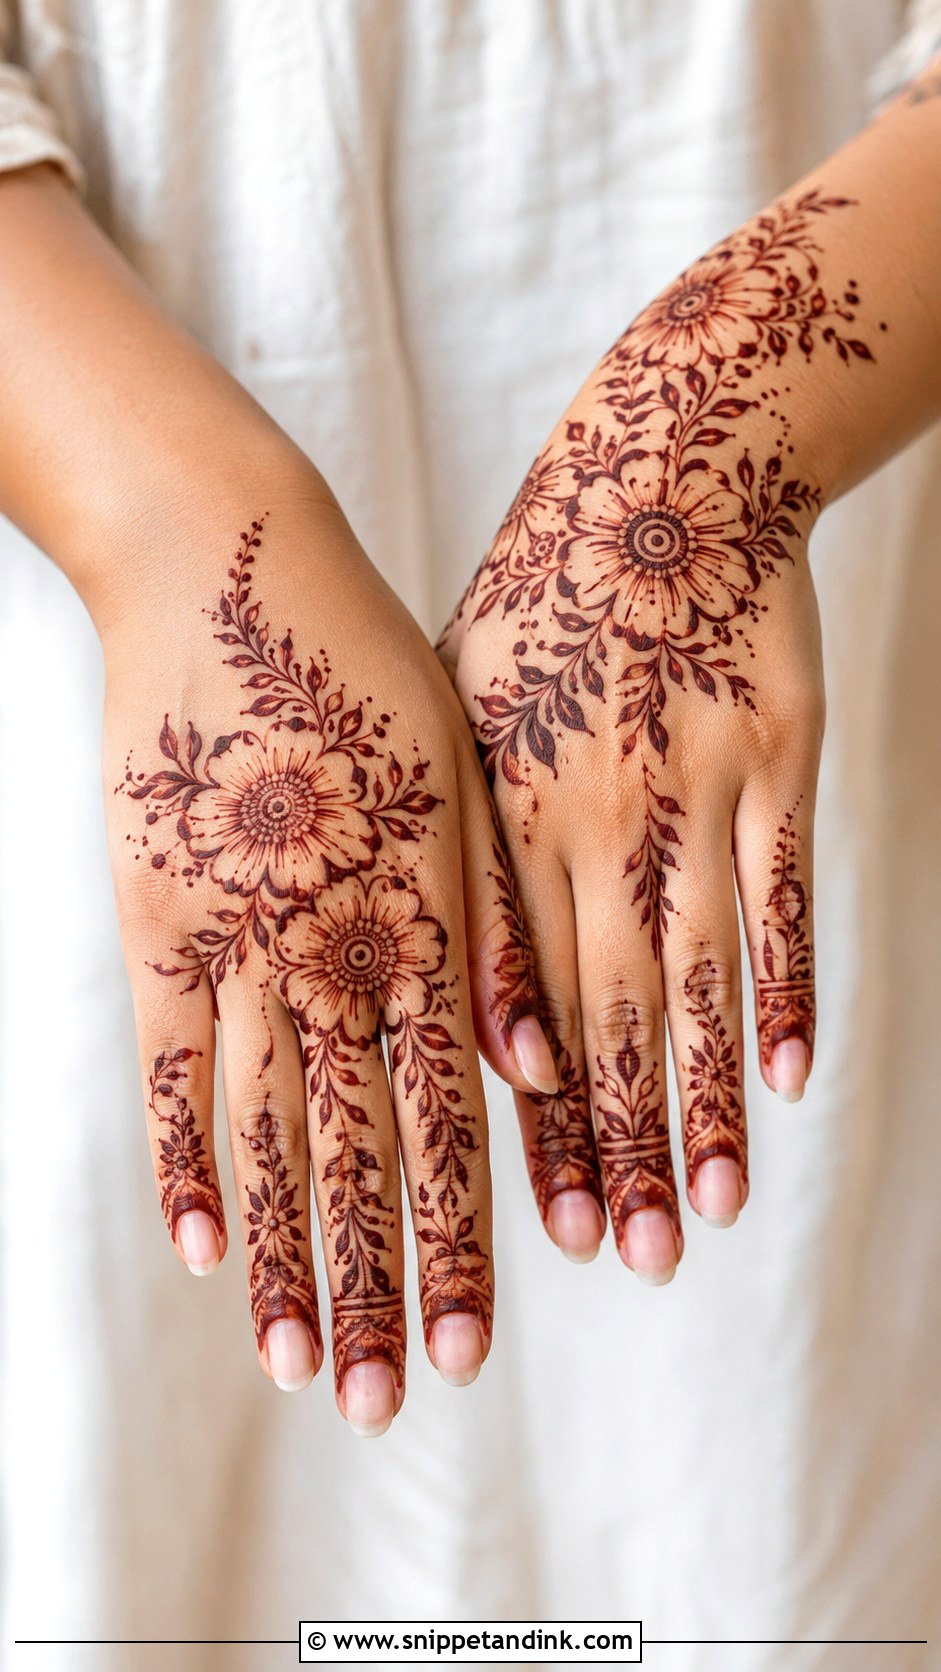
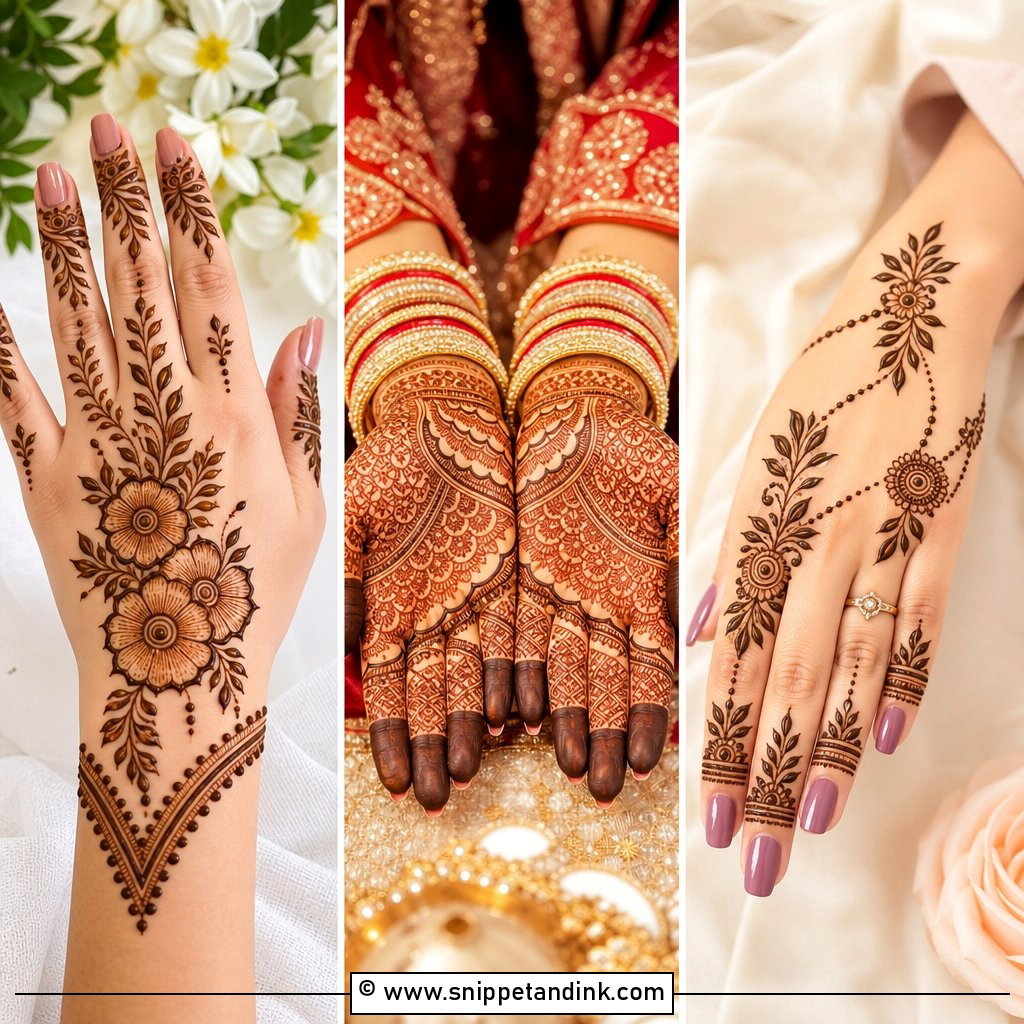
Florals are where most people start, and for good reason: a flower is just a circle with rounded petals around it. I draw one large flower on the palm or back hand, two smaller ones beside it, and connect them with curved vines and simple leaves. Vary the sizes deliberately, because three identical flowers in a row look stamped on. Dots soften the edges, and light petals or leafy lines finish the fingers. It suits every age, from teenagers to grandmothers.
6. Simple Finger Mehndi Design
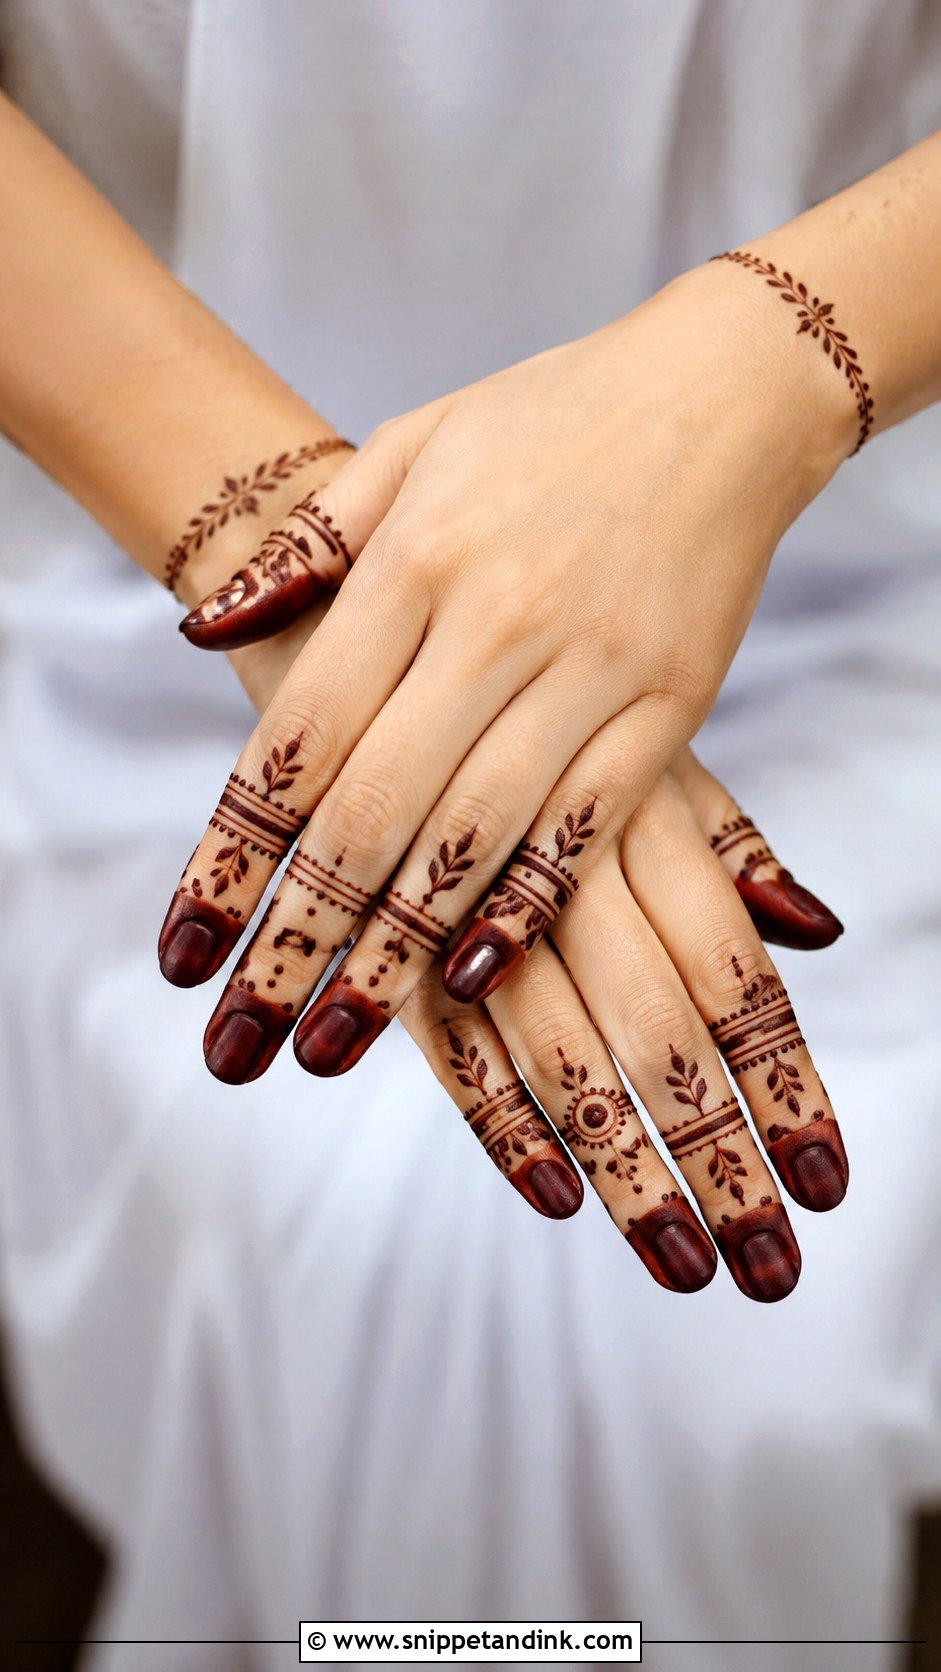
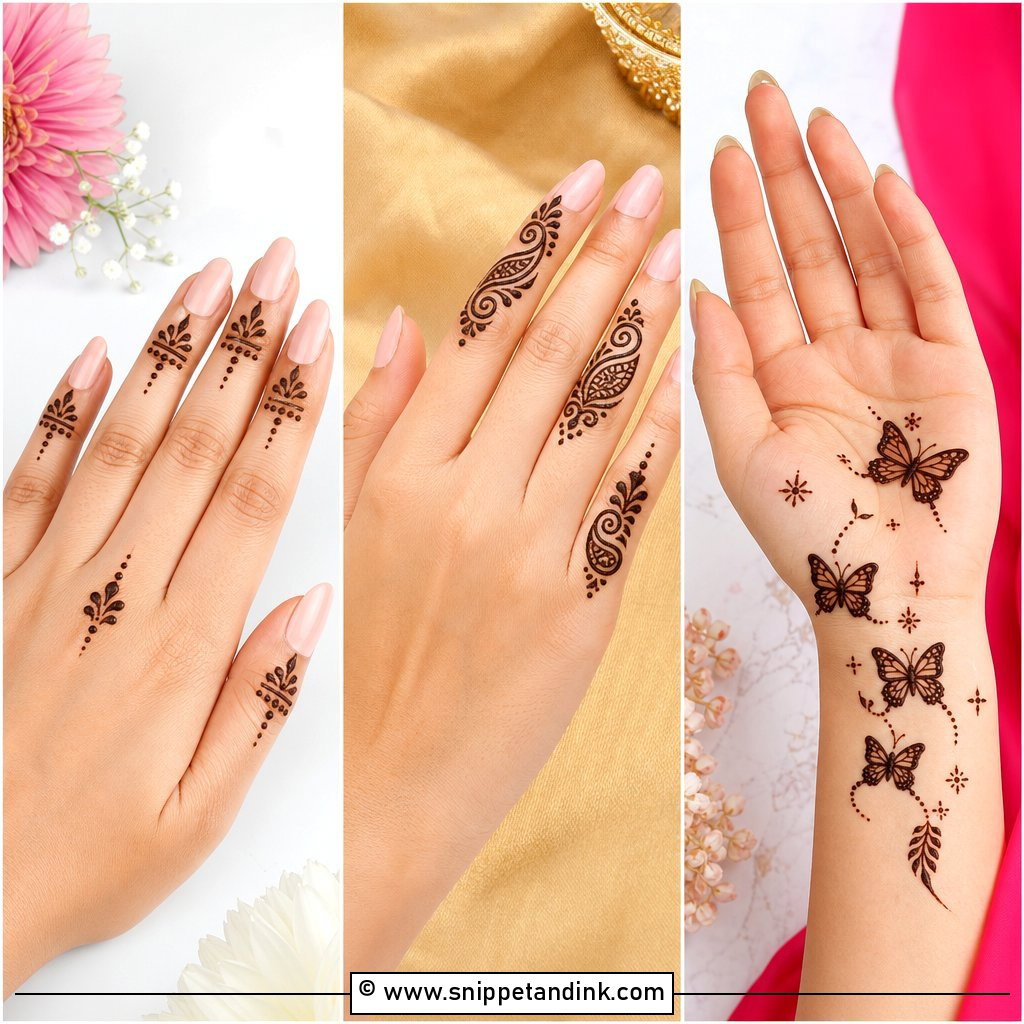
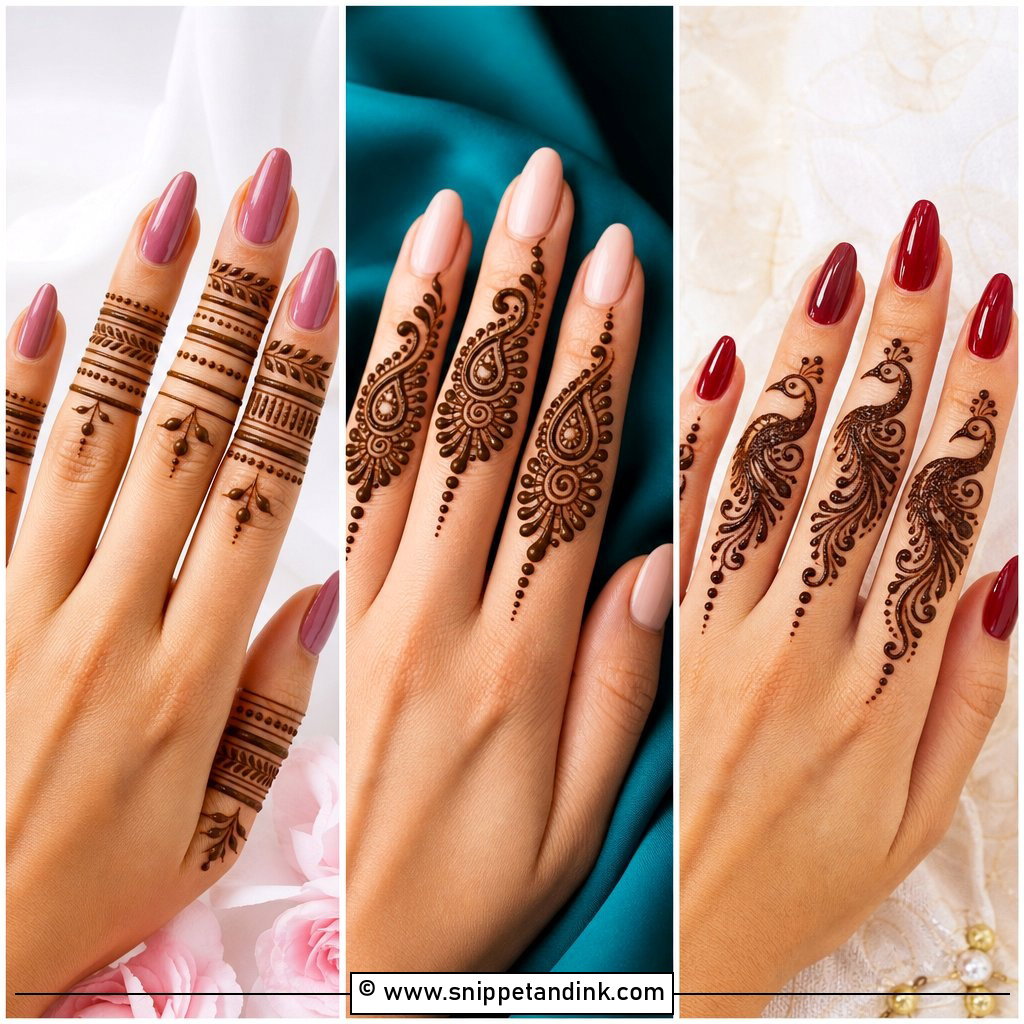
Decorating only the fingers gives a clean, modern result in a fraction of the time. Each finger gets matching bands, small leaves, dots or a floral cap, and a little mandala or a bracelet line at the wrist ties the look together. The rhythm matters more than the motif: if each finger repeats the same sequence, the hand reads as one design. I fill the fingertips solidly for the darkest contrast, since fingertip skin takes stain more strongly than almost anywhere else on the hand.
7. Simple Bracelet Mehndi Design
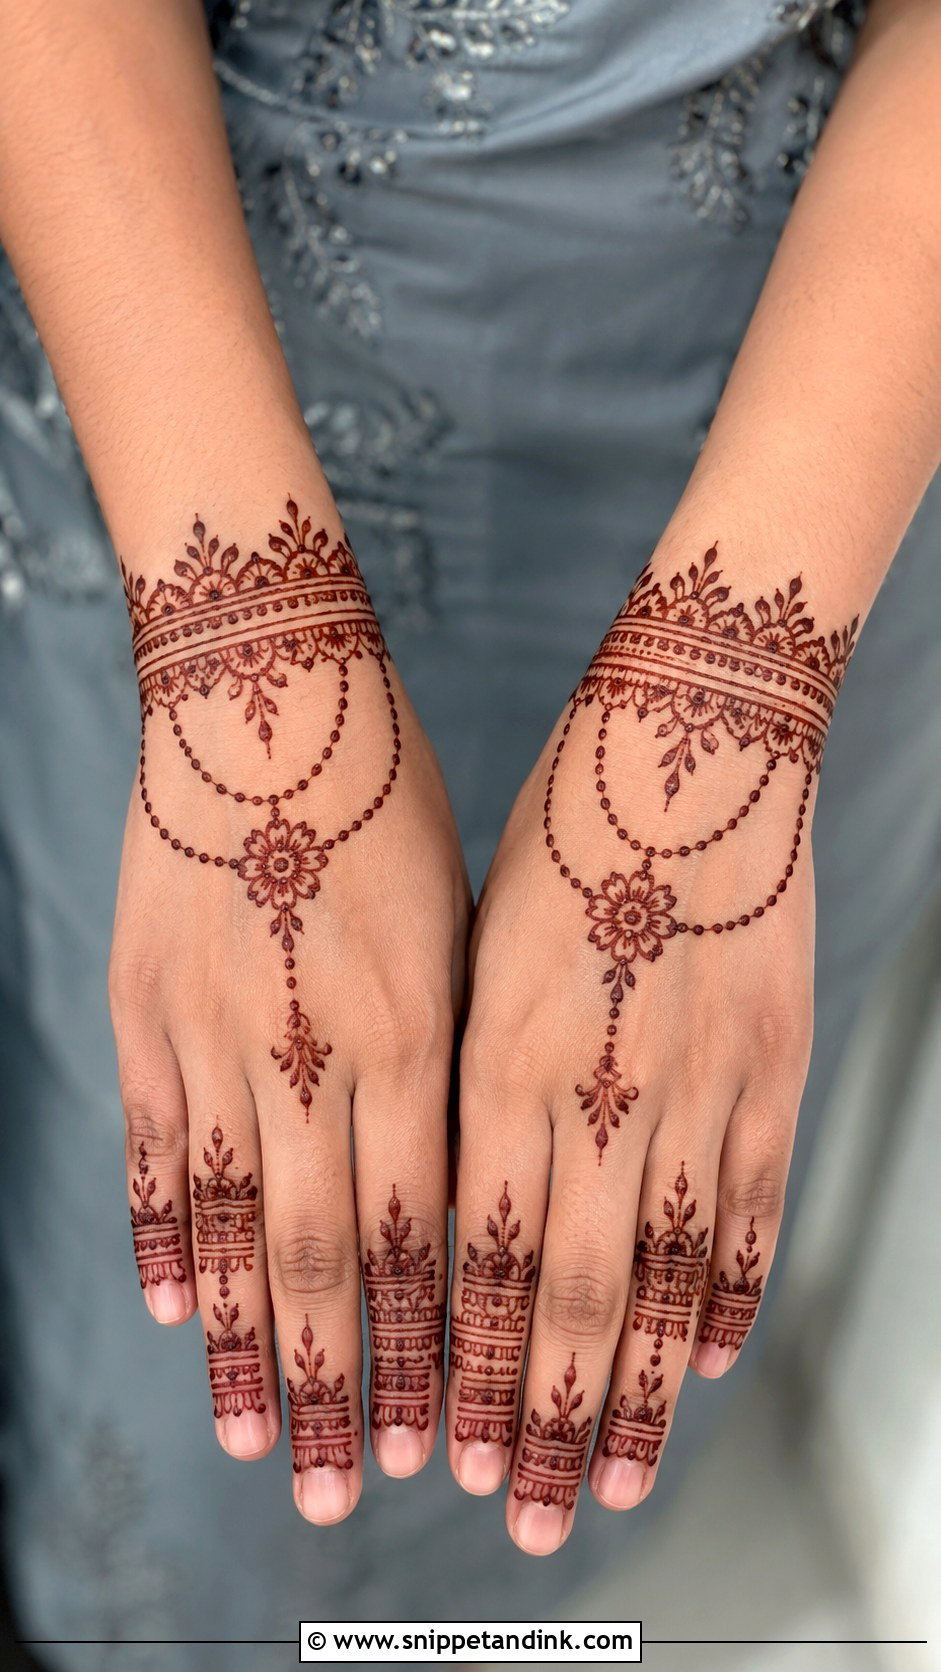
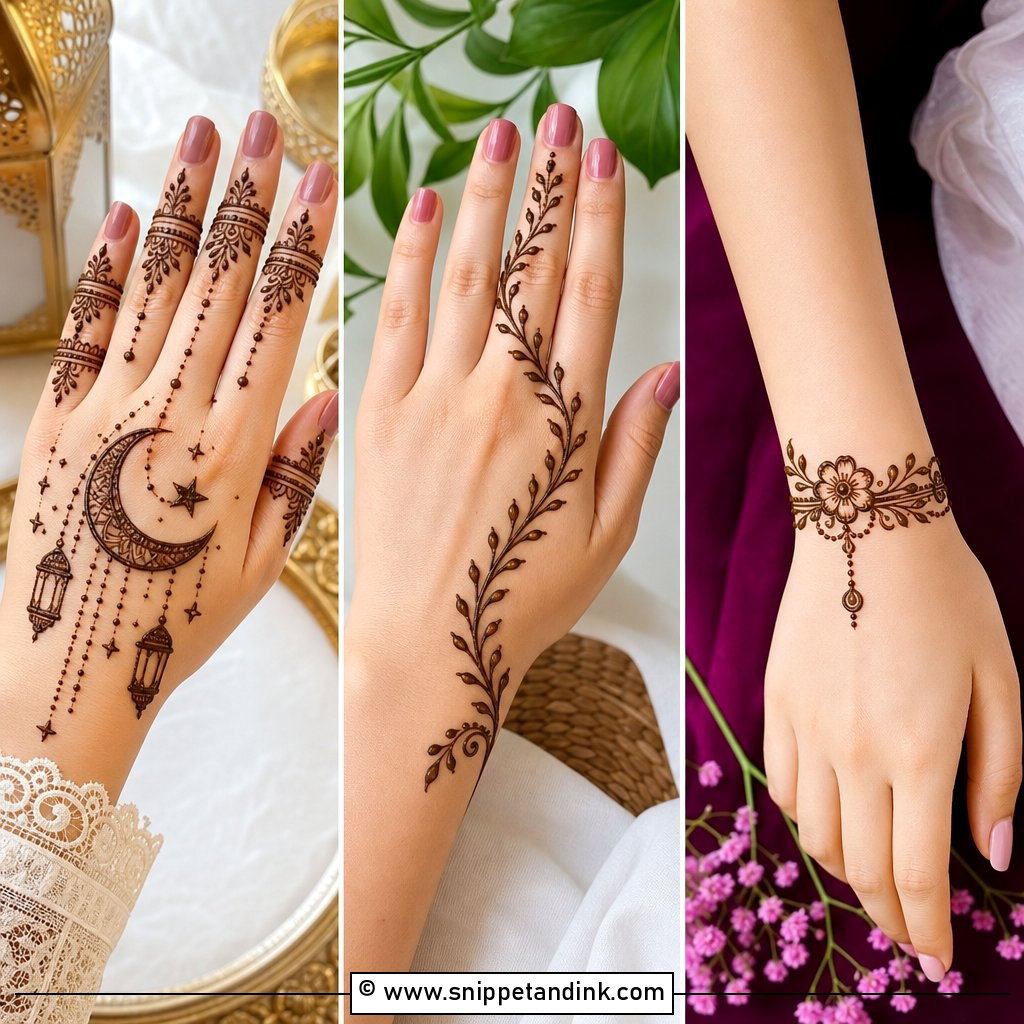
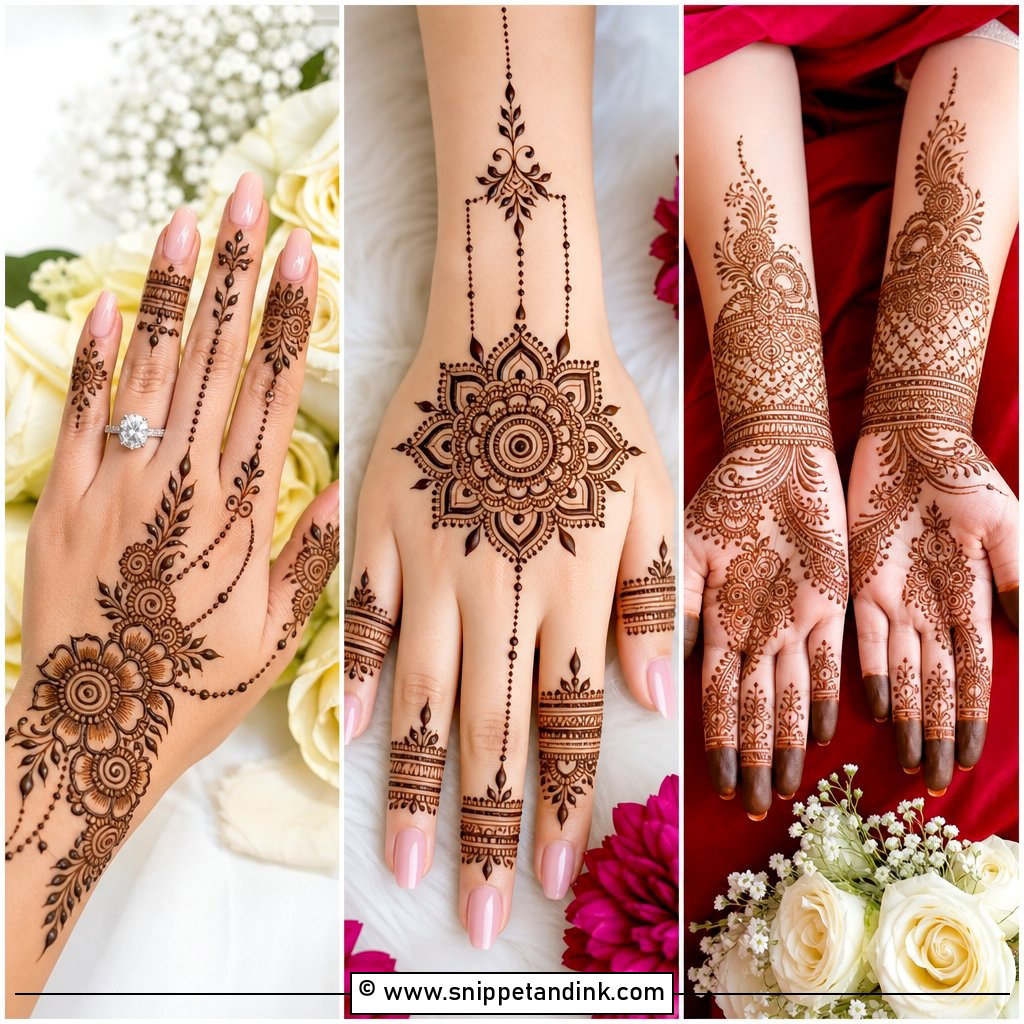
A bracelet design wraps the wrist in two or three thin bands with small flowers, dots and leaf borders between them. From the center of the bracelet, a fine chain runs to the middle or ring finger and ends in a tiny ring, which gives the haath phool effect of hand jewelry. It looks complete with almost no palm coverage. The structure is just lines and repeated dots, so it’s one of the best practice pieces for steadying your pressure. Keep the chain thin; heavy lines lose the jewelry look.
8. Easy Palm Mehndi Design
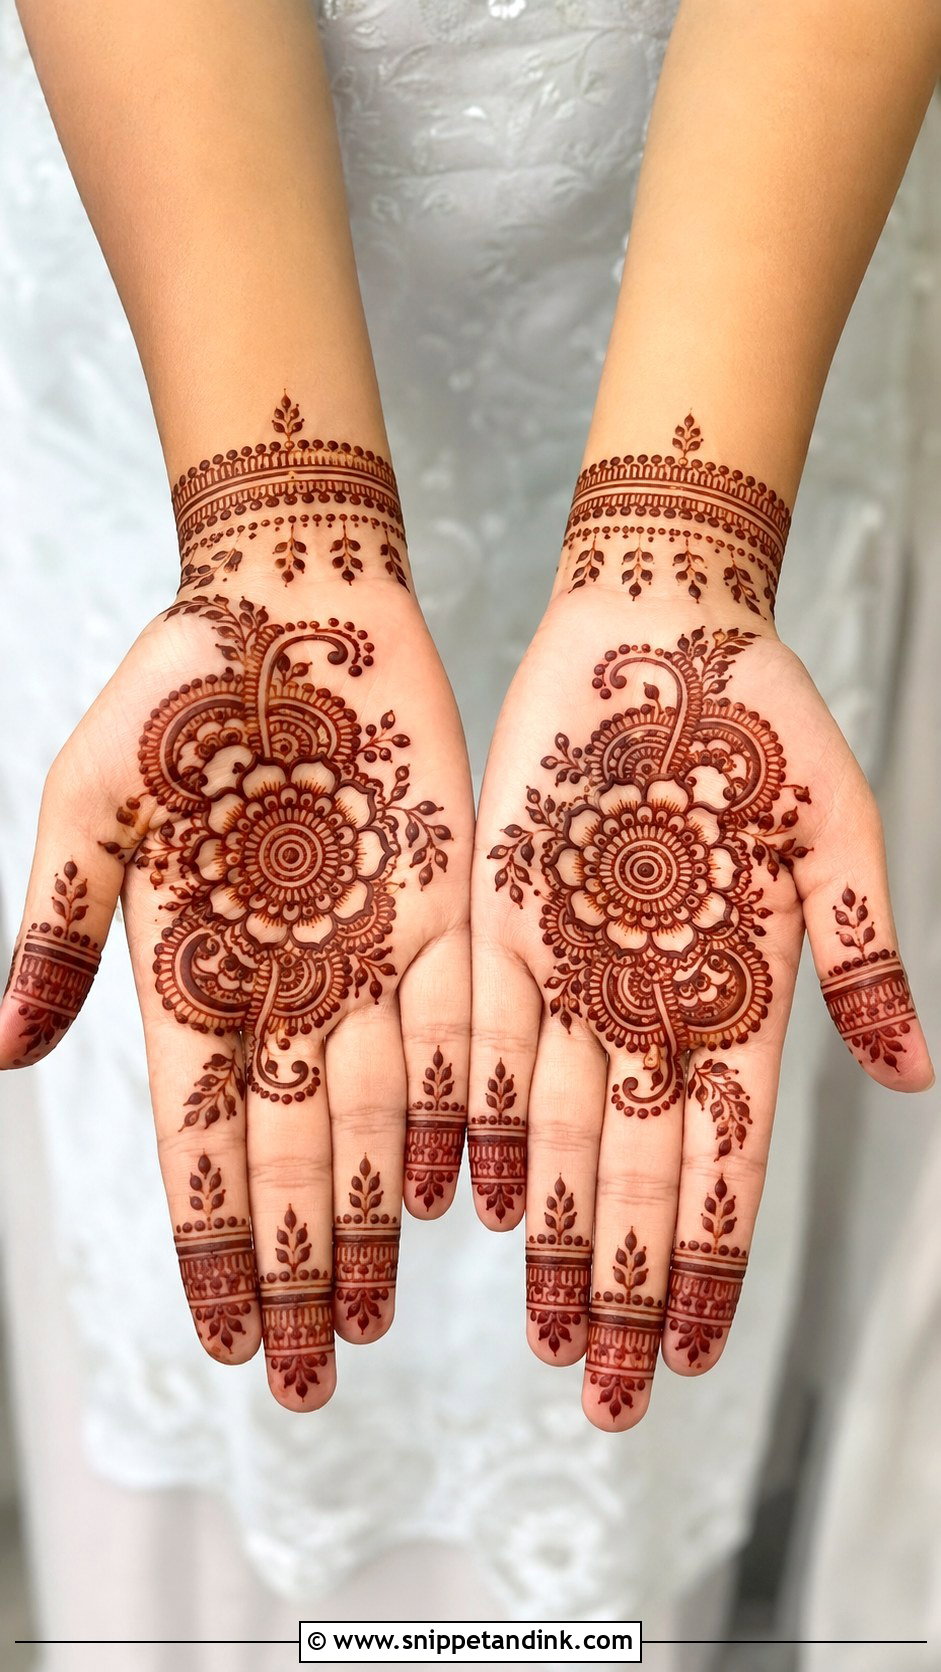
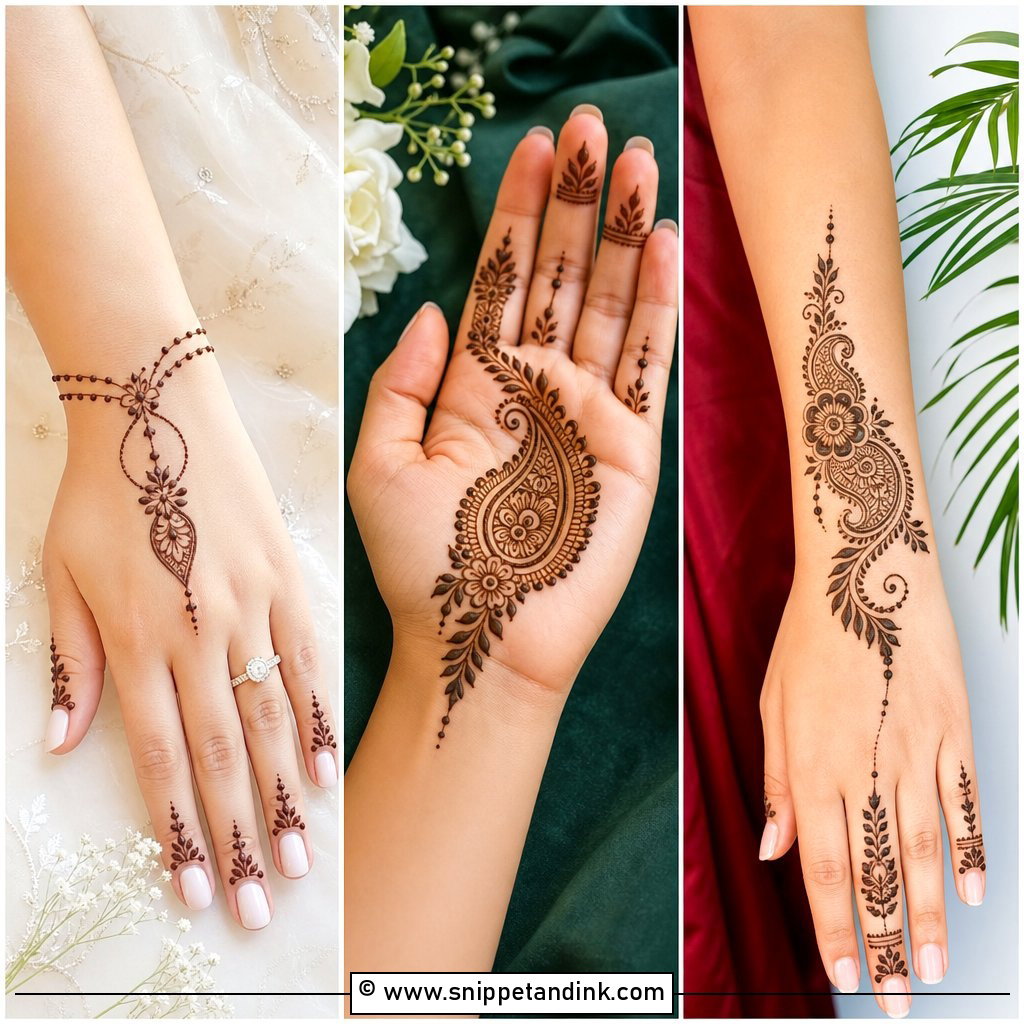
A palm design should feel full without being crowded. I set a bold mandala or flower in the center, curved paisleys near the base of the palm, and dots, small leaves and short lines in the gaps. The fingers take simple horizontal bands, little petals or shaded tips, and a narrow wrist border stops the design ending abruptly. The palm usually gives the deepest color on the hand, so this layout is the one I’d choose for family photos where you want the henna to show.
9. Simple Vine Mehndi Design
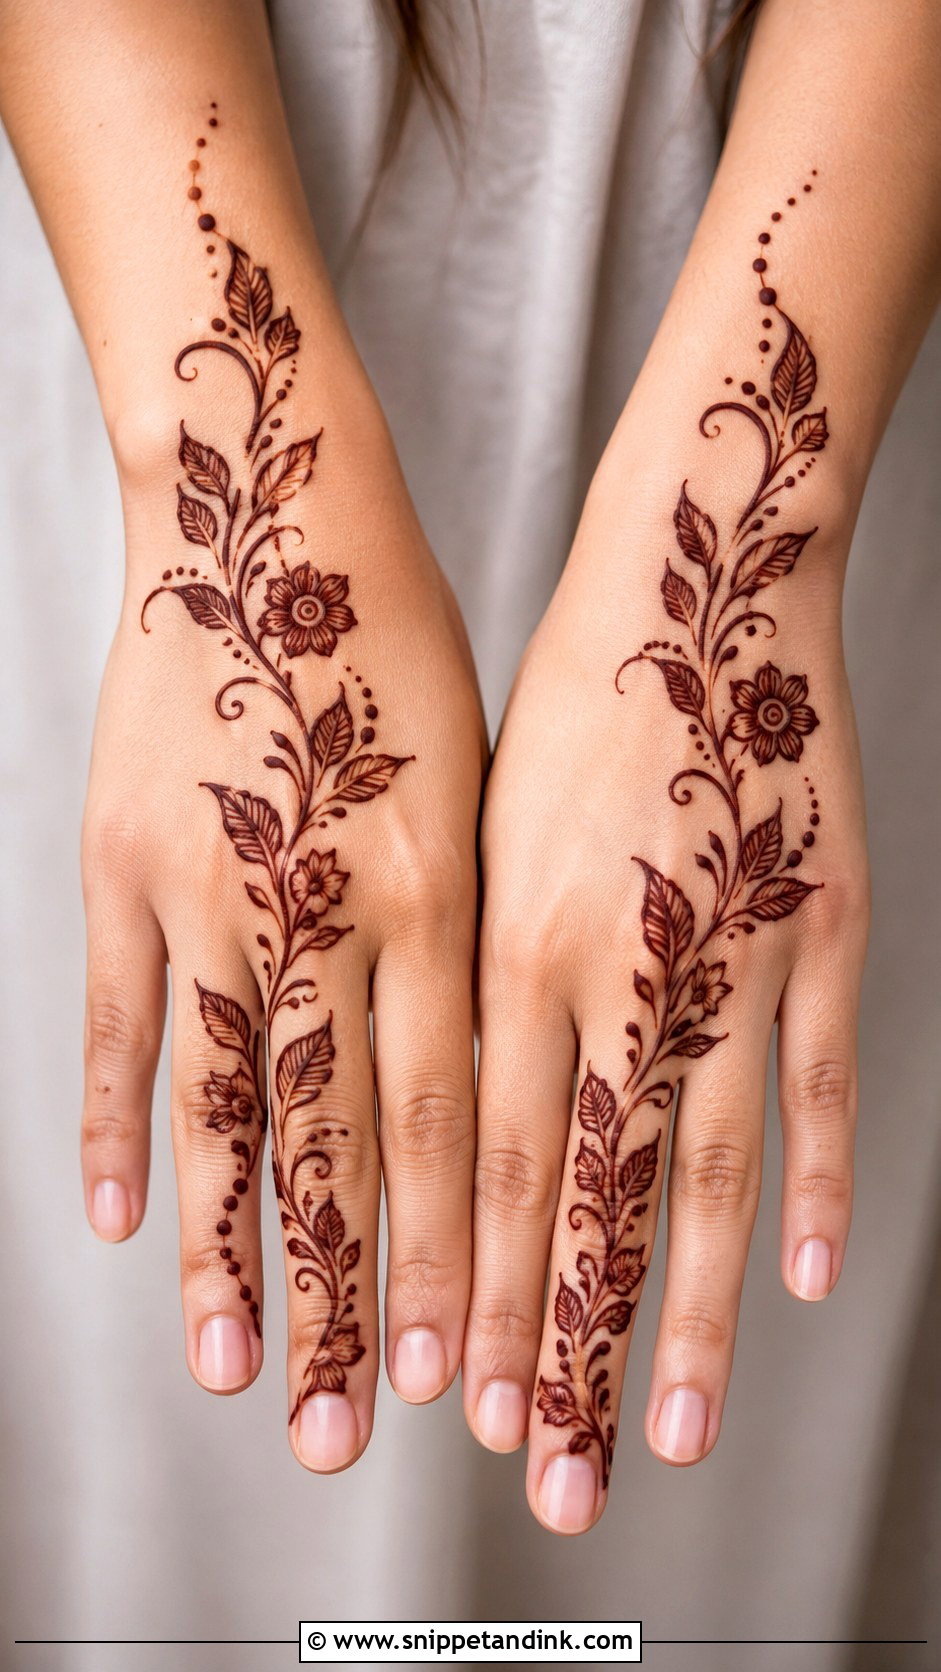
One curved stem runs from the wrist toward the index finger, with leaves on alternating sides and two or three small flowers along the way. Everything else stays open. I’d always draw the stem in one smooth movement rather than short strokes; joins show up clearly once the stain darkens. Dots around the trail make it feel finished. Because it has no strict symmetry, it suits narrow hands, wide hands and short fingers equally, and the curve can be bent to follow the shape of each hand.
10. Easy Paisley Mehndi Design
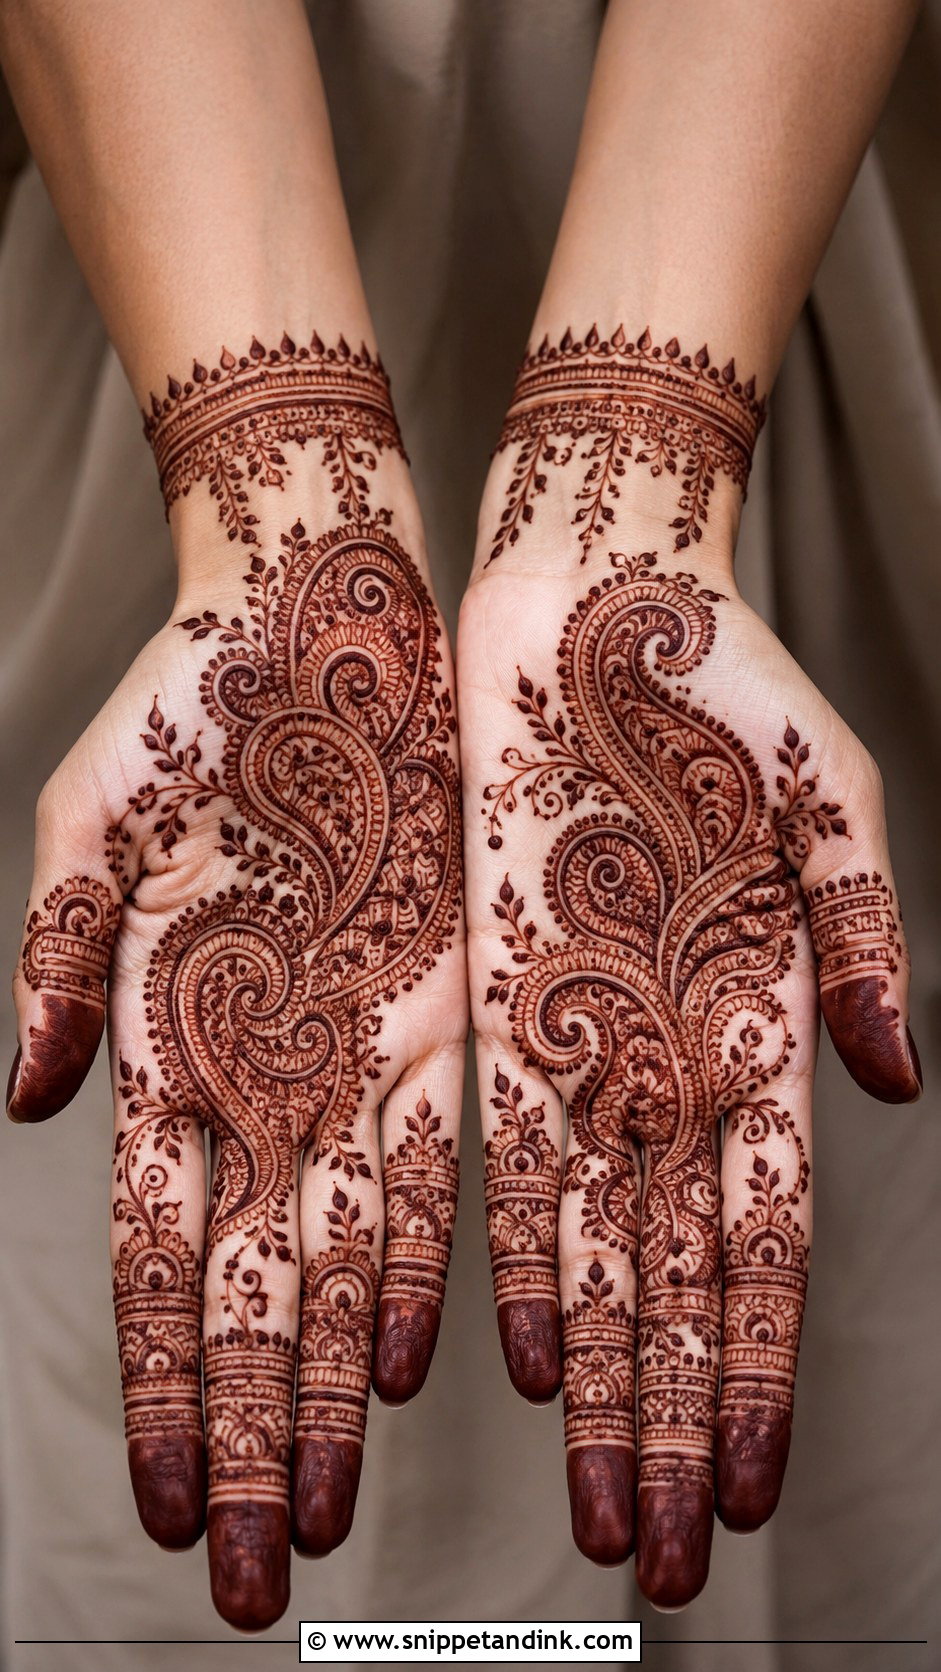
Paisleys look detailed, but a bold outline does most of the work. I start with one large paisley on the palm or back hand, add a smaller one beside it, and join them with leafy vines. Inside, I use dots, curved lines and small petals instead of dense shading, which keeps it quick and lets the stain read clearly. Simple finger bands complete the hand. The curved teardrop shape is easy to adjust mid-line, so if the tip drifts, you can widen the body to match.
11. Simple Indo Arabic Mehndi Design
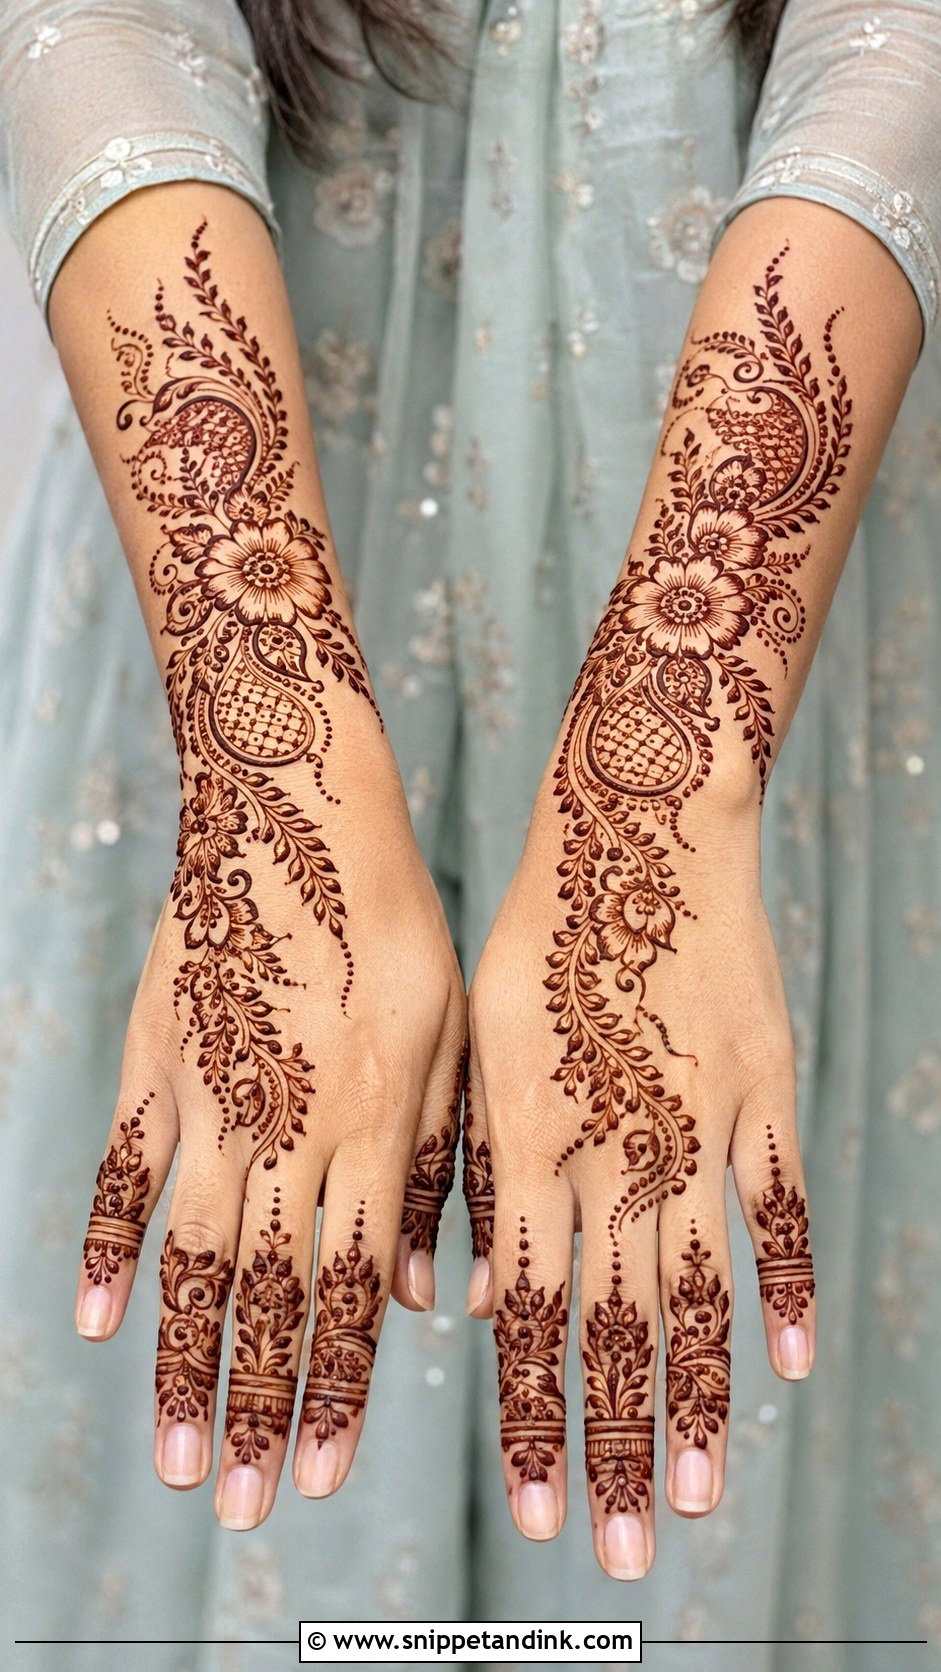
A simple Indo Arabic mehndi design takes the open diagonal trail of Arabic work and fills a few chosen flowers with Indian-style detail: dots, a small jaali panel, a mini paisley. The rest stays airy. I always pipe the whole trail first and only add the inner details once the structure is right, because filling as you go tends to pull the trail off course. It looks festive enough for a wedding, Eid or Diwali without the hours a full Indian design takes.
12. Easy Back Hand Ring Mehndi Design
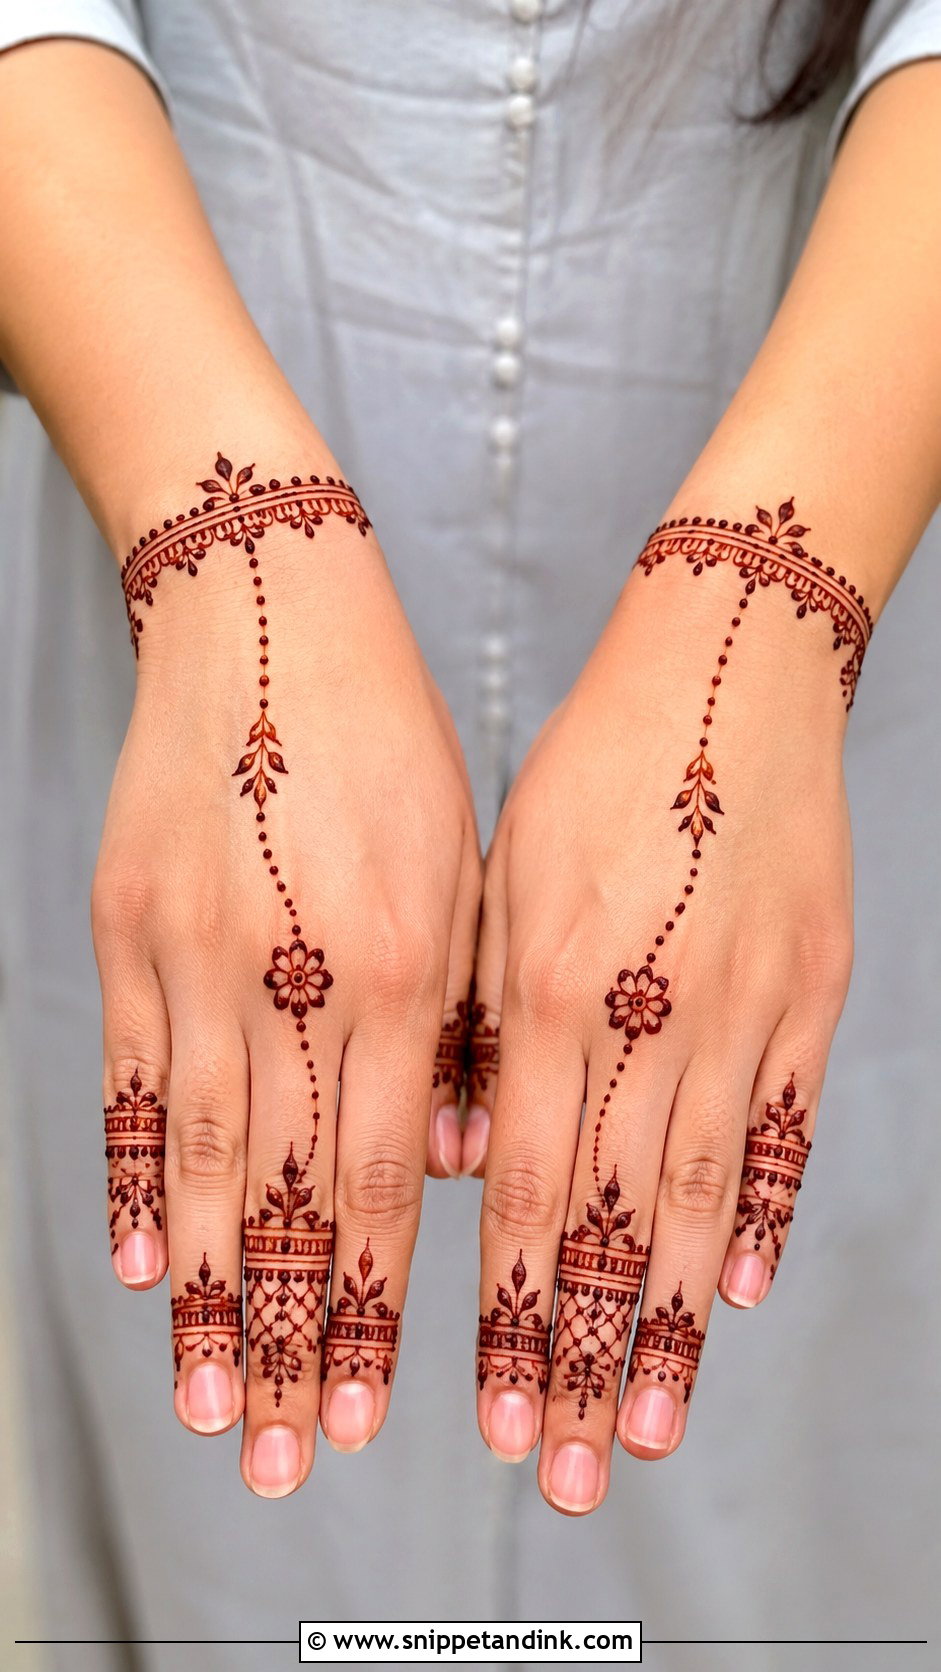
This design makes the hand look as though it’s wearing jewelry. A small ring pattern goes around the middle or ring finger, a dotted chain crosses the back of the hand, and it ends in a bracelet at the wrist. Tiny leaves or flowers along the chain soften it, and the other fingers get thin bands or a few dots. I find it one of the most popular choices for engagement guests and bridesmaids, because it looks dressed for an event yet sits lightly next to a bride’s full work.
13. Simple Full Hand Mehndi Design
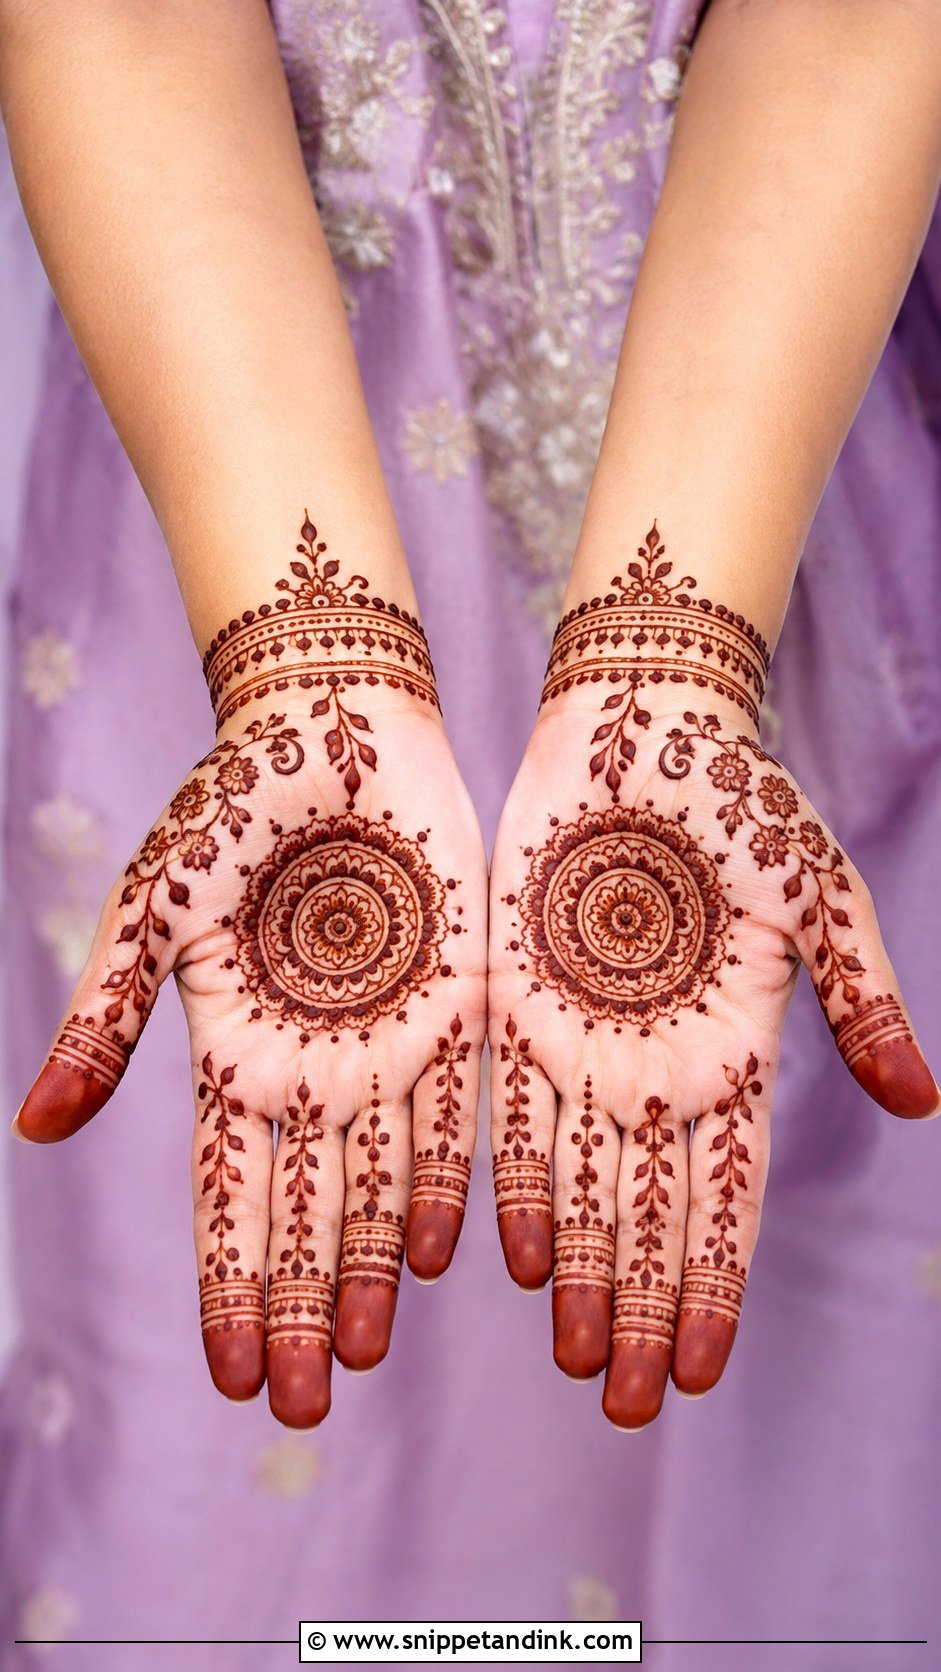
Full coverage doesn’t have to mean dense or difficult. I divide the hand into four zones, fingertips, fingers, palm and wrist, and give each its own simple job: a central mandala, floral vines on both sides, repeated lines and dots on the fingers, and a bracelet border at the wrist. Leaving a little bare skin between zones keeps it from turning into a heavy bridal look. Repeating a few easy patterns neatly always looks better than cramming in many complicated motifs.
14. Easy Half Hand Mehndi Design
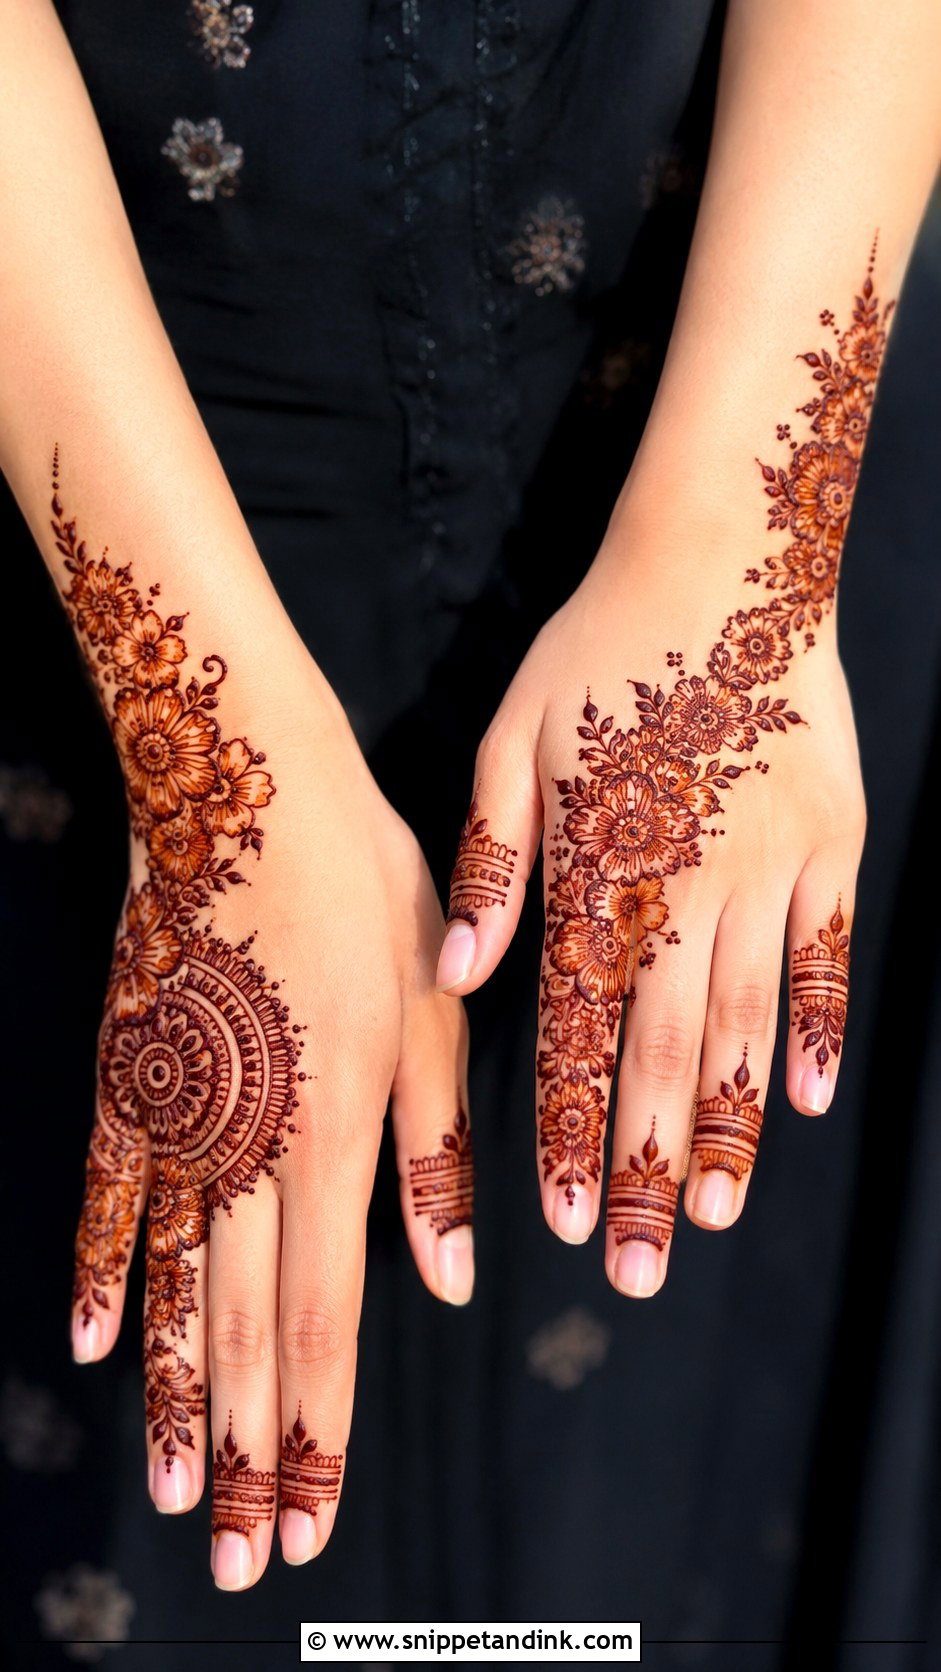
Half-hand designs cover either the fingers down to the middle of the palm or the wrist up to it, with the rest left bare. A floral trail runs down one side, finger bands go on top, and a small mandala or paisley anchors the composition. The bare skin is part of the design, so I keep the edge of the pattern deliberate rather than letting it trail off. It’s quick, comfortable for anyone who dislikes heavy coverage, and good practice for planning a layout.
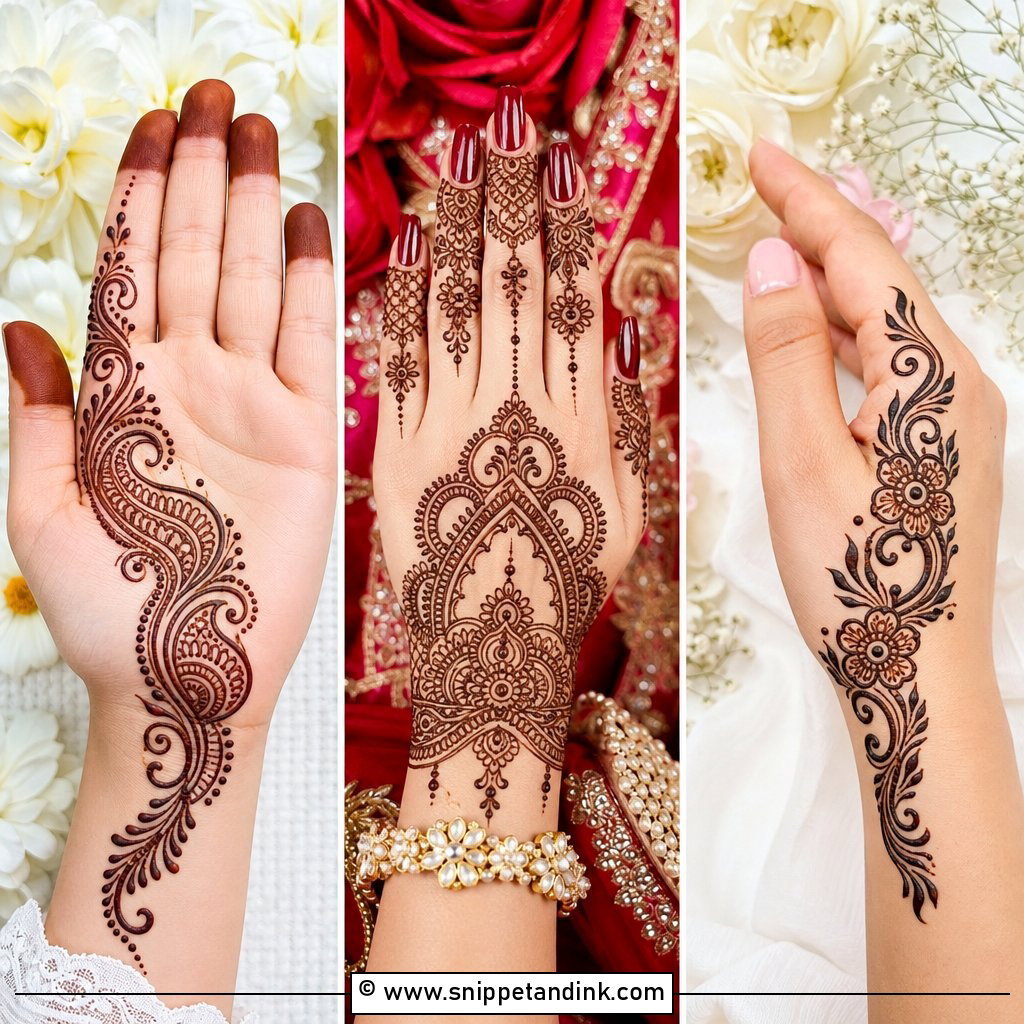
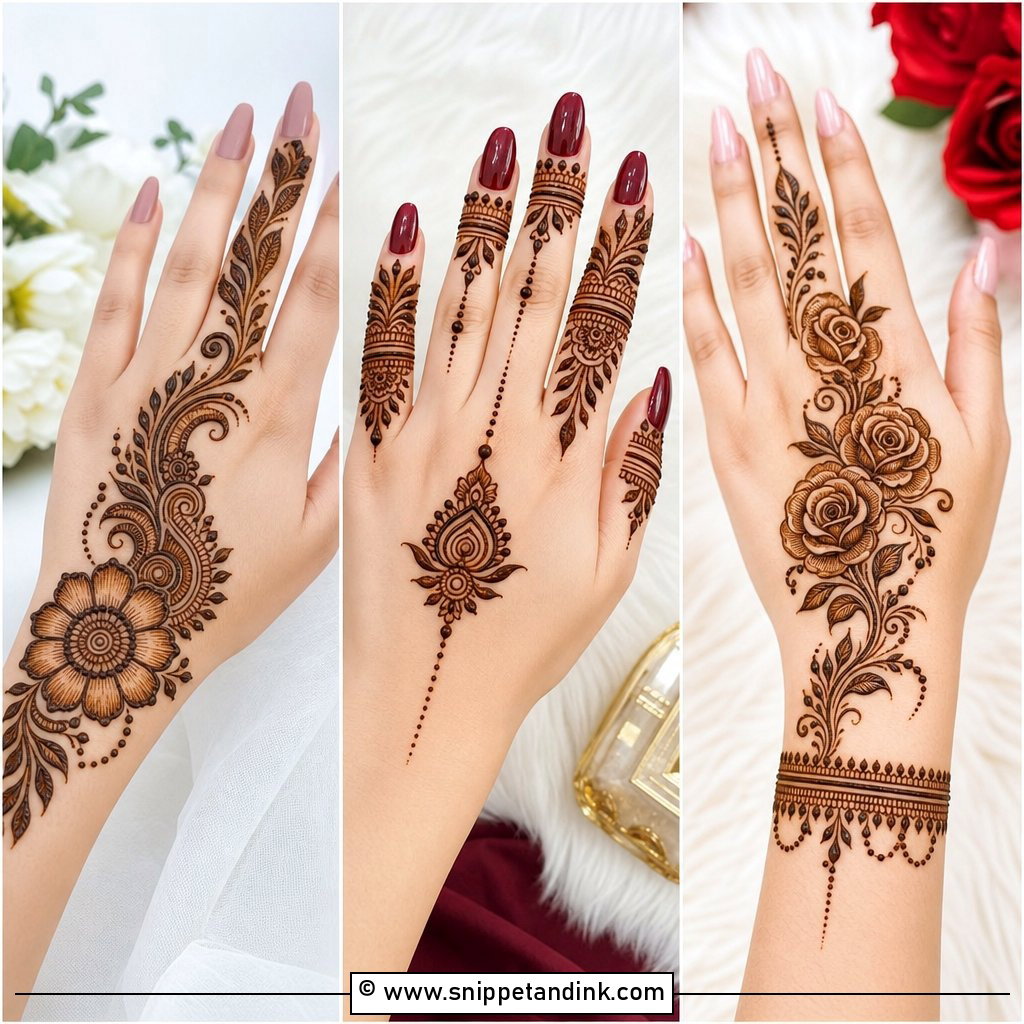
15. Simple Minimal Mehndi Design
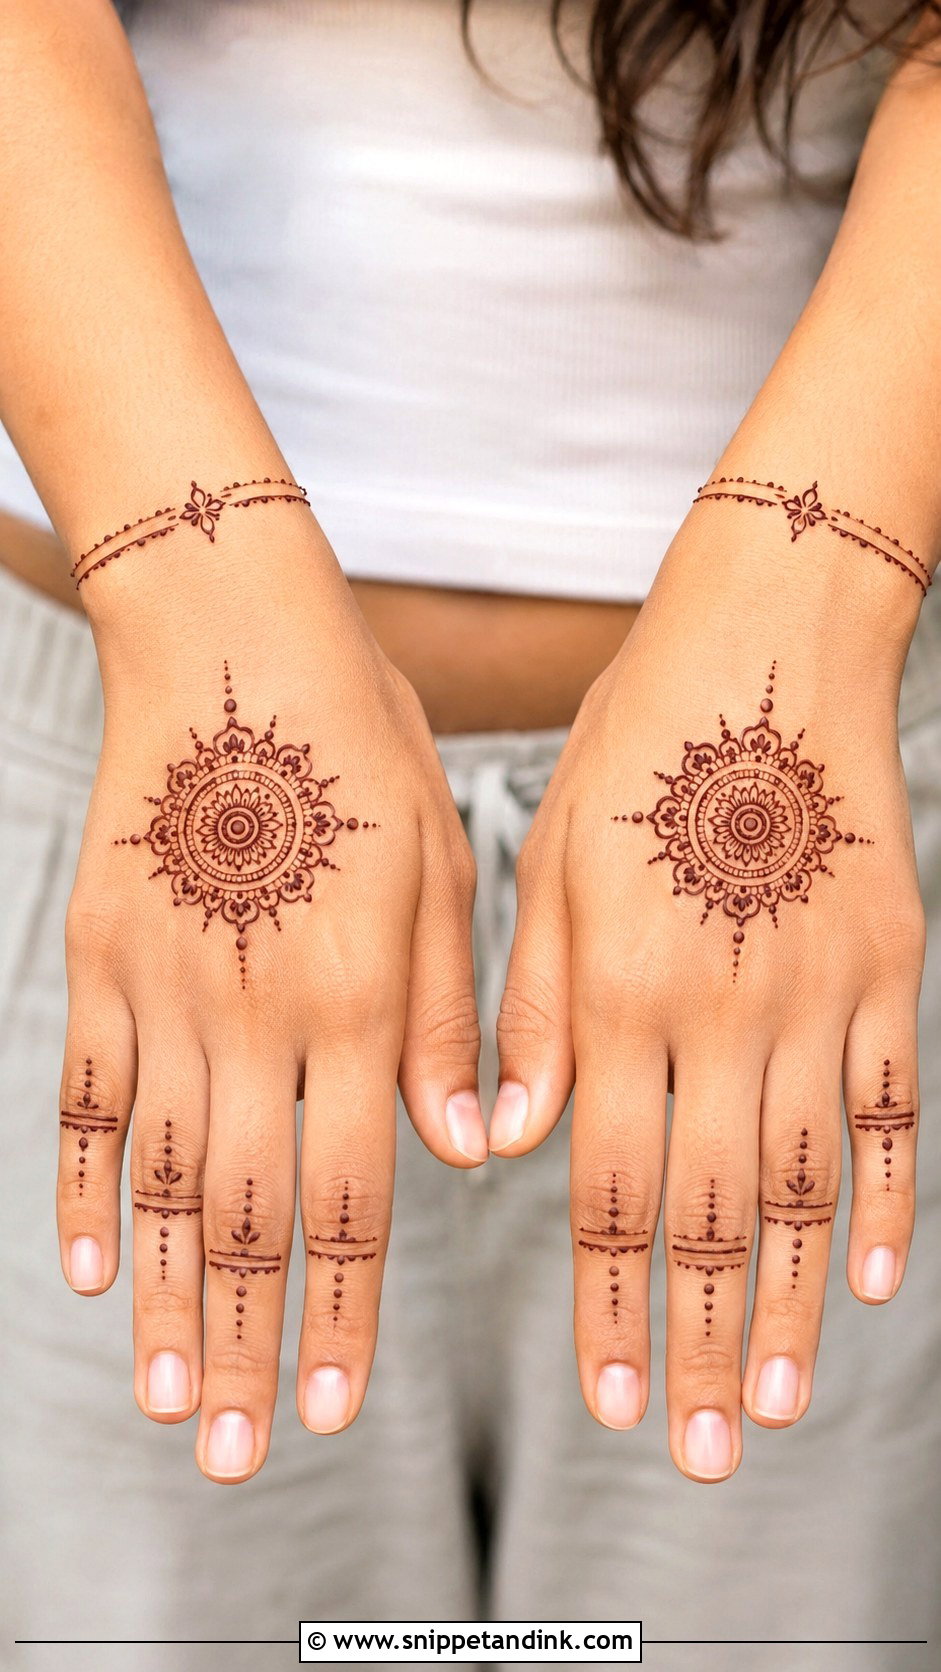
Minimal mehndi works by letting empty skin do half the job. One small mandala on the back of the hand or the palm, a few dots, short finger lines and a thin wrist band are enough. I’ll center it for a neat look or push it slightly to one side for something more modern. It’s discreet enough for a work event or a school function. The catch is that every line is visible, so I’d only choose this once your cone pressure is fairly even.
16. Easy Leaf Mehndi Design
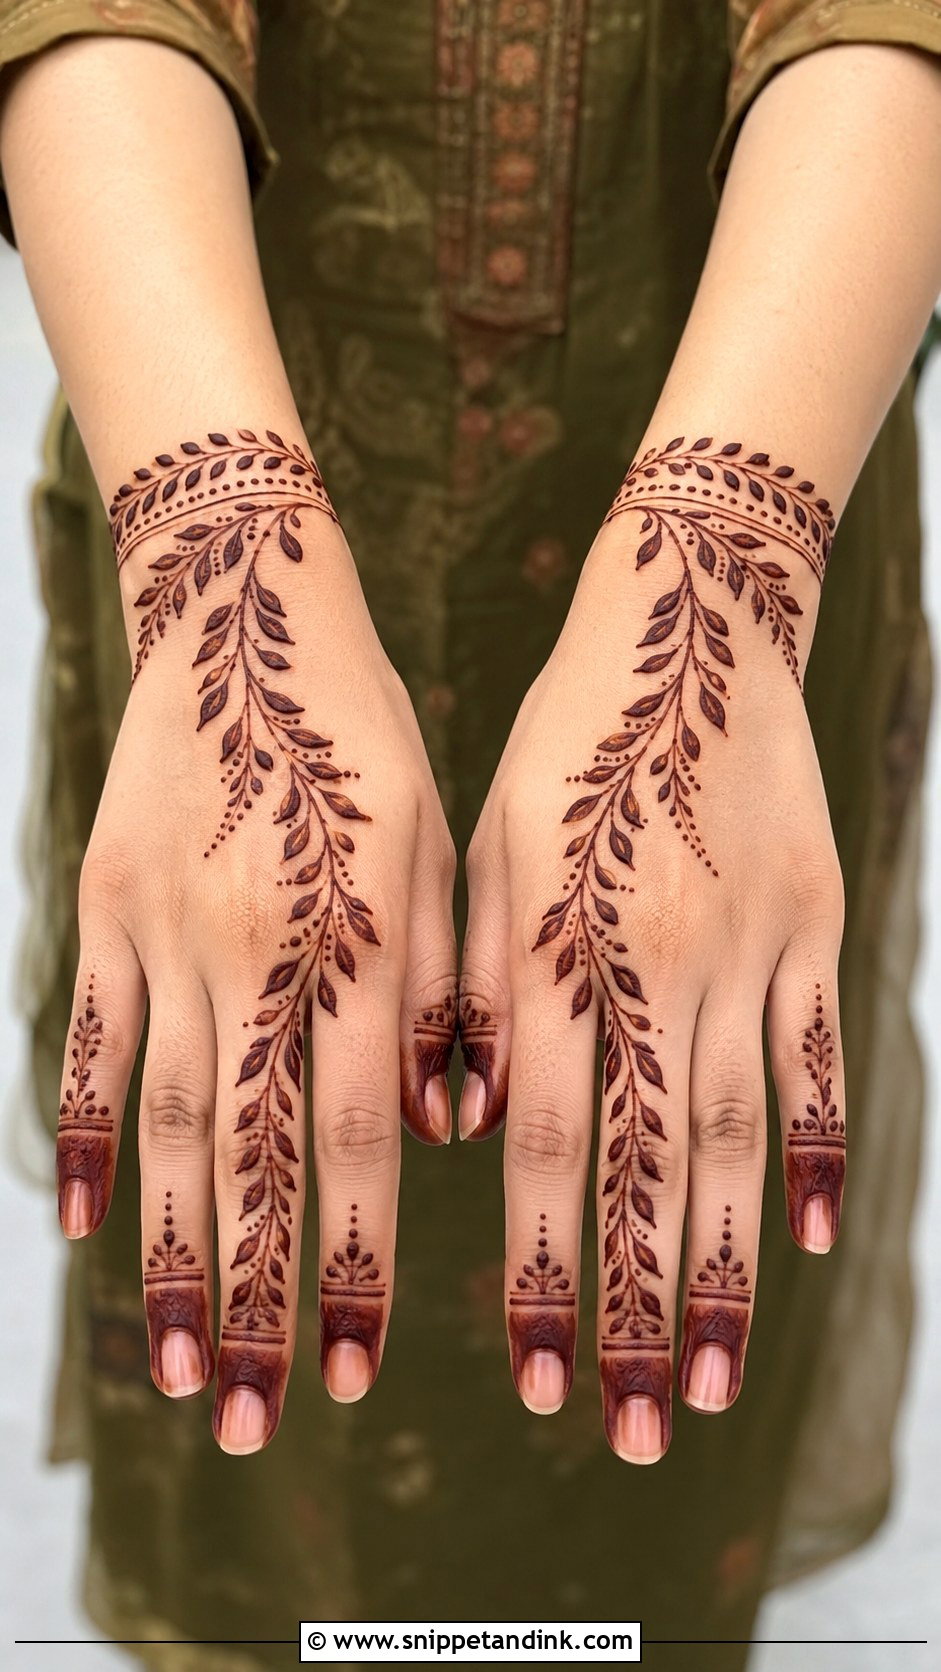
Leaves are the easiest shape in mehndi: two curved strokes that meet at a point. A flowing vine runs from the wrist to the fingers, leaves sit in pairs or alternate along it, and small dots near the vine add movement. A simple wrist band and tiny leaf caps on the fingertips finish it. I vary the leaf sizes slightly so it looks grown rather than printed. It’s a fresh choice for daytime festivals and family gatherings, and it’s quick to apply. Avoid filling every gap; the open skin keeps it light.
17. Simple Jaali Mehndi Design
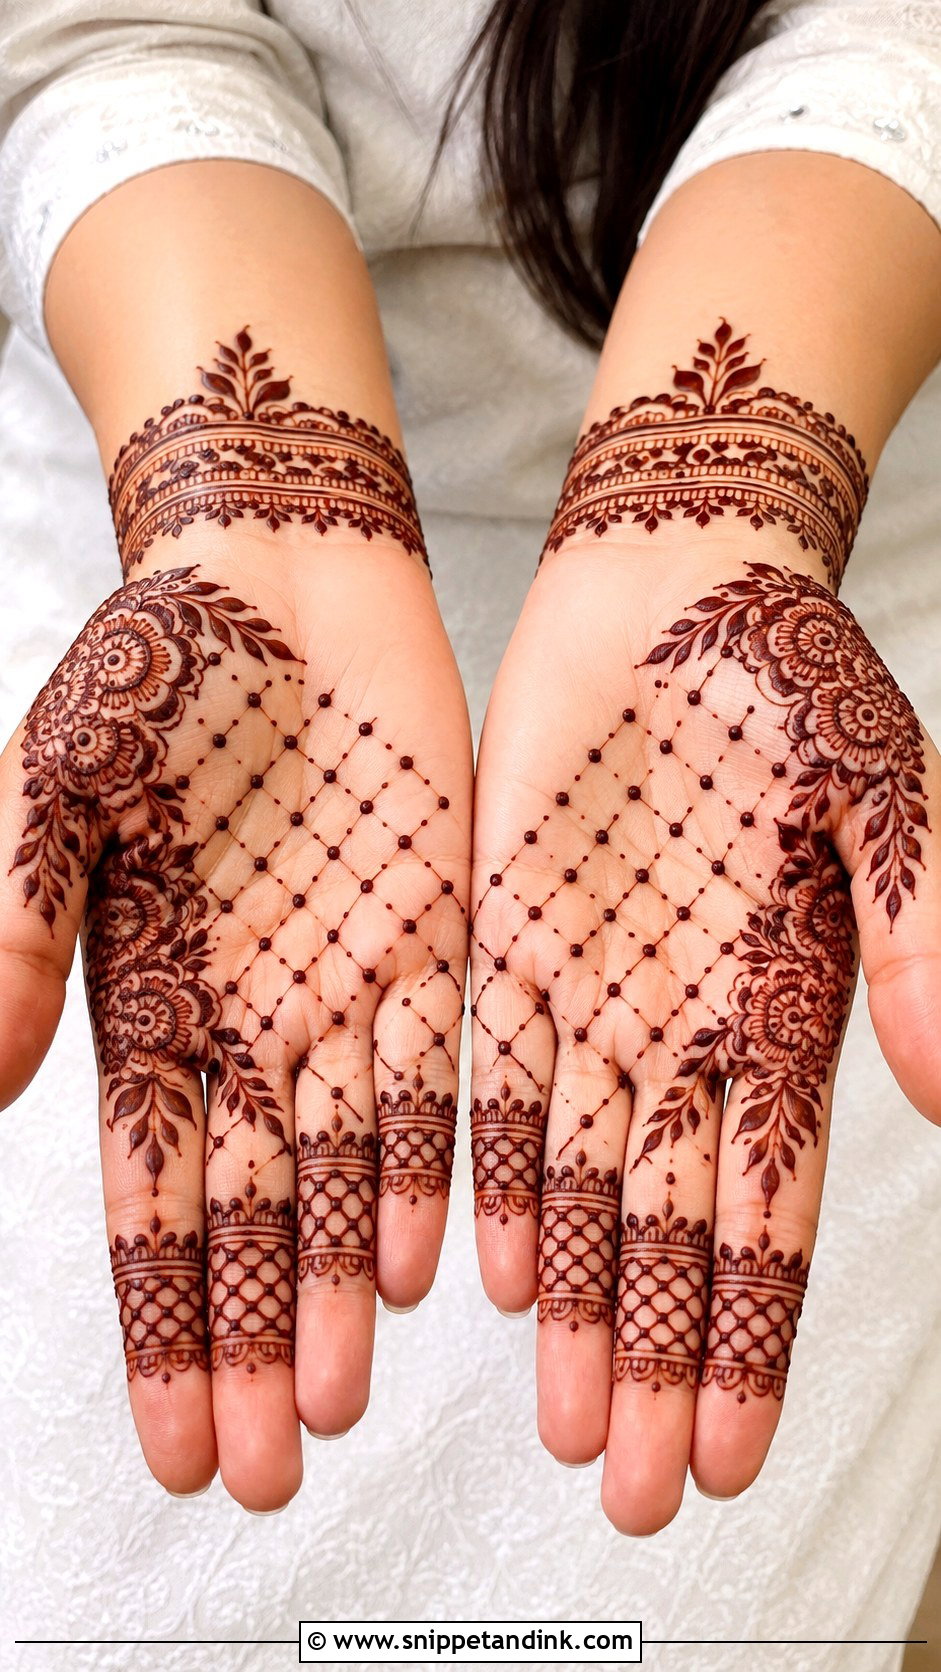
Jaali is a net pattern, and it gives texture without needing many motifs. I mark out a small square, diamond or curved panel, fill it with evenly spaced crisscross lines, and set a dot at each intersection. Flowers, leaves or a simple border around the panel make it feel like a full design, and mini net bands on the fingers echo it. Keep the panel small at first: a large jaali area exposes every uneven line, and evenly spaced straight lines are harder to pipe than they look.
18. Easy Round Tikki Mehndi Design
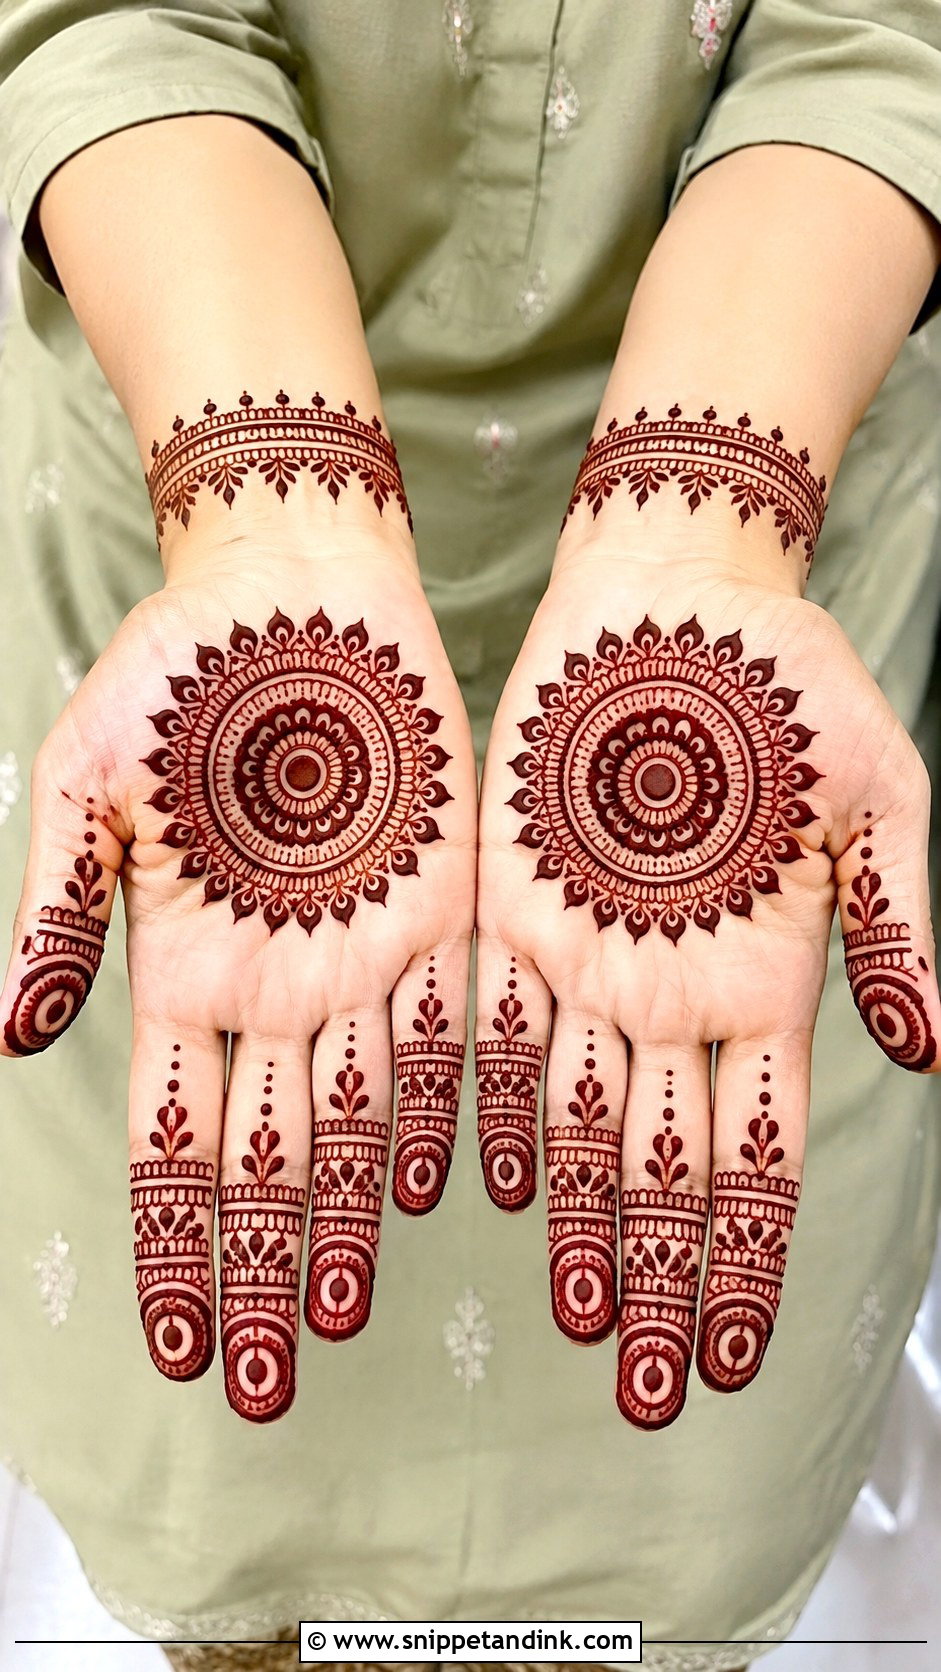
The round tikki mehndi design is one of the oldest layouts there is: a bold circle in the center of the palm, ringed with petals, dots and scalloped borders. Small matching circles on the fingertips or at the base of each finger balance it, and a light wrist border finishes the hand. Draw the center circle slowly, because everything else is built around it and an oval tikki throws the whole design off. It suits Eid, Diwali, Karwa Chauth and children’s hands alike.
19. Simple Kids Mehndi Design
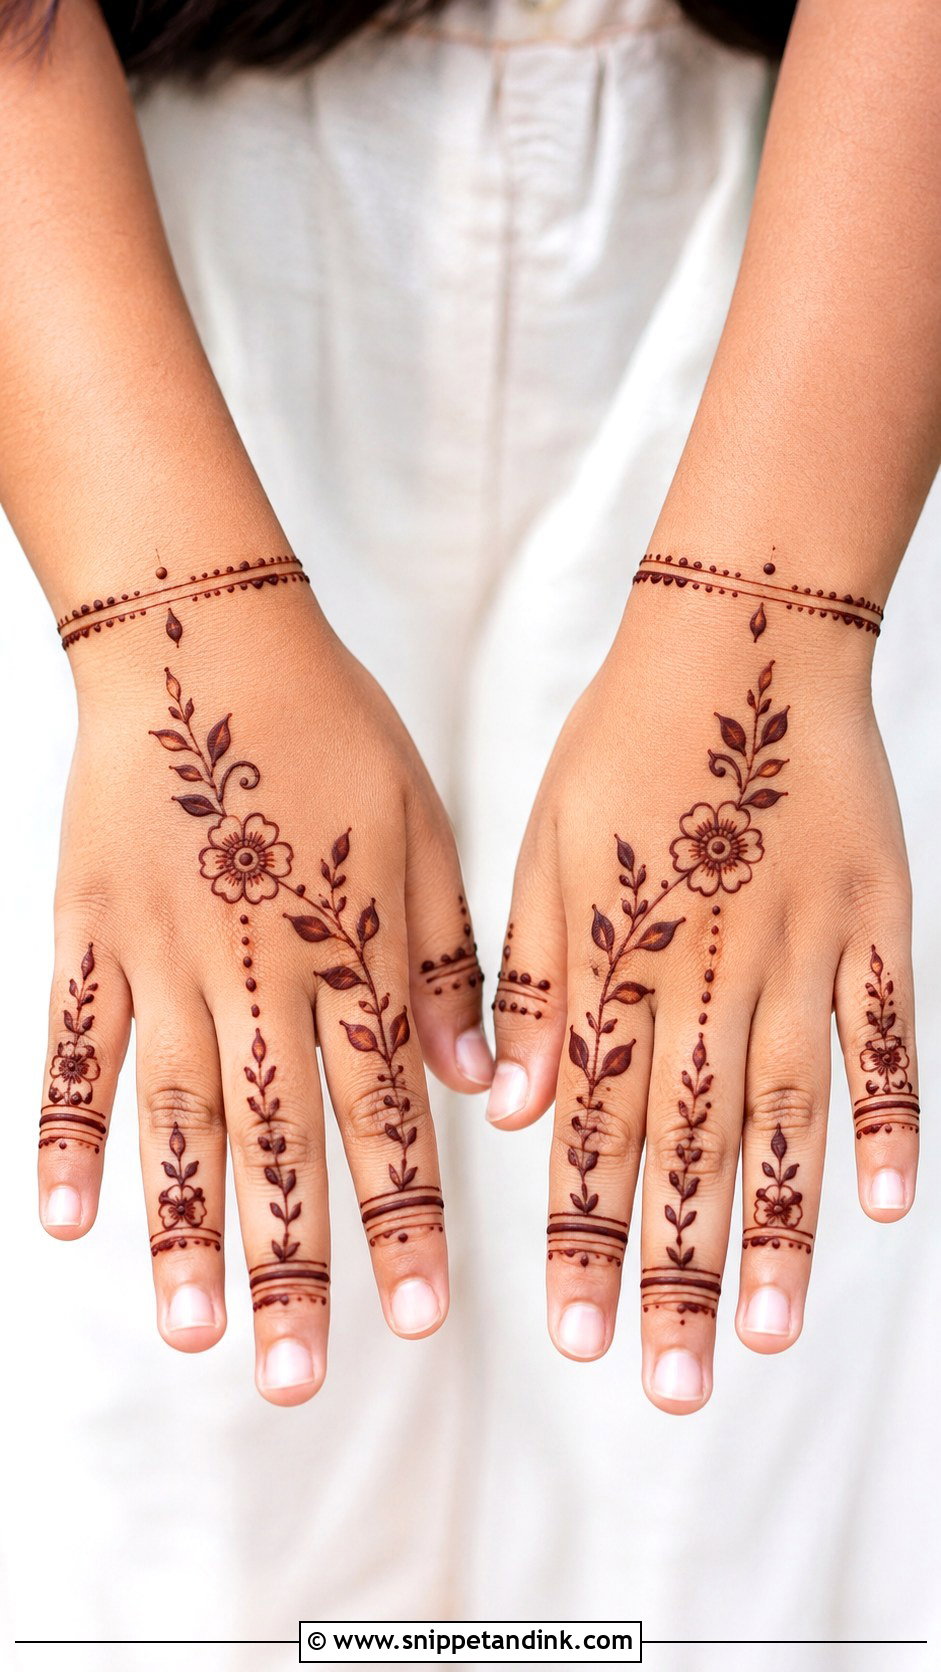
A simple kids mehndi design has to be quick, because most children won’t sit still for long. I pick one small motif, a flower, a butterfly-like shape or a mini mandala, on the back of the hand, and add a few dots, little leaves and simple finger bands. A thin bracelet line completes it. Rounded shapes dry faster and smudge less than fine detail. Only ever use natural henna on children; if a cone promises an instant black stain, it isn’t henna and shouldn’t go near young skin.
20. Easy Eid Mehndi Design
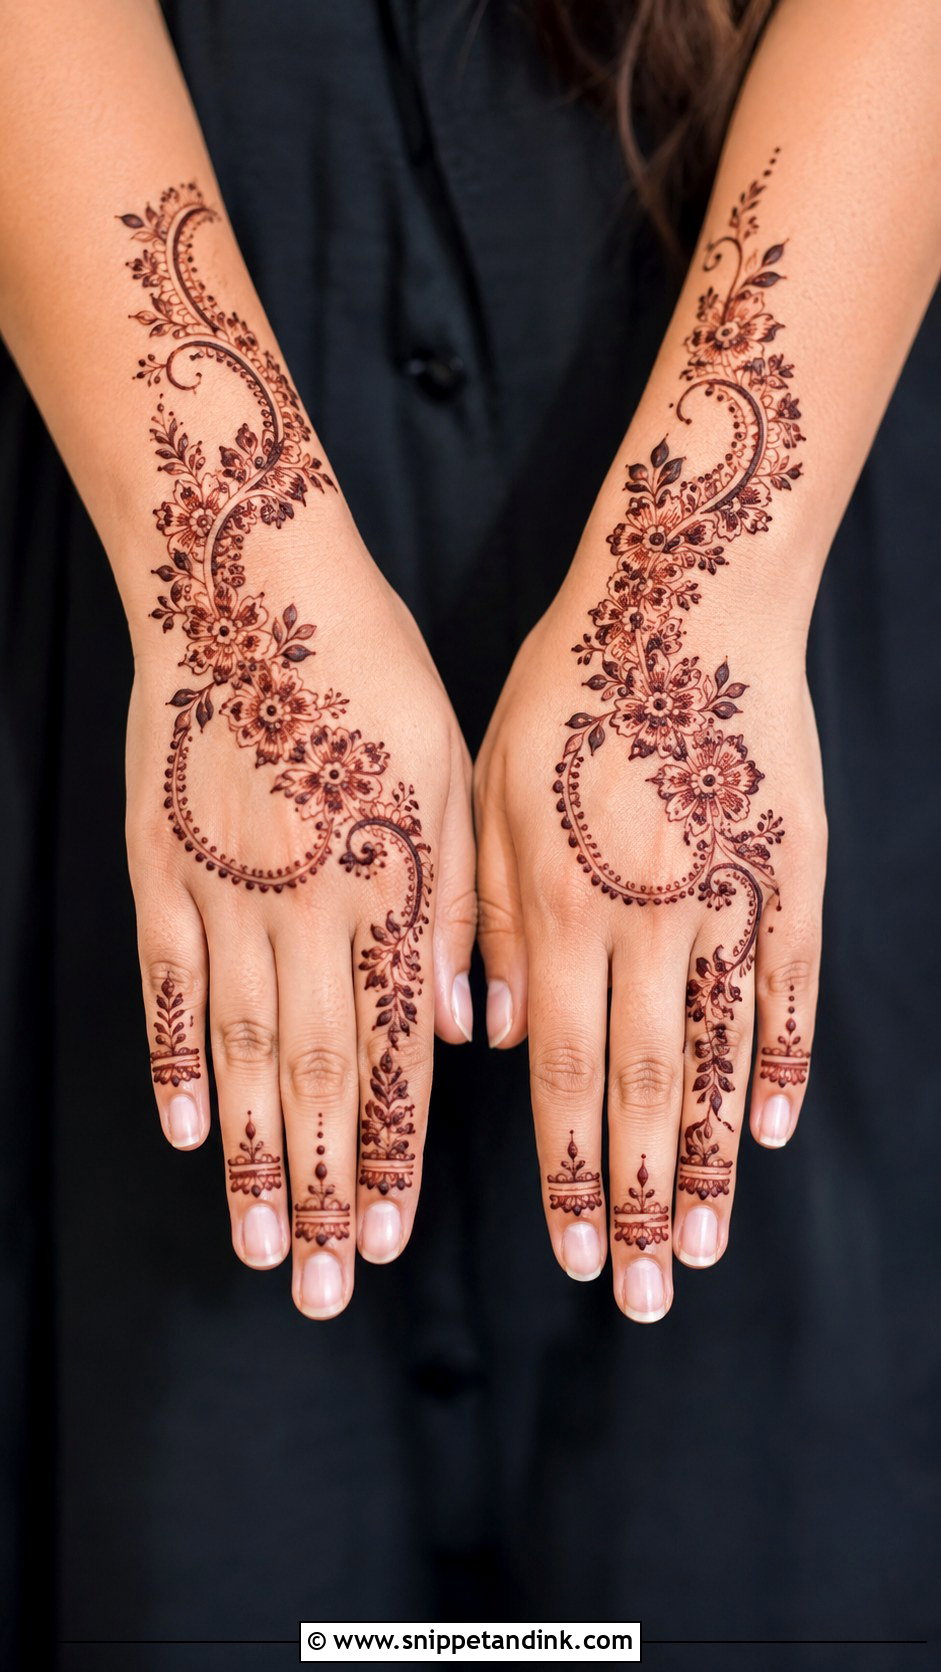
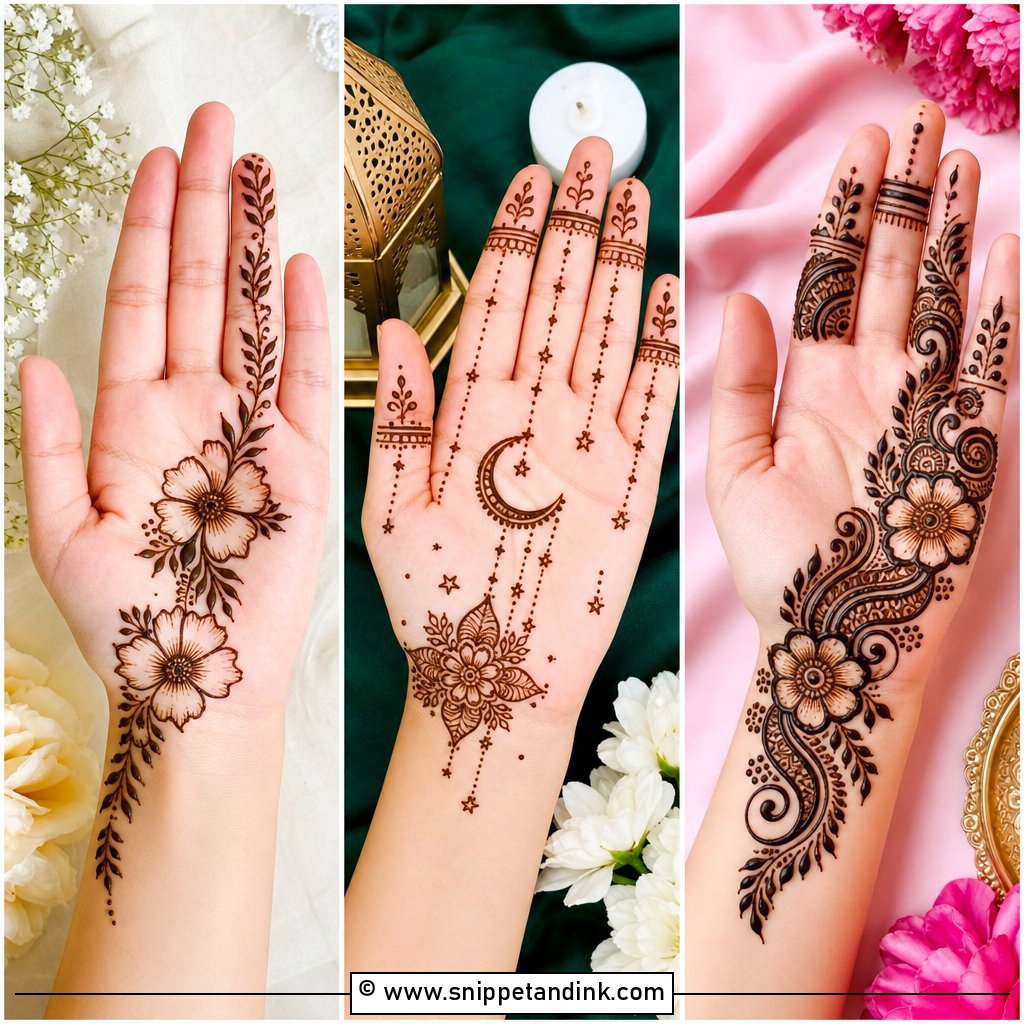
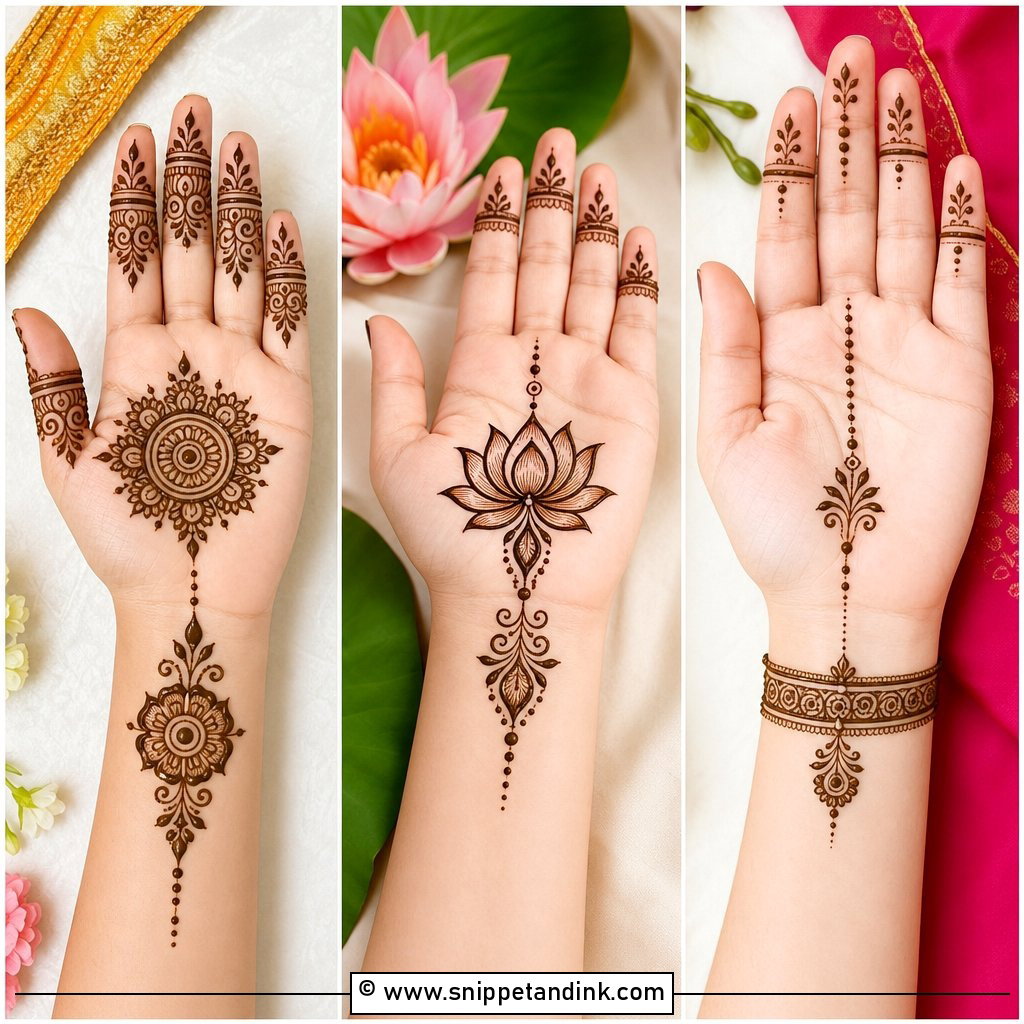
Eid is often a busy morning, so the design needs to be festive but fast. A diagonal Arabic floral trail does that well: flowers, leaves, dots and curves from the wrist to the index finger, with small bands or leafy tips on the remaining fingers. A tiny crescent curve can be tucked in as a festive touch. Whenever I can, I apply Eid henna on Chaand Raat, the night before, so the stain has the whole night to deepen. Outlines first, then dots and small fillers once the trail is done.
21. Simple Diwali Mehndi Design
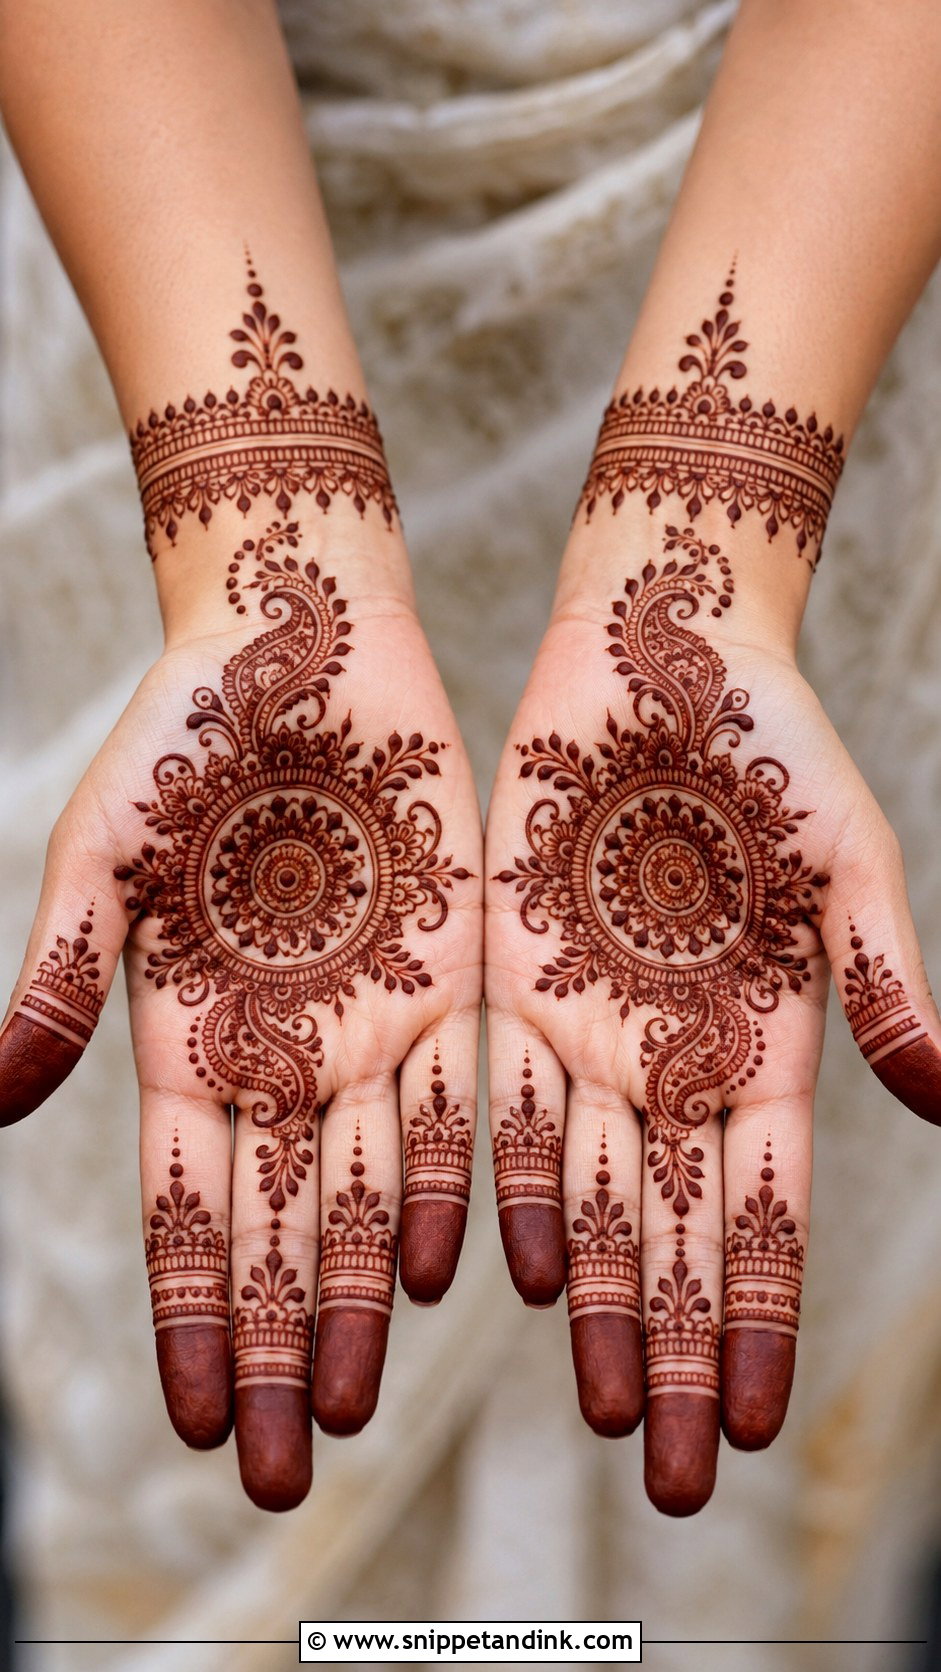
Diwali designs lean on symmetry and traditional motifs. I start with a central palm mandala, add small paisleys and leafy vines around it, and fill the fingers with neat bands, dots and tiny petals. A bracelet border at the wrist makes it feel complete. Medium coverage sits well alongside bangles and bright outfits. If you’re working on yourself, do your non-dominant hand first while you’re fresh; the second hand is always harder because the first one is still drying.
22. Easy Wedding Guest Mehndi Design
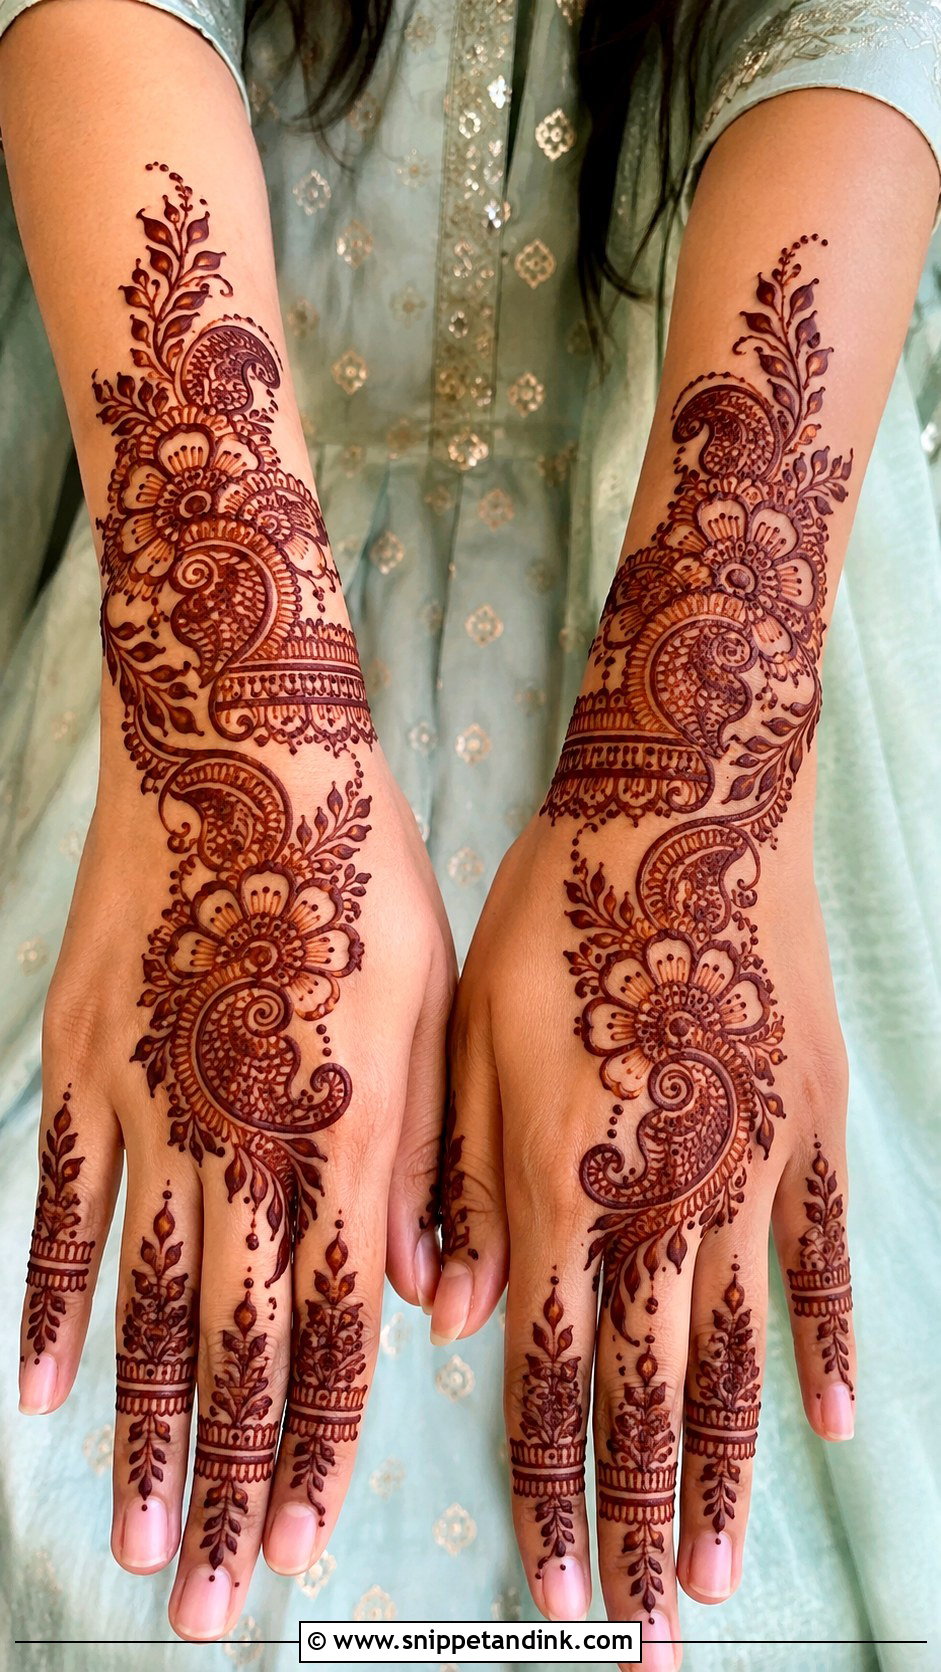
A wedding guest’s hands should look dressed up without competing with the bride’s. An Indo-Arabic layout on the back of the hand does that: a bold floral trail, a couple of small paisleys and a bracelet at the wrist, with open space around the flowers. Finger bands, leafy tips and dots finish it. I’d suggest guests keep coverage to the hand and wrist, leaving fuller arm designs for the bride. Larger flowers and simple fillers keep application time down at a busy mehndi night.
23. Simple Bridal Mehndi Design
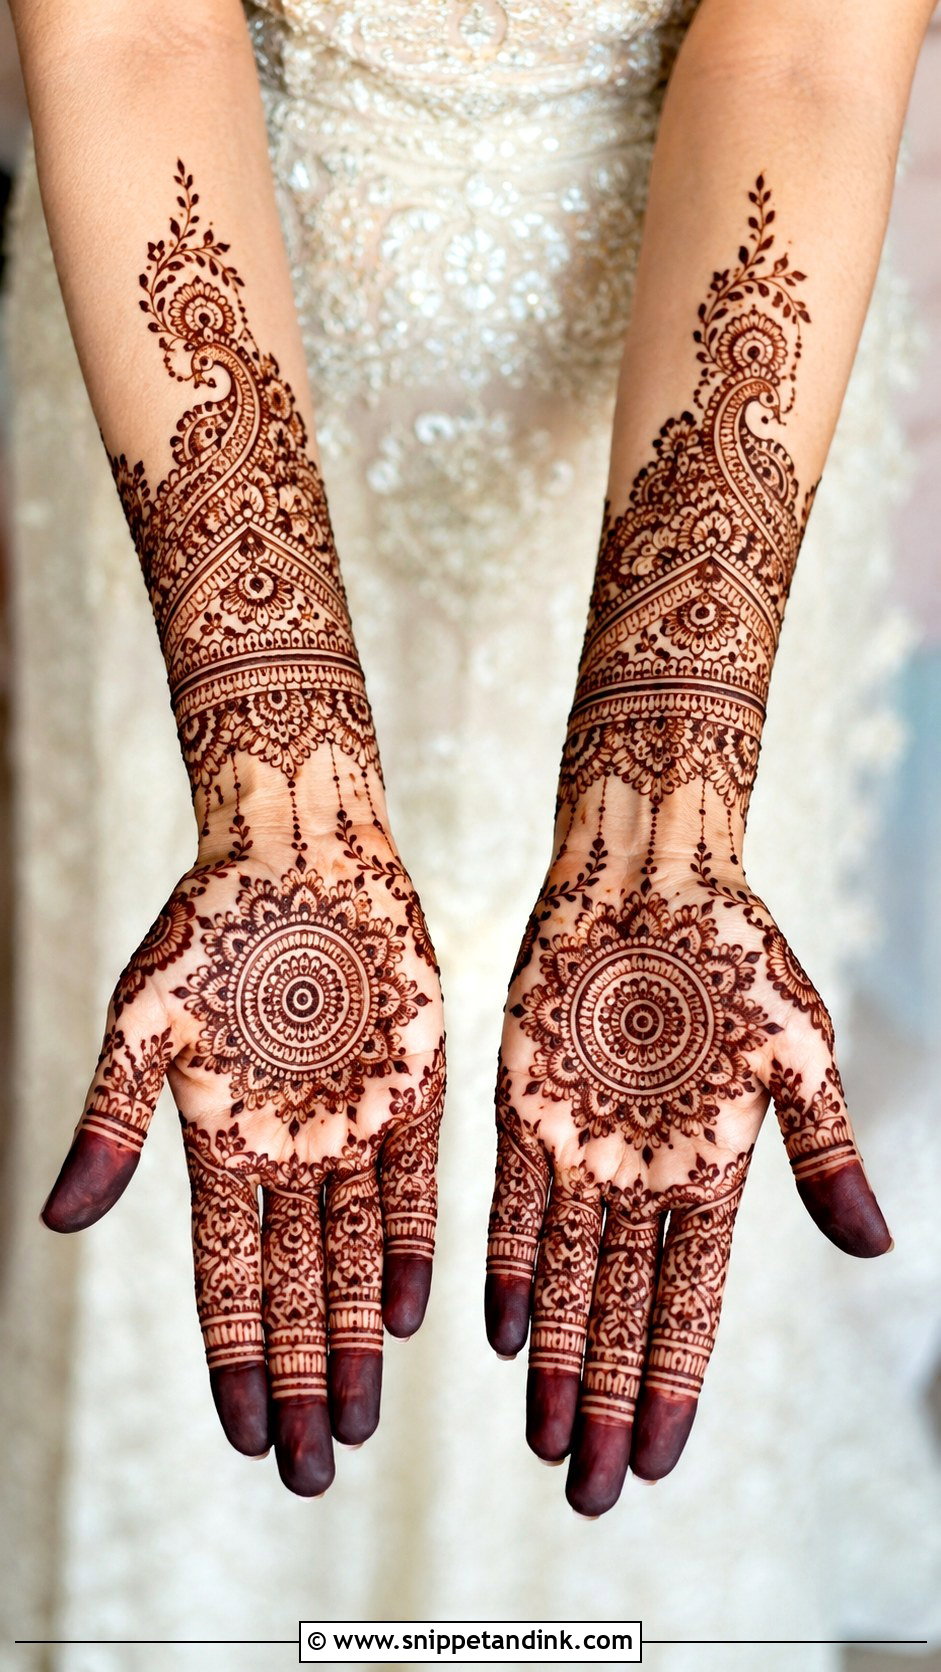
A lighter bridal design swaps dense full-arm coverage for a palm mandala, paisley borders, floral vines and neat finger filling, extended a little past the wrist with bracelet bands and hanging dots. The backs of the hands get matching details. It suits intimate weddings, engagement ceremonies and brides who prefer clean patterns. Bridal henna is the one time I’d insist on applying it a day or two before the wedding, because the stain keeps darkening for up to two days and you want it at its peak on the day.
24. Easy Modern Mehndi Design
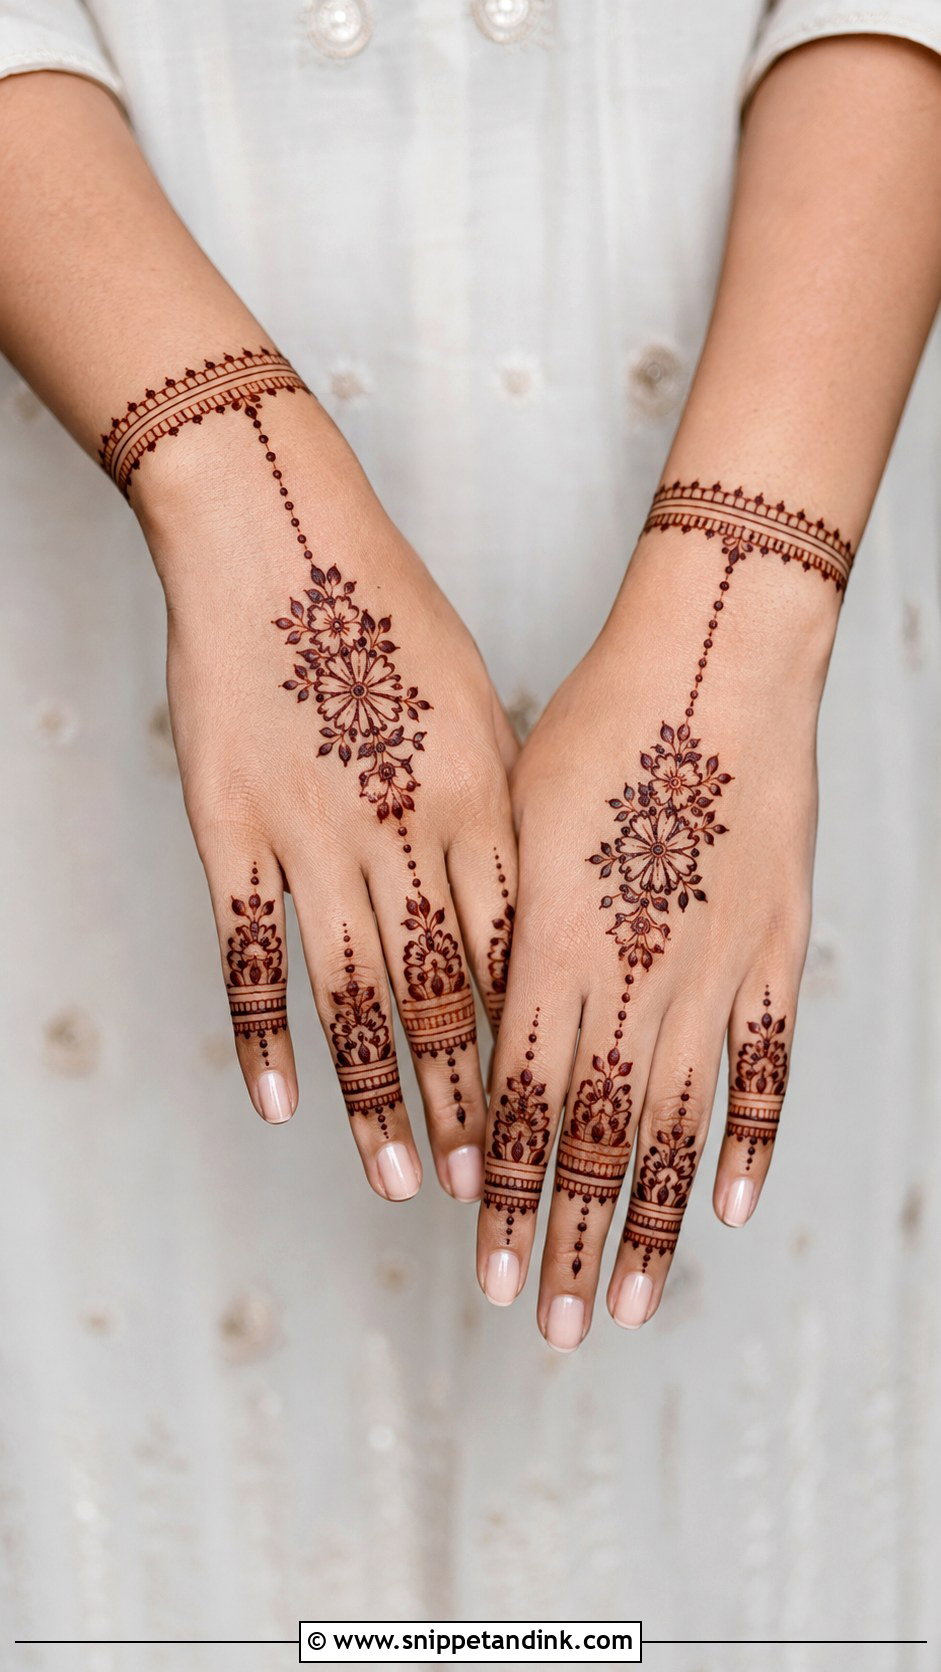
Modern designs rely on placement more than filling. A half-hand layout on the back of the hand, a bracelet at the wrist, a fine chain across the hand, simple finger bands and one floral cluster or mandala as the focus: that’s the whole design. The rest of the hand stays bare, so every detail reads clearly in photos. I keep the lines thin and the spacing even, since in a sparse design any crowding looks like an error.
25. Simple Moroccan Mehndi Design
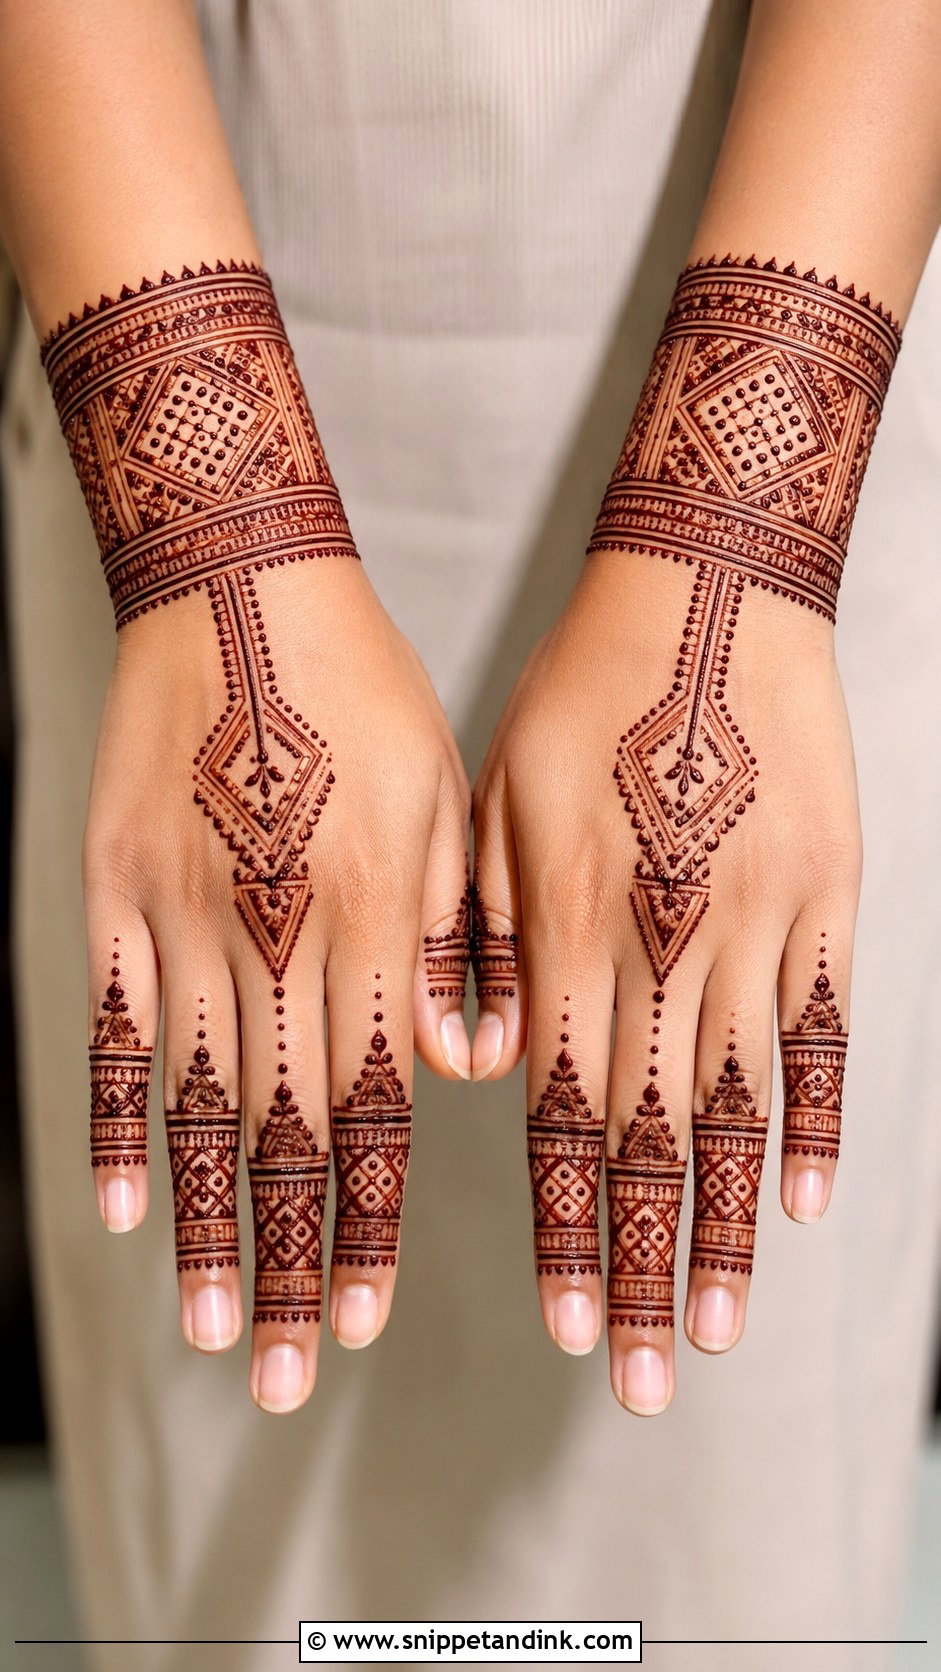
Moroccan-style work uses geometry instead of florals: diamonds, straight lines, triangles, dots and small grids. I build a central diamond on the back of the hand or the palm, extend it toward the fingers with clean bands and rows of dots, and finish with a geometric cuff at the wrist. Straight lines are the challenge, so keep the cone moving at a steady speed and don’t stop mid-line. It appeals to anyone who finds floral work too fussy.
26. Easy Gulf Mehndi Design
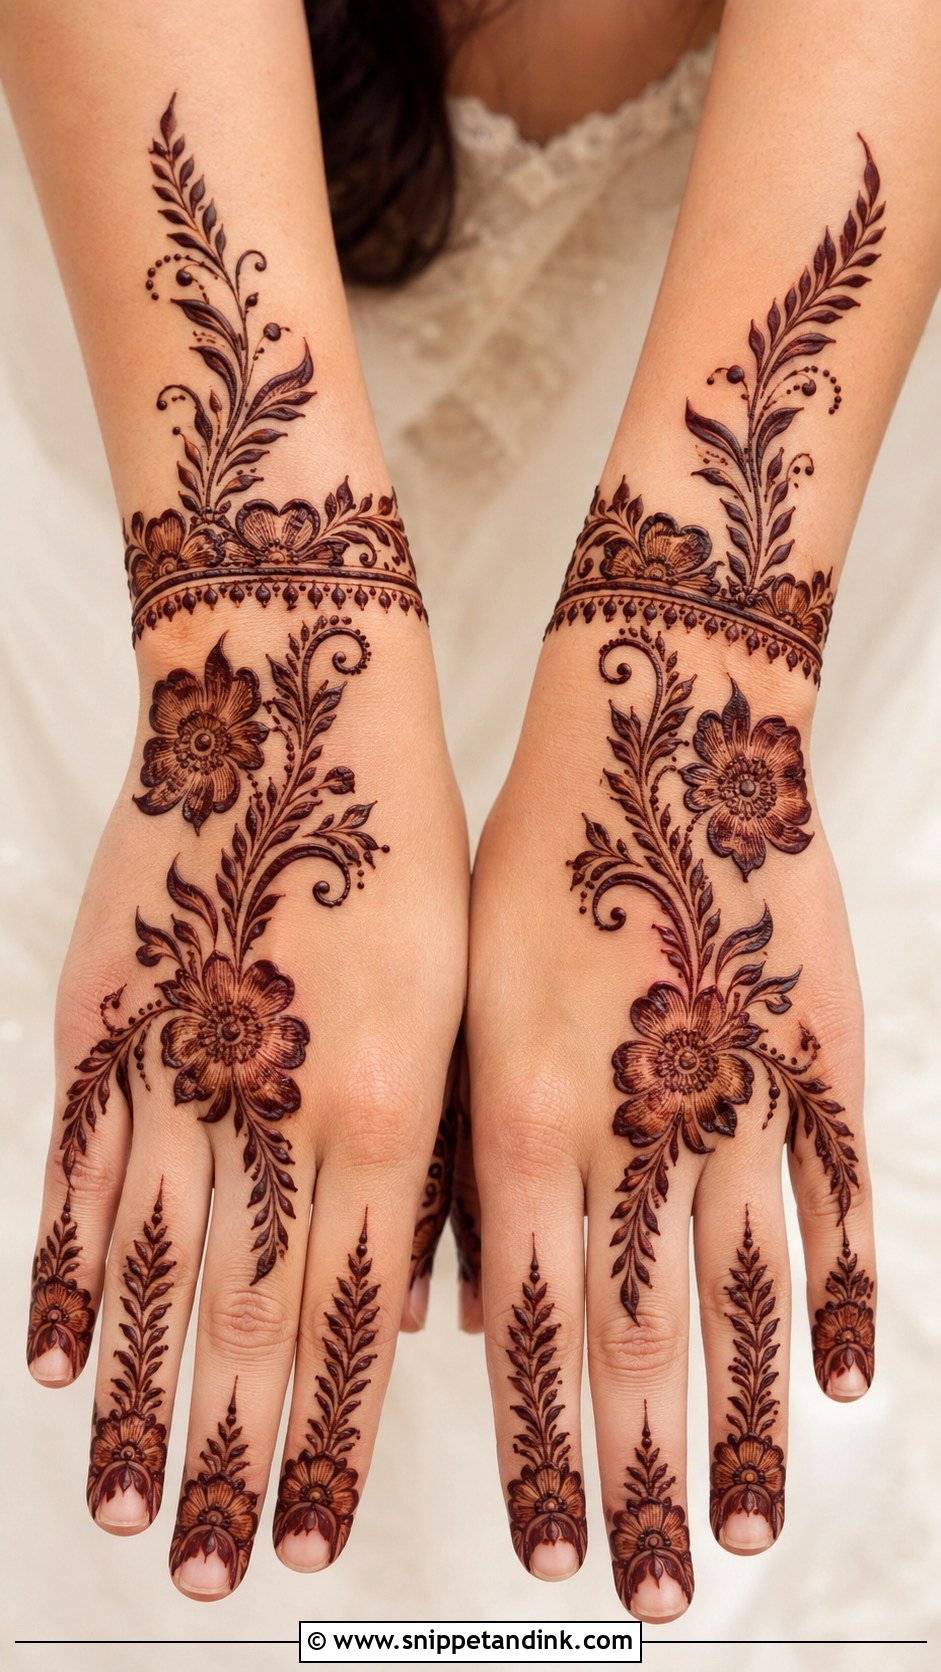
Gulf designs are bold and airy: large floral motifs on one side of the hand, connected by sweeping vines and leaves, with clear open spaces between them. The fingers get leafy bands or half-flower tips, and a soft wrist border can finish it. I use a thicker outline here than anywhere else in this list, and sometimes shade inside the petals for contrast. The open layout gives high impact with few details, which makes it a good choice for Eid or an evening event.
27. Simple Side Hand Mehndi Design
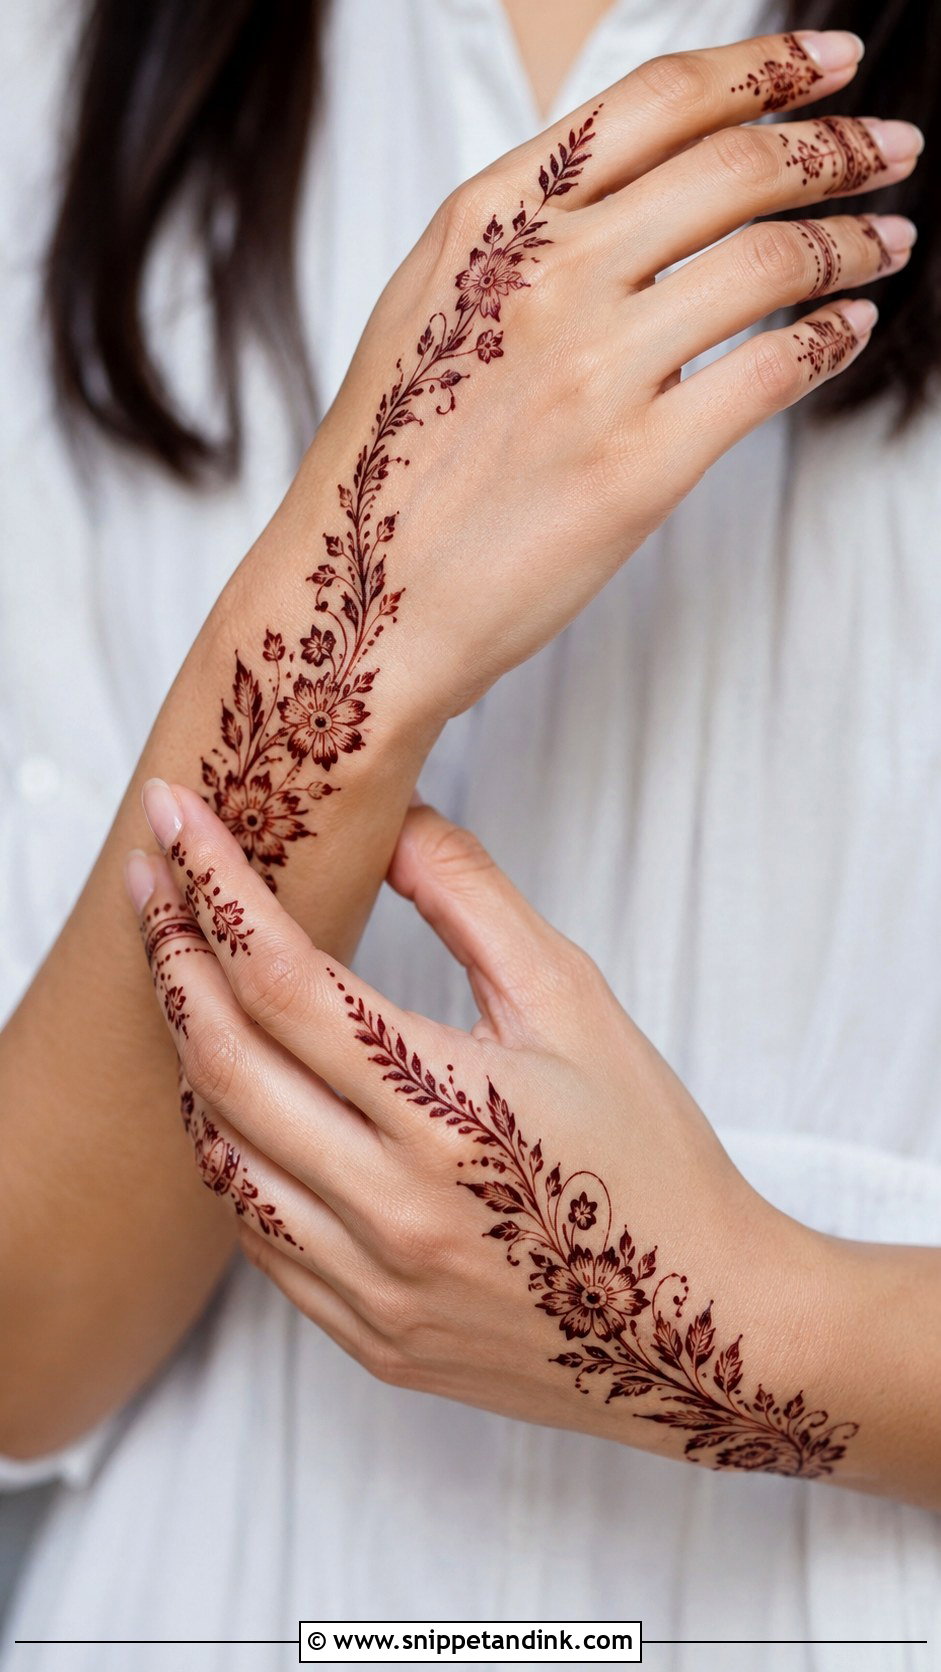
A side design runs the pattern along one edge of the palm or the back of the hand, following its natural curve, and leaves the center open. A vine starts at the wrist and travels up the outer side, picking up flowers, leaves and dots, with light bands or leafy tips on the fingers. Because it follows the shape of the hand rather than its center, it doesn’t need precise placement. I like it as a subtle option that still looks considered.
28. Easy Finger And Wrist Mehndi Design
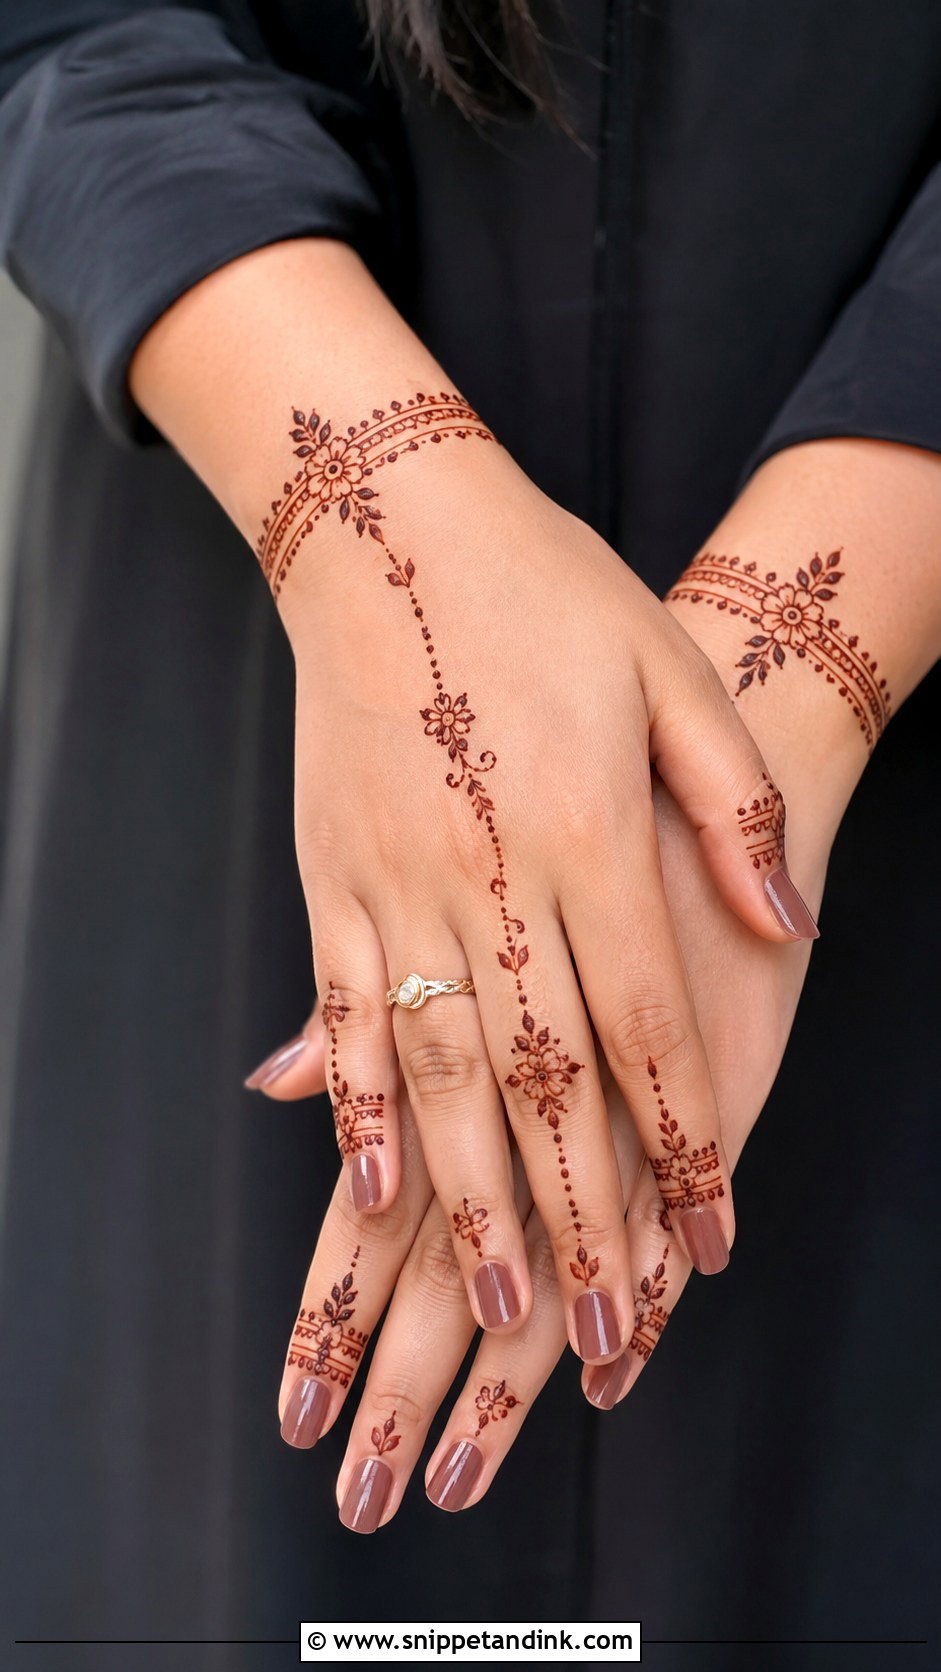
This design skips the palm entirely. The wrist gets bracelet bands with dots, leaves and small flowers, and the fingers get matching rings, lines and fingertip details. One fine chain or dotted trail across the back of the hand links the two. Each part is small and separate, which makes it forgiving for a beginner, and the result looks like a set of jewelry. Keep the connecting chain thin, or it turns heavy and the jewelry effect is lost.
29. Simple Festival Mehndi Design
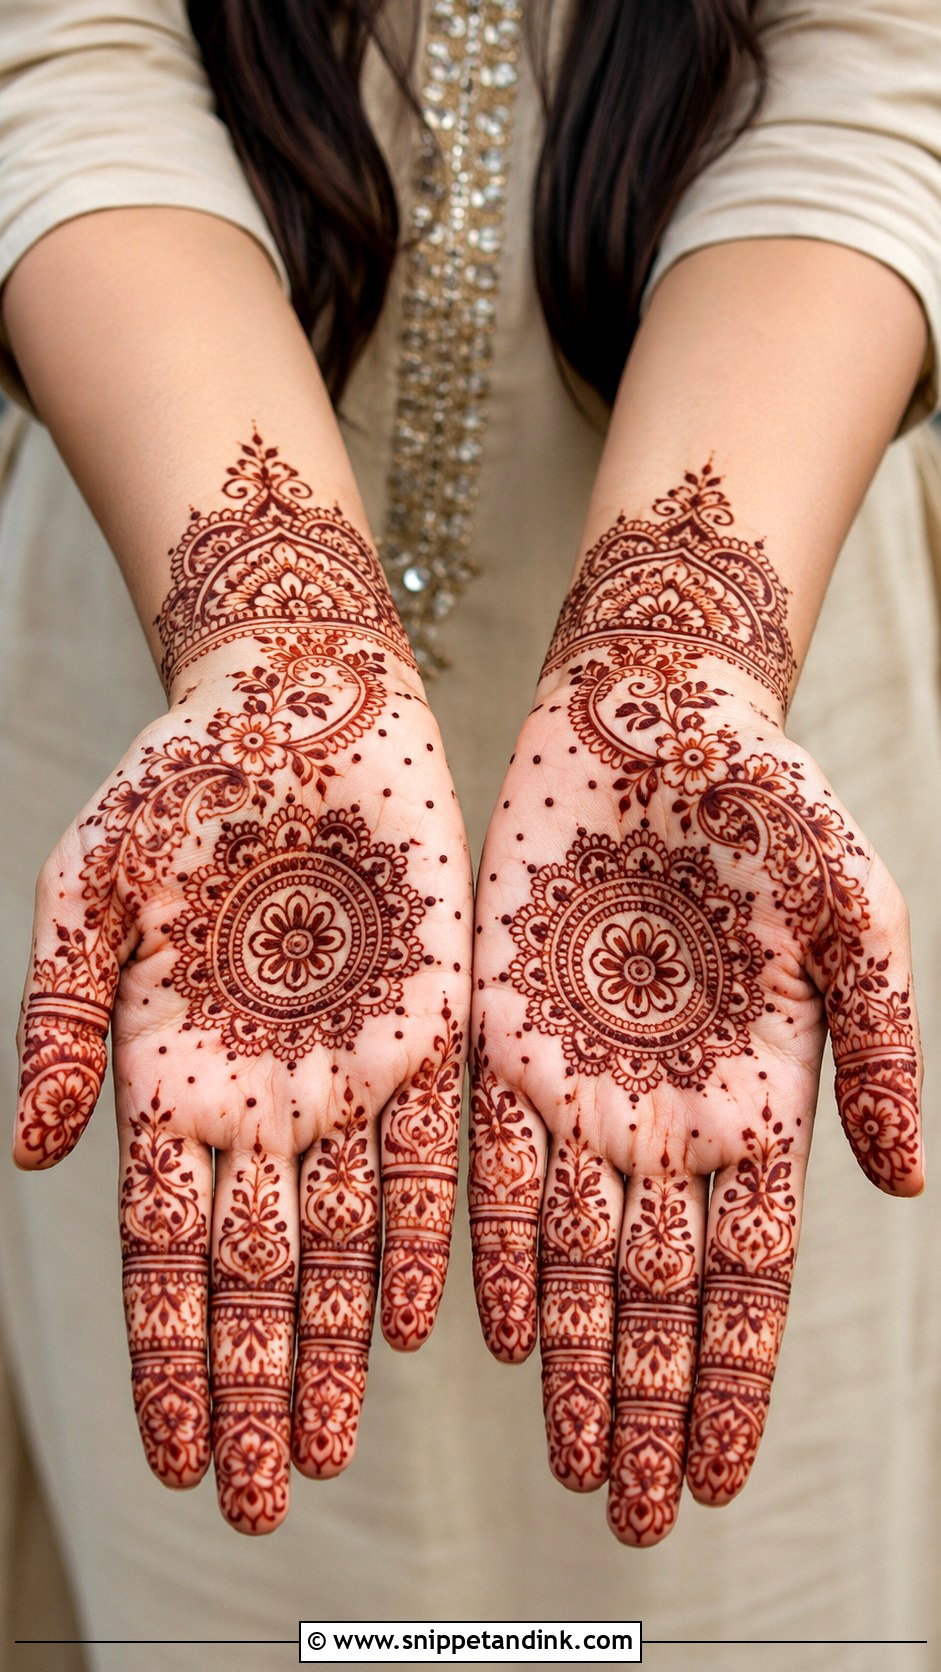
A simple festival mehndi design combines a palm mandala, floral vines, paisley corners and finger bands, with dots tying the empty spaces together and a light wrist border. It covers the main areas of the hand while remaining quick to finish, which suits Eid, Diwali, Teej, Raksha Bandhan and family parties. I draw the mandala first and add the side details step by step; keeping the wrist border light stops the hand from looking overcrowded.
30. Easy Beginner Mehndi Design
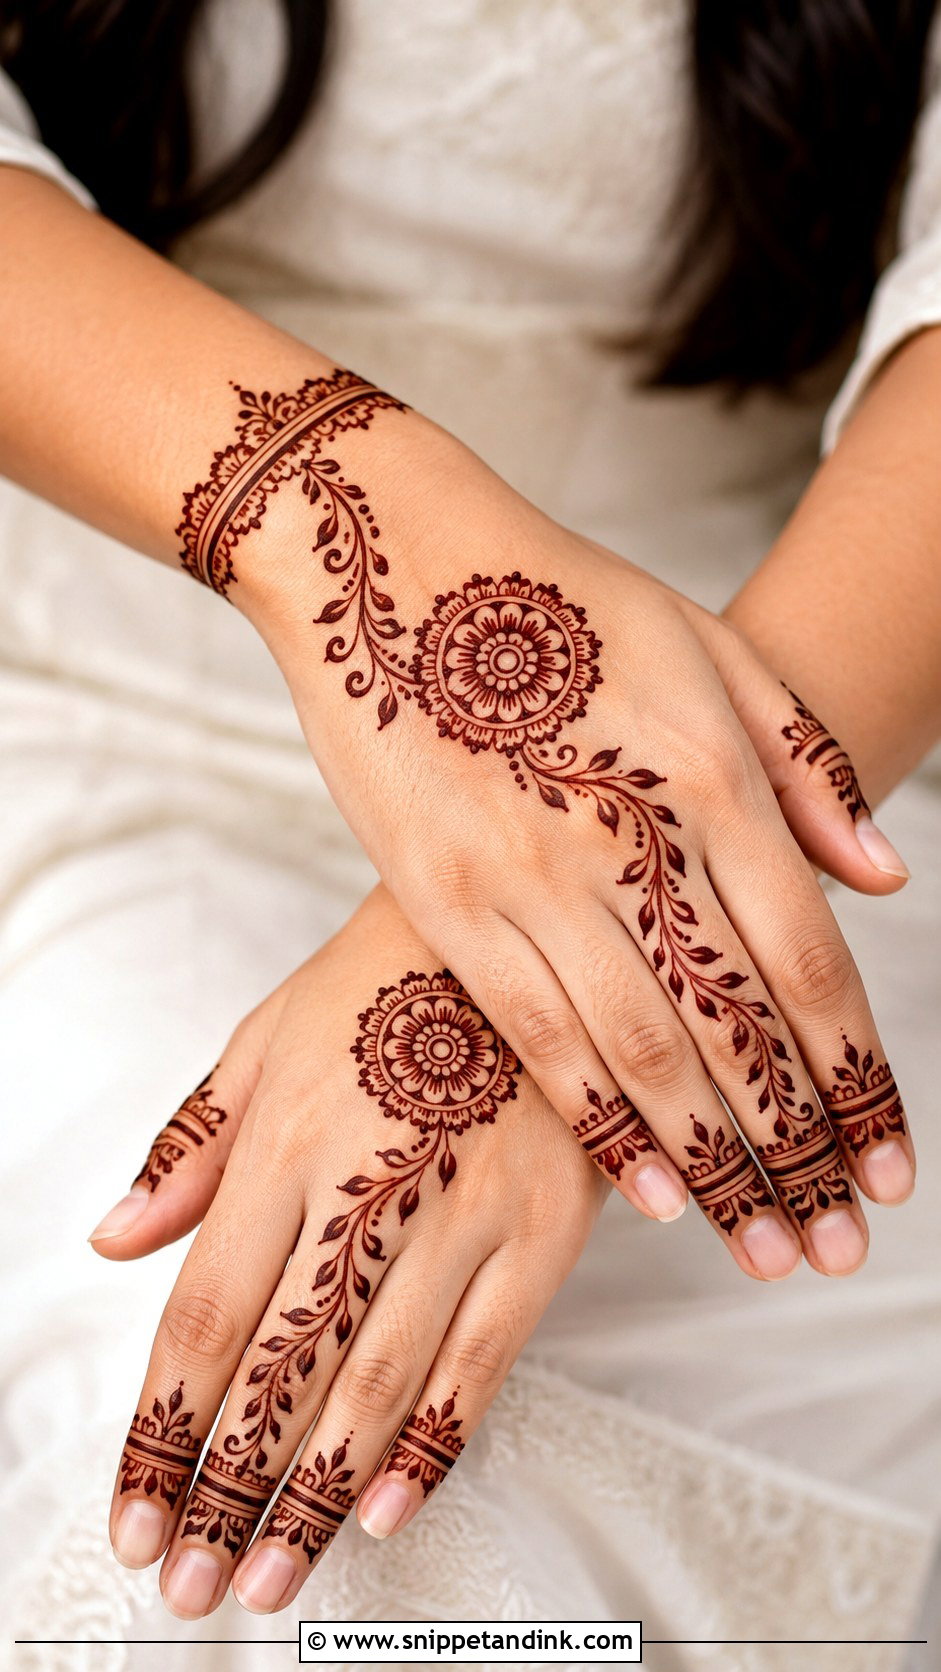
A first design should use only the shapes you can repeat with confidence. Put a flower or mandala in the center of the palm or the back of the hand, add a curved vine, simple leaves and dots, then clean finger bands and a small wrist border. This one layout teaches cone pressure, spacing and flow. Keep it medium-sized and skip tiny fillers at first; once your lines are steady, add paisleys or jaali to make it richer.
Why the First Stain Looks Orange, and How to Darken It
When the paste comes off, natural henna is always bright orange. That’s normal. The color oxidizes and deepens over the next day or two into reddish brown or maroon, so judge your stain on the second morning, not the first evening.
- Let the paste dry, then dab on a little lemon and sugar mix to keep it stuck to the skin.
- Leave it on as long as you can; I suggest at least six hours, and overnight is better.
- Scrape the dried paste off with a blunt edge or your fingernail instead of washing it off.
- Keep the hands away from water for the first few hours, and as long as possible after that.
- Warmth helps; keeping your hands warm encourages a deeper stain.
Palms and fingertips always stain darkest; the back of the hand and the arms stay lighter. That’s how skin works, not a flaw in the design.
Red Flags in a Ready-Made Cone
Natural henna never stains black, and it never gives instant dark color. A cone labelled black henna, or one promising a dark stain within an hour, usually contains chemical dyes that can cause severe skin reactions. I’d only use cones that smell earthy rather than of chemicals, list their ingredients, and are kept refrigerated or frozen, as fresh paste should be. If you’re unsure about a new cone, do a small patch test on your inner arm a day or two before an event.
Start Big, Then Add the Fine Detail
From palm mandalas and Arabic trails to bracelet bands and minimal finger work, every design here is built from a handful of simple shapes. The fastest way to improve is to pipe big shapes first, repeat a few details neatly, and leave enough bare skin for the design to breathe. Steady pressure and a clear layout matter far more than complicated motifs. Practice on paper, then on your own non-dominant hand, and you’ll see your lines settle within a few sessions.
You'll Like These Ideas:


Leave a Reply